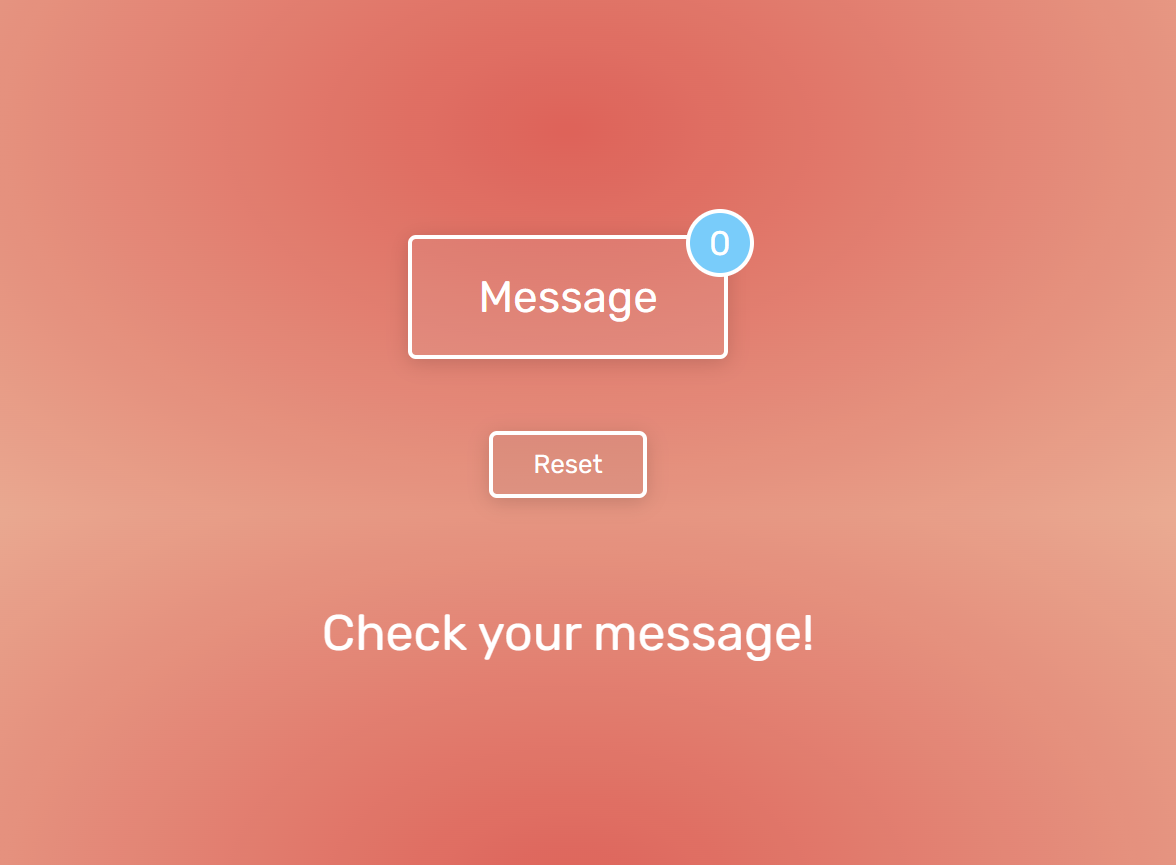
Button with Badge
: 메세지 버튼과 버튼 클릭 횟수를 같이 보여준다.

사용 언어
- HTML
- Javascript
- CSS
구조
- index.html: 전체 구조
- index.js: 버튼 & 뱃지 기능
- main.css: 디자인
코드
구현 계획
-
Message 버튼 & badge
Message 버튼을 클릭하면 클릭 숫자가 badge에 출력된다. -
Reset 버튼
Reset 버튼을 클릭하면 Message 버튼 badge의 숫자 카운트가 0으로 초기화된다.
기능 구현
- Message 버튼의 badge
- 클릭 횟수를 변수로 선언하고 클릭(click) 이벤트가 발생할때마다 1씩 증가해준다.(count++;)
index.html
<!DOCTYPE html>
<html lang="en">
<head>
    <meta charset="UTF-8">
    <meta name="viewport" content="width=device-width, initial-scale=1.0">
    <title>Document</title>
    <link rel="stylesheet" href="main.css">
</head>
<body>
    <!-- Message 버튼 -->
    <div class="container">
        <div class="button">
            <span class="content">Message</span>
            <span class="badge">0</span>
        </div>
    </div>

    <!-- Reset 버튼 -->
    <div class="resetcontainer">
        <button class="btn">Reset</button>
    </div>

    <!-- 문자 -->
    <div class="contentcontainer">
        <p id="content">
            Check your message!
        </p>
    </div>

    <script src="index.js"></script>
</body>
</html>
index.js
// 숫자 뱃지
let count = 0;

document.querySelector('.button').addEventListener('click', function() {

    count++;
    document.querySelector('.badge').innerHTML = count;
});

// Reset 버튼
document.querySelector('.btn').addEventListener('click', function() {

    count = 0;
    document.querySelector('.badge').innerHTML = count;
});
main.css
@import url('https://fonts.googleapis.com/css?family=Rubik');

body {
	font-family: 'Rubik', sans-serif;
    font-size: 22px;
	background: radial-gradient(ellipse at center, rgb(251, 87, 82) 0%, rgb(254, 168, 142)100%);
	overflow: hidden;

}

/* 버튼 상자 */
.container {
	min-height: 70vh; /* 세로 높이 */
	display: flex;
	align-items:center;
	justify-content: center;
}

/* 버튼 */
.button {
	position: relative;
	border-radius: 4px;
	border: 2px solid white;
	padding: 16px 33px;
	color: white;
	background: rgba(223, 212, 212, 0.1);
	box-shadow: 0 2px 10px rgba(0,0,0,.15);
	cursor: pointer;
	user-select: none;
	transition: all .3s;

	&:hover {
		transform: scale(1.03);
		background: rgba(239, 235, 235, 0.13);
		box-shadow: 0 2px 20px rgba(0,0,0,.15);
	}

	&:active {
		transform: scale(.96);

		.badge {
			transform: scale(1.2);
		}
	}
}

/* 숫자 뱃지 */
.badge {
	border-radius: 50%;
	width: 30px;
	height: 30px;
	display: block;
	position: absolute;
	background: rgba(31,206,255,1);
	border: 2px solid white;
	display: flex;
	align-items: center;
	justify-content: center;
	top: -15px;
	right: -15px;
	transition: all .3s;
    font-size: 17px;
}

/* Reset 버튼 */
.resetcontainer {
    text-align: center;
    margin-top: -200px;
}

.btn {
    font-family: 'Rubik', sans-serif;
    font-size: 13px;

	position: relative;
	border-radius: 4px;
	border: 2px solid white;
	padding: 7px 20px;
	color: white;
	background: rgba(145, 140, 140, 0.1);
	box-shadow: 0 2px 10px rgba(0,0,0,.15);
	cursor: pointer;
	user-select: none;

	&:hover {
		transform: scale(1.03);
		background: rgba(239, 235, 235, 0.13);
		box-shadow: 0 2px 20px rgba(0,0,0,.15);
	}

	&:active {
		transform: scale(.96);
	}
}

/* Click to the button */
.contentcontainer {
	display: flex;
	justify-content: center;
}

#content {
    position: fixed;
    bottom: 280px;
    color: white;
    font-size: 25px;
}
배운 것
요소의 세로 크기
min-height : 요소의 최소 세로 크기 설정
min-height : length | percentage | max-content | min-content | fit-content
length: CSS 단위로 설정percentage: %를 통해 설정max-content: 콘텐츠를 기준으로 최대로 설정min-content: 콘텐츠를 기준으로 최소로 설정fit-content: 콘텐츠를 기준으로 설정
요소 정렬하기
justify-content
: 가로 축을 기준으로 좌우에 대한 정렬
flex-start: 컨테이너의 왼쪽 정렬(기본값)flex-end: 우측 정렬center: 중앙 정렬space-between: 요소 사이에 동일한 간격을 둔다.space-around: 요소 주위에 동일한 간격을 둔다.
align-items
: 세로 축을 기준으로 정렬
flex-start: 컨테이너의 최상단으로 정렬flex-end: 최하단으로 정렬center: 중앙 정렬baseline: 컨테이너의 시작 위치에 정렬stretch: 컨테이너에 맞게 정렬(기본값)
요소 배치하기
position: : 요소 배치하기
- 요소 위치를 옮길 기준점 잡기 (
Position 속성)
static: 기준 없음 (기본값, 배치 불가능)relative: 자기 자신의 원래 위치(static일 때의 위치)를 기준으로 배치absolute: 가장 가까운 위치에 있는 부모 요소를 기준으로 배치fixed: 뷰포트 기준으로 배치(현재 화면에 보이는 창 영역)stickey: 스크롤 영역 기준으로 배치
- 요소 이동시키기 (
top: 50px;)
top: 요소의 position 기준에 맞는 위쪽에서의 거리(위치) 설정bottom: 아래쪽에서의 거리 설정left: 왼쪽에서의 거리 설정right: 오른쪽에서의 거리 설정
텍스트 효과
user-select
: 텍스트를 선택했을 때의 동작을 설정할 수 있는 속성
auto: 텍스트를 더블클릭 or 드래그할 경우 선택(기본값)none: 선택 Xall: 클릭 한 번만으로 텍스트 영역 선택text: 텍스트를 더블클릭 or 드래그할 경우 선택(= auto)
버튼 누르는 효과
:active : 마우스가 요소를 클릭하는 순간부터 떼는 순간까지의 스타일 변경
:focus : 요소를 클릭하면 요소의 스타일 변경
:hover : 마우스가 요소 위에 있을 때의 스타일 변경
display: flex;
: 요소들이 자신의 컨텐츠 크기만큼의 크기로 조정됨(inline 요소)
- block 요소(한 줄을 차지)와 반대
잘한 점
-
버튼과 뱃지 기능을 수월하게 구현했다!
아직 쉬운 기능이라 그렇긴 하지만 이젠 감이 조금 오는 것 같아서 즐겁다. -
Reset 기능을 추가했다.
-
css에 익숙해진 것 같다.
어제까지만 해도 화면 중앙으로 위치하는게 너무 어려웠는데 (억지로 맞춰놓는 식이긴 하지만) 이제는 위치 조정이 가능하다.
아쉬운 점
- css를 codepen 사이트에서 가져오고 내가 원하는 디자인으로 변경하는 식으로 구현했다.
처음부터 혼자 힘으로만 만들어보라고 하면 하루종일 만들어야 할 것 같다... 이제 기본적인 css 기능은 부여할 수 있지만 박스 위치 정렬이나 화면 크기에 맞춰서 요소가 변경되는 기능이 너무 어렵다.
깃허브
https://github.com/kwonboryong/study_of_FE/tree/main/button-with-badge
출처
https://codepen.io/huszerldani/pen/YGOWOx
https://webstoryboy.co.kr/1857
https://ipex.tistory.com/entry/CSS3-flex-Box-justifycontent-alignitems
https://creamilk88.tistory.com/197
https://abcdqbbq.tistory.com/66
https://joooing.tistory.com/entry/%EA%B3%84%EC%82%B0%EA%B8%B0-%EB%A7%8C%EB%93%A4%EA%B8%B0-ver1-CSSactive%EB%A5%BC-%ED%99%9C%EC%9A%A9%ED%95%B4-%EB%B2%84%ED%8A%BC-%EB%88%84%EB%A5%B4%EB%8A%94-%ED%9A%A8%EA%B3%BC-%EB%82%B4%EA%B8%B0
https://hogni.tistory.com/110