해당 로직은 https://codesandbox.io/s/ecstatic-fast-01gsk?file=/index.html:33-662 에서 작성되었습니다 리액트 cdn은 구글링 하면 됩니다
children 은 태그 안의 내용 content 라 생각하면 됩니다
자바스크립트로 글자를 DOM 에 만들어 보겠습니다
<!DOCTYPE html>
<html lang="en">
  <body>
    <div id="root"></div>
    <script>
      const rootElement = document.getElementById("root");
      const element = document.createElement("h1");
      rootElement.textContent = "Hello, World";
      rootElement.appendChild(element)
    </script>
  </body>
</html>
- div id 를 선택합니다
- h1 태크를 생성합니다.
- rootElement에 글자를 주입합니다
- rootElement 를 div root 자식 태그로 주입합니다
다음은 리엑트로 같은 작업을 해보겠습니다
<body>
<script
crossorigin
src="https://unpkg.com/react@17/umd/react.development.js"
></script>
<script
crossorigin
src="https://unpkg.com/react-dom@17/umd/react-dom.development.js"
></script>
<div id="root"></div>
<script>
const rootElement = document.getElementById("root");
// const element = document.createElement("h1");
// rootElement.appendChild(element);
// rootElement.textContent = "Hello, World";
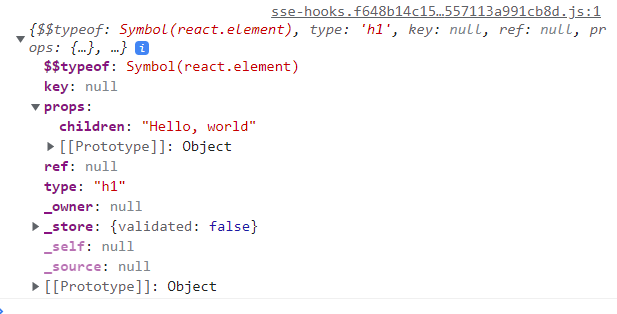
const element = React.createElement("h1", { children: "Hello, world" });
ReactDOM.render(element, rootElement);
console.log(element)
</script>
</body>
- cdn 을 주입했습니다.
- div id 가 root 인 애를 roorElement 로 주었습니다.
- 리액트 함수 createElement 를 사용했습니다, h1 태그에 Hello, world 라 적었습니다. 그걸 element 에 담았습니다.
- render 함수로 앞 인자가 주입할 녀석 뒤에가 부모 태그입니다
React.createElement(
  type,
  [props],
  [...children]
)
createElement 로 클래스 이름을 주겠습니다
 <script>
      const rootElement = document.getElementById("root");
      const element = React.createElement(
        "h1",
        {
          className: "title",
          children: "where are you goin?"
        },
        "Hello, world!"
      );
      ReactDOM.render(element, rootElement);
    </script>
결과는 세번째 인자인 Hello, world 만 나옵니다
 <script>
      const rootElement = document.getElementById("root");
      const element = React.createElement(
        "h1",
        {
          className: "title",
          children: ["where are you goin?","Hello, world"]
        }

      );
      ReactDOM.render(element, rootElement);
    </script>
props에 배열로 계속 문자열 나열이 가능합니다
해당 로직은 Babeljs.io 에서 작업 되었습니다

한줄의 로직으로 여러줄의 로직을 대체할 수 있게 되었습니다, html 태크를 변수에 담아서 사용하는 편리함
Babel은 자바스크립트에서 사용할 수 없습니다, cdn 를 복사 붙여넣기 해야 합니다
   <script src="https://unpkg.com/@babel/standalone/babel.min.js"></script>
    <div id="root"></div>
    <script type="text/babel">
      const rootElement = document.getElementById("root");
      const element = <h1 className="title">Hello,world</h1>;
      ReactDOM.render(element, rootElement);
    </script>
  </body>
script type 에 text/babel 적어주고 unpkg cdn 을 가져와야 알아 먹습니다. 이제 프롭스를 만들어 주입하는 방법을 보겠습니다
<script type="text/babel">
      const rootElement = document.getElementById("root");
      const text = "Hello, world!";
      const element = <h1 className="title">{text}</h1>;
      ReactDOM.render(element, rootElement);
    </script>
text 변수를 만들고 h1 태그 프롭스에 주입시켰습니다
 <script type="text/babel">
      const rootElement = document.getElementById("root");

      const text = "Hello, world";
      const titleClassName = "title123";
      const props = { className: titleClassName, children: text };
      const customH1 = <h1 {...props} />;
      const element = customH1;
      ReactDOM.render(customH1, rootElement);
    </script>
props 에 가 text랑 titleClassName 을 주입받습니다, 그리고 customH1으로 스프레드 연산자 로 props 의 내용을 전부 주입할 수 있습니다. customH1 을 풀면
<h1 className="title123" children="Hello, wolrd"/> 입니다
또는
<h1 className = {props.className} children={props.children}/> 입니다
<script type="text/babel">
      const rootElement = document.getElementById("root");
      const element = (
        <div
          className="box"
          children={[
            React.createElement("h1", null, "Hi"),
            React.createElement("h2", null, "Bye"),
            React.createElement("h3", null, "children")
          ]}
        />
      );
      ReactDOM.render(element, rootElement);
    </script>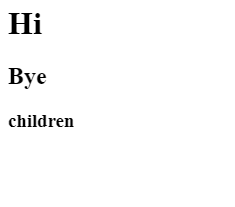
children 배열을 이용해서 여러개 넣어봤습니다
<div id="root">
<h1>Hi</h1>
<h3>Bye</h3>
<h5>Childred</h5>
</div>
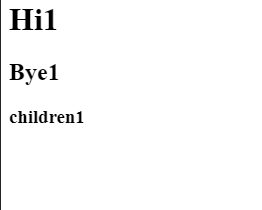
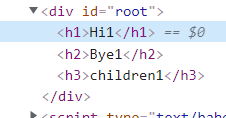
<script type="text/babel">
const rootElement = document.getElementById("root");
const element = (
<div
className="box"
children={[
React.createElement("h1", null, "Hi1"),
React.createElement("h2", null, "Bye1"),
React.createElement("h3", null, "children1")
]}
/>
);
ReactDOM.render(element, rootElement);
</script>
element 가 rootElement 안으로 들어 간게 보인다
만약 box 라는 div 가 보이지 않게 하려면 어떻게 해야 할까
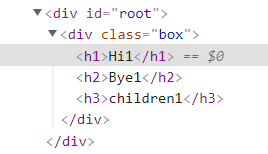
<React.Fragment> 로 해보자
 <React.Fragment
          className="box"
          children={[
            React.createElement("h1", null, "Hi1"),
            React.createElement("h2", null, "Bye1"),
            React.createElement("h3", null, "children1")
          ]}
        />
태그를 React.Fragment 로 고치니 className box가 사라졌다.
다른 예제 하나 더 보자
import React from "react";
function App() {
  return (
    <div className="App">
      <table>
        <tr>
          <Table />
        </tr>
      </table>
    </div>
  );
}
function Table() {
  return (
    <div className="Table">
      <td>Hello</td>
      <td>World</td>
    </div>
  );
}
export default App;
div App 안에 Table 을 import 한다. 그럼 return 값에 있는 불필요한 div className Table 도 같이 import 하게 된다.
import { Fragment } from "react";
function Table() {
  return (
    <Fragment>
      <td>Hello</td>
      <td>World</td>
      </Fragment>
  );
}
이렇게 Fragment 로 감싸주면
<table>
  <tr>
    <td>Hello</td>
    <td>World</td>
  </tr>
</table>
이렇게 깔끔하게 사용된다.
Fragment 는 타이핑 하기 귀찮으니 근야 <> </> 해도 된다
<script type="text/babel">
      const rootElement = document.getElementById("root");
      const paint = () => (
        <>
          <h1>Hi</h1>
          <h3>Bye</h3>
        </>
      );
      const element = (
        <>
          {paint()}
          {paint()}
          {paint()}
        </>
      );
      ReactDOM.render(element, rootElement);
    </script>
element 를 랜더링 해서 rootElement 의 자식 요소로 넣습니다. element 는 props 로 paint 함수 실행을 합니다.
 <div id="root"></div>
  <script type="text/babel">
      const rootElement = document.getElementById("root");
      const paint = (title, description) => (
        <>
          <h1>{title}</h1>
          <h3>{description}</h3>
        </>
      );
      const element = (
        <>
          {paint("Good", "good")}
          {paint("Bad", "bad")}
          {paint("So so", "so so")}
        </>
      );
      ReactDOM.render(element, rootElement);
    </script>
ReactDOM 에서 element 를 랜더링 해서 rootElement 에 넣습니다. 랜더링 하는 동안 paint 함수가 호출됩니다, 첫번째 인자값 title, 두번째 description 입니다. fragment 로 사용했기때문에 root 자식요소로 h 태그들만 있습니다
 <div id="root"></div>
    <script type="text/babel">
      const rootElement = document.getElementById("root");
      const Paint = ({ title, description }) => {
        return (
          <>
            <h1>{title}</h1>
            <h3>{description}</h3>
          </>
        );
      };
      const element = (
        <>
          <Paint title="Good" description="good" />
        </>
      );
      ReactDOM.render(element, rootElement);
    </script>
element 랜더링 하면서 Paint 를 import 합니다. props 로 title 과 description 을 받고 Paint 함수 에 있는 props 로 전달 했습니다.
가져올 컴포넌트가 호출하는 컴포넌트는 대문자가 아니면 오류가 납니다
<script type="text/babel">
      const rootElement = document.getElementById("root");
      const Paint = ({ title, description, children }) => {
        return (
          <>
            <h1>{title}</h1>
            <h3>{description}</h3>
            {children}
          </>
        );
      };
      const element = (
        <>
          <Paint title="Good" description="good">
  <span>hi</span>
          </Paint>
        </>
      );
      ReactDOM.render(element, rootElement);
    </script>
Paint 에 children 을 적어서 Paint 에 인자값으로 넘깁니다. props로 받아서
