개요
AWS에 EKS를 띄우고, aws loadbalancer controller를 설치한 후 alb로 테스트를 진행해보자.
클러스터 만들기
소스코드: 디렉토리 12 참고
eksctl로 클러스터 설치
아래 yaml 파일로
apiVersion: eksctl.io/v1alpha5
kind: ClusterConfig

metadata:
  name: my-cluster
  region: ap-northeast-2
  version: "1.33"

availabilityZones: ["ap-northeast-2a", "ap-northeast-2c"]

vpc:
  clusterEndpoints:
    publicAccess: true  # kubectl exec를 위해 API 서버는 Public에서 접근 허용
    privateAccess: true
  nat:
    gateway: Single

# IAM OIDC 활성화 (LB 컨트롤러 등을 위해 필수)
iam:
  withOIDC: true

managedNodeGroups:
  # 1. Infra Node Group (모니터링, ingress controller 등)
  - name: infra
    instanceType: t3.medium
    minSize: 1
    maxSize: 2
    desiredCapacity: 1
    privateNetworking: true
    availabilityZones: ["ap-northeast-2a"]
    labels:
      role: infra

  # 2. Server Node Group (백엔드 API 등)
  - name: server
    instanceType: t3.medium
    minSize: 1
    maxSize: 1
    desiredCapacity: 1
    privateNetworking: true
    availabilityZones: ["ap-northeast-2a"]
    labels:
      role: server

  # 3. Client Node Group (테스트용 클라이언트 등)
  - name: client
    instanceType: t3.medium
    minSize: 1
    maxSize: 1
    desiredCapacity: 1
    privateNetworking: true
    availabilityZones: ["ap-northeast-2a"]
    labels:
      role: client
eksctl로 클러스터와 노드그룹을 생성한다.
eksctl create cluster -f cluster.yaml --profile kyeongjun-dev생성이 완료되면 context를 가져온다.
aws eks update-kubeconfig --region ap-northeast-2 --name my-cluster --profile kyeongjun-devload balancer controller 설치
curl로 iam policy를 다운로드한 뒤, 생성한다.
curl -O https://raw.githubusercontent.com/kubernetes-sigs/aws-load-balancer-controller/v2.13.3/docs/install/iam_policy.json

aws --profile kyeongjun-dev iam create-policy \
    --policy-name AWSLoadBalancerControllerIAMPolicy \
    --policy-document file://iam_policy.json
kube-system namespace에 serviceaccount를 생성하고, iam role과 연결한다.
eksctl create iamserviceaccount \
    --cluster=my-cluster \
    --namespace=kube-system \
    --name=aws-load-balancer-controller \
    --attach-policy-arn=arn:aws:iam::<AWS 계정 ID>:policy/AWSLoadBalancerControllerIAMPolicy \
    --override-existing-serviceaccounts \
    --region ap-northeast-2 \
    --approve \
    --profile kyeongjun-dev
helm으로 aws lb controller를 설치한다.
helm install aws-load-balancer-controller eks/aws-load-balancer-controller -f albc-value.yaml -n kube-systemadd-on 파드들의 노드 변경하기
kubectl -n kube-system edit deployments.apps metrics-server
kubectl -n kube-system scale deployment metrics-server --replicas 1
kubectl -n kube-system edit deployments.apps coredns
kubectl -n kube-system scale deployment coredns --replicas 1
테스트 환경 만들기
client, server 배포
client, server namespace 생성
kubectl create ns client
kubectl create ns server12/client.yaml, 12/server.yaml 배포
kubectl apply -f client.yaml -n client
kubectl apply -f server.yaml -n server
아래 그림을 참고하여 tagret group을 aws 콘솔에서 생성한다. nlb 때와 다른 점은 protocol이 HTTP라는 점이다. http여야 alb에 연결할 수 있다.
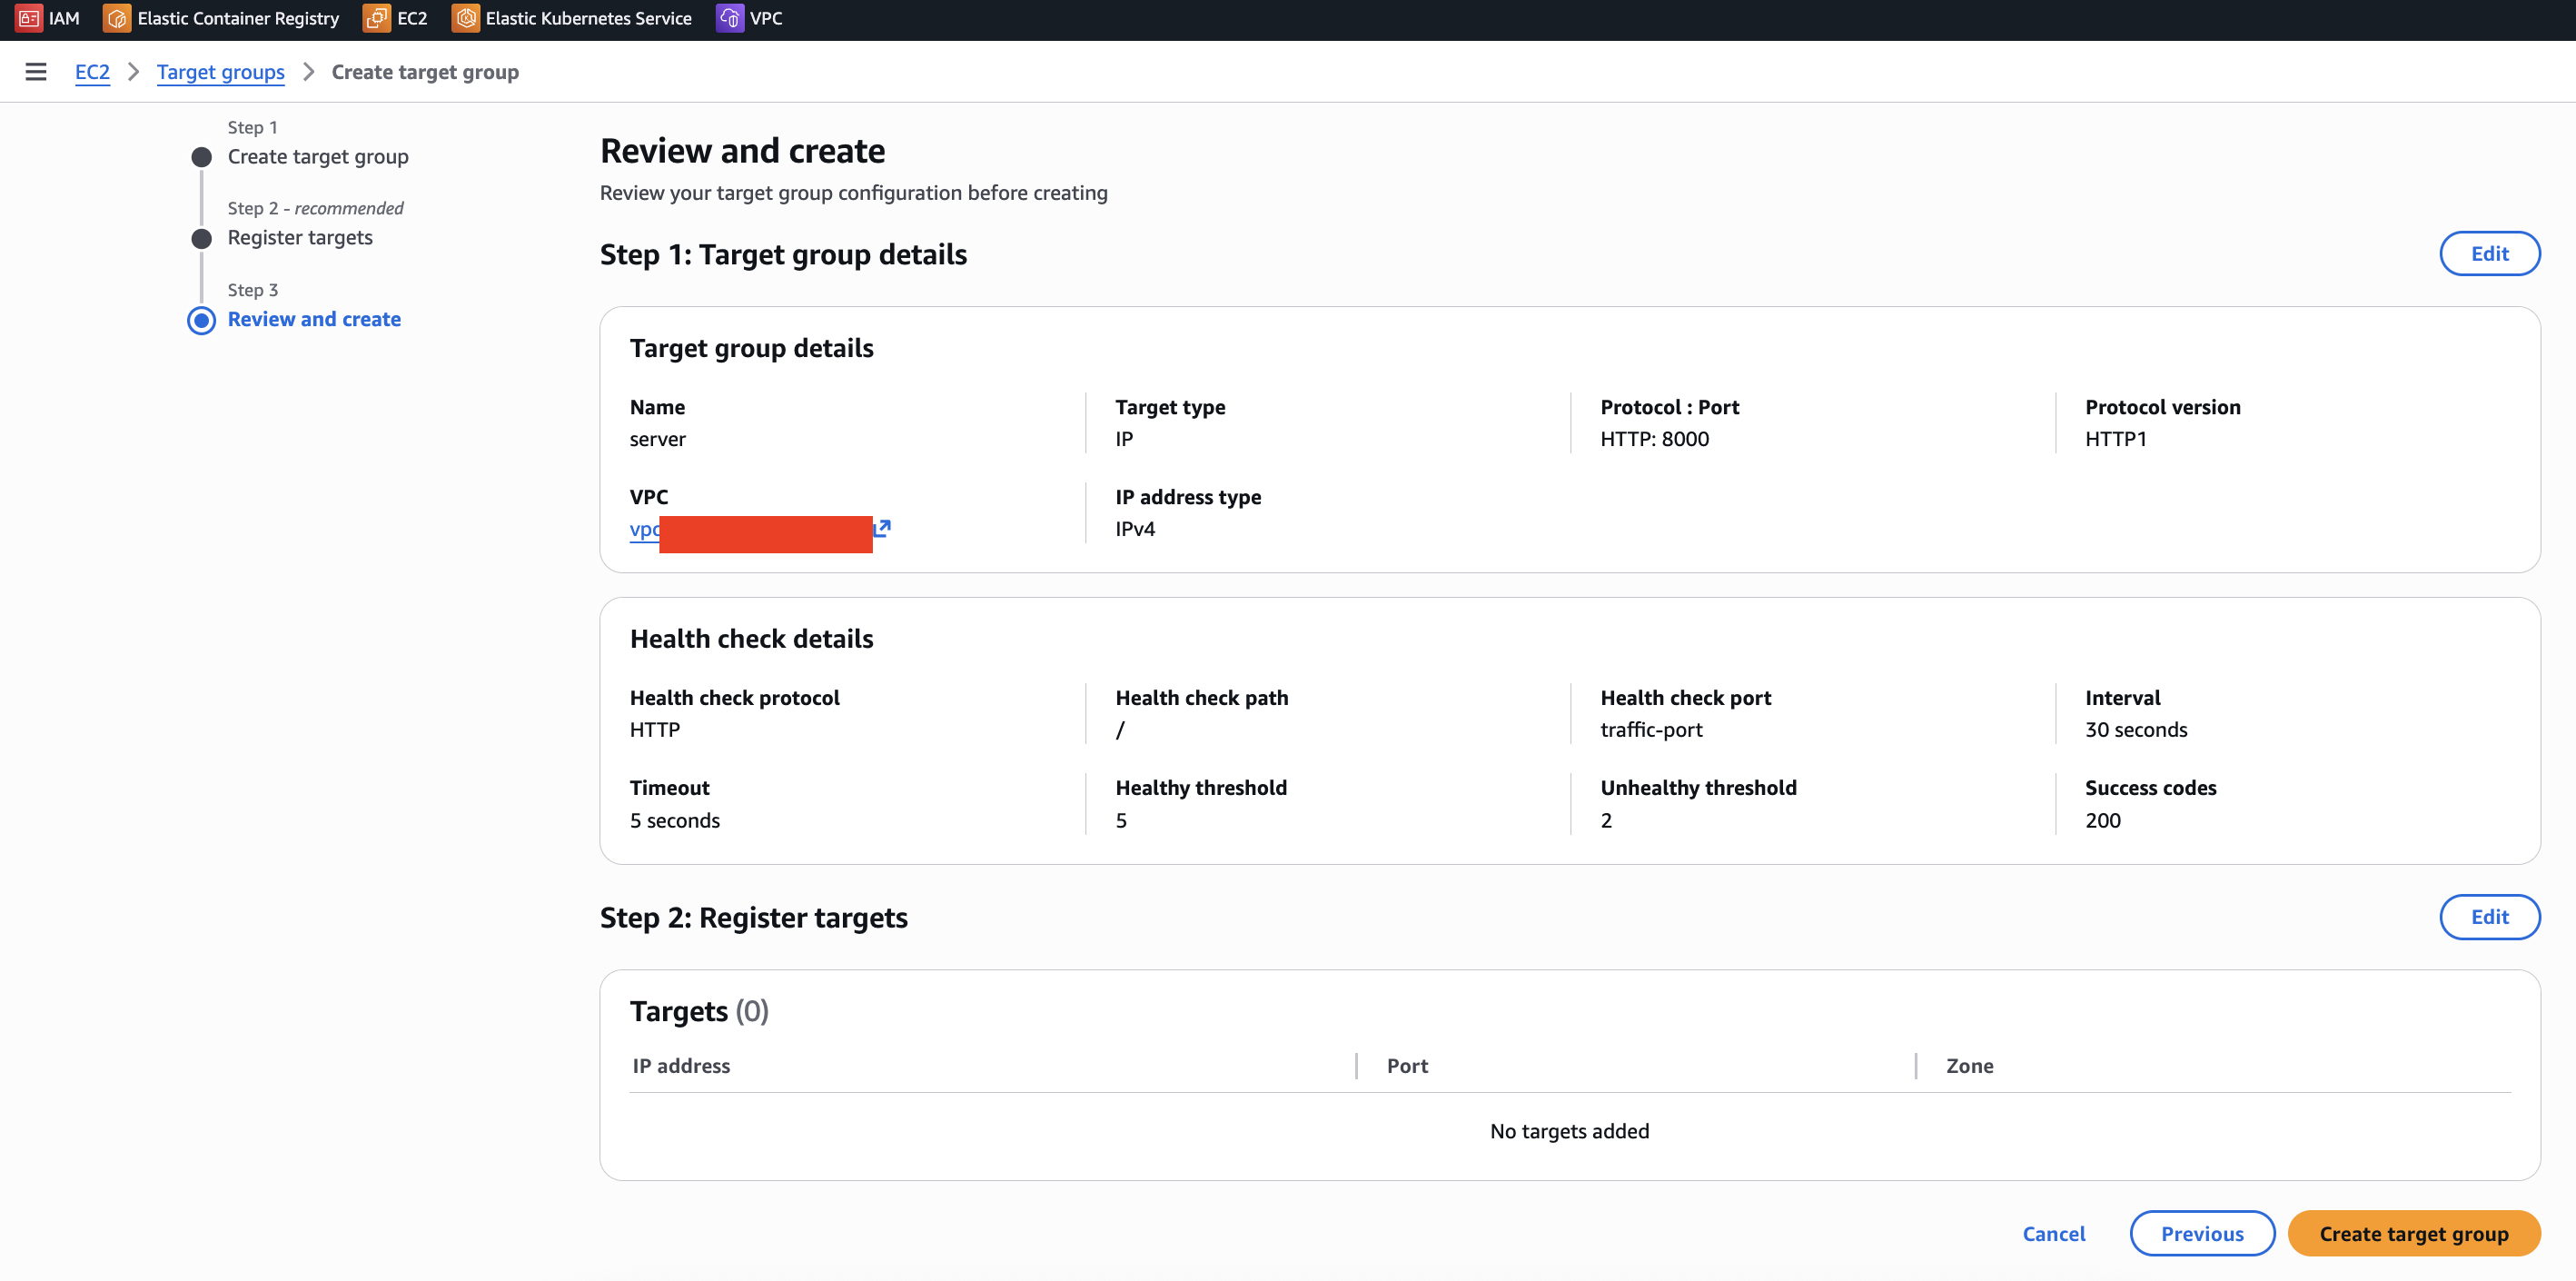
생성한 target group의 arn을 입력해서 target group binding을 생성한다. (12/tgb.yaml)
kubectl -n server create -f tgb.yamlALB 만들기
시리즈 6의 'NLB 만들기'를 참고한다. 여기서 다른 점은, nlb는 az를 하나만 선택할 수 있지만 alb는 2개를 선택해야 한다.
리스터 포트는 80으로 지정했다.
target group의 target이 health가 되면 테스트 환경 세팅 성공이다.

ping-pong 해보기
client 수정해서 ping pong
먼저 alb가 생성됐으니, alb의 private dns 주소를 client.yaml을 수정해준다. 헬스체크도 tcpdump에 잡혀서, /index 경로를 앱에 추가했다.
apiVersion: v1
kind: Service
metadata:
  name: client
  labels:
    app: client
spec:
  ports:
    - port: 80
      targetPort: 80
  selector:
    app: client
  type: ClusterIP
---
apiVersion: apps/v1
kind: Deployment
metadata:
  name: client
  labels:
    app: client
spec:
  replicas: 1
  selector:
    matchLabels:
      app: client
  template:
    metadata:
      labels:
        app: client
    spec:
      containers:
        - name: client
          image: ghcr.io/kyeongjun-dev/network:dev
          imagePullPolicy: Always
          command: ["sleep", "infinity"]
          env:
            - name: HOST
              value: "internal-server-118699894.ap-northeast-2.elb.amazonaws.com"
            - name: PORT
              value: "80"
            - name: HOST_HEADER
              value: "internal-server-118699894.ap-northeast-2.elb.amazonaws.com"
            - name: USE_TLS
              value: "false"
            - name: ENDPOINT
              value: "/index"
              # value: "/slow?wait=11"
      nodeSelector:
        role: client
client 파드 정보를 저장하고
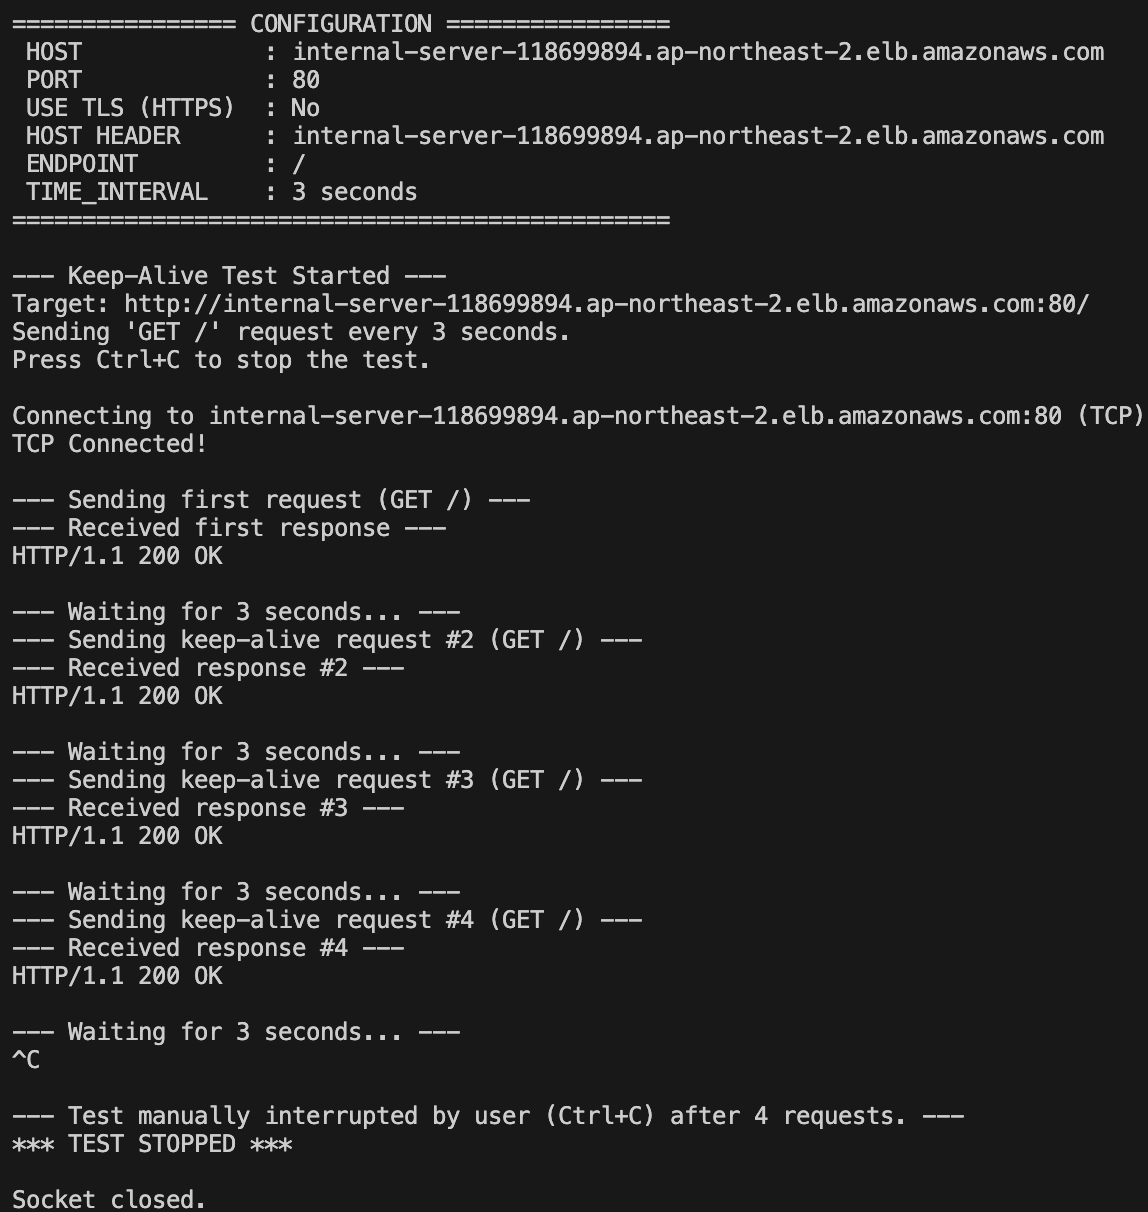
export CLIENT=$(kubectl get pod -n client | grep client | awk '{print $1}')간단하게 3초로 테스트 해본다.
kubectl -n client exec -it $CLIENT -- python client.py 3잘 되는 걸 확인할 수 있다.
설정 값 확인
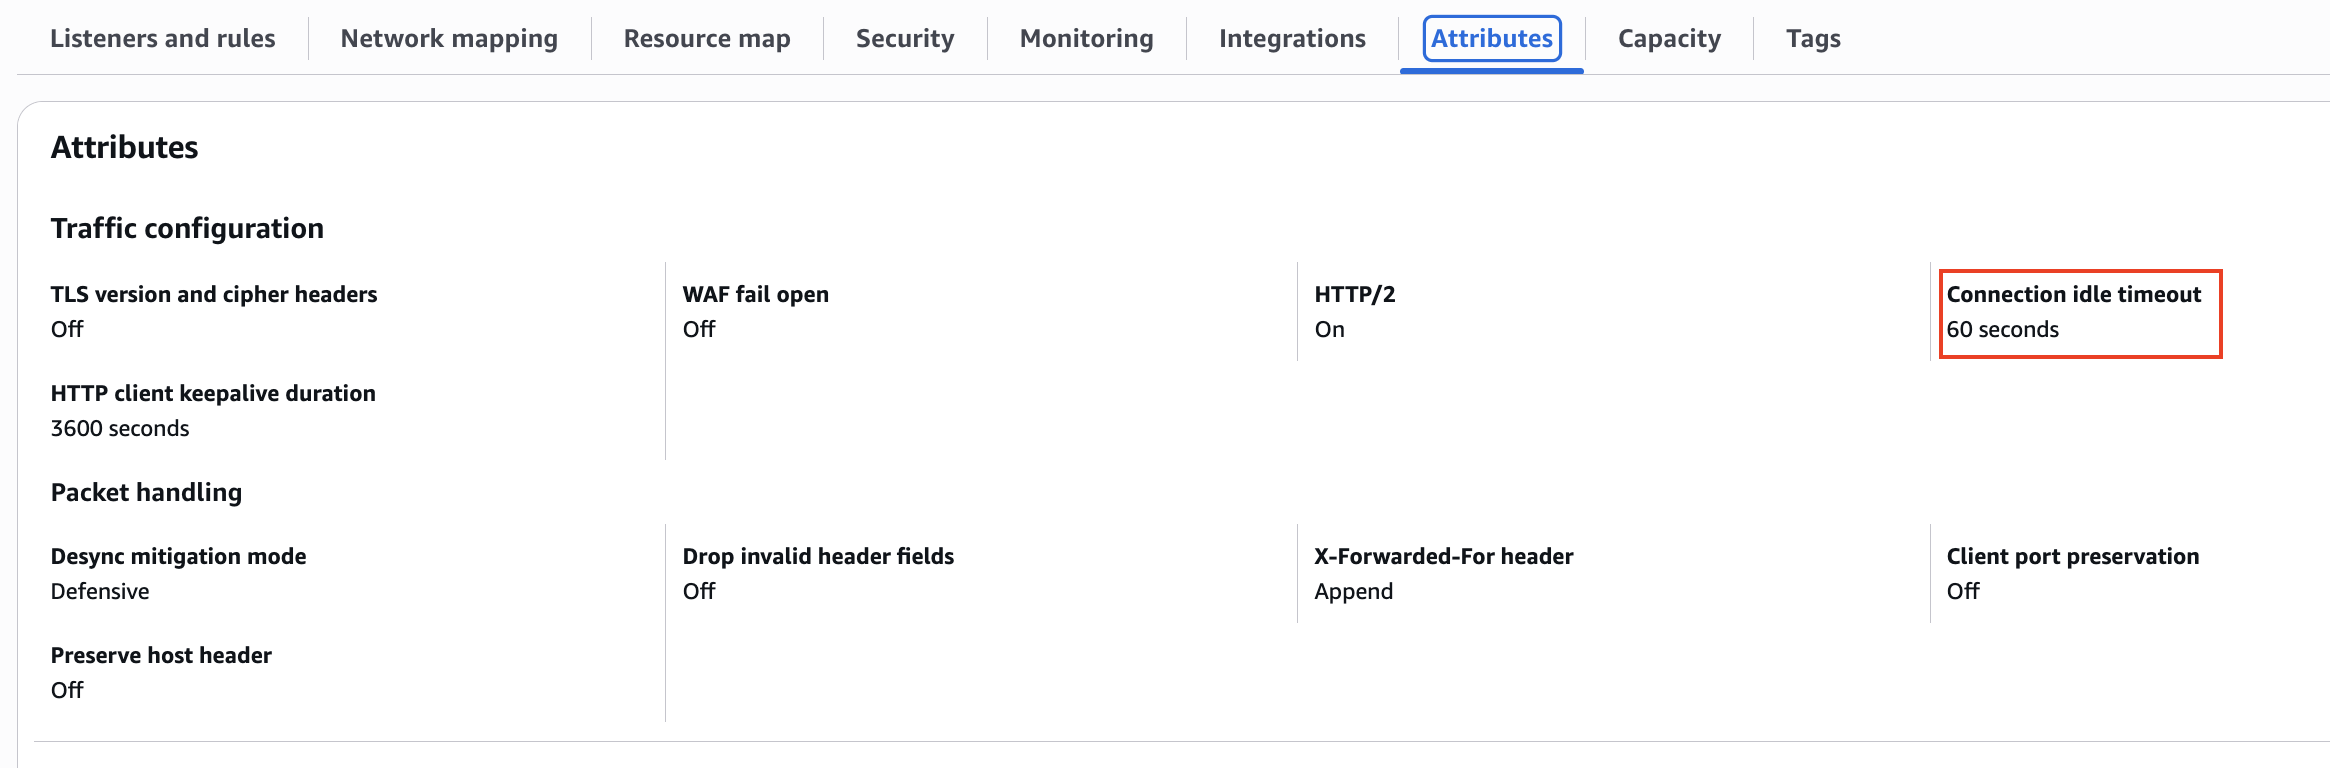
alb의 기본 Attribute 값을 확인하면 Connection idle timeout이 60초인 것을 확인할 수 있다.
그리고 현재 server(gunicorn)의 --keep-alive는 20초다.
command: ["gunicorn", "--workers", "1", "-k", "gevent", "--bind", "0.0.0.0:8000", "--timeout", "10", "--keep-alive", "20", "app:app", "--log-level", "debug"]위 값을 고려하면서 server의 --keep-alive 값과 client의 request interval를 조정하며 테스트를 해보자. 현재 interval이 3초일 때는 잘 동작하는 걸 확인했다.
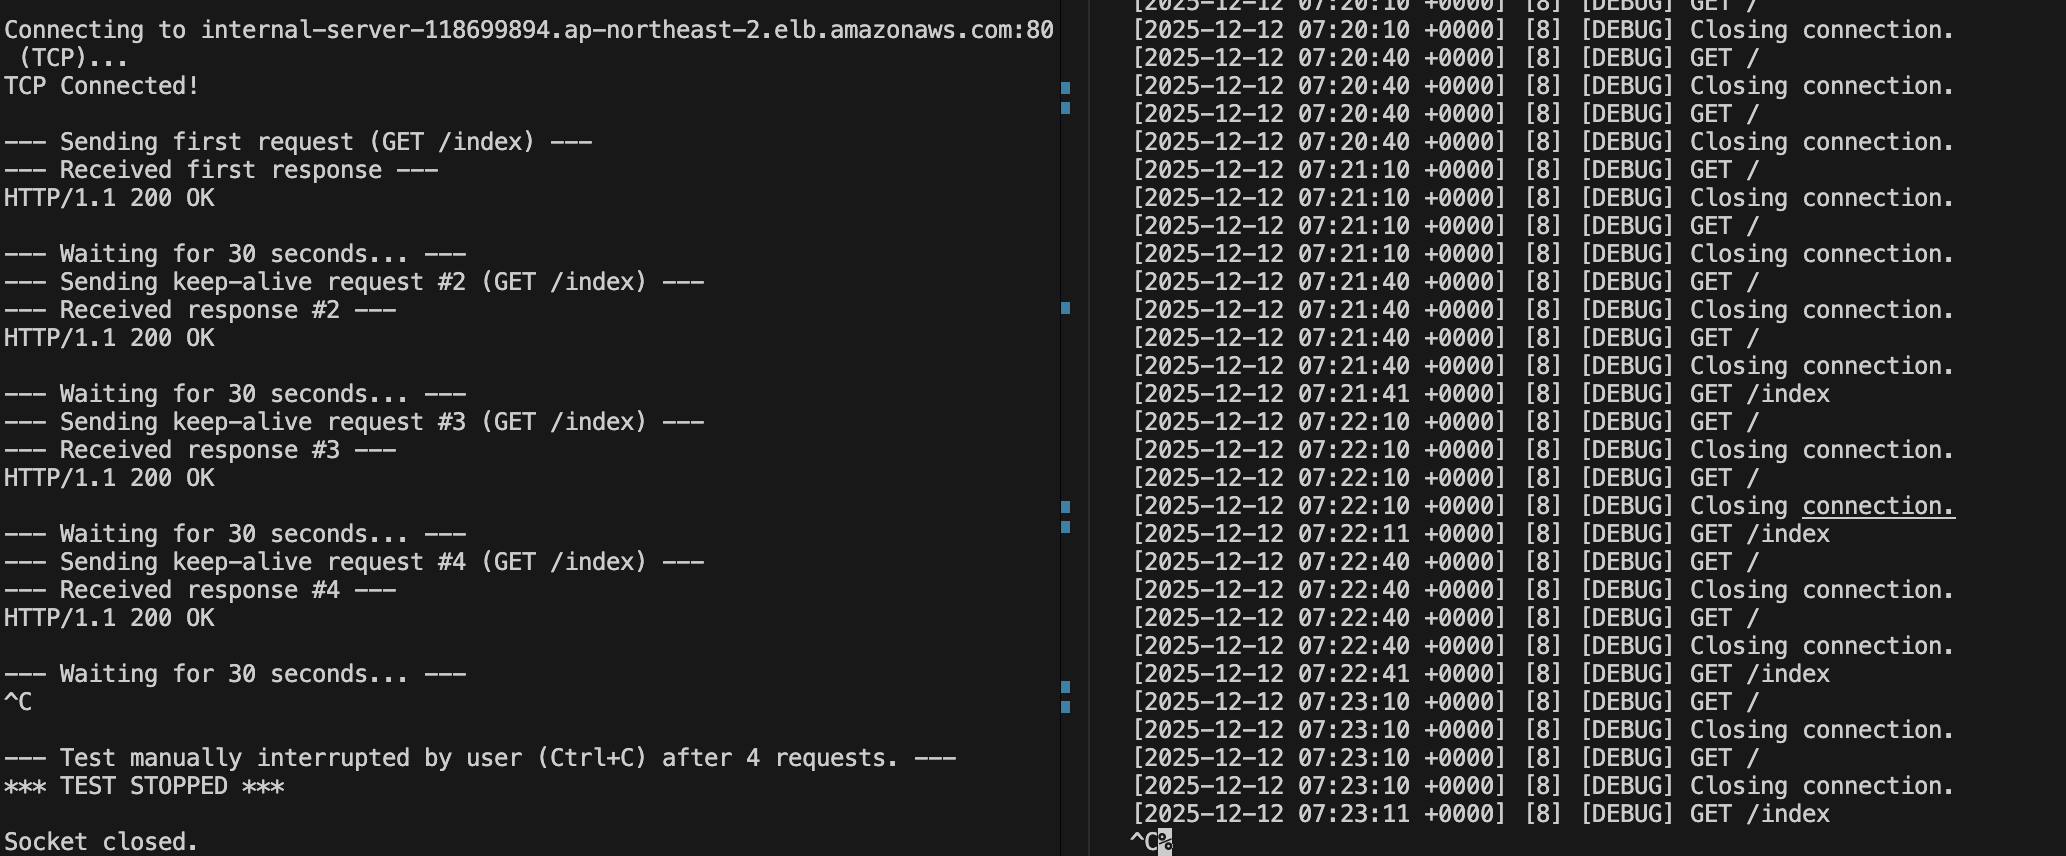
keep alive 20, interval 30
kubectl -n client exec -it $CLIENT -- python client.py 303회 정도 요청을 하고 종료했다.
dump 파일에서 Wireshark에 아래와 같이 입력하면 /index 패킷만 확인이 가능하다
http.request.uri contains "/index"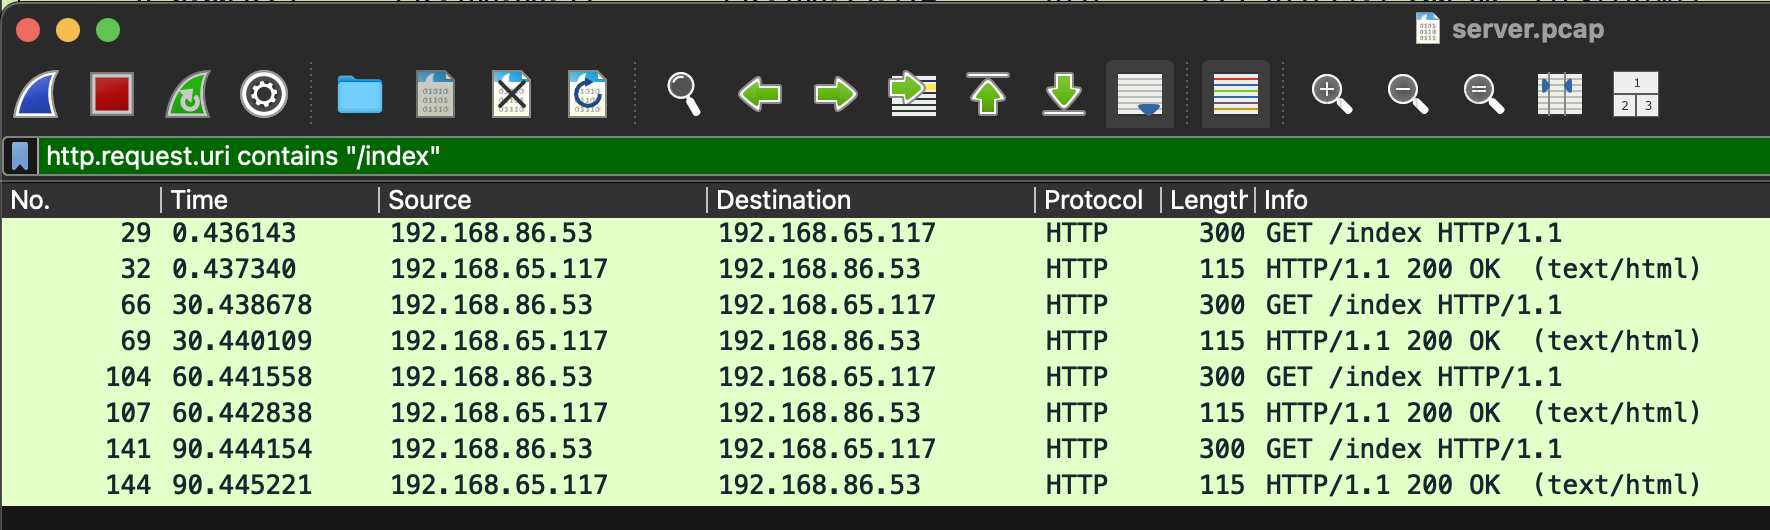
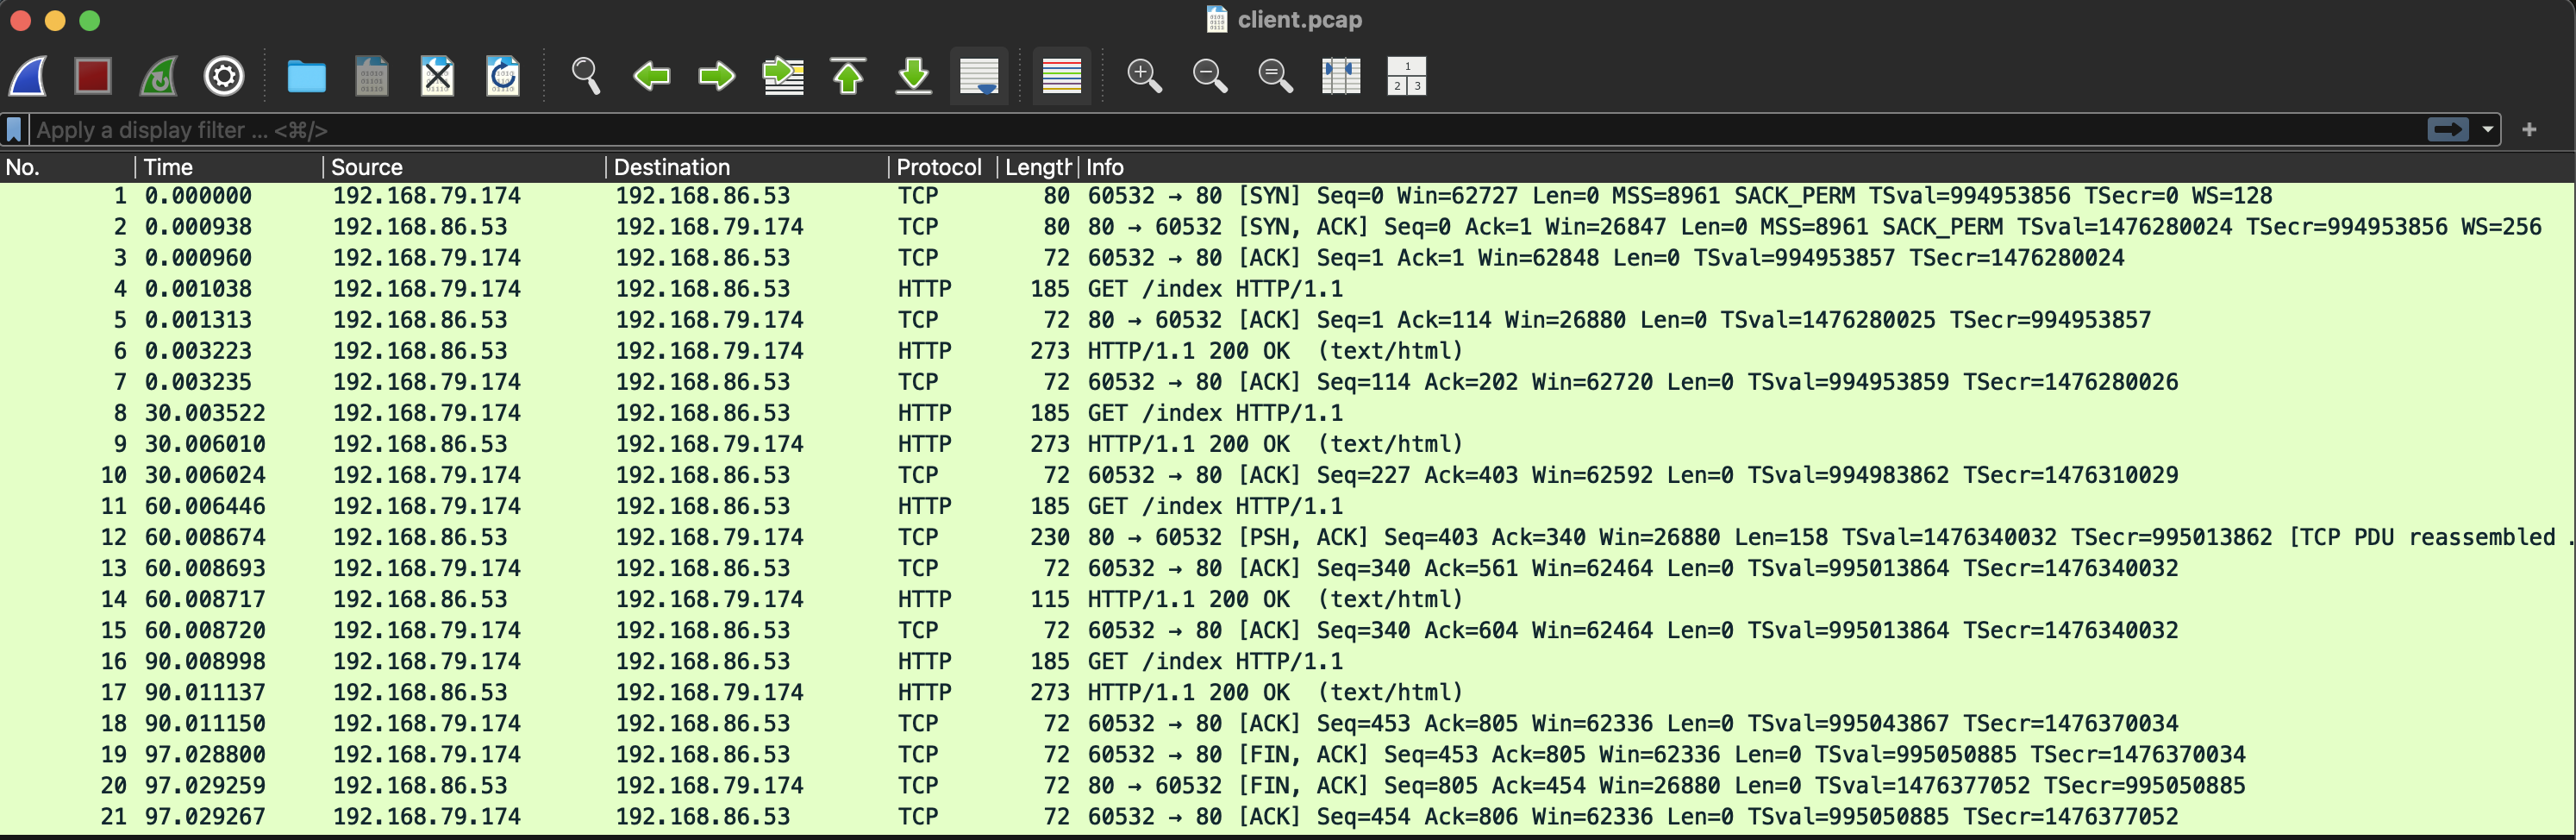
먼저 client 패킷이다. 열어둔 소켓을 이용해 계속 요청을 보내는 걸 확인할 수 있다. (0초, 30초, 60초, 90초)
다음 server 패킷이다. 헬스체크 패킷이 섞여 있어서 각 시간대별로 패킷 스크린샷을 첨부했다.
- 0초
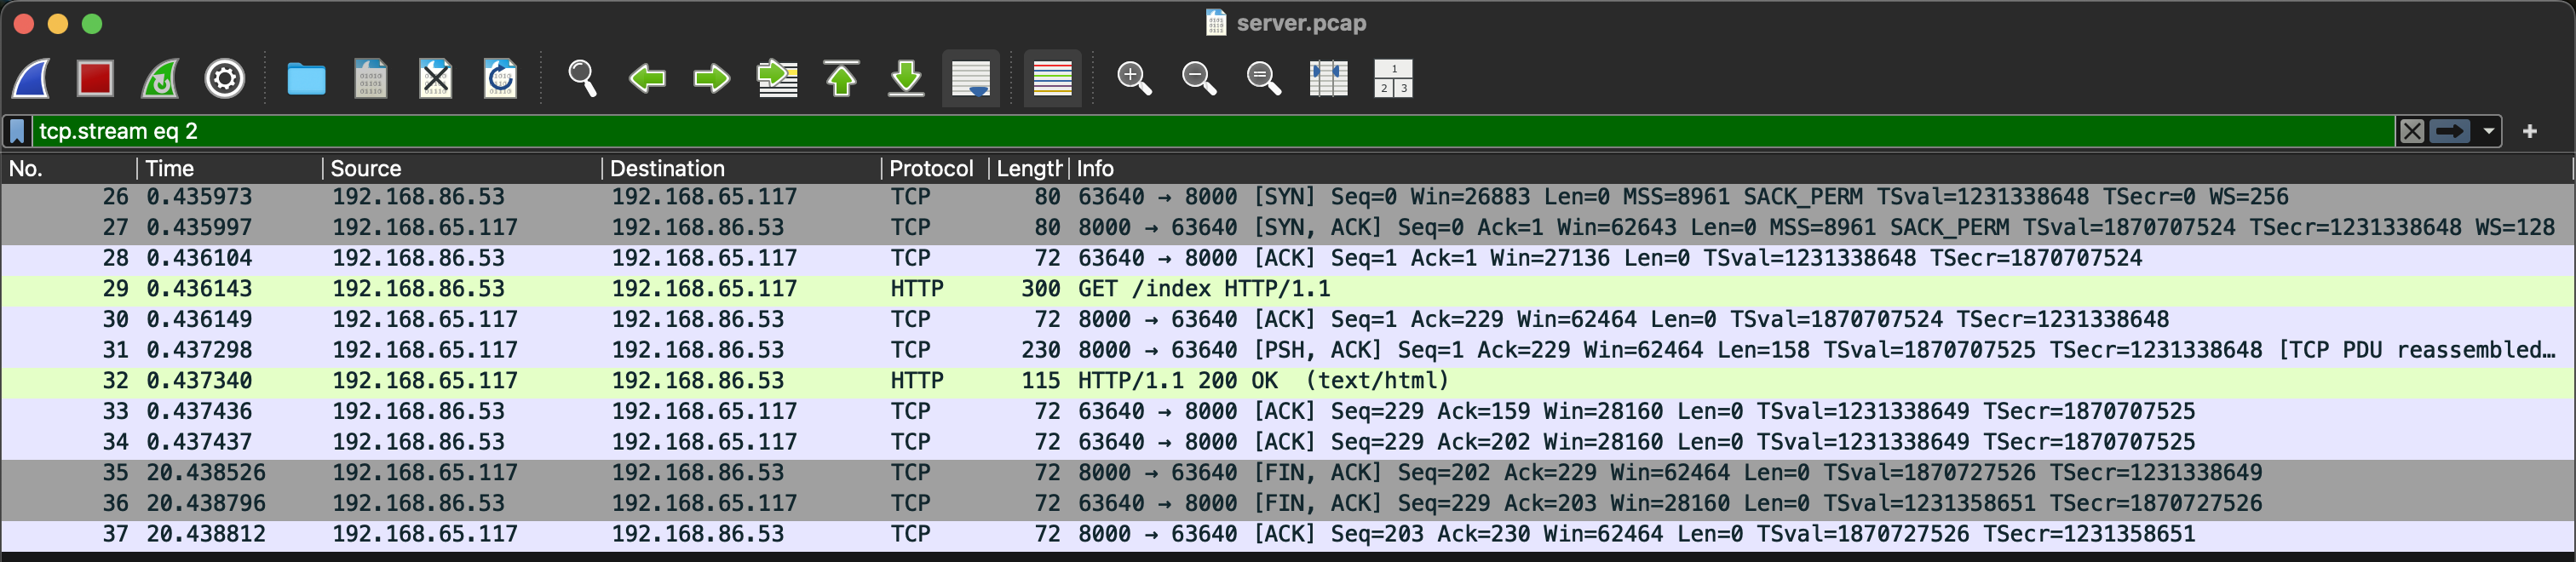
- 30초
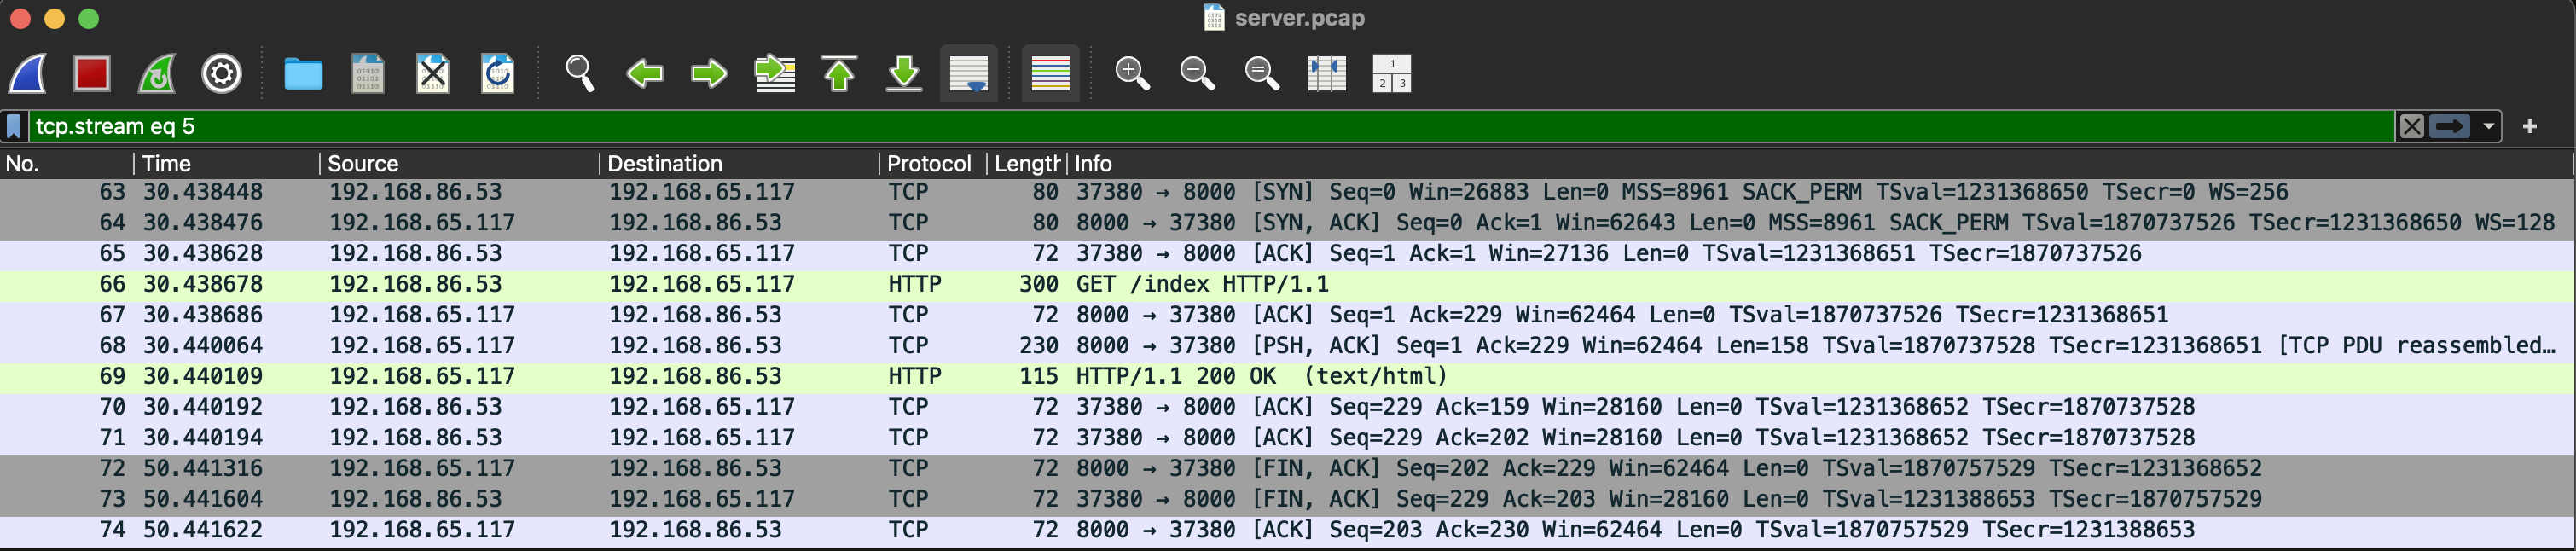
- 60초
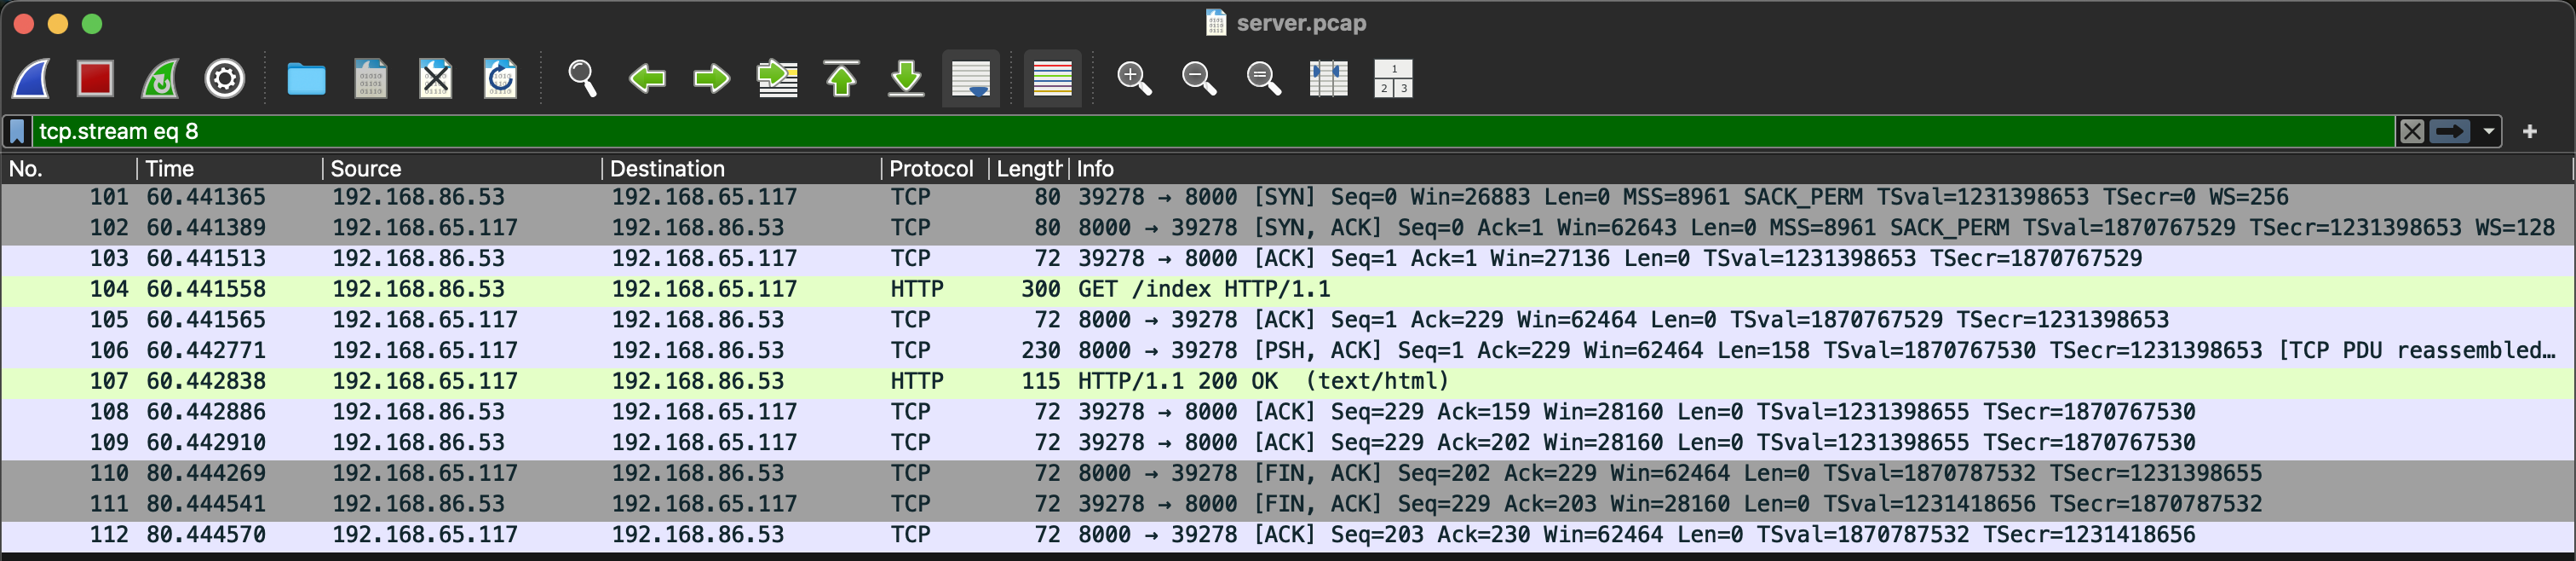
- 90초

여기서 특이한 점이 있는데, client에서는 기존 연결을 이용해 계속 요청을 보낸다. 그런데 server에서는 --keep-alive 20이 적용되어 있어서 연결을 끊는다.
그런데도 client의 요청은 실패하지 않는다.
패킷 내용을 보면, alb가 client의 요청이 있을 때마다 새롭게 연결을 맺어서 요청을 보내는 걸 확인할 수 있다.
20.xxx초로 요청 부하를 주면, 에러를 재현할 수 있다고 하는데, 재현하지 못했다.
keep alive 20, interval 70
먼저 client 패킷이다. 60초에 alb로부터 client가 FIN 패킷을 받은 걸 확인할 수 있다. - 이를 이용해서 client 앱에서 예외처리를 하면, RST 방지가 가능하다.
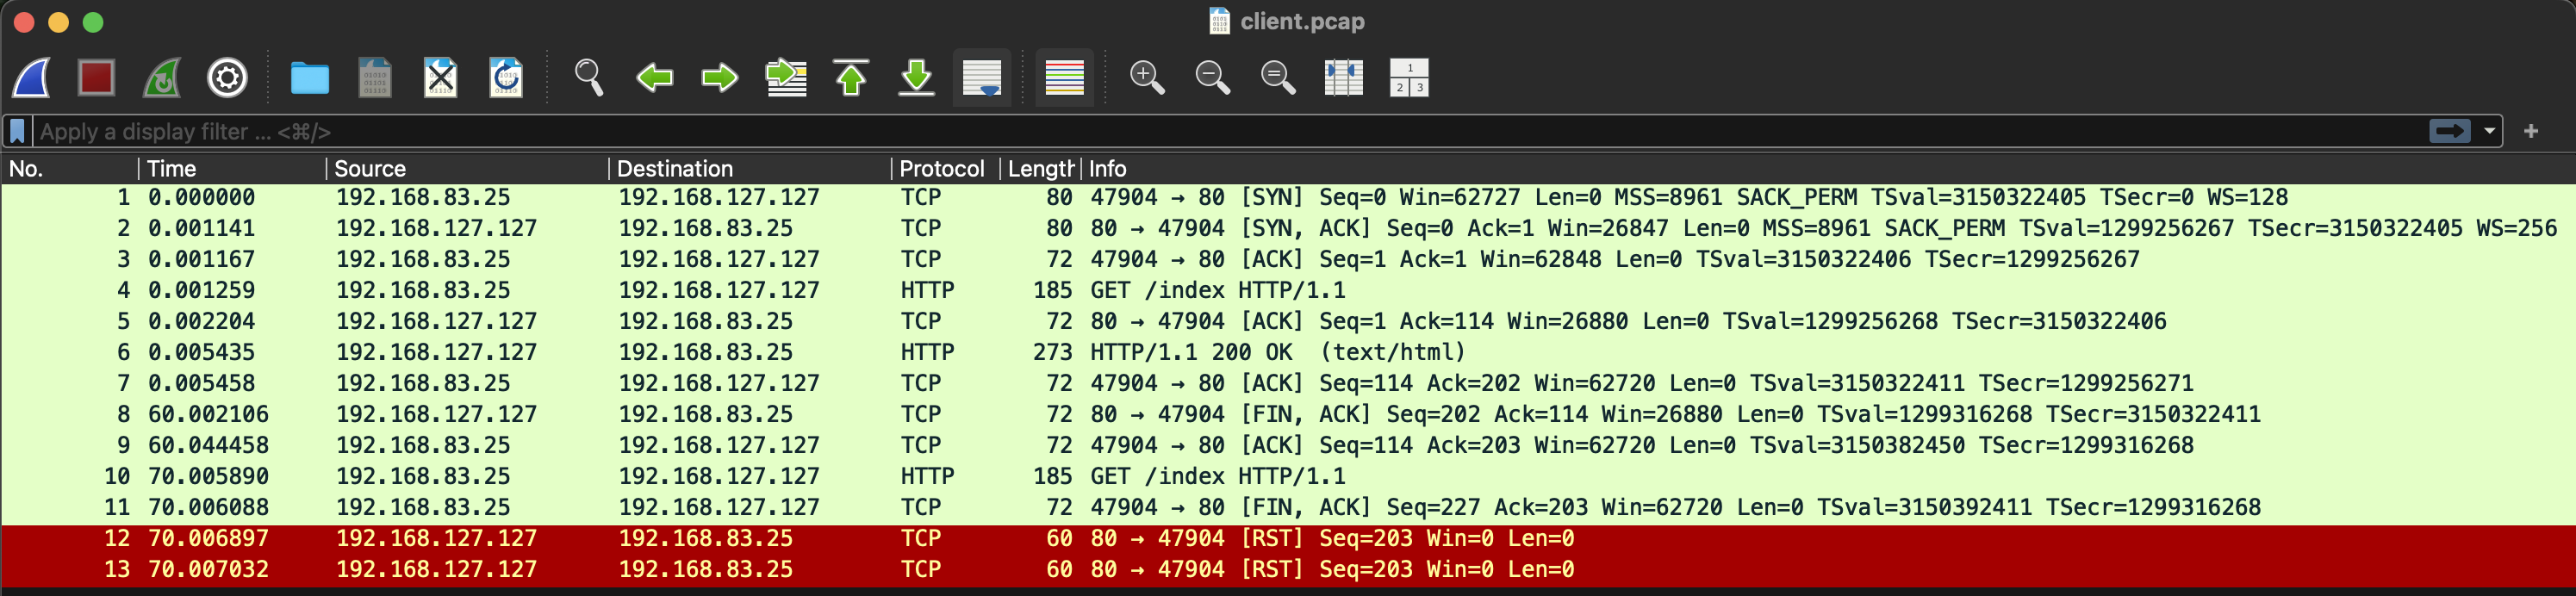
다음은 server 패킷이다. 일단 처음에 /index로 GET 요청이 오고, 다음부터는 /index로 요청된 패킷이 없다.

그리고 해당 연결은 20초 후에 제거된다.

여기서도 nlb와의 차이를 알 수 있다. nlb는 idle timeout이 되면 연결 종료(FIN)를 client에게 알리지 않고 제거해버리는데, alb는 client에게 FIN을 전달해서 연결이 종료됨을 알린다.
결과 해석
alb는 어떤 값 설정이 이상적일까?
답은 문서에 나와있기는 하다. 링크
"The target closes the connection with a TCP RST or a TCP FIN message when the load balancer has an outstanding request to the target."
The load balancer receives a request and forwards the request to the target. The target starts to process the request, but closes the connection to the load balancer too early. This occurs when the duration of the keep-alive timeout that you configured on the target is shorter than the idle timeout value of the load balancer. Make sure that the duration of the keep-alive timeout is longer than the idle timeout value.
해당 글에서는 server의 keep alive < alb의 idle timeout일 때도 문제가 발생하지는 않았다.
그래도 생각해보면 alb는 연결을 종료할 때, client에 FIN을 보내서 연결이 종료됨을 알리기 때문에 반대가 되어야 하는 게 맞다.
다음 글에서는
이렇게 client > load balancer > server로 이어지는 구조면 좋겠지만, k8s 환경에서는 istio 등 서비스 매시를 쓰는 경우가 많다.
이제 머리가 복잡해져 보자...
