1. 들어가기 전
인터넷으로 많이 사용하는 페이지 중 하나는 장바구니 페이지가 아닐까 하는 생각이 듭니다. 리액트를 공부하면서 장바구니 페이지를 어쭙게나마 흉내를 내고 싶다는 생각이 들었습니다. 그래서 이번에는 리액트로 간단한 장바구니 페이지를 만들어보고자 합니다. 프로젝트를 통해 상품 리스트를 출력하고 원하는 상품을 장바구니에 넣는 과정까지 구현해보겠습니다.
이번에는 데이터베이스를 사용하지 않고 하드 코딩으로 데이터를 가져오겠습니다.
자료 출처 : https://brand.naver.com/linefriends/category/b4f7430d419e4e729c8eae3093b37e21?cp=1
저작권 : 라인 프렌즈
위 데이터는 공부 목적으로 사용했으며 어떠한 결제 시스템이 없음을 사전에 공지합니다.
그러면 장바구니 페이지 만들기 첫 번째 여정을 시작하겠습니다.
2. 목표
- 데이터베이스에 있는 상품 목록을 출력한다.
- Navbar의 값에 따라 알맞은 상품을 목록에 출력한다.
3. 필요한 패키지 설치
$ npm install sweetalert2
$ npm install @mui/icons-material
$ npm install @mui/material @emotion/react @emotion/styled
$ npm install @mui/material @mui/styled-engine-sc styled-components
$ npm i react-router-dom
4. 데이터베이스 만들기
먼저 상품 리스트를 하드 코딩으로 입력하겠습니다.
export const database = [
    {
        id: 6876937251,
        category: "COOKY",
        description: "머그컵이나 텀블러를 받쳐주는 코스터입니다. 투명한 아크릴에 쿠키 얼굴이 선명하게 새겨졌어요. 테이블을 화사한 분위기로 만들어줍니다",
        image: "https://shop-phinf.pstatic.net/20220705_37/1656985010822HLcmJ_JPEG/21562010_76204184.jpg?type=m510",
        price: 6000,
        title: "BT21 COOKY 페이스 아크릴 코스터",
    },
    {
        id: 6876937252,
        category: "TATA",
        description: "머그컵이나 텀블러를 받쳐주는 코스터입니다. 투명한 아크릴에 타타 얼굴이 선명하게 새겨졌어요. 테이블을 화사한 분위기로 만들어줍니다",
        image: "https://shop-phinf.pstatic.net/20220705_261/1656985006709b6YuD_JPEG/21561956_76204183.jpg?type=m510",
        price: 6000,
        title: "BT21 TATA 페이스 아크릴 코스터",
    },
    {
        id: 6876937253,
        category: "CHIMMY",
        description: "머그컵이나 텀블러를 받쳐주는 코스터입니다. 투명한 아크릴에 치미 얼굴이 선명하게 새겨졌어요. 테이블을 화사한 분위기로 만들어줍니다",
        image: "https://shop-phinf.pstatic.net/20220705_46/1656985002552vE8wt_JPEG/21561923_76204182.jpg?type=m510",
        price: 6000,
        title: "BT21 CHIMMY 페이스 아크릴 코스터",
    },
    {
        id: 6876937254,
        category: "MANG",
        description: "머그컵이나 텀블러를 받쳐주는 코스터입니다. 투명한 아크릴에 망이 얼굴이 선명하게 새겨졌어요. 테이블을 화사한 분위기로 만들어줍니다",
        image: "https://shop-phinf.pstatic.net/20220705_298/1656984998573xl211_JPEG/21561905_76204181.jpg?type=m510",
        price: 6000,
        title: "BT21 MANG 페이스 아크릴 코스터",
    },
    {
        id: 6876937255,
        category: "KOYA",
        description: "머그컵이나 텀블러를 받쳐주는 코스터입니다. 투명한 아크릴에 코야 얼굴이 선명하게 새겨졌어요. 테이블을 화사한 분위기로 만들어줍니다",
        image: "https://shop-phinf.pstatic.net/20220705_27/1656984986653gPodo_JPEG/21561851_76204172.jpg?type=m510",
        price: 6000,
        title: "BT21 KOYA 페이스 아크릴 코스터",
    },
    {
        id: 6876937256,
        category: "SHOOKY",
        description: "머그컵이나 텀블러를 받쳐주는 코스터입니다. 투명한 아크릴에 슈키 얼굴이 선명하게 새겨졌어요. 테이블을 화사한 분위기로 만들어줍니다",
        image: "https://shop-phinf.pstatic.net/20220705_108/1656984994540exhfb_JPEG/21561869_76204180.jpg?type=m510",
        price: 6000,
        title: "BT21 SHOOKY 페이스 아크릴 코스터",
    },
    {
        id: 6876937257,
        category: "RJ",
        description: "머그컵이나 텀블러를 받쳐주는 코스터입니다. 투명한 아크릴에 RJ 얼굴이 선명하게 새겨졌어요. 테이블을 화사한 분위기로 만들어줍니다",
        image: "https://shop-phinf.pstatic.net/20220705_191/16569849906726A3mM_JPEG/21561803_76204179.jpg?type=m510",
        price: 6000,
        title: "BT21 RJ 페이스 아크릴 코스터",
    },
    {
        id: 6876937258,
        category: "COOKY",
        description: "내 차의 힐링템 BT21 KOOKY 차량용 고속 무선 충전 거치대",
        image: "https://shop-phinf.pstatic.net/20220524_179/1653354840728iQSSm_JPEG/21371561_74732033.jpg?type=m510",
        price: 49500,
        title: "라인프렌즈 BT21 COOKY BABY 차량용 스마트폰 고속 충전 거치대",
    },
    {
        id: 6876937259,
        category: "TATA",
        description: "내 차의 힐링템 BT21 KOOKY 차량용 고속 무선 충전 거치대",
        image: "https://shop-phinf.pstatic.net/20220524_225/1653354836389IdVwn_JPEG/21371552_74731942.jpg?type=m510",
        price: 49500,
        title: "라인프렌즈 BT21 TATA BABY 차량용 스마트폰 고속 충전 거치대",
    },
    {
        id: 6876937260,
        category: "CHIMMY",
        description: "내 차의 힐링템 BT21 CHIMMY 차량용 고속 무선 충전 거치대",
        image: "https://shop-phinf.pstatic.net/20220524_141/1653354832143VnuLs_JPEG/21371496_74731941.jpg?type=m510",
        price: 49500,
        title: "라인프렌즈 BT21 CHIMMY BABY 차량용 스마트폰 고속 충전 거치대",
    },
    {
        id: 6876937261,
        category: "MANG",
        description: "내 차의 힐링템 BT21 MANG 차량용 고속 무선 충전 거치대",
        image: "https://shop-phinf.pstatic.net/20220524_232/1653354827951Bywn3_JPEG/21371368_74731940.jpg?type=m510",
        price: 49500,
        title: "라인프렌즈 BT21 MANG BABY 차량용 스마트폰 고속 충전 거치대",
    },
    {
        id: 6876937262,
        category: "SHOOKY",
        description: "내 차의 힐링템 BT21 SHOOKY 차량용 고속 무선 충전 거치대",
        image: "https://shop-phinf.pstatic.net/20220524_136/16533548234444B97i_JPEG/21371319_74731939.jpg?type=m510",
        price: 49500,
        title: "라인프렌즈 BT21 SHOOKY BABY 차량용 스마트폰 고속 충전 거치대",
    },
    {
        id: 6876937263,
        category: "RJ",
        description: "내 차의 힐링템 BT21 RJ 차량용 고속 무선 충전 거치대",
        image: "https://shop-phinf.pstatic.net/20220524_139/1653354819422z0hGl_JPEG/21371284_74731848.jpg?type=m510",
        price: 49500,
        title: "라인프렌즈 BT21 RJ BABY 차량용 스마트폰 고속 충전 거치대",
    },
    {
        id: 6876937264,
        category: "KOYA",
        description: "내 차의 힐링템 BT21 KOYA 차량용 고속 무선 충전 거치대",
        image: "https://shop-phinf.pstatic.net/20220524_29/1653354814805jjY1A_JPEG/21371229_74731737.jpg?type=m510",
        price: 49500,
        title: "라인프렌즈 BT21 KOYA BABY 차량용 스마트폰 고속 충전 거치대",
    },
];
출처 : 라인프렌즈 | 저작권 : 라인프렌즈
5. 인터페이스 설정
src/interfaces/item.interface.ts
export interface MenuListInterface {
    id: number;
    category: string;
    description: string;
    image: string;
    price: number;
    title: string;
}

export interface ShoppingCartItem{
    id: number;
    category: string;
    description: string;
    image: string;
    price: number;
    title: string;
    amount: number;
}
6. 상품 리스트 데이터
6.1 상품 리스트를 가져올 페이지 만들기
src/pages/main.tsx
import React, {useState} from "react";
import {MainWrap} from "../styles/main.styled";

export const Main = () => {
    return <MainWrap>
    </MainWrap>
}
6.2 각 상품 별 데이터를 출력할 컴포넌트 준비
src/components/Item.tsx
import React from "react";
import {ShoppingCartItem} from "../interfaces/item.interface";
import {numberFormat} from "../common";
// CSS
import {Button} from "@mui/material";
import {ItemWrap} from "../styles/item.styled,ts";
type ItemType = {
item: ShoppingCartItem
}
export const Item = ({item}: ItemType) => {
return <ItemWrap>
<div>
<div className="container">
<div className="item-image">
<img src={item.image} alt={item.title}/>
</div>
<div className="item-info">
<h3>{item.title}</h3>
<h3>{numberFormat(item.price)}원</h3>
</div>
<Button>
Add To Cart
</Button>
</div>
</div>
</ItemWrap>
}
const numberFormat = (price: number): string => {
return price.toString().replace(/\B(?=(\d{3})+(?!\d))/g, ",");
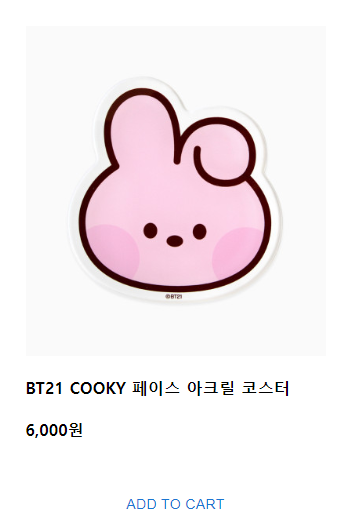
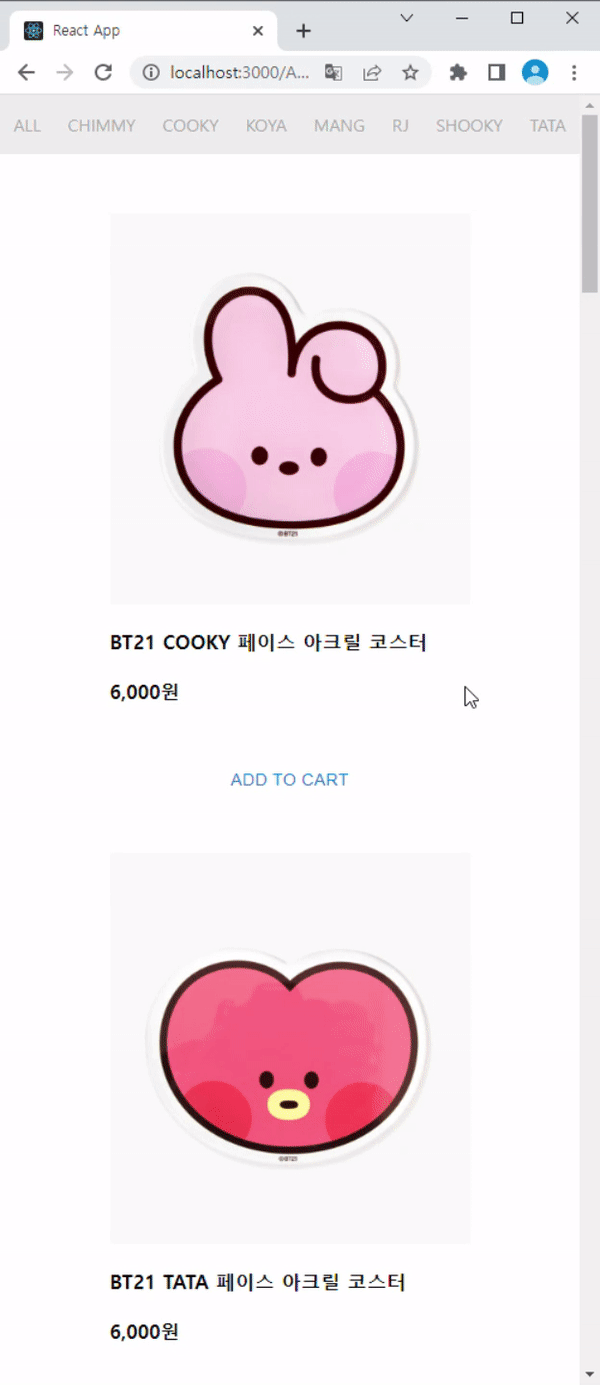
}item 인자를 받으면 개별 아이템 폼을 만들어 줍니다.
(결과)
6.3 Navbar 컴포넌트 만들기
src/components/Navbar.tsx
import React from "react";
import {NavWrap} from "../styles/navbar.styled";

export const Navbar = () => {
    return <NavWrap>
    </NavWrap>
}
6.4 라우터 설정
Navbar와 Main 컴포넌트를 import 합니다.
후에 category 별로 데이터를 가져올 예정이라 미리 category를 param으로 설정하도록 하겠습니다.
import React from "react";
import {BrowserRouter, Routes, Route} from "react-router-dom";
import {Main} from "../pages/main";
import {Navbar} from "../components/Navbar";

export const AppRouter = () => {
    return <>
        <BrowserRouter>
		        <Navbar />
            <Routes>
                <Route path={'/:category'} element={<Main />}></Route>
            </Routes>
        </BrowserRouter>
    </>
}
자 이제 프로젝트를 시작할 최소한의 준비를 마쳤습니다.
지금부터 본격 상품 리스트를 출력하도록 하겠습니다.
6.5 데이터 출력
src/App.tsx
import React, {useState} from 'react';
import {database} from "./database/products";

import {AppRouter} from "./routers/AppRoutes";

import './App.css'

// SET CATEGORY
const arr = database.map((item) => {
    return item.category
});
arr.push('ALL');
const category = Array.from(new Set(arr)).sort();

const App = () => {
    return (
        <>
            <AppRouter menuList={database} category={category}/>
        </>
    );
}

export default App;
💡 'category'는 데이터베이스에 있는 category 목록을 중복 없이 가져온 배열입니다. 위 변수는 Navbar에서 사용합니다.
앱 전반적으로 사용할 database와 category 값을 AppRouter에 넘겨주도록 하겠습니다.
src/routers/AppRouter.tsx
import React from "react";
import {BrowserRouter, Routes, Route} from "react-router-dom";
import {Main} from "../pages/main";
import {Navbar} from "../components/Navbar";


type AppRoutesType = {
    menuList: MenuListInterface[] | null
    category: string[] | null
}

export const AppRouter = ({menuList, category}: AppRoutesType) => {
    return <>
        <BrowserRouter>
            <Navbar category={category}/>
            <Routes>
                <Route path={'/:category'} element={<Main />}></Route>
            </Routes>
        </BrowserRouter>
    </>
}
전달받은 prop을 각각 Navbar와 Main 컴포넌트에 전달하겠습니다.
src/pages/main.tsx
import React from "react";
import {useParams} from "react-router-dom";
import {Item} from "../components/Item";


import {MenuListInterface} from "../interfaces/item.interface";
import {MainWrap} from "../styles/main.styled";
import {Grid} from "@mui/material";

type MainType = {
    menuList: MenuListInterface[] | null
}

export const Main = ({menuList}: MainType) => {
    const {category} = useParams();
    let list ;
    if (category === 'ALL') {
        list = menuList
    } else {
        list = menuList?.filter((item:any) => (item.category === category));
    }

    return <MainWrap>
        <Grid container item spacing={5}>
            {list?.map((item: any) => (
                <Grid item key={item.id} xs={12} sm={3}>
                    <Item item={item}></Item>
                </Grid>
            ))}
        </Grid>
    </MainWrap>
}
💡 useParmas() 을 사용하여 parm 값을 가져옵니다.
방금 라우터 설정할 때/:category에서 받은 category 값입니다.
category 값이 'ALL' 일 경우에는 모든 상품 리스트를 출력하고, 나머지는 category 별로 상품 리스트가 출력하도록 했습니다.
list 배열이 만들어지면 반복문을 돌려 아까 만든 Item 컴포넌트에 각각 상품을 전달합니다.
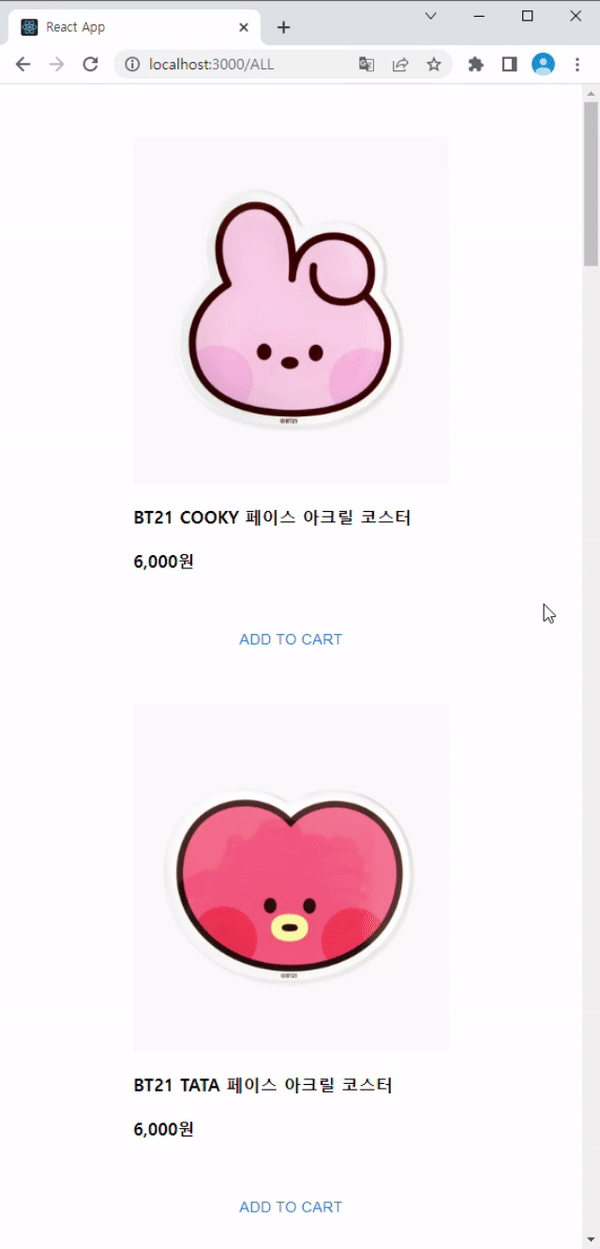
💡 주소창에 category를 입력하면 category 별로 필터 되어 데이터가 출력됨을 알 수 있습니다.
6.6 Navbar 설정
매번 주소창에 category를 칠 순 없으니 Navbar를 사용하여 category를 누르면 각각에 맞는 데이터가 출력하도록 하겠습니다.
src/components/Navbar.tsx
import React from "react";
import {Link} from "react-router-dom";
import {NavWrap} from "../styles/navbar.styled";
type NavbarType = {
category: string[] | null
}
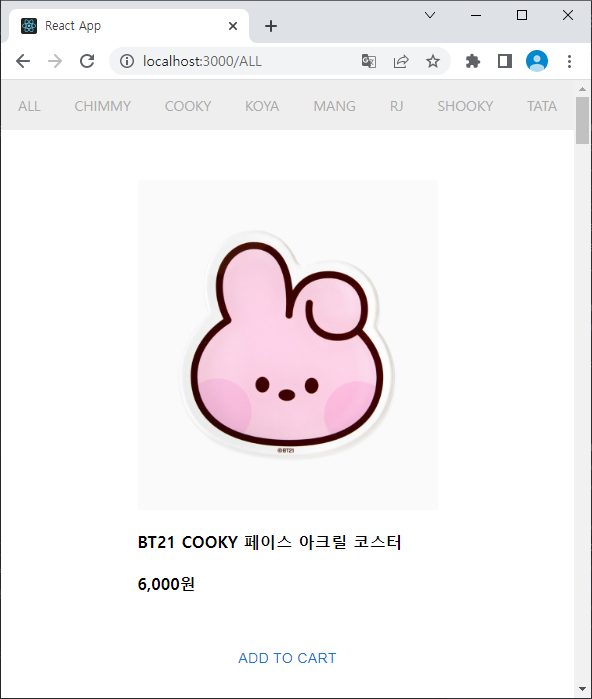
export const Navbar = ({category}: NavbarType) => {
const renderLi = (cate: string, index: number) => {
let key = `${cate}-${index}`
return <Link style={{textDecoration: "none", color: "inherit"}}
to={`/${cate}`}>
<li key={key}>{cate}</li>
</Link>
}
return <NavWrap>
<ul className="nav-ul">{category?.map((item, index: number) => renderLi(item, index))}</ul>
</NavWrap>
}💡
AppRouter에서 전달받은 category 파라미터를 사용하여 각각 페이지로 이동할 수 있는 li를 만들었습니다.
6.7 확인
이제 Navbar을 클릭하여 데이터가 필터되는 지 확인해보겠습니다.
카테고리별로 필터 되어 데이터가 잘 출력되고 있습니다.
상품 목록 가지고 오는 작업이 끝났습니다.
다음 편에서는 장바구니에 상품을 추가하는 작업을 해보도록 하겠습니다.