마이크로 프론트엔드 아키텍쳐를 리액트를 가지고 실제로 적용시켜 보며 개념을 정리해보자.
Micro Frontends Architecture(MFA)
마이크로프론트엔드란?
- 모놀로식 애플리케이션을 여러개의 조금한 애플리케이션으로 나누어 개발하는 것을 말한다. 일반적으로 마이크로 서비스 아키텍쳐 개념을 프론트엔드 애플리케이션에 접목시켰다고 이해하면 쉬울 것이다.
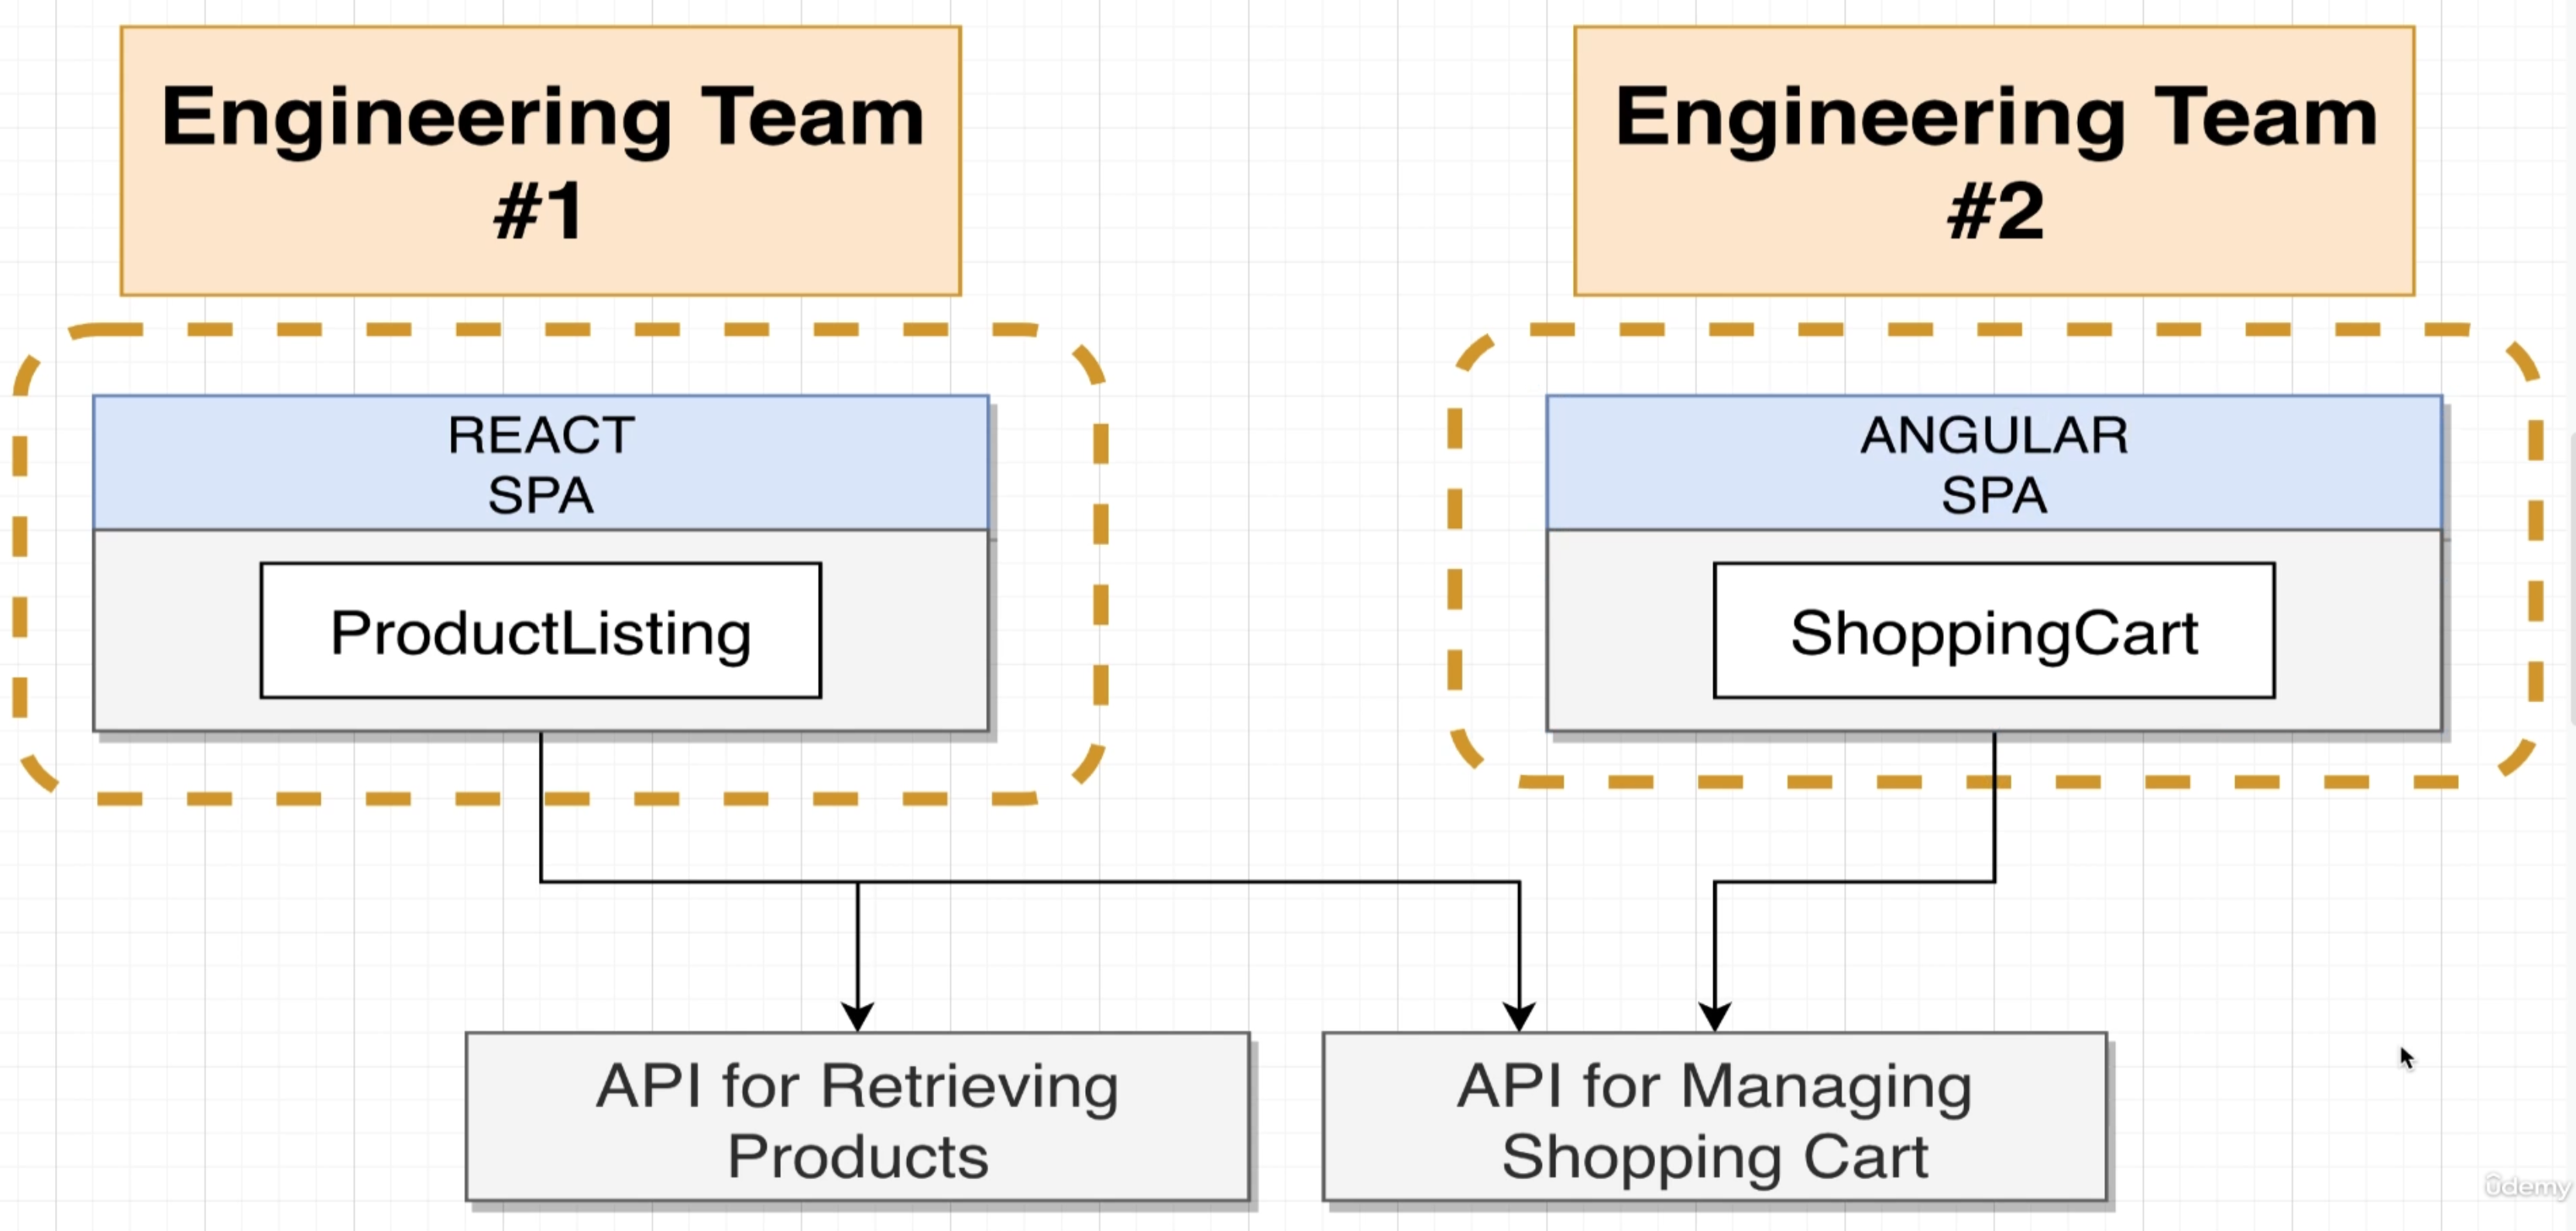
- 나누어진 각자의 조금한 서비스가 각자의 서비스를 담당한다고 보면 된다. 위에 사진 처럼 하나의 리액트 앱은 상품 리스트, 또 하나의 앵귤러 앱은 장바구니를 담당하고 이것들을 하나의 서비스로 묶어주는 것이 마이크로프론트엔드 아키텍쳐라고 볼 수 있다.
마이크로프론트엔드의 장점
- 팀 단위로 애플리케이션을 구현하기에 기술스택에 있어서 자율성이 높다.
- 작은 단위로 독립적인 배포가 가능하다. 그리하여 빌드속도가 빠르다.
- 독립적이기 때문에 하나의 서비스에 문제가 생겨도 다른 서비스에 끼치는 리스크가 적다.
마이크로프론트엔드의 단점
- 컴포넌트간의 통신 및 기능 구현이 복잡한 구성으로 되어 있다.
마이크로 프론트엔드 설계
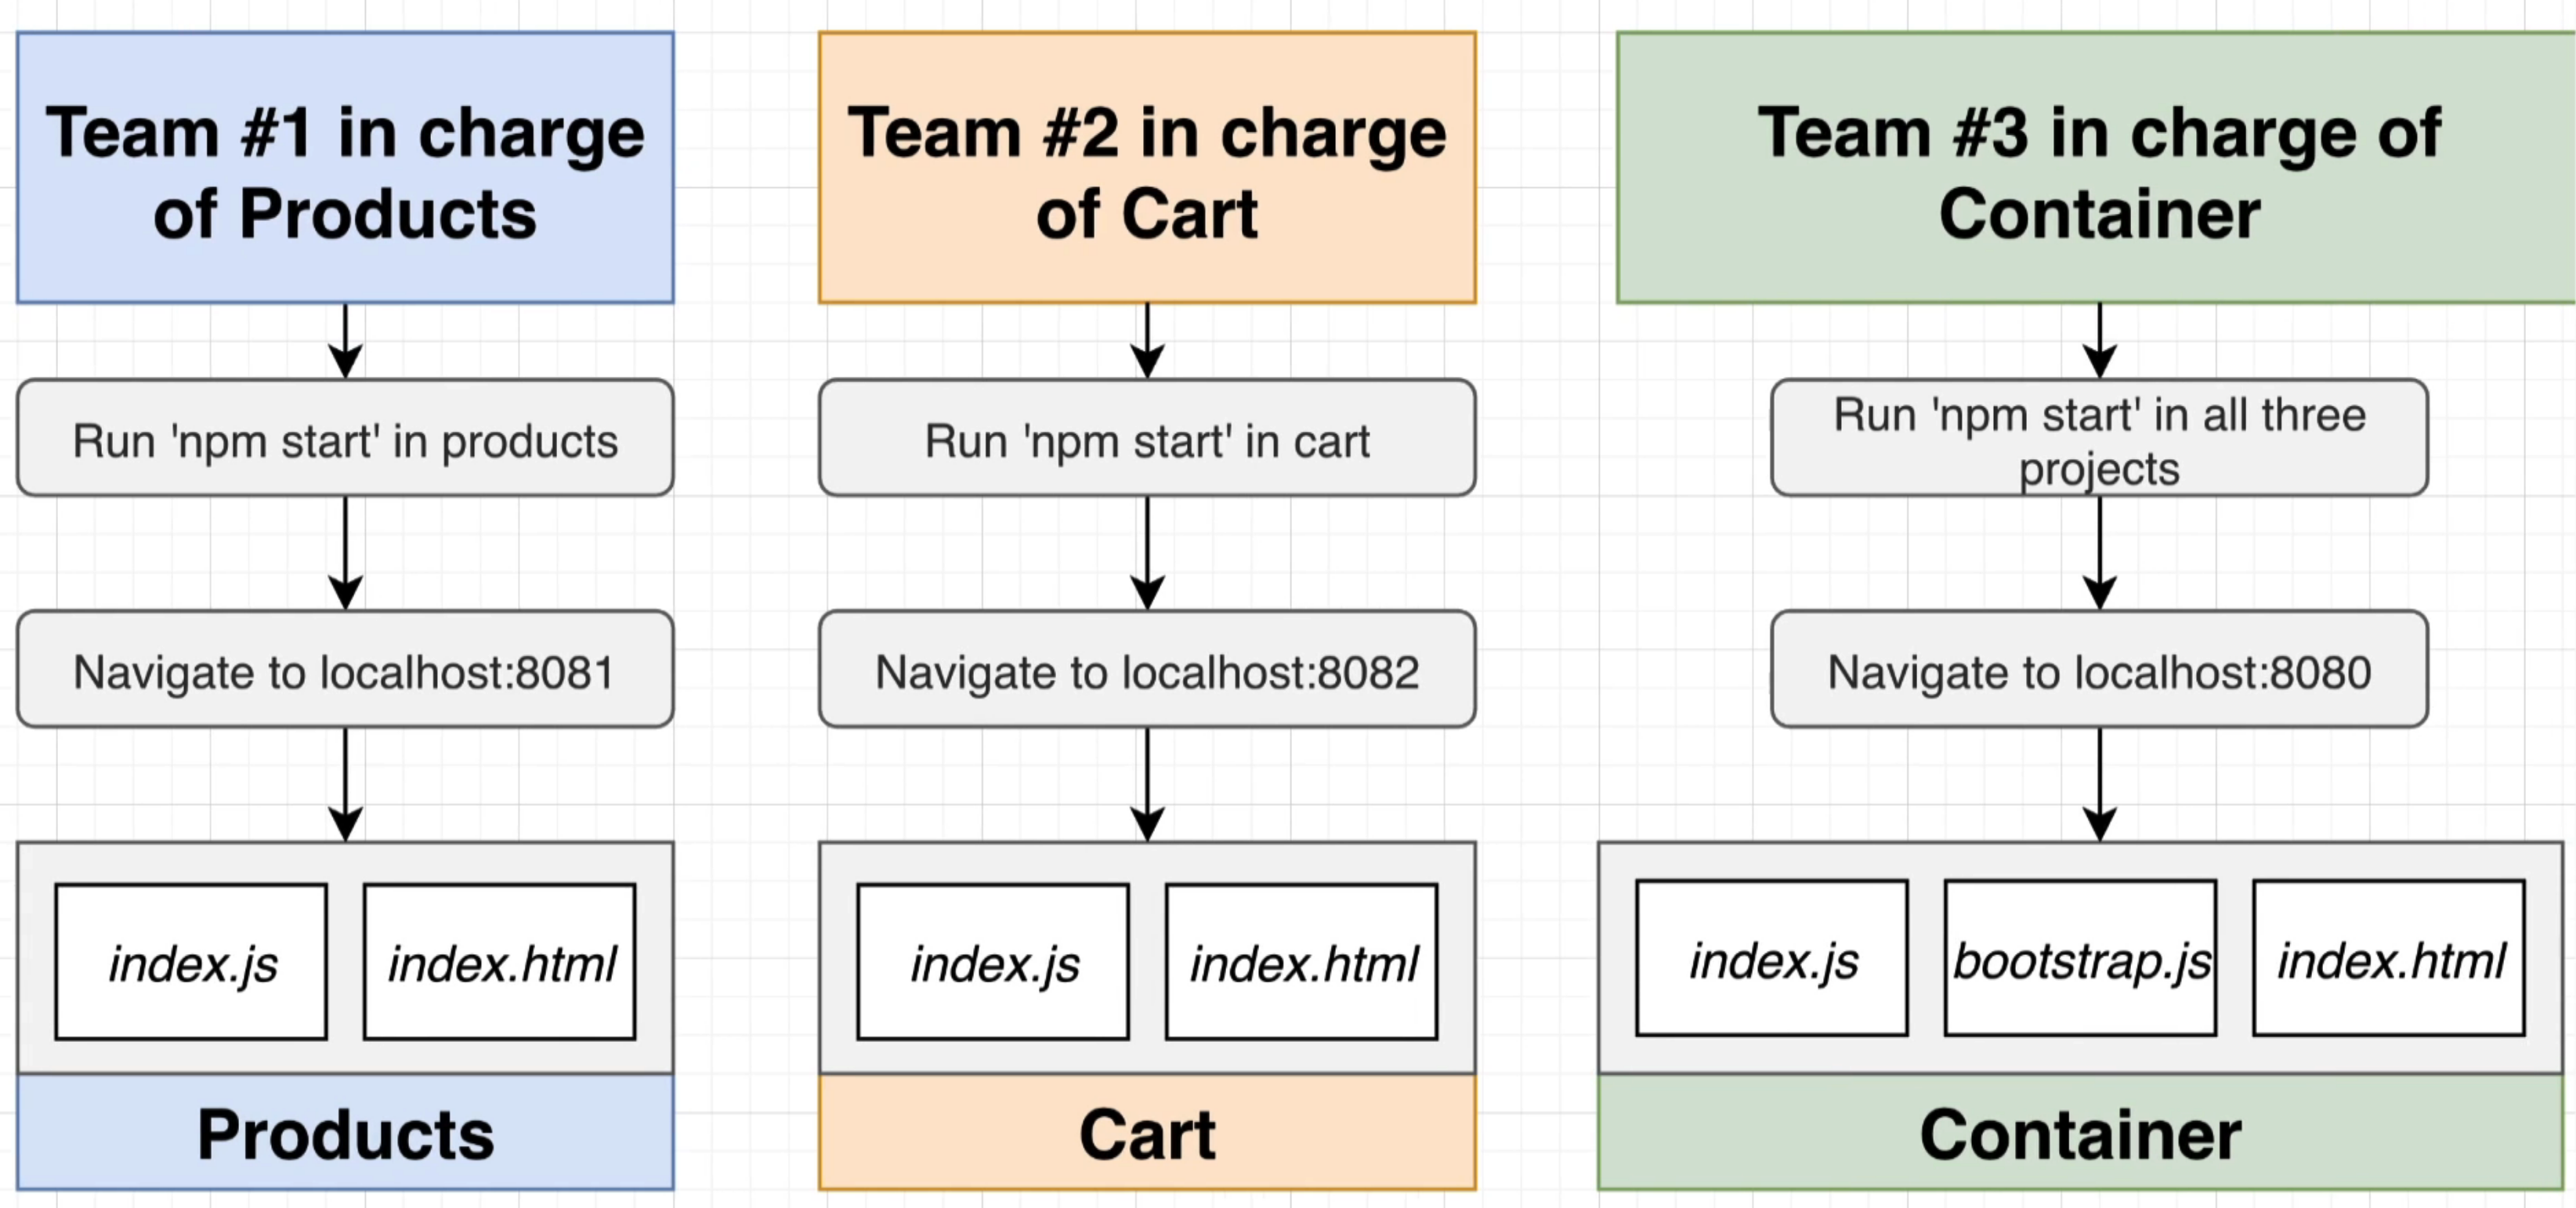
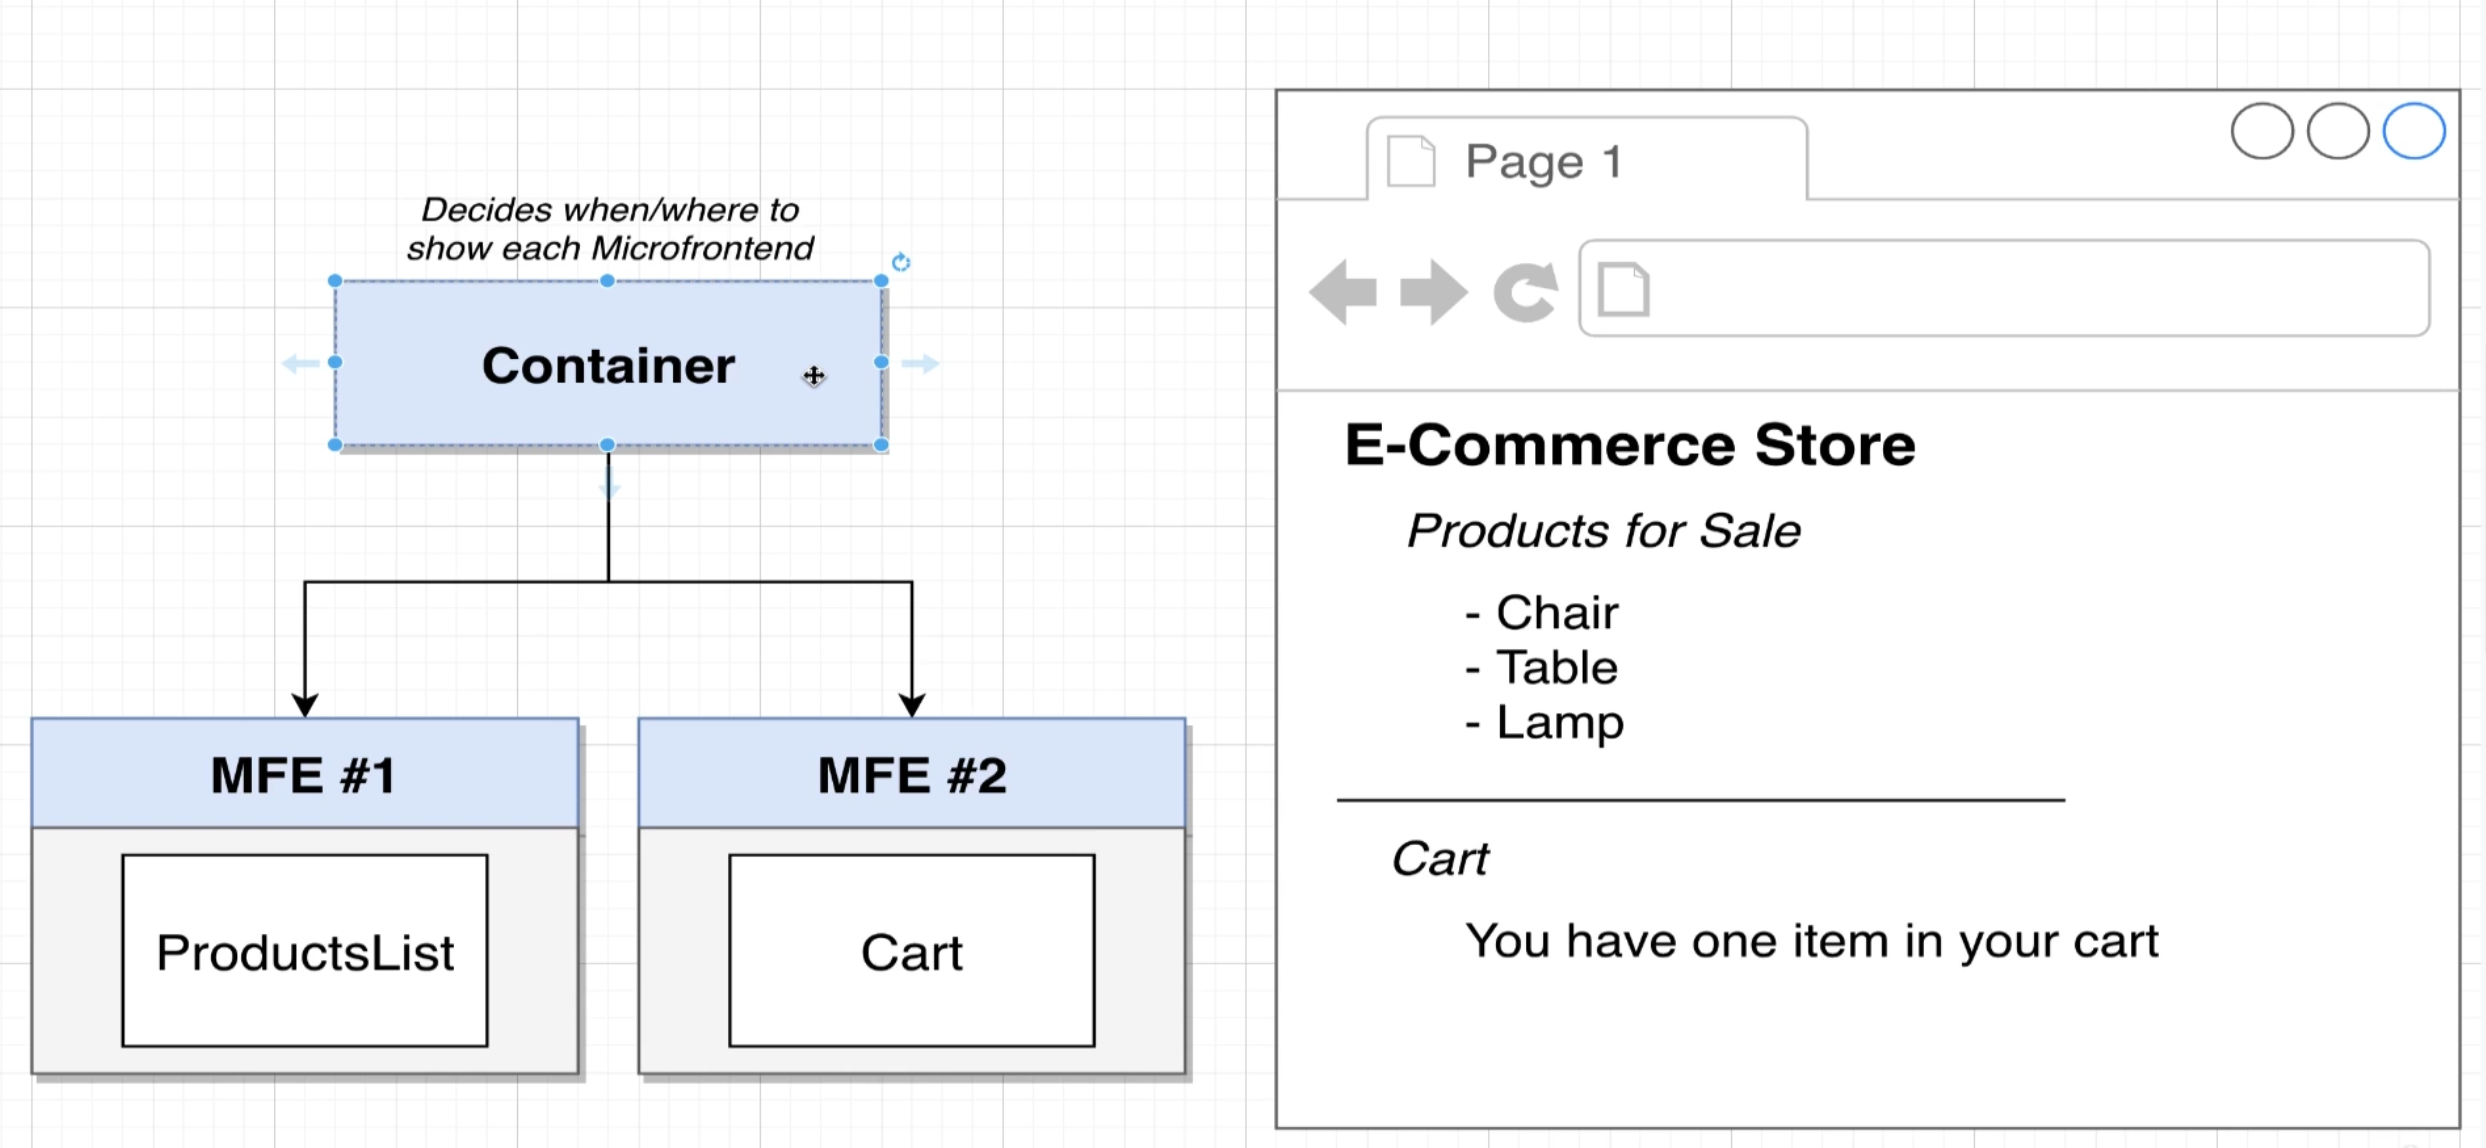
아래와 같은 구조로 애플리케이션들을 구현하고 마이크로 프론트엔드 아키텍쳐로 합쳐서 서비스를 해볼 것 이다. 이 내용에서 필요하게 되는 애플리케이션은 아래와 같다.
- 다른 애플리케이션들의 Wrapper 역할을 하는 컨테이너 애플리케이션
- 상품리스트 역할을 맡는 애플리케이션
- 장바구니 역할을 맡는 애플리케이션
마이크로 프론트엔드를 구현하는데 있어서 build-time, 그리고 run-time 총 두 가지 방법으로 접근을 할 수 있다.
Build-Time Integration(Compile-Time Integration)
build-time integration은 컨테이너가 브라우저에서 로드되기전에 상품리스트 소스코드 접근하는 것을 의미한다.
- 통합 방법
- 개발자들이 상품리스트를 개발하고 배포를 한다.
- NPM package를 이용해서 상품리스트를 퍼블리싱 한다.
- 컨테이너 담당자가들이 NPM Registry에 있는 상품리스트를 컨테이너에 설치한다.
- 컨테이너 개발자가 해당 패캐지를 들고 있는 소스를 빌드한다.
- 빌드된 파일은 이제 상품리스트 코드도 함께 포함되어 있게 된다.
- 장점
- 설치가 쉽다.
- 과정이 복잡하지 않다.
- 단점
- 상품리스트 내용이 업데이트 될 때마다 컨테이너가 다시 배포되어야한다는 불편함이 있다.
Run-Time Integration(Client-Side Integration)
컨테이너가 로드 된 이후에, 상품리스트에 대한 소스코드를 접근한다.
- 통합 방법
- 상품리스트를 개발하고 배포한다.
- 상품리스트 코드를 https://my-app.com/productList.js 같이 url을 가진채로 배포를 한다.
- 사용자가 위 주소로 이동하는 순간 컨테이너를 로드 시킨다.
- 컨테이너가 상품리스트를 가져와서 실행시킨다.
- 장점
- 상품리스트는 배포를 언제 어디서든 할 수 있다.
- 컨테이너는 여러 버전의 상품리스트중 어떤 버전을 사용할지 고를 수 있다. (ex. A/B Testing)
- 단점
- 설정하는 과정이 굉장히 복잡하다.
Run-Time Integration을 활용해서 마이크로프론트엔드 아키텍쳐를 구현해볼 것이다.
마이크로 프론트엔드 without React
우선 기본적인 구조를 알아보기 위해 프레임워크를 안쓰고 구현해보자. 일단 워크스페이스 파일을 하나 만들어주도록 하자. 그리고 그 안에 products라는 폴더를 만들어주고 아래 명령어들을 차례대로 입력해보자.
Products
- workspace/products
// package.json 파일 생성
npm init -y

// 웹팩 설정 및 필요한 모듈 설치
npm install webpack@5.68.0 webpack-cli@4.10.0 webpack-dev-server@4.7.4 faker@5.1.0 html-webpack-plugin@5.5.0
아래의 경로처럼 폴더와 파일을 만들어주고 더미 데이터를 만들어주는 코드를 작성해보자.
- workspace/products/src/index.js
import faker from "faker";

let products = "";

for (let i = 0; i < 3; i++) {
  const name = faker.commerce.productName();
  products += `<div>${name}</div>`;
}

document.querySelector("#dev-products").innerHTML = products;
- workspace/products/webpack.config.js
const HtmlWebpackPlugin = require("html-webpack-plugin");

module.exports = {
  mode: "development",
  // 개발 서버 설정
  devServer: {
    port: 8081,
  },
  // html에 버들링 된 스크립트를 자동으로 넣어주는 플러그인
  plugins: [
    new HtmlWebpackPlugin({
      template: "./public/index.html",
    }),
  ],
};
- package.json
  "scripts": {
    "start": "webpack serve"
},- workspace/products/public/index.html
이 파일은 사실상 개발환경에서 테스트하기 위해 필요한 것이고 최종적으로는 container 프로젝트의 index.html만 있으면 된다.
<!DOCTYPE html>
<html>
  <head> </head>
  <body>
    <div id="dev-products"></div>
  </body>
</html>
이제 npm run start를 해주고 http://localhost:8081/ 에 접속해서 아래와 같은 화면이 나오면 성공적으로 products 프로젝트를 만든 것이다.

Container
이번엔 컨테이너 프로젝트를 생성해보자 위에랑 동일한 세팅을 하면서 이번엔 facker 모듈을 빼고 아래처럼 노드몬이라는 모듈을 추가로 설치해주도록 하자. 그리고 PORT를 8080으로 설정해준다.
npm install webpack@5.68.0 webpack-cli@4.10.0 webpack-dev-server@4.7.4 html-webpack-plugin@5.5.0 nodemon
- workspace/container/public/index.html
<!DOCTYPE html>
<html>
  <head></head>
   <body>
    <div id="dev-products"></div>
  </body>
</html>
Module Federation
이제 웹팩에 내장되어 있는 모듈페더레이션 플러그인 가지고 마이크로 프론트엔드를 구현해보자. 애플리케이션의 Host(Container)에서 Remote(Products)를 불러와서 사용할 수 있게 세팅해야 한다. 그러기 위해선 아래의 절차가 필요하다.
- Remote 프로젝트에서 내보내서 Host에서 보여줄 파일들을 선택해서 Module Federation Plugin으로 아래와 같은 방법으로 설정해서 내보내주도록 하자.
- workspace/products/webpack.config.js
const HtmlWebpackPlugin = require("html-webpack-plugin");
const ModuleFederationPlugin = require("webpack/lib/container/ModuleFederationPlugin");

module.exports = {
  mode: "development",
  devServer: {
    port: 8081,
  },
  plugins: [
    new ModuleFederationPlugin({
      name: "products",
      filename: "remoteEntry.js",
      exposes: {
        "./ProductsIndex": "./src/index",
      },
    }),
    new HtmlWebpackPlugin({
      template: "./public/index.html",
    }),
  ],
};- Host인 컨테이너에서 내보낸 remote를 받아서 쓸 수 있게 아래와 같이 설정해주자.
- workspace/container/webpack.config.js
const HtmlWebpackPlugin = require("html-webpack-plugin");
const ModuleFederationPlugin = require("webpack/lib/container/ModuleFederationPlugin");

module.exports = {
  mode: "development",
  devServer: {
    port: 8080,
  },
  plugins: [
    new ModuleFederationPlugin({
      name: "container",
      remotes: {
        products: "products@http://localhost:8081/remoteEntry.js",
      },
    }),
    new HtmlWebpackPlugin({
      template: "./public/index.html",
    }),
  ],
};
- 그런 다음 Host의 index.js 파일로가서 boostrap.js파일을 불러온다. 그러면 bootstrap.js를 불러오면서 자연스럽게 products/ProductsIndex 를 함께 불러오게 된다. 여기서 products 프로젝트를 불러오기전에 boostrap.js를 index.js에서 불러오는게 꼭 선행되어야한다.
import 구문을 사용해서 boostrap을 먼저 불러들이는 행위는 웹팩한테 product를 bootstrap.js가 실행되기전에 준비할 수 있게 해주는 아주 중요한 요소이다.
- workspace/container/src/index.js
import("./bootstrap");- workspace/container/src/bootstrap.js
import "products/ProductsIndex";

console.log("Container!");
- 그리고 Host로 설정해둔 8080port 로 접속을 해보면 아래와 같은 결과물이 보인다면 성공이다.

모듈 페더레이션의 원리를 이해하기 위해 잠시 네트워크 텝을 열어 8080포트일때 로드되는 파일들이 무엇들인지 확인해보자.

보다시피 8081포트인 products 프로젝트에서 쓰이는 faker모듈과 index.js 파일이 로드 된 것을 볼 수 있다. 모듈페더레이션을 사용해 번들을 빌드하게 되면 웹팩은 총 두가지의 작업을 수행한다.
- 기존처럼 main.js 또는 bundle.js를 생성
- remoteEntry.js , src_index.js(리모트 index.js) , faker.js(외부 라이브러리 모듈) 같은 모듈들을 생성해서 불러온다.
Cart
이제 장바구니 프로젝트를 한번 만들어보도록 하자. 세팅은 products 별 다를게 없다.
- cart/public/index.html
이 파일은 사실상 개발환경에서 테스트하기 위해 필요한 것이고 최종적으로는 container 프로젝트의 index.html만 있으면 된다.
<!DOCTYPE html>
<html>
  <head></head>
  <body>
    <div id="cart-dev"></div>
  </body>
</html>
- cart/src/index.js
import faker from "faker";

const cartText = `<div>You have ${faker.random.number()}</div>`;

document.querySelector("#cart-dev").innerHTML = cartText;
- cart/src/webpack.config.js
const HtmlWebpackPlugin = require("html-webpack-plugin");
const ModuleFederationPlugin = require("webpack/lib/container/ModuleFederationPlugin");

module.exports = {
  mode: "development",
  devServer: {
    port: 8082,
  },
  plugins: [
    new ModuleFederationPlugin({
      name: "cart",
      filename: "remoteEntry.js",
      exposes: {
        "./CartShow": "./src/index",
      },
    }),
    new HtmlWebpackPlugin({
      template: "./public/index.html",
    }),
  ],
};
이제 다시 Container로 돌아가서 cart를 import 해주는 작업을 해주자.
- container/src/webpack.config.js
const HtmlWebpackPlugin = require("html-webpack-plugin");
const ModuleFederationPlugin = require("webpack/lib/container/ModuleFederationPlugin");

module.exports = {
  mode: "development",
  devServer: {
    port: 8080,
  },
  plugins: [
    new ModuleFederationPlugin({
      name: "container",
      remotes: {
        products: "products@http://localhost:8081/remoteEntry.js",
        cart: "cart@http://localhost:8082/remoteEntry.js",
      },
    }),
    new HtmlWebpackPlugin({
      template: "./public/index.html",
    }),
  ],
};
- container/public/index.html
<!DOCTYPE html>
<html>
  <head></head>
  <body>
    <div id="dev-products"></div>
    <div id="cart-dev"></div>
  </body>
</html>
이렇게하면 다음과 같이 container에서 products와 cart 프로젝트를 한 화면에 불러오는걸 확인 할 수 있다.

- 지금까지 구현한 전체적인 구조는 다음과 같다고 보면 된다.