Spring Security is a powerful and highly customizable authentication and access-control framework. It is the de-facto standard for securing Spring-based applications.
Spring Security는 고수준 사용자 정의가 가능한 인증 및 인가(access-control) 프레임워크이며, Spring 기반 어플리케이션의 사실상의 표준이다.
Spring Security의 기능들
공식 사이트에서는 크게 Authentication, Protection Againist Exploits, Integration 로 분야를 나누어 기능을 설명하고 있다.
🔒Authentication
Spring Security에서 제공하는 인증 방법은 아래와 같다.
- username & password
- 일반적인 id, password로 인증하는 방식
- OAuth 2.0
- 구글, 카카오, 네이버 등의 서드파티가 가지고 있는 정보를 기반으로 로그인하는 방식
- SAML 2.0
- CAS(Central Authentication Server)
- Remember Me
- ID/PW 기억하기 기능
- JAAS Authentication
- OpenID
- deprecated
- Pre-Authentication Scenarios
- X509 Authentication
✏️Details
자주 쓰이는 인증 방법에 대해 작동하는 방법을 알아보자.
1. username & password
- 인증되지 않은 사용자 요청을 받았을 경우
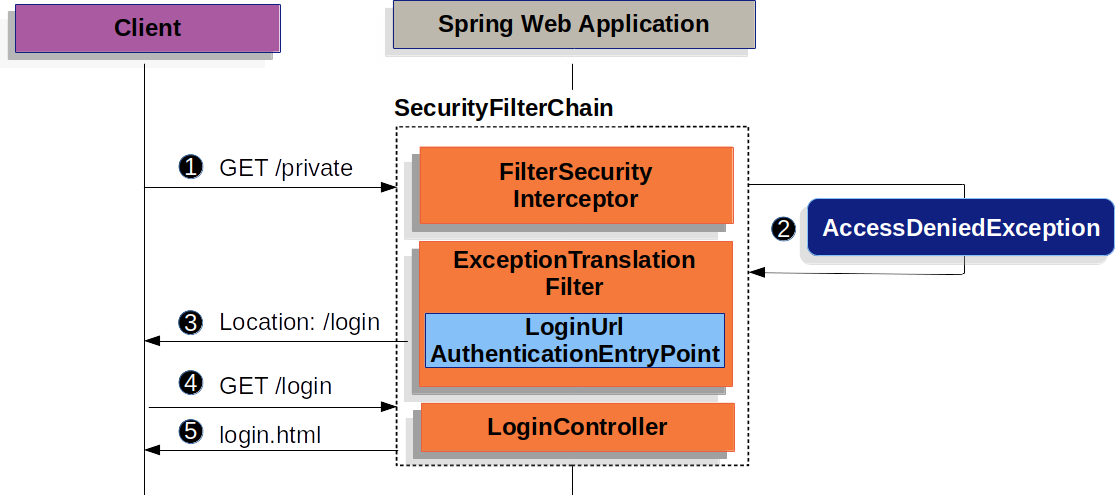
- 로그인 권한이 필요한
GET /private에 사용자가 접근을 요청한다. FilterSecurityInterceptor에서AccessDeniedException예외를 던진다(throw).ExceptionTranslationFilter가 실행되며 로그인 페이지로 리디렉션을 요청한다.- 그 뒤, 브라우저에서 리디렉션 된
GET /login으로 요청을 보낸다. - Controller는 알맞은 자원 (그림에서는
login.html)을 반환한다.
- 사용자가 username과 password를 제출한 경우 (로그인 요청을 한 경우)
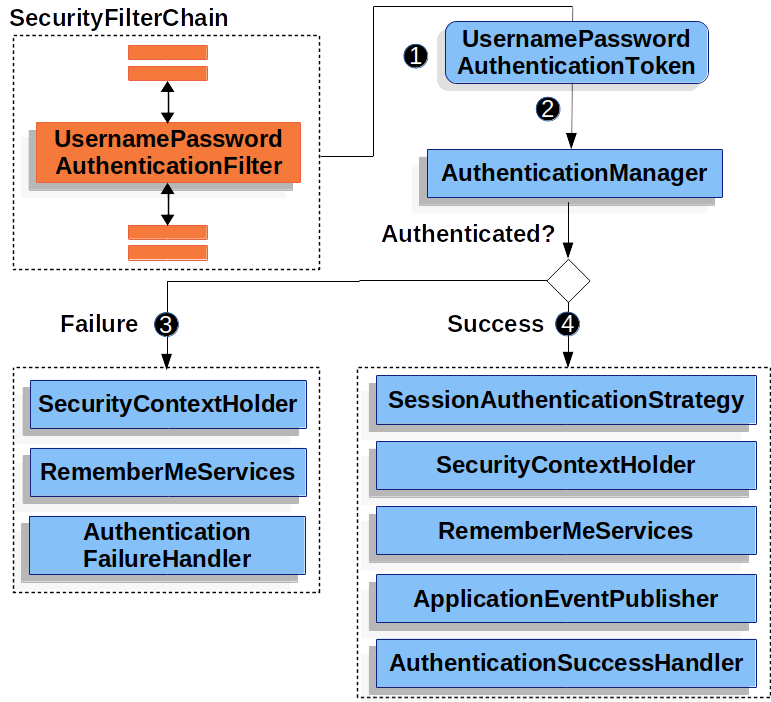
- 사용자가
username(id)와password를 제출하면UsernamePasswordAuthenticationFilter가HttpServletRequest에서 추출한username과password를 기반으로UsernamePasswordAuthenticationToken (이하 Token)을 생성한다. - 생성된
Token을AuthenticationManager에 전달하여 인증을 수행한다. - (인증에 실패했을 경우)
SecurityContextHolder가 초기화된다.RememberMeService의loginFail메소드를 실행한다. (remember me가 구성되지 않은 경우 작동되지 않는다.)AuthenticationFailureHandler를 호출한다.
- (인증에 성공했을 경우)
SessionAuthenticationStrategy가 새로운 로그인 요청에 대한 알림을 받는다.SecurityContextHolder에Authentication가 설정된다.RememberMeService의loginSuccess메소드를 실행한다. (remember me가 구성되지 않은 경우 작동되지 않는다.)ApplicationEventPublisher에서InteractiveAuthenticationSuccessEvent이벤트를 발행한다.- 일반적으로
SimpleUrlAuthenticationSuccessHandler가 호출되며, 로그인 후 리디렉션 되는 페이지는ExceptionTranslationFilter에 의해 저장된 URL이다.
*참고
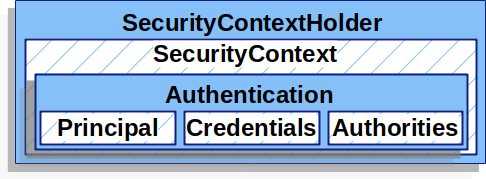
- SecurityContextHolder 구조
- SessionAuthenticationStrategy
인증이 발생할 때 HttpSession 관련 동작에 대한 플러그형 지원(pluggable support)을 제공한다. 세션이 존재하는지 확인하거나 세션 고정 공격(session-fixation attack)을 방지하기 위해 세션 ID를 변경하는 것이 일반적인 동작이다.
2. OAuth 2.0
-
사전 작업
- Google, GitHub 등의 OAuth 2.0을 제공하는 사이트에서
리디렉션 URI를 설정하고client-id,client-secret-key를 발급받는다. - 이 때,
리디렉션 URI는 기본적으로{baseUrl}/login/oauth2/code/{registrationId}이다. (ex. 로컬 Spring boot 서버에 Google OAuth 2.0 로그인을 적용하는 경우 :localhost:8080/login/oauth2/code/google) - 또한, Spring Boot 2.x 버전 부터는 위의
리디렉션 URI를 기본적으로 제공하고 있기 때문에 따로 구현할 필요는 없다.
- Google, GitHub 등의 OAuth 2.0을 제공하는 사이트에서
-
Spring boot에 적용
application.yml파일에client-id,client-secret-key를 기재한다.WebSecurityConfigurerAdapter클래스에서OAuth 2.0 Login을 활성화한다.
#application.yml
spring:
  security:
    oauth2:
      client:
        registration:
          google:
            client-id: {google-client-id}
            client-secret: {google-client-secret}
// OAuth2LoginSecurityConfig.java
@EnableWebSecurity
public class OAuth2LoginSecurityConfig extends WebSecurityConfigurerAdapter {
@Override
protected void configure(HttpSecurity http) throws Exception {
http
.authorizeHttpRequests(authorize -> authorize
.anyRequest().authenticated()
)
.oauth2Login(withDefaults());
}
}*참고
- Spring boot - OAuth 2.0 구현 예제 (swchoi.log - 스프링 시큐리티와 OAuth 2.0으로 로그인 기능 구현)
3. Remember Me
Remember Me 기능은 로그인 시 쿠키를 브라우저에 전송하고, 이후 웹사이트 재방문 시 발급된 쿠키를 발견하여 자동으로 로그인을 하는 기능이다.
그리고 이 기능은 UserDetailsService 클래스가 구현되어 있어야 작동한다.
- 기본 설정
<!-- login.html -->
<form action="/login" method="POST">
  ...
  <input type="checkbox" name="remember-me">
</form>
// WebSecurityConfig.java
@EnableWebSecurity
public class WebSecurityConfig extends WebSecurityConfigurerAdapter {
@Override
protected void configure(HttpSecurity http) throws Exception {
http
.rememberMe()
.rememberMeParameter("remember-me") // 기본값, remember-me 기능 사용 여부를 입력하는 input 태그의 name을 적어주면 된다.
.tokenValiditySeconds(3600) // remember-me 쿠키 유효 기간
}
}login form에서 체크박스 형태로 remember-me 사용 여부를 받아온 뒤, UsernamePasswordAuthenticationFilter 에서 remember-me 쿠키 를 발견하면 RememberMeServices 를 적시에 호출해 자동으로 로그인하게 된다.