GPT-5.6 Programmatic Tool Calling: Agent가 Tool 호출을 코드로 묶기 시작했다
GPT-5.6 Programmatic Tool Calling: Agent가 Tool 호출을 코드로 묶기 시작했다
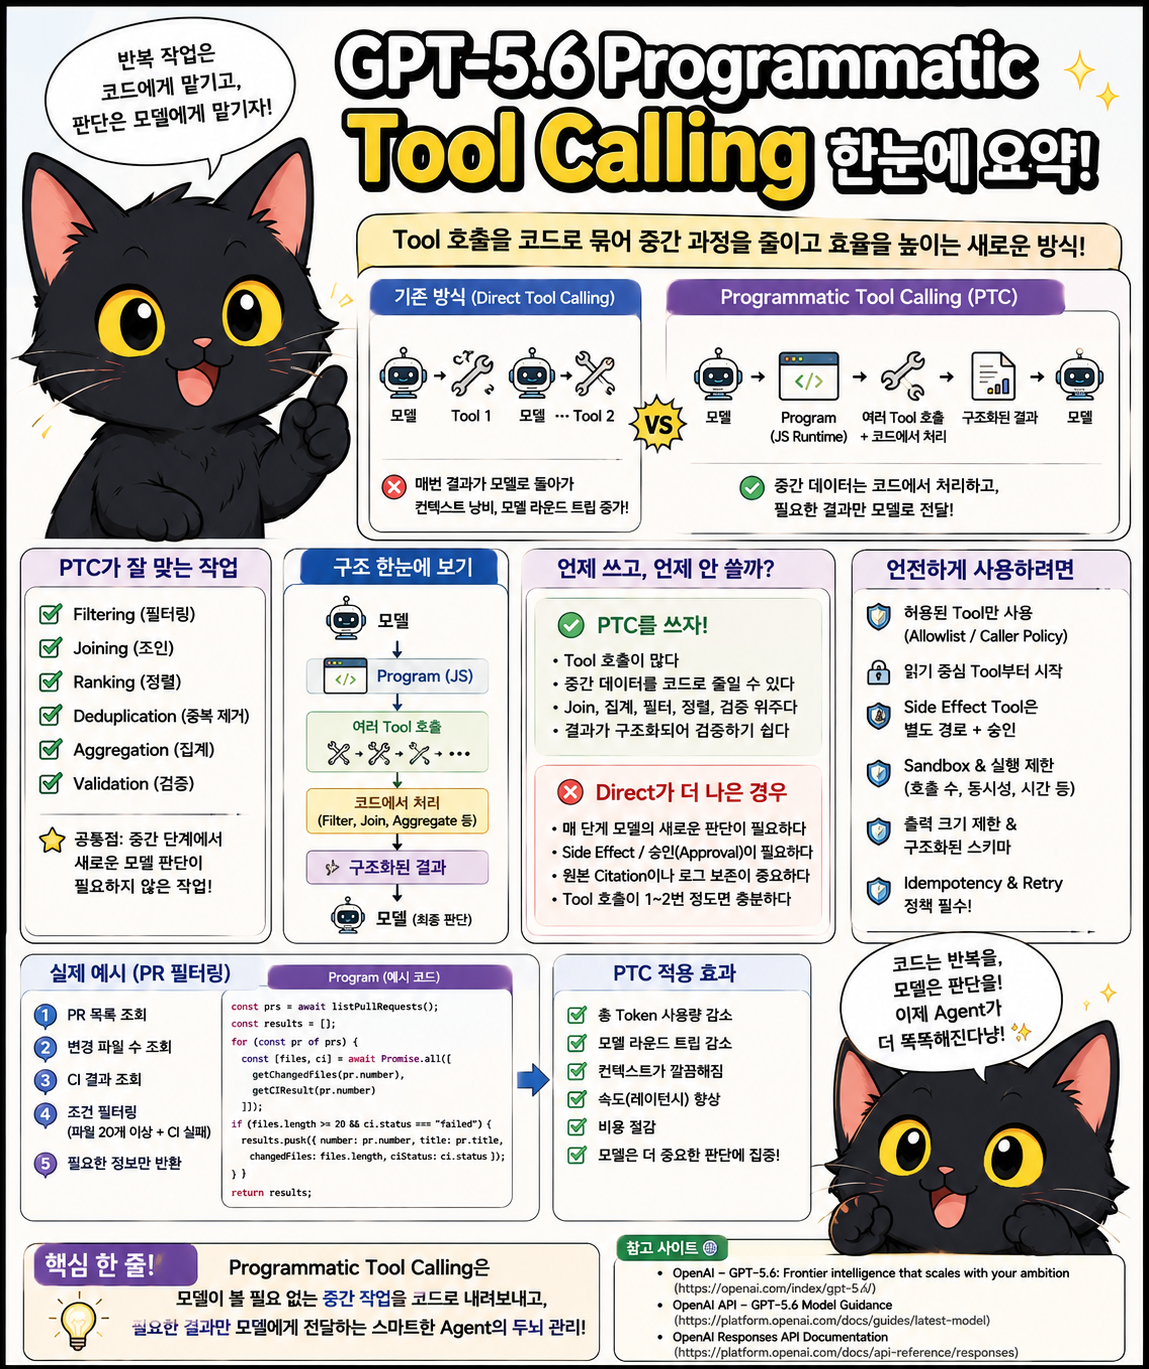
AI Agent를 만들다 보면 생각보다 많은 비용이 Tool 호출 사이에서 발생한다.
예를 들어 Repository에서 여러 파일을 조사하고 테스트 결과를 모아야 하는 Agent가 있다고 하자.
기존 방식은 대략 이렇다.
Model

→ search_files()

→ 결과를 Model에게 전달

→ read_file()

→ 결과를 Model에게 전달

→ read_file()

→ 결과를 Model에게 전달

→ run_test()

→ 결과를 Model에게 전달

→ 로그 분석

→ 다음 Tool 결정
Tool을 한 번 사용할 때마다 결과가 다시 모델 Context로 들어온다.
그리고 모델은 그 결과를 읽고 다음 Tool을 결정한다.
작업이 작으면 문제없다.
하지만 Tool 호출이 수십 번으로 늘어나면 상황이 달라진다.
Tool Result
→ Model
→ Tool Result
→ Model
→ Tool Result
→ Model
→ Tool Result
→ Model
중간 결과가 계속 Context를 차지한다.
Model Round Trip도 늘어난다.
특히 Tool이 큰 JSON이나 검색 결과를 반환하면 실제 최종 답변에는 필요하지 않은 데이터까지 모델이 계속 읽게 된다.
GPT-5.6에서 OpenAI가 새롭게 밀고 있는 Programmatic Tool Calling은 바로 이 부분을 바꾼다.
이제 Agent가 Tool을 하나 호출하고 다시 모델로 돌아오는 대신, 작은 JavaScript 프로그램을 작성해 여러 Tool을 호출하고 결과를 코드에서 처리할 수 있다.
구조가 이렇게 바뀐다.
기존

Model
→ Tool
→ Model
→ Tool
→ Model
→ Tool
→ Model
Programmatic Tool Calling을 사용하면
Model
↓
Program
├── Tool
├── Tool
├── Tool
├── Filter
├── Join
├── Aggregate
└── Result
↓
Model
이 된다.
Tool 호출 사이에서 모델이 매번 개입할 필요가 없는 것이다.
이번 글에서는 GPT-5.6의 Programmatic Tool Calling이 왜 등장했는지부터 실제 Agent Runtime에 어떻게 적용할 수 있는지까지 정리해본다.
1. Programmatic Tool Calling이 뭔가
OpenAI 공식 설명을 단순하게 정리하면 다음과 같다.
GPT-5.6이 JavaScript 프로그램을 작성하고

그 프로그램 안에서 허용된 Tool들을 호출하며

중간 결과를 처리하고

필요한 결과만 다시 모델에게 전달하는 방식
핵심은 Tool을 호출하는 주체가 중간 단계에서는 모델이 아니라 프로그램이 될 수 있다는 것이다.
예를 들어 이런 Tool이 있다고 하자.
listPullRequests()

getPullRequest()

getChangedFiles()

getCIResult()
기존 Agent라면 Pull Request 100개를 조사할 때 이런 식으로 동작할 수 있다.
Model

→ listPullRequests()

→ 100개 결과 읽기

→ PR #101 확인

→ getPullRequest(101)

→ 결과 읽기

→ PR #102 확인

→ getPullRequest(102)

→ 결과 읽기

...
하지만 실제 목적이
CI가 실패했고
변경 파일이 20개 이상인 PR만 찾아라.
라면 모델이 100개 PR의 모든 세부 내용을 읽을 필요가 없다.
Programmatic Tool Calling에서는 작은 프로그램이 중간 처리를 담당한다.
개념적으로는 이런 형태다.
const pullRequests = await listPullRequests();

const results = [];

for (const pr of pullRequests) {
  const [files, ci] = await Promise.all([
    getChangedFiles(pr.number),
    getCIResult(pr.number)
  ]);

  if (files.length >= 20 && ci.status === "failed") {
    results.push({
      number: pr.number,
      title: pr.title,
      changedFiles: files.length,
      ciStatus: ci.status
    });
  }
}

return results;
모델에게 돌아가는 것은 최종적으로 필터링된 몇 개의 PR뿐이다.
2. 왜 이게 중요한가
처음 보면 이렇게 생각할 수 있다.
그냥 서버 코드에서 처리하면 되는 것 아닌가?맞다.
기존에도 개발자가 직접 이런 Orchestration 코드를 만들 수 있었다.
차이는 매 작업마다 필요한 Tool 조합과 처리 로직이 달라질 수 있다는 것이다.
기존에는 개발자가 Workflow를 미리 작성해야 했다.
async function inspectPullRequests() {
  ...
}
하지만 Agent 환경에서는 사용자 요청이 계속 달라진다.
오늘은
CI 실패 PR만 찾아줘.내일은
30일 이상 열린 PR 중
리뷰가 없는 것만 찾아줘.
다음에는
Security 관련 파일을 수정한 PR 중
테스트가 없는 것만 찾아줘.
가 될 수 있다.
모든 조합을 개발자가 미리 코드로 만들기 어렵다.
Programmatic Tool Calling은 이 중간 영역을 모델에게 맡긴다.
개발자

Tool Interface 제공
↓
Model

필요한 Program 생성
↓
Program

Tool Orchestration
↓
Model

최종 판단
3. 기존 Tool Calling에서 가장 비싼 부분
Tool 자체보다 중간 결과를 모델에게 반복해서 전달하는 과정이 문제일 때가 많다.
예를 들어 Tool이 다음 데이터를 반환한다고 하자.
[
  {
    "id": 1001,
    "repository": "ios-app",
    "title": "Fix login flow",
    "author": "kim",
    "status": "open",
    "changedFiles": 8,
    "comments": [...],
    "labels": [...],
    "checks": [...],
    "commits": [...],
    "reviewers": [...]
  }
]
이런 데이터가 500개라면 상당한 Context가 된다.
하지만 실제로 필요한 필드가
id
title
status
changedFiles
뿐일 수도 있다.
기존 구조에서는 모델이 전체 데이터를 받은 뒤 필요한 필드를 골랐다.
Large Tool Output

↓️

Model

↓️

필터링
PTC에서는 모델에게 전달되기 전에 처리한다.
Large Tool Output

↓️

Program

Filter
Map
Sort
Join

↓️

Small Structured Result

↓️

Model
이 차이가 크다.
4. OpenAI가 권장하는 PTC 작업 형태
Programmatic Tool Calling은 모든 Tool 작업에 쓰는 기능이 아니다.
OpenAI 공식 가이드는 특히 다음 종류의 작업에 잘 맞는다고 설명한다.
Filtering

Joining

Ranking

Deduplication

Aggregation

Validation
공통점이 있다.
중간 단계에서 새로운 모델 판단이 반드시 필요하지 않은 작업이다.
예를 들어
최근 30일 PR 조회
↓
CI 실패만 필터링
↓
작성자별 집계
↓
실패 횟수 순으로 정렬
은 대부분 코드로 처리할 수 있다.
반면
이 PR이 보안상 위험한가?는 단순 필터가 아니라 의미 판단이 필요하다.
이 경우 모델이 다시 개입해야 한다.
5. 핵심 기준은 "중간 판단이 필요한가"
PTC 적용 여부를 가장 쉽게 판단하는 질문이 있다.
Tool 결과를 하나 받을 때마다
모델이 새롭게 판단해야 하는가?
YES라면 Direct Tool Calling이 적합하다.
Tool

→ 결과

→ Model 판단

→ 다음 Tool 선택
NO라면 PTC 후보다.
Tool

→ 결과

→ Code 처리

→ 다음 Tool

→ Code 처리

→ 요약 결과

→ Model
예를 들어 다음 작업은 PTC에 잘 맞는다.
Repository 100개에서
최근 24시간 실패 Build를 모두 조회하고

중복 Commit을 제거한 뒤

Branch별 실패 횟수를 집계해라.
하지만 다음 작업은 다르다.
각 Build 실패 로그를 읽고
실패 원인을 추론한 다음
다음에 어떤 로그를 조사해야 할지 판단해라.
각 로그를 읽은 뒤 판단이 달라질 수 있다.
Direct Tool Calling 쪽이 더 자연스럽다.
6. Agent Runtime은 이렇게 달라진다
기존 Runtime이 다음 구조였다고 하자.
Agent Runtime

Model
↓
Tool Call
↓
Tool Executor
↓
Tool Result
↓
Model
PTC를 넣으면 한 계층이 추가된다.
Agent Runtime

Model
↓
Program
↓
Hosted Runtime
↓
Tool Calls
↓
Intermediate Processing
↓
Program Output
↓
Model
그래서 Runtime에서 새로운 Output Type을 처리해야 한다.
대략 다음 세 가지가 중요하다.
program

function call

program_output
OpenAI 공식 가이드도 PTC를 적용할 때 Application이 이 출력들을 처리하고 call_id와 caller 관계를 유지해야 한다고 설명한다.
7. Tool을 아무거나 Program에서 호출할 수 있는 것은 아니다
이 부분은 매우 중요하다.
Programmatic Tool Calling을 켰다고 해서 프로그램이 등록된 모든 Tool을 마음대로 호출하게 두면 안 된다.
PTC에서 사용할 Tool을 명시적으로 허용한다.
개념적으로는
Tool

search_repository
allowed_callers:
  - programmatic_tool_calling
처럼 설정한다.
즉 Tool에는
누가 호출할 수 있는가라는 권한 개념이 생긴다.
이걸 Runtime에서는 Tool Policy로 관리하는 편이 좋다.
type ToolPolicy = {
  name: string;
  allowedCallers: Array<
    "model" |
    "programmatic_tool_calling"
  >;
};
예를 들어
const tools: ToolPolicy[] = [
  {
    name: "search_repository",
    allowedCallers: [
      "model",
      "programmatic_tool_calling"
    ]
  },
  {
    name: "read_file",
    allowedCallers: [
      "model",
      "programmatic_tool_calling"
    ]
  },
  {
    name: "deploy_production",
    allowedCallers: [
      "model"
    ]
  }
];
Production Deploy 같은 Tool은 Programmatic 실행 경로에서 제외한다.
8. 읽기 Tool과 쓰기 Tool을 구분한다
PTC에서는 특히 Side Effect가 있는 Tool을 신중하게 다뤄야 한다.
예를 들어 다음 Tool들은 비교적 안전하다.
list_files
read_file
search_code
get_build_result
get_pull_request
read_logs
반면 다음 Tool은 위험하다.
delete_file
merge_pull_request
deploy
send_email
purchase
create_user
rotate_secret
Program이 반복문에서 잘못 실행되면 사고 범위가 커질 수 있다.
예를 들어
for (const repo of repositories) {
  await deleteRepository(repo.id);
}
같은 코드가 만들어지면 문제가 심각하다.
그래서 기본 정책을 이렇게 두는 것이 좋다.
Programmatic Tool Calling

READ
→ 허용

LOCAL COMPUTE
→ 허용

SAFE VALIDATION
→ 허용

EXTERNAL WRITE
→ Direct Tool + Approval

DESTRUCTIVE
→ Human Approval
9. 실제 Agent Tool을 만들어보자
예제로 Repository 분석 Agent를 만든다고 하자.
Tool은 세 개다.
searchFiles

readFile

getTestResults
TypeScript Interface는 다음처럼 만들 수 있다.
type SearchFilesRequest = {
  query: string;
};

type SearchFileResult = {
  path: string;
  score: number;
};

type ReadFileRequest = {
  path: string;
};

type ReadFileResult = {
  path: string;
  content: string;
};

type TestResultRequest = {
  target: string;
};

type TestResult = {
  target: string;
  status: "passed" | "failed" | "not_run";
  durationMs: number;
};
중요한 것은 Tool Output 구조가 명확해야 한다는 것이다.
PTC Program은 Tool의 반환 형태를 알고 코드를 작성해야 하기 때문이다.
10. Tool Description도 더 정확해야 한다
PTC에서는 Tool 이름만 잘 짓는 것으로 부족하다.
예를 들어
search()같은 Tool은 좋지 않다.
무엇을 반환하는지 알기 어렵다.
대신
search_repository_files같이 목적을 명확하게 만든다.
Tool 설명도
Repository에서 파일을 검색합니다.보다
Search repository file paths by keyword.

Returns:
- path: repository-relative file path
- score: relevance score from 0 to 1

Does not return file contents.
처럼 반환 구조와 제한을 알려주는 편이 좋다.
OpenAI도 PTC에서는 모델이 프로그램을 작성하기 전에 Tool 반환 형태를 이해할 수 있어야 한다고 설명한다.
반환 구조를 알 수 없다면 Direct Tool Calling을 사용하는 편이 낫다.
11. PTC가 필요한 작업을 하나 만들어보자
다음 요구사항이 있다고 하자.
프로젝트에서 Auth 관련 Swift 파일을 찾고

각 파일의 크기를 조사한 뒤

500줄 이상인 파일만 추려서

가장 큰 순서대로 10개를 알려줘.
기존 Agent는 이런 식으로 움직일 수 있다.
searchFiles("Auth")

↓️

Model

↓️

readFile(file1)

↓️

Model

↓️

readFile(file2)

↓️

Model

...
파일이 100개면 매우 비효율적이다.
PTC에서는 다음과 같은 Program을 생성할 수 있다.
const files = await search_repository_files({
  query: "Auth"
});

const results = [];

for (const file of files) {
  const data = await read_file({
    path: file.path
  });

  const lines = data.content.split("\n").length;

  if (lines >= 500) {
    results.push({
      path: file.path,
      lines
    });
  }
}

results.sort((a, b) => b.lines - a.lines);

return results.slice(0, 10);
모델은 마지막 10개만 받으면 된다.
12. 독립 Tool은 병렬로 실행할 수 있다
위 예제에서 각 파일 읽기는 서로 의존하지 않는다.
따라서 병렬화할 수 있다.
const files = await search_repository_files({
  query: "Auth"
});

const results = await Promise.all(
  files.map(async file => {
    const data = await read_file({
      path: file.path
    });

    return {
      path: file.path,
      lines: data.content.split("\n").length
    };
  })
);

return results
  .filter(item => item.lines >= 500)
  .sort((a, b) => b.lines - a.lines)
  .slice(0, 10);
이 경우
100 files

순차 호출
→ 100번 대기

병렬 호출
→ 여러 요청 동시 실행
이 가능하다.
하지만 무조건 Promise.all()을 쓰게 해서는 안 된다.
Tool Server가 감당할 수 있는 Concurrency를 제한해야 한다.
13. Concurrency Limit을 둔다
실제 Runtime에서는 다음처럼 제한한다.
type ProgramPolicy = {
  maxToolCalls: number;
  maxConcurrency: number;
  timeoutMs: number;
  maxRetries: number;
};
예를 들어
const policy: ProgramPolicy = {
  maxToolCalls: 100,
  maxConcurrency: 5,
  timeoutMs: 30_000,
  maxRetries: 1
};
Program에게도 같은 조건을 알려준다.
Maximum tool calls: 100
Maximum concurrent calls: 5
Transient retry: 1
Timeout: 30 seconds
이 제한이 없으면 Program이 예상보다 많은 Tool을 호출할 수 있다.
14. PTC Prompt에는 작업 범위를 정확히 쓴다
OpenAI는 단순히
Programmatic Tool Calling을 효율적으로 사용해.라고 지시하는 방식을 권장하지 않는다.
어느 단계에서 PTC를 사용할지 명확히 정의한다.
예를 들어
Use Programmatic Tool Calling only for repository discovery.

Allowed tools:

- search_repository_files
- read_file

Find Swift files related to authentication.

For each file calculate:

- path
- lineCount

Return only files with 500 or more lines.

Sort descending by lineCount.

Maximum tool calls: 100.
Maximum concurrency: 5.
Do not modify files.

After discovery, return the structured result to the model.
Use direct model reasoning for the final architecture recommendation.
이런 구조가 좋다.
핵심은 PTC가 어디에서 끝나는지도 알려주는 것이다.
15. Program Output을 Schema로 고정한다
중간 결과를 자연어로 반환하게 만들 필요가 없다.
가능하면 구조화한다.
예를 들어
type LargeAuthFile = {
  path: string;
  lineCount: number;
};

type DiscoveryResult = {
  files: LargeAuthFile[];
  scannedFileCount: number;
};
Program Output은
{
  "files": [
    {
      "path": "Sources/Auth/AuthManager.swift",
      "lineCount": 812
    },
    {
      "path": "Sources/Auth/LoginCoordinator.swift",
      "lineCount": 611
    }
  ],
  "scannedFileCount": 43
}
처럼 만든다.
이 데이터를 Model이 받아 Architecture 판단을 한다.
16. PTC와 Typed Contract를 같이 쓰면 좋다
Program Output도 Agent 간 Contract처럼 검증할 수 있다.
예를 들어 Zod를 사용한다.
import { z } from "zod";

const DiscoveryResultSchema = z.object({
  files: z.array(
    z.object({
      path: z.string(),
      lineCount: z.number().int().nonnegative()
    })
  ),
  scannedFileCount: z.number().int().nonnegative()
});

type DiscoveryResult =
  z.infer<typeof DiscoveryResultSchema>;
PTC 결과가 들어오면
const result =
  DiscoveryResultSchema.parse(programOutput);
처럼 검증한다.
이렇게 하면
Program

→ Tool

→ Program Output

→ Schema Validation

→ Model
구조가 된다.
17. 중간 결과를 모두 Model에게 보내지 않는다
이게 PTC를 쓰는 가장 큰 이유다.
예를 들어 Dependency Scanner 결과가 1만 건이라고 하자.
10,000 Vulnerabilities최종 목표가
critical 또는 high 등급이면서
현재 Production dependency에 포함된 항목만 찾아라.
라면 Program에서 필터링한다.
const vulnerabilities =
  await scan_dependencies();

const productionPackages =
  await list_production_dependencies();

const productionNames =
  new Set(
    productionPackages.map(item => item.name)
  );

return vulnerabilities
  .filter(item =>
    ["critical", "high"].includes(item.severity)
  )
  .filter(item =>
    productionNames.has(item.package)
  );
1만 건 전체가 아니라 수십 건만 Model로 올라온다.
18. Join 작업에도 특히 좋다
Agent Tool이 여러 시스템을 연결할 때 흔히 Join이 필요하다.
예를 들어
GitHub PR

+

Jira Issue

+

CI Result
를 연결한다고 하자.
기존에는 세 결과를 모두 Model에게 보낼 수 있다.
PTC에서는 코드로 합친다.
const pullRequests =
  await list_pull_requests();

const results = [];

for (const pr of pullRequests) {
  const issue =
    await get_issue({
      key: pr.issueKey
    });

  const ci =
    await get_ci_status({
      sha: pr.headSha
    });

  results.push({
    pr: pr.number,
    issue: issue.key,
    priority: issue.priority,
    ciStatus: ci.status
  });
}

return results;
모델은 통합된 결과만 받는다.
19. Deduplication도 모델에게 시킬 필요가 없다
예를 들어 여러 Source에서 동일 Incident가 들어온다고 하자.
Sentry
Datadog
CloudWatch
세 Tool 결과를 그대로 Model에게 주면 같은 장애를 여러 건으로 판단할 수 있다.
Program에서 먼저 중복을 제거한다.
const events = [
  ...(await get_sentry_events()),
  ...(await get_datadog_events()),
  ...(await get_cloudwatch_events())
];

const unique = new Map();

for (const event of events) {
  const key =
    `${event.service}:${event.errorCode}`;

  if (!unique.has(key)) {
    unique.set(key, event);
  }
}

return [...unique.values()];
이런 deterministic 작업은 모델 reasoning을 소비할 이유가 거의 없다.
20. Aggregation도 대표적인 활용처다
예를 들어 QA Agent가 지난 일주일 테스트 결과를 분석한다고 하자.
Raw Data는 수천 건이다.
Test Run

Test Case

Duration

Result

Device

OS Version
모델이 전부 읽는 대신 Program이 먼저 집계한다.
const runs = await get_test_runs({
  days: 7
});

const summary = {};

for (const run of runs) {
  const key = run.testName;

  if (!summary[key]) {
    summary[key] = {
      passed: 0,
      failed: 0
    };
  }

  summary[key][run.status]++;
}

return summary;
모델은
어떤 테스트가 flaky한지같은 의미 판단에 집중한다.
21. 코드가 잘하는 것과 모델이 잘하는 것을 분리한다
PTC의 핵심을 한 문장으로 정리하면 이렇다.
Code가 잘하는 일은 Code에게 맡기고

Model이 필요한 곳에서만 Model을 사용한다.
코드가 잘하는 것은 다음과 같다.
Filter

Sort

Map

Join

Count

Aggregate

Deduplicate

Exact Validation
모델이 잘하는 것은 다음과 같다.
의미 해석

불완전한 정보 판단

우선순위 결정

위험 평가

Architecture 판단

다음 행동 선택
둘을 섞지 않는 것이 좋다.
22. 모든 Multi-Tool 작업에 PTC를 쓰면 안 된다
Tool 호출이 많다고 무조건 PTC를 쓰는 것은 아니다.
OpenAI 공식 가이드에서도
Multiple calls
Parallel calls
Dependent calls
자체만으로 PTC를 선택할 이유가 되지는 않는다고 설명한다.
예를 들어 다음 작업을 보자.
로그를 읽고 원인을 판단한다.

판단 결과에 따라

Database를 볼지

Network Trace를 볼지

App Log를 볼지 결정한다.
여기서는 매 단계 모델 판단이 필요하다.
Log

↓️

Model 판단

↓️

Network Trace

↓️

Model 판단

↓️

Database

↓️

Model 판단
PTC로 억지로 묶을 필요가 없다.
23. 한 번의 Tool Call이면 그냥 Direct로 쓴다
다음 작업도 PTC가 필요 없다.
현재 Build 상태를 알려줘.Tool 하나면 된다.
Model

→ get_build_status()

→ Model
이걸
Model

→ JavaScript Program 생성

→ Program

→ get_build_status()

→ program_output

→ Model
로 만드는 것은 오히려 복잡하다.
24. Approval이 필요한 작업도 Direct가 낫다
예를 들어
Production 배포작업이 있다.
Program 안에서 자동으로
await deploy_production();을 실행하게 만들고 싶지 않다.
구조를 이렇게 나눈다.
PTC

Deploy 후보 계산
↓
Artifact

{
  version,
  environment,
  checks
}

↓
Model

배포 요청 생성
↓
Human Approval
↓
Direct Tool Call

deploy_production()
PTC는 자료 수집과 검증까지만 담당한다.
실제 Side Effect는 별도 경로로 둔다.
25. Citation이나 원본 Artifact가 중요한 경우도 주의한다
OpenAI는 최종 결과가 원본 Citation이나 Native Artifact를 유지해야 하는 경우 Direct Tool Calling을 선호할 수 있다고 설명한다.
Program에서 중간 결과를 변환하다 보면
원본 Tool Result

→ 변환

→ 요약

→ 필터

→ Program Output
과정에서 Provenance가 사라질 수 있기 때문이다.
그래서 PTC Output에 Evidence를 포함시키는 것이 좋다.
예를 들어
type Evidence = {
  sourceId: string;
  tool: string;
  recordId: string;
};

type Finding = {
  message: string;
  evidence: Evidence[];
};
Program Output을
{
  "message": "CI 실패율이 가장 높은 branch는 feature/auth입니다.",
  "evidence": [
    {
      "tool": "get_ci_runs",
      "recordId": "run-18291",
      "sourceId": "github-actions"
    }
  ]
}
처럼 만든다.
26. Program에도 Idempotency가 필요하다
Agent Runtime에서는 같은 Program이 Retry될 수 있다.
예를 들어 네트워크 오류가 발생하면 Runtime이 다시 실행할 수 있다.
Read Tool이라면 큰 문제가 없지만 Write Tool이면 위험하다.
create_issue()

Retry

create_issue()

Retry

create_issue()
Issue가 세 개 생길 수 있다.
그래서 Side Effect Tool에는 requestId를 둔다.
type CreateIssueRequest = {
  requestId: string;
  title: string;
  body: string;
};
Tool Server는 이미 처리한 requestId면 기존 결과를 반환한다.
requestId

→ 이미 처리됨

→ duplicate execution 방지
PTC에서 Write Tool을 허용해야 한다면 필수에 가깝다.
27. Retry도 Program 안에서 무한히 하면 안 된다
잘못된 예:
while (true) {
  try {
    return await get_build_result();
  } catch {
    // retry forever
  }
}
Agent는 끝나지 않는다.
Retry 횟수를 제한한다.
async function retry(fn, maxRetries = 2) {
  let lastError;

  for (
    let attempt = 0;
    attempt <= maxRetries;
    attempt++
  ) {
    try {
      return await fn();
    } catch (error) {
      lastError = error;
    }
  }

  throw lastError;
}
그리고 Runtime에서도 상한을 둔다.
Program Retry
≤ 2

Tool Retry
≤ 2

Agent Retry
≤ 1
여러 계층에서 Retry가 곱해지지 않게 해야 한다.
28. Tool Call Budget를 둔다
PTC는 프로그램이 Tool을 반복 호출할 수 있기 때문에 Budget가 중요하다.
type ToolBudget = {
  maxCalls: number;
  maxConcurrentCalls: number;
  maxDurationMs: number;
};
예를 들어
{
  "maxCalls": 50,
  "maxConcurrentCalls": 5,
  "maxDurationMs": 60000
}
같은 제한을 둔다.
Program이 50개를 넘으면 중단한다.
TOOL_BUDGET_EXCEEDED라는 구조화 오류를 반환하면 된다.
29. Program Output 크기도 제한한다
PTC의 목적은 중간 Context를 줄이는 것이다.
그런데 Program이 결과를 이렇게 반환하면 의미가 없다.
원본 결과 100MB

→ Program

→ 원본 결과 99MB 반환
그래서 Output Contract에 제한을 둔다.
Maximum findings: 50

Maximum evidence per finding: 3

Do not return raw logs.

Do not return complete file contents.

Return repository-relative paths only.
이런 정책이 필요하다.
30. 실패도 구조화한다
Program이 필요한 데이터를 얻지 못했을 때 자연어로
뭔가 잘 안 됐습니다.라고 반환하면 Runtime이 처리하기 어렵다.
실패 Schema를 만든다.
type ProgramFailure = {
  status: "failed";
  code:
    | "TOOL_TIMEOUT"
    | "TOOL_BUDGET_EXCEEDED"
    | "MISSING_REQUIRED_DATA"
    | "INVALID_TOOL_RESULT";

  message: string;
  retryable: boolean;
};
성공도 명확하게 둔다.
type ProgramSuccess<T> = {
  status: "success";
  data: T;
};
결과는
type ProgramResult<T> =
  | ProgramSuccess<T>
  | ProgramFailure;
로 처리한다.
31. Agent Runtime 폴더 구조
실제로 만든다면 다음 정도가 좋다.
src/
├── agent/
│   └── AgentRuntime.ts
│
├── orchestration/
│   ├── ToolRouter.ts
│   ├── ProgramPolicy.ts
│   ├── ProgramResult.ts
│   └── ExecutionBudget.ts
│
├── tools/
│   ├── repository/
│   │   ├── searchFiles.ts
│   │   └── readFile.ts
│   │
│   ├── github/
│   │   ├── listPullRequests.ts
│   │   └── getCIResult.ts
│   │
│   └── ToolRegistry.ts
│
├── contracts/
│   ├── DiscoveryResult.ts
│   └── ProgramFailure.ts
│
└── eval/
    └── ToolCallingEval.ts
Tool Registry에는 PTC 가능 여부를 둔다.
type RegisteredTool = {
  name: string;

  sideEffect:
    | "none"
    | "local"
    | "external";

  programmaticAllowed: boolean;

  requiresApproval: boolean;
};
예를 들어
const registry: RegisteredTool[] = [
  {
    name: "read_file",
    sideEffect: "none",
    programmaticAllowed: true,
    requiresApproval: false
  },
  {
    name: "run_tests",
    sideEffect: "local",
    programmaticAllowed: true,
    requiresApproval: false
  },
  {
    name: "merge_pull_request",
    sideEffect: "external",
    programmaticAllowed: false,
    requiresApproval: true
  }
];
32. PTC Policy를 별도 파일로 관리한다
Policy를 Prompt 안에 흩어놓지 않는다.
programmaticToolCalling:

  enabled: true

  limits:
    maxToolCalls: 50
    maxConcurrency: 5
    timeoutSeconds: 60
    maxRetries: 1

  allowedTools:
    - search_repository_files
    - read_file
    - get_test_results
    - list_pull_requests
    - get_ci_status

  deniedTools:
    - deploy_production
    - merge_pull_request
    - delete_repository
    - rotate_secret

  output:
    maxItems: 50
    requireEvidence: true
Runtime은 이 Policy를 읽는다.
33. Tool Allowlist가 특히 중요하다
Agent에게 Tool 40개가 등록되어 있다고 하자.
그렇다고 Program이 40개 모두를 볼 필요는 없다.
현재 작업에 필요한 Tool만 노출한다.
예를 들어 Repository 분석이라면
search_repository_files
read_file
get_test_results
세 개만 허용한다.
이전 Context Engineering 글에서 이야기한 것과 같은 원칙이다.
모든 Tool을 항상 제공

X

필요한 Tool만 제공

O
Tool Description 자체도 Context를 사용하기 때문이다.
34. PTC와 MCP는 경쟁 관계가 아니다
여기서 MCP와 헷갈릴 수 있다.
MCP는
Agent
→ Tool
연결을 표준화한다.
PTC는
Tool들을 어떻게 호출하고
중간 결과를 어떻게 처리할지
에 관한 실행 방식이다.
둘은 같이 쓸 수 있다.
GPT-5.6

↓️

Programmatic Tool Calling

↓️

Program

↓️

MCP Tools

├── GitHub MCP
├── Database MCP
├── Xcode MCP
└── Internal MCP
MCP Tool이 PTC에서 호출 가능한 형태로 노출된다면 Program에서 여러 Tool을 조율할 수 있다.
즉
MCP
= Tool 연결 계층

PTC
= Tool Orchestration 전략
으로 보면 이해하기 쉽다.
35. A2A와도 역할이 다르다
A2A는
Agent
→ Agent
연결이다.
PTC는 한 Agent 안에서 Tool 호출을 최적화하는 쪽에 가깝다.
예를 들어
Developer Agent

↓️ A2A

Security Agent
Security Agent 내부에서는
PTC

↓️

Dependency Scanner
SAST
GitHub
Policy Database
를 묶어 사용할 수 있다.
전체 구조는 이렇게 된다.
Developer Agent

↓ A2A

Security Agent

↓ PTC

Program

├── SAST Tool
├── Dependency Tool
├── GitHub Tool
└── Policy Tool
서로 다른 문제를 해결한다.
36. Multi-Agent와도 구분해야 한다
GPT-5.6에는 Multi-Agent beta도 있다.
PTC와 Multi-Agent도 다르다.
PTC:
하나의 Model

→ Program

→ 여러 Tool
Multi-Agent:
Coordinator

├── Agent A
├── Agent B
├── Agent C
└── Agent D
PTC는 deterministic한 중간 처리에 강하다.
Multi-Agent는 서로 독립된 복잡한 사고 작업을 병렬화할 때 적합하다.
예를 들어
100개 로그에서
errorCode별 개수 집계

→ PTC
네 가지 Architecture 후보를
독립적으로 검토
→ Multi-Agent라고 생각하면 쉽다.
37. PTC를 Subagent 대체제로 쓰지 않는다
PTC의 Program은 일반 Agent가 아니다.
JavaScript가 잘하는 일을 담당한다.
Program

→ 계산
→ 필터
→ 반복
→ 병렬 호출
→ 집계
Subagent는
Agent

→ 판단
→ 추론
→ 계획
→ 비판
→ 전문 분야 분석
을 담당한다.
둘을 구분해야 한다.
38. 실제 PR Review Agent 예제
조금 더 실전적인 구조를 보자.
사용자가 다음 요청을 한다.
현재 열린 PR 중에서

변경 파일이 15개 이상이고

CI가 실패했고

Security 디렉터리를 수정한 PR을 찾아서

위험한 순서대로 검토해줘.
Agent는 이걸 두 단계로 나눈다.
Stage 1 — PTC
PR 조회

→ 변경 파일 조회

→ CI 조회

→ Security 경로 검사

→ 조건 필터링
Program Output:
{
  "candidates": [
    {
      "pr": 314,
      "title": "Refactor token storage",
      "changedFiles": 22,
      "ciStatus": "failed",
      "securityFiles": [
        "Sources/Security/TokenStore.swift"
      ]
    }
  ]
}
Stage 2 — Direct Model Reasoning
이제 Model이 PR #314만 깊게 본다.
Diff 분석

Architecture 검토

Security 위험 판단

Review 작성
이게 PTC의 좋은 사용 형태다.
넓게 찾는 작업은 Program이 하고, 깊게 판단하는 작업은 Model이 한다.
39. Verification Agent에도 잘 맞는다
예를 들어 코드 수정 후 검증해야 한다.
기존에는 모델이 테스트 하나마다 결과를 읽을 수 있다.
PTC에서는
Unit Test

Integration Test

Lint

Build
를 프로그램에서 실행한 뒤 결과를 묶는다.
const [
  unit,
  integration,
  lint,
  build
] = await Promise.all([
  run_unit_tests(),
  run_integration_tests(),
  run_lint(),
  run_build()
]);

return {
  unit: unit.status,
  integration: integration.status,
  lint: lint.status,
  build: build.status
};
모델은 최종 검증 상태만 본다.
단, 실패한 경우 Raw Log가 필요할 수 있다.
그때만 필요한 Log를 추가로 읽는다.
Validation Summary

↓️

Failure 발견

↓️

Direct Model 판단

↓️

관련 로그만 조회
이런 Hybrid 구조가 좋다.
40. PTC를 쓸 때 Context Budget이 달라진다
기존 Tool Calling에서는 Context Budget을 이렇게 생각했다.
System Prompt

+ User Prompt

+ Tool Definitions

+ Tool Result 1

+ Tool Result 2

+ Tool Result 3

+ Tool Result 4
PTC에서는 중간 Tool Result 상당 부분이 Model Context에 들어오지 않아도 된다.
System Prompt

+ User Prompt

+ Tool Definitions

+ Program Output
그래서 Agent Context가 훨씬 깔끔해질 수 있다.
하지만 Tool 호출 수 자체가 공짜가 되는 것은 아니다.
Latency와 외부 API 비용은 여전히 관리해야 한다.
41. OpenAI가 공개한 실제 효과
OpenAI는 GPT-5.6 발표에서 Unity Scene 생성 Workflow에 Programmatic Tool Calling을 적용한 사례를 소개했다.
해당 고객 평가에서는 같은 GPT-5.6을 Direct Tool Calling 방식으로 사용했을 때와 비교해
총 Token 사용량

63.5% 감소
Model Turn
50.1% 감소했다고 밝혔다.
중요한 것은 이 수치를 모든 프로젝트에 그대로 적용하면 안 된다는 것이다.
Unity의 특정 Structured API Workflow에서 측정된 결과다.
우리 Agent에서도 같은 효과가 난다고 가정하면 안 된다.
PTC 적용 전후를 직접 Eval해야 한다.
42. 반드시 Direct Tool Calling과 비교한다
PTC를 도입했다면 최소한 다음을 비교해야 한다.
Task Success

Final Answer Completeness

Evidence Completeness

Total Tokens

Latency

Cost

Tool Calls

Model Turns

Retries
예를 들어 Eval 결과가
Direct

Success     96%
Tokens      50K
Latency     28s
PTC
Success 95%
Tokens 18K
Latency 15s라면 PTC가 좋은 후보가 된다.
하지만
PTC

Success     72%
Tokens      12K
라면 싸다고 좋은 구조가 아니다.
43. Program Output과 Final Answer를 따로 검증한다
이 부분도 중요하다.
Program이 정확한 데이터를 만들었는데 최종 Model Answer가 일부를 빠뜨릴 수 있다.
Program Output

정확함

↓️

Model

↓️

Final Answer

필수 필드 누락
OpenAI도 공식 가이드에서 program_output과 최종 Assistant Message를 별도로 평가하라고 권장한다.
Eval을 두 단계로 만든다.
Program Eval

→ Data 정확성

Final Answer Eval

→ 사용자 요구 충족
44. PTC 전용 Fixture를 만든다
예를 들어
.ai/
└── evals/
    └── programmatic-tools/
        ├── pr-filter.json
        ├── dependency-join.json
        ├── test-aggregation.json
        └── incident-dedup.json
Fixture는 이런 형태다.
{
  "id": "pr-filter",

  "task": "Find PRs with failed CI and more than 20 changed files.",

  "expected": {
    "prNumbers": [
      112,
      147,
      193
    ]
  }
}
같은 Dataset으로
Direct Tool Calling

vs

Programmatic Tool Calling
을 비교한다.
45. PTC Observability도 필요하다
Agent 실행 기록에 다음 값을 남긴다.
{
  "runId": "run-1932",

  "mode": "programmatic_tool_calling",

  "program": {
    "durationMs": 8412,
    "toolCalls": 37,
    "retries": 1
  },

  "model": {
    "turns": 2,
    "inputTokens": 18200,
    "outputTokens": 3100
  },

  "result": {
    "status": "completed"
  }
}
이 데이터가 있어야
PTC가 정말 도움이 됐는가?를 판단할 수 있다.
46. Program 자체도 Trace에 남긴다
최소한 다음은 기록하는 것이 좋다.
programId

runId

toolCallId

caller

toolName

duration

status
흐름은 이런 식이다.
Agent Run

traceId: abc123

↓

Program

programId: p001

↓

Tool

callId: t001

↓

Tool

callId: t002

↓

Program Output

↓

Final Model
나중에 실패했을 때 어느 단계에서 문제가 생겼는지 알 수 있다.
47. Security 관점에서 Program은 신뢰하면 안 된다
모델이 작성한 JavaScript라고 해서 안전하다고 가정하면 안 된다.
Program도 Untrusted Execution으로 취급한다.
원칙은 다음과 같다.
Network
→ 필요한 Endpoint만

Filesystem
→ 기본 차단 또는 Scoped

Secrets
→ 직접 노출 금지

Tool
→ Allowlist

Runtime
→ Sandbox

CPU
→ Limit

Memory
→ Limit

Execution Time
→ Limit
Program이 직접 Secret을 읽는 대신 Tool Server가 Credential을 가지고 작업을 수행해야 한다.
Program

→ github_get_pr()

↓️

Tool Server

→ GitHub Credential 사용
Program에는 Token을 넘기지 않는다.
48. PTC를 위한 Tool 설계 원칙
정리하면 Tool은 다음 기준이 좋다.
작고 명확한 책임

구조화된 Input

구조화된 Output

명확한 Error Type

Side Effect 명시

Idempotency

Timeout

Caller Policy
예를 들어
type ToolDefinition = {
  name: string;
  description: string;

  sideEffect:
    | "none"
    | "local"
    | "external";

  idempotent: boolean;

  programmaticAllowed: boolean;

  requiresApproval: boolean;

  timeoutMs: number;
};
Tool Description이 단순한 Prompt 설명을 넘어 Runtime Contract가 된다.
49. 처음 도입할 때는 이런 작업부터 추천한다
처음부터 Production Agent 전체를 PTC로 바꾸지 않는다.
가장 적용하기 좋은 것은 다음이다.
대량 파일 Metadata 조사

PR Filtering

CI 결과 집계

Test Result Aggregation

Dependency 분석

Log Deduplication

여러 API 결과 Join

Repository Inventory
공통점은 결과가 명확하고 자동 검증하기 쉽다는 것이다.
50. 이런 작업은 처음에는 Direct로 남긴다
Architecture 결정

Security 위험 판단

복잡한 Debugging

사용자 의도 재해석

Production 변경

결제

외부 메시지 전송

Human Approval 필요한 작업
이런 작업은 Model Judgment 또는 사람 판단이 중요하다.
51. 제가 실제 Agent Runtime을 만든다면
처음에는 세 가지 실행 모드만 둔다.
DIRECT

PROGRAMMATIC

HYBRID
DIRECT
Model
→ Tool
→ Model
PROGRAMMATIC
Model
→ Program
→ Tools
→ Program Output
→ Model
HYBRID
Model

→ Programmatic Discovery

→ Structured Result

→ Direct Reasoning

→ 필요시 Direct Tool

→ Final Result
실제 개발 Agent에서는 HYBRID가 가장 많이 쓰일 가능성이 높다.
52. Router까지 붙이면 구조가 더 좋아진다
앞 글에서 만든 Model Router와 연결할 수 있다.
이번에는 Tool Router가 추가된다.
Task

↓️

Task Profiler

↓️

Model Router
→ Luna / Terra / Sol

↓️

Tool Strategy Router

├── DIRECT
├── PROGRAMMATIC
└── HYBRID

↓️

Agent Runtime
예를 들어
파일 하나 읽기

→ DIRECT
Repository 500개 Metadata 조사
→ PROGRAMMATIC대량 로그 필터링 후 Root Cause 분석
→ HYBRID이다.
53. Tool Strategy도 규칙으로 시작하면 된다
type ToolStrategy =
  | "direct"
  | "programmatic"
  | "hybrid";

type ToolTaskProfile = {
  expectedCalls: number;
  intermediateDataSize: number;
  requiresJudgmentBetweenCalls: boolean;
  hasSideEffects: boolean;
};

function selectToolStrategy(
  task: ToolTaskProfile
): ToolStrategy {

  if (
    task.hasSideEffects ||
    task.requiresJudgmentBetweenCalls
  ) {
    return "direct";
  }

  if (
    task.expectedCalls >= 10 ||
    task.intermediateDataSize >= 3
  ) {
    return "programmatic";
  }

  return "direct";
}
그리고
대량 Discovery + 최종 판단이면 hybrid로 올린다.
정답이 아니라 시작점이다.
54. 가장 중요한 것은 "Tool 호출 수"가 아니다
PTC의 목적을
Tool 많이 호출하는 기능으로 이해하면 조금 다르다.
더 정확하게는
Model이 볼 필요 없는
중간 Tool 작업을 Code로 밀어내는 기능
에 가깝다.
핵심 질문은 이것이다.
이 중간 데이터가
다음 모델 판단에 정말 필요한가?
아니라면 Program 안에서 처리한다.
55. Agent Architecture가 바뀌기 시작한다
이전 Agent 구조는 모델 중심이었다.
Model

↓️

Tool

↓️

Model

↓️

Tool

↓️

Model
앞으로는 Runtime 안에 세 종류의 실행 주체가 생긴다.
Model
→ 판단

Program
→ deterministic orchestration

Tool
→ 실제 작업
구조는 다음처럼 된다.
             Agent Runtime
                  │
           ┌──────┴──────┐
           │             │
         Model         Program
           │             │
       Reasoning      Filtering
       Planning       Joining
       Judgment       Aggregation
           │             │
           └──────┬──────┘
                  │
                 Tools
모든 것을 LLM에게 시키지 않는 구조다.
56. 개발자가 왜 PTC를 알아야 할까
Agent 개발에서 지금까지 가장 중요한 관심사는 대체로
Prompt

Tool Calling

Context

Memory
였다.
하지만 Agent가 커질수록 Orchestration 비용이 커진다.
Tool 3개까지는 Model Loop로 충분하다.
Tool 30개, 데이터 수천 건, 여러 API Join이 시작되면 상황이 달라진다.
모델이 판단해야 하는 것

vs

코드가 처리하면 되는 것
을 나눠야 한다.
Programmatic Tool Calling은 바로 이 경계에 등장한 기능이다.
57. 마무리
GPT-5.6의 Programmatic Tool Calling은 단순히 Tool Calling API가 하나 더 추가된 기능이 아니다.
Agent Runtime에서
모든 중간 작업을 Model이 읽고 판단한다.라는 전제를 바꾸는 기능이다.
기존에는
Model

→ Tool

→ Model

→ Tool

→ Model
이었다.
이제는
Model

→ Program

→ Tool
→ Tool
→ Tool

→ Filter
→ Join
→ Aggregate

→ Structured Result

→ Model
구조를 사용할 수 있다.
잘 맞는 작업은 명확하다.
Filtering

Joining

Ranking

Deduplication

Aggregation

Validation
반대로
의미 판단

Approval

복잡한 Debugging

고위험 Side Effect

다음 행동이 매번 바뀌는 작업
은 Direct Tool Calling을 유지하는 편이 좋다.
그리고 실제 Agent에서는 둘 중 하나만 고집할 이유가 없다.
가장 현실적인 구조는
Programmatic Discovery

↓

Structured Result

↓

Model Reasoning

↓

Direct Action
인 Hybrid Agent다.
한 줄로 정리하면 이렇다.
GPT-5.6 Programmatic Tool Calling은
Tool을 더 많이 호출하는 기술이 아니라,

Model이 볼 필요 없는 Tool 작업을
Code로 내려보내는 기술이다.
Agent가 커질수록 중요한 것은 모델에게 모든 일을 맡기는 것이 아니다.
판단은 Model에게, 반복·집계·필터링은 Program에게, 실제 행동은 Tool에게 맡기는 구조를 만드는 것이다.
이 구분이 앞으로 Agent Runtime의 중요한 설계 기준이 될 가능성이 높다.
참고 자료
-
OpenAI — GPT-5.6: Frontier intelligence that scales with your ambition
GPT-5.6에서 Programmatic Tool Calling이 왜 도입됐는지, Tool-heavy Workflow에서 중간 데이터를 처리해 Model Round Trip과 Token 사용을 줄이는 방식이 소개된 공식 발표 자료. -
OpenAI API — GPT-5.6 Model Guidance
Programmatic Tool Calling을 어떤 작업에 적용해야 하는지, Direct Tool Calling과 어떻게 구분해야 하는지,allowed_callers,program,program_output처리와 Eval 기준을 설명하는 공식 개발 문서. -
OpenAI Responses API Documentation
GPT-5.6 Agent Workflow에서 Tool Calling, reasoning, multi-turn execution을 구현할 때 기준이 되는 공식 API 문서.
핵심 참고 포인트
OpenAI는 Programmatic Tool Calling을 여러 Tool 결과를 코드에서 필터링·조인·정렬·중복 제거·집계·검증해 작은 구조화 결과로 줄일 수 있는 bounded workflow에 적합한 기능으로 설명한다.
반대로 Tool 결과 하나하나가 다음 모델 판단을 바꾸는 작업, 승인이나 Side Effect가 필요한 작업, Citation이나 원본 Artifact 보존이 중요한 작업에서는 Direct Tool Calling을 우선 검토하라고 권장한다.
또한 OpenAI는 PTC를 적용했다고 해서 단순히 Tool Call 수나 Token 수만 비교하지 말고, 최종 답변의 정확성·완전성·Evidence·Latency·Cost·Retry까지 같은 대표 Task에서 비교해야 한다고 명시하고 있다.
GPT-5.6 발표에서 소개된 Unity Structured API 사례에서는 Direct Tool Calling 대비 Programmatic Tool Calling 사용 시 총 Token 사용량이 63.5%, Model Turn이 50.1% 감소했지만, 이는 특정 Workflow에서 측정된 결과이므로 일반적인 성능 수치로 받아들이기보다는 각 서비스에서 별도 Eval을 수행하는 것이 맞다.