Gradle Scaffold CLI도 만들지 않는다: Gemini Agent + Convention Plugin으로 Android Clean Architecture 모듈 자동 생성하기
Gradle Scaffold CLI도 만들지 않는다: Gemini Agent + Convention Plugin으로 Android Clean Architecture 모듈 자동 생성하기
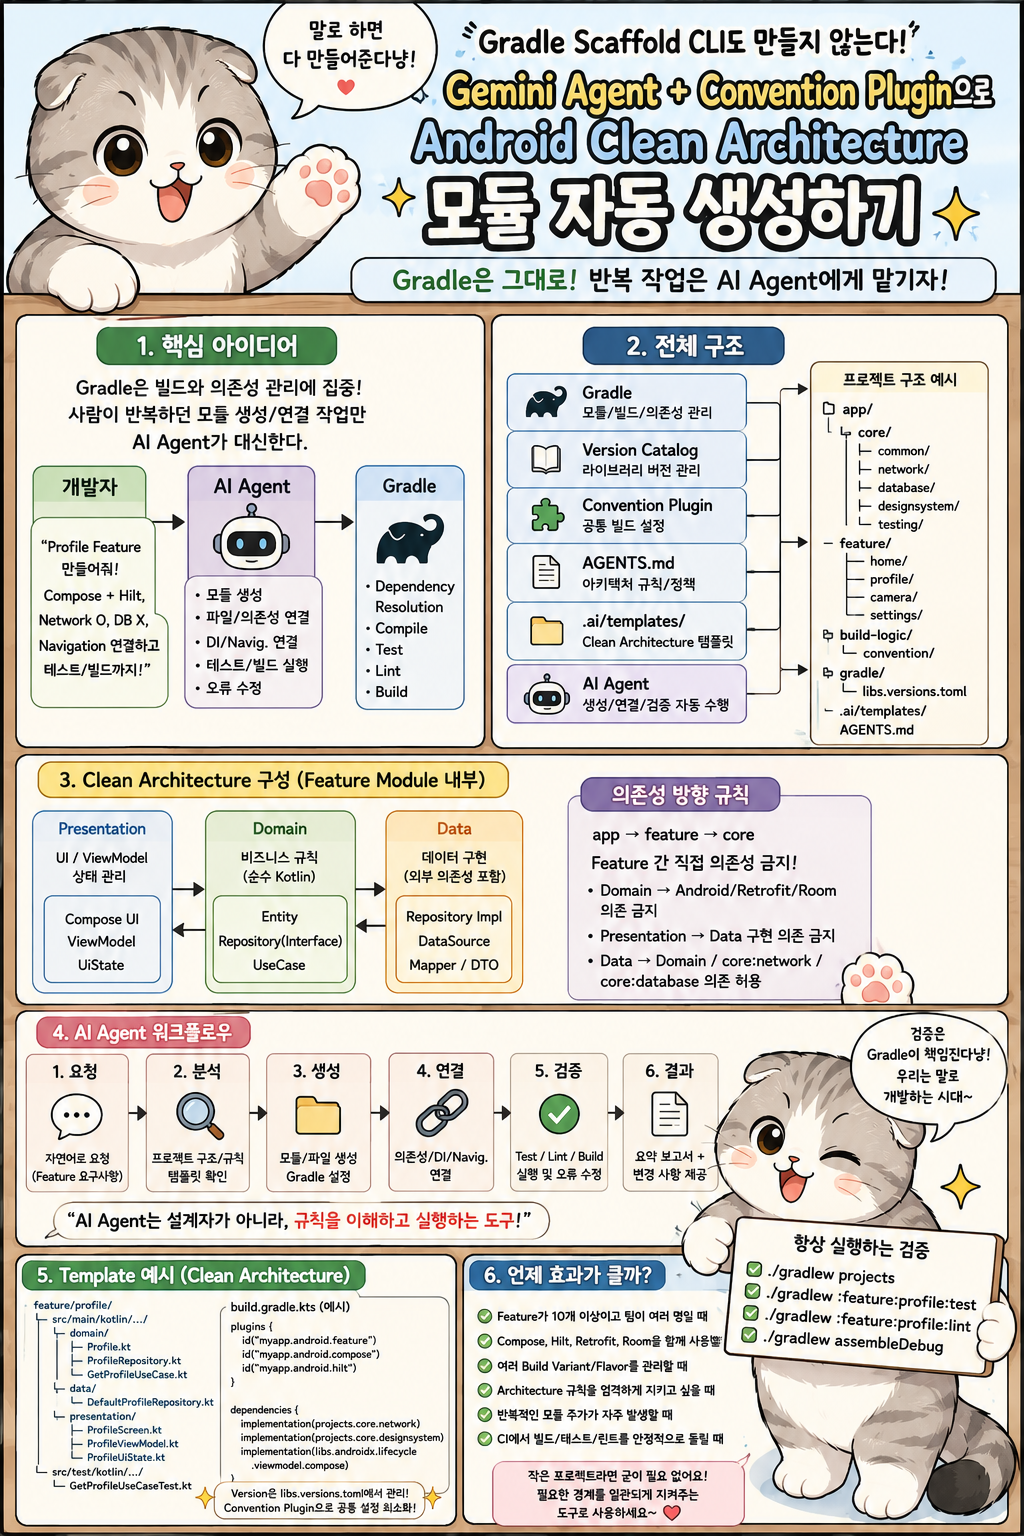
Android 프로젝트를 멀티모듈로 운영하다 보면 새 Feature를 하나 추가하는 작업이 생각보다 반복적이다.
예를 들어 Profile 기능을 만든다고 하자.
feature/
└── profile/
    ├── build.gradle.kts
    ├── src/main/kotlin/...
    └── src/test/kotlin/...
여기에 Clean Architecture를 적용하면 할 일이 더 많아진다.
Domain

Data

Presentation

DI

Navigation

Test

Gradle Dependency
프로젝트에 따라서는 Feature 하나를 만들 때마다 다음 작업을 반복한다.
폴더 생성

↓

build.gradle.kts 작성

↓

settings.gradle.kts 등록

↓

Version Catalog Dependency 연결

↓

Convention Plugin 적용

↓

Domain / Data / Presentation 생성

↓

Hilt 연결

↓

Navigation 연결

↓

Test 생성

↓

Gradle Sync

↓

Build / Test / Lint
그래서 팀 내부에서 종종 이런 도구를 만든다.
./gradlew createFeature -Pname=Profile또는
android-scaffold feature Profile처럼 별도의 Scaffold CLI를 만든다.
문제는 이 CLI도 결국 하나의 제품이 된다는 것이다.
Architecture 변경

↓

Template 변경

↓

CLI 수정

↓

CLI Test

↓

배포

↓

팀원 업데이트
Android는 원래 Gradle이 Module과 Dependency를 잘 관리한다.
따라서 별도의 Project Generator를 하나 더 얹기보다, Gradle은 그대로 두고 사람이 반복하던 Scaffold 작업만 AI Agent에게 맡기는 방식이 더 단순할 수 있다.
2026년 Android Studio에는 Gemini Agent Mode가 들어와 있다.
Agent Mode는 높은 수준의 목표를 받으면 스스로 계획을 세우고, 여러 파일을 읽고 수정하고, 필요한 Tool을 호출하며, 문제가 생기면 반복해서 고치는 방식으로 동작한다.
또 Android Studio의 Gemini는 Repository 안의 AGENTS.md를 공식적으로 읽을 수 있다. 프로젝트 전체 Rule이나 특정 Module Rule을 Git에 같이 저장하고 팀에서 공유할 수 있다.
이제 구조를 이렇게 바꿀 수 있다.
Gradle
→ 실제 Build / Module / Dependency

Version Catalog
→ Library Version

Convention Plugin
→ 공통 Build 설정

AGENTS.md
→ Architecture Rule

.ai/templates/
→ Clean Architecture 골격

Gemini Agent / Codex / Claude Code
→ Feature 생성과 Wiring

Gradle
→ 최종 검증
개발자가 사용하는 인터페이스는 자연어다.
Profile Feature 만들어줘.

Clean Architecture Template을 사용하고
Compose + Hilt 기반으로 구성해.

Network는 core:network를 사용하고
Room은 필요 없어.

다른 Feature를 직접 참조하지 말고
Navigation까지 연결한 뒤
Test와 Lint, Debug Build까지 확인해줘.
Agent가 뒤에서 Gradle을 조작한다.
중요한 것은 AI가 Gradle을 대체하는 것이 아니라 Gradle을 다루는 반복 작업을 대신한다는 점이다.
1. Android는 왜 Tuist 같은 도구가 덜 필요했을까
Android는 기본적으로 Gradle Multi-module 구조를 사용한다.
app

feature:home

feature:profile

core:network

core:database

core:designsystem
그리고 각 Module이 자신의 build.gradle.kts를 가진다.
dependencies {
    implementation(project(":core:network"))
    implementation(project(":core:designsystem"))
}
그래서 iOS처럼 .xcodeproj 자체를 별도 도구로 생성해야 하는 필요성이 상대적으로 작다.
Android 공식 Modularization 가이드에서도 Multi-module 구조 자체를 Gradle 중심으로 설명하고 있다. 다만 모든 앱에 모듈화가 필요한 것은 아니며, 지나치게 많은 Module은 Build Configuration과 유지보수 비용을 늘릴 수 있다고 명시한다.
즉 목표는:
Module을 최대한 많이 만든다.

X
가 아니다.
경계가 필요한 곳만 Module로 나누고
반복되는 생성 작업을 자동화한다.

O
에 가깝다.
2. Android에서 Agent를 붙이기 좋은 이유
Android Feature Module은 구조가 상당히 반복적이다.
예를 들어:
feature/profile/을 만들면 거의 항상 다음이 필요하다.
build.gradle.kts

AndroidManifest.xml

Domain

Repository

ViewModel

Compose Screen

DI

Navigation

Tests
이런 반복 작업은 AI Agent가 꽤 잘한다.
반대로 Gradle Dependency Resolution이나 Kotlin Compile 결과는 Agent가 판단할 영역이 아니다.
Agent

파일 생성
설정 변경
Dependency 연결
↓
Gradle

Resolve
Compile
Test
Lint
역할을 나누는 것이 핵심이다.
3. 전체 프로젝트 구조부터 만든다
예를 들어 다음 정도가 현실적이다.
MyApp/
├── app/
│
├── core/
│   ├── common/
│   ├── network/
│   ├── database/
│   ├── designsystem/
│   └── testing/
│
├── feature/
│   ├── home/
│   ├── profile/
│   ├── camera/
│   └── settings/
│
├── build-logic/
│   └── convention/
│
├── gradle/
│   └── libs.versions.toml
│
├── .ai/
│   └── templates/
│       └── clean-feature/
│
├── AGENTS.md
├── settings.gradle.kts
└── build.gradle.kts
Android 공식 가이드도 App Module, Feature Module, Common/Core Module처럼 책임을 나누고, Module 간에는 높은 응집력과 낮은 결합력을 유지하는 방향을 권장한다.
4. Feature를 너무 잘게 쪼개지 않는다
Clean Architecture를 적용한다고 무조건:
feature-profile-domain

feature-profile-data

feature-profile-presentation

feature-profile-api

feature-profile-impl
처럼 전부 Gradle Module로 만들 필요는 없다.
작은 앱이라면 오히려:
feature:profile하나 안에서:
domain/

data/

presentation/
Package만 나누는 것이 더 단순하다.
Android 공식 가이드도 Module 자체에는 Build Configuration과 유지보수 Overhead가 있으므로 지나친 Module 분리는 피해야 한다고 설명한다. Kotlin/Java Module을 사용할 수 있다면 Android Library Module보다 가벼운 구조를 우선 고려하라고도 권장한다.
따라서 기준을 이렇게 잡을 수 있다.
작은 Feature

→ 하나의 Feature Module 내부 Layer 분리
크고 독립적인 Feature
→ api / impl 또는 별도 Module 분리5. 기본 Clean Architecture 구조
Feature 하나를 다음처럼 잡는다.
feature/profile/
└── src/main/kotlin/com/example/profile/
    ├── domain/
    │   ├── model/
    │   ├── repository/
    │   └── usecase/
    │
    ├── data/
    │   ├── datasource/
    │   ├── repository/
    │   └── model/
    │
    └── presentation/
        ├── ProfileScreen.kt
        ├── ProfileViewModel.kt
        └── ProfileUiState.kt
Dependency 방향은:
Presentation
      │
      ▼
    Domain
      ▲
      │
    Data
공통 Infra는:
Data
 ↓
core:network
core:database
Presentation은:
Presentation
 ↓
core:designsystem
을 사용할 수 있다.
6. Domain은 Android Framework에서 최대한 분리한다
Domain:
Compose

X

Retrofit

X

Room

X
정도로 가져간다.
예:
data class Profile(
    val id: String,
    val name: String
)
Repository:
interface ProfileRepository {
    suspend fun getProfile(): Profile
}
UseCase:
class GetProfileUseCase(
    private val repository: ProfileRepository
) {
    suspend operator fun invoke(): Profile {
        return repository.getProfile()
    }
}
이 부분은 JVM Unit Test가 쉽다.
7. Data Layer
internal class DefaultProfileRepository(
    private val api: ProfileApi
) : ProfileRepository {

    override suspend fun getProfile(): Profile {
        return api.getProfile()
            .toDomain()
    }
}
Data는:
Domain

+

core:network
을 알 수 있다.
하지만:
Presentation은 알면 안 된다.
8. Presentation Layer
@HiltViewModel
class ProfileViewModel @Inject constructor(
    private val getProfile: GetProfileUseCase
) : ViewModel() {

    private val _state =
        MutableStateFlow<ProfileUiState>(
            ProfileUiState.Loading
        )

    val state = _state.asStateFlow()

    fun load() {
        viewModelScope.launch {
            runCatching {
                getProfile()
            }.onSuccess {
                _state.value =
                    ProfileUiState.Content(it)
            }.onFailure {
                _state.value =
                    ProfileUiState.Error
            }
        }
    }
}
Compose:
@Composable
fun ProfileRoute(
    viewModel: ProfileViewModel =
        hiltViewModel()
) {
    val state by
        viewModel.state.collectAsStateWithLifecycle()

    ProfileScreen(state)
}
9. Convention Plugin부터 만들어두는 것이 중요하다
Feature마다 이런 설정을 반복하면 Agent가 생성하더라도 관리하기 어렵다.
plugins {
    alias(libs.plugins.android.library)
    alias(libs.plugins.kotlin.android)
    alias(libs.plugins.kotlin.compose)
    alias(libs.plugins.hilt)
}
그리고:
android {
    compileSdk = ...
    defaultConfig { ... }

    compileOptions { ... }

    kotlinOptions { ... }
}
를 모든 Module에 복사한다.
이런 부분은 build-logic으로 올린다.
Android 공식 Modularization 가이드도 여러 Module에서 공통 Build Logic을 공유할 때 Convention Plugin을 활용하는 방식을 권장한다.
10. Convention Plugin 구조
build-logic/
└── convention/
    ├── build.gradle.kts
    └── src/main/kotlin/
        ├── AndroidFeatureConventionPlugin.kt
        ├── AndroidLibraryConventionPlugin.kt
        └── AndroidComposeConventionPlugin.kt
예:
class AndroidFeatureConventionPlugin :
    Plugin<Project> {

    override fun apply(target: Project) {
        with(target) {
            pluginManager.apply(
                "com.android.library"
            )

            pluginManager.apply(
                "org.jetbrains.kotlin.android"
            )

            pluginManager.apply(
                "com.google.devtools.ksp"
            )
        }
    }
}
실제 세부 설정은 프로젝트 Gradle/AGP 버전에 맞춰 구성한다.
11. 그러면 Feature build.gradle.kts가 작아진다
plugins {
    id("myapp.android.feature")
    id("myapp.android.compose")
}

android {
    namespace =
        "com.example.feature.profile"
}

dependencies {
    implementation(projects.core.network)
    implementation(projects.core.designsystem)

    implementation(
        libs.androidx.lifecycle.viewmodel.compose
    )
}
이 정도만 남긴다.
Agent가 생성하기도 훨씬 쉽다.
12. Version도 Feature Module에서 직접 쓰지 않는다
잘못된 방식:
implementation(
    "androidx.lifecycle:lifecycle-viewmodel-compose:2.10.0"
)
Module마다 Version을 직접 적기 시작하면 관리가 어려워진다.
gradle/libs.versions.toml로 모은다.
[versions]
lifecycle = "..."

[libraries]
androidx-lifecycle-viewmodel-compose = {
    module = "androidx.lifecycle:lifecycle-viewmodel-compose",
    version.ref = "lifecycle"
}
그리고:
implementation(
    libs.androidx.lifecycle.viewmodel.compose
)
로 사용한다.
Version Catalog는 Gradle Dependency 정보를 중앙에서 관리하는 대표적인 방식이다.
13. 이제 Clean Architecture Template을 만든다
Repository에 Template을 둔다.
.ai/
└── templates/
    └── clean-feature/
        ├── template.json
        ├── build.gradle.kts.template
        │
        ├── domain/
        │   ├── __FEATURE__.kt
        │   ├── __FEATURE__Repository.kt
        │   └── Get__FEATURE__UseCase.kt
        │
        ├── data/
        │   └── Default__FEATURE__Repository.kt
        │
        ├── presentation/
        │   ├── __FEATURE__Screen.kt
        │   ├── __FEATURE__ViewModel.kt
        │   └── __FEATURE__UiState.kt
        │
        └── test/
            └── Get__FEATURE__UseCaseTest.kt
이 Template이 기존 Scaffold CLI의 Template 역할을 한다.
14. Template Metadata
{
  "name": "clean-feature",
  "placeholder": "__FEATURE__",
  "defaultLayers": [
    "domain",
    "data",
    "presentation"
  ],
  "rules": {
    "featureToFeatureDependency": false,
    "domainMayUseAndroid": false,
    "dataMayUseNetwork": true,
    "presentationMayUseCompose": true
  }
}
Agent가 구조를 해석하기 쉬워진다.
15. AGENTS.md가 생성 정책을 담당한다
Android Studio의 Gemini는 현재 Directory와 상위 Directory의 AGENTS.md를 읽을 수 있고, 여러 디렉터리에 다른 AGENTS.md를 둘 수도 있다. 팀 공유가 목적이라면 Google도 IDE 개인 Rules보다 AGENTS.md를 권장한다.
Root:
# Android Architecture Rules

## Architecture

Dependency direction:

app
→ feature
→ core

Feature-to-Feature dependency is prohibited.

## Domain

Domain must not depend on:

- Android framework
- Compose
- Retrofit
- Room

## Data

Data may depend on:

- Domain
- core:network
- core:database

Data must not depend on Presentation.

## Presentation

Presentation may depend on:

- Domain
- core:designsystem

Presentation must not create concrete repository implementations.

## Gradle

- Use Kotlin DSL.
- Use Version Catalog.
- Use existing Convention Plugins.
- Do not duplicate common Android configuration.
- Do not add external dependencies without approval.

## New Feature

When creating a feature:

1. Read `.ai/templates/clean-feature`.
2. Create `feature:<name>`.
3. Apply the existing feature convention plugin.
4. Create Domain, Data, Presentation.
5. Add unit tests.
6. Register the module.
7. Add only required dependencies.
8. Do not create Feature-to-Feature dependencies.
9. Wire navigation from the app/navigation layer.

## Validation

After changing the module graph:

- inspect Gradle projects
- run feature tests
- run lint
- build Debug

Never report a command as passed unless it was executed.
16. Module 내부에는 더 구체적인 AGENTS.md를 둘 수도 있다
예:
feature/
└── AGENTS.md
# Feature Module Rules
All feature modules must contain:
- domain
- data
- presentation
Compose UI belongs only to presentation.
Repositories are interfaces in domain.
Concrete repositories belong in data.
Feature modules must not depend on other feature implementations.Gemini는 해당 Directory 작업 시 Root와 Feature Rule을 함께 사용할 수 있다.
17. 이제 개발자가 실제로 하는 일
새 Profile 기능이 필요하다.
기존:
Android Studio

↓

New Module

↓

파일 생성

↓

Gradle 수정

↓

Dependency 연결

↓

DI

↓

Navigation
Agent 방식:
Profile Feature 만들어줘.

clean-feature Template을 사용해.

Compose + Hilt.

프로필 조회는 core:network를 사용하고
DB는 필요 없어.

Home Feature를 직접 참조하지 마.

Navigation 연결하고
Unit Test와 Lint,
Debug Build까지 확인해줘.
끝이다.
18. Gemini Agent Mode가 이 방식과 잘 맞는다
Android Studio의 Gemini Agent Mode는 사용자가 높은 수준의 Goal을 주면 Agent가 작업 계획을 세우고 여러 파일에 걸쳐 변경을 수행하며 필요한 Tool을 호출하는 방식으로 설계되어 있다.
흐름은 대략 다음과 같다.
User Goal

↓

Gemini Agent

↓

AGENTS.md

↓

Template 확인

↓

Gradle 구조 분석

↓

Module 생성

↓

Dependency 연결

↓

Code 생성

↓

Gradle 실행

↓

오류 수정

↓

변경 Review
개발자는 Agent가 제안한 변경을 승인하거나 거절할 수 있다.
19. Codex나 Claude Code에서도 같은 구조를 쓸 수 있다
이 방식은 Gemini 전용 Architecture가 아니다.
Repository에:
AGENTS.md

.ai/templates/

Gradle
이 존재한다면 Codex나 Claude Code에서도 거의 같은 Workflow를 만들 수 있다.
차이는 Agent UI와 Tool Integration 정도다.
Gemini Agent Mode

Android Studio 안에서 실행
Codex
Repository 중심 Agent 작업Claude Code
Terminal 중심 작업구조의 핵심은 Agent 제품이 아니라 Repository가 Architecture를 설명할 수 있느냐다.
20. Agent가 Module을 생성한다
예를 들어:
feature/profile/
├── build.gradle.kts
│
├── src/main/
│   ├── AndroidManifest.xml
│   └── kotlin/com/example/profile/
│       ├── domain/
│       │   ├── Profile.kt
│       │   ├── ProfileRepository.kt
│       │   └── GetProfileUseCase.kt
│       │
│       ├── data/
│       │   └── DefaultProfileRepository.kt
│       │
│       └── presentation/
│           ├── ProfileScreen.kt
│           ├── ProfileUiState.kt
│           └── ProfileViewModel.kt
│
└── src/test/
    └── kotlin/com/example/profile/
        └── GetProfileUseCaseTest.kt
를 만든다.
21. settings.gradle.kts도 Agent가 연결한다
일반적인 구조라면:
include(":feature:profile")을 추가한다.
프로젝트가 다른 Module Discovery 구조를 사용한다면 기존 Repository 패턴을 먼저 확인하고 그대로 따른다.
Agent가 새로운 패턴을 발명하면 안 된다.
22. build.gradle.kts 생성
plugins {
    id("myapp.android.feature")
    id("myapp.android.compose")
    id("myapp.android.hilt")
}

android {
    namespace =
        "com.example.feature.profile"
}

dependencies {
    implementation(projects.core.network)
    implementation(projects.core.designsystem)

    implementation(
        libs.androidx.lifecycle.viewmodel.compose
    )
}
중요한 것은:
compileSdk

Kotlin Compiler Option

Compose 설정

공통 Test 설정
등을 복사하지 않는 것이다.
Convention Plugin이 담당한다.
23. 외부 Dependency를 Agent가 마음대로 추가하지 않게 한다
Agent가 Profile 화면을 만들다가:
새 Image Library가 있으면 편하겠네.라고 판단할 수 있다.
바로:
new-library = ...를 추가하게 하면 안 된다.
Rule:
기존 Dependency로 먼저 해결

↓

새 Library 필요

↓

이유 보고

↓

승인

↓

Version Catalog 추가
로 둔다.
AI Agent 시대에는 Dependency 추가도 Supply Chain 관리의 일부다.
24. Feature 간 직접 Dependency도 막는다
예를 들어 Profile에서 Home 정보를 필요로 한다.
잘못된 구조:
feature:profile

↓

feature:home
Android 공식 가이드에서도 Module 간 낮은 결합을 유지하고 내부 구현을 가능한 한 노출하지 않는 방향을 권장한다.
공유 Domain이 필요하다면:
core:model이나 별도의 공통 계약으로 올린다.
25. api / impl 분리는 언제 쓸까
Feature 간 Navigation이나 공개 계약이 필요하면:
feature/profile/api

feature/profile/impl
구조가 유용할 수 있다.
Google의 최신 Navigation 3 Modularization 가이드에서도 Feature별로 api와 impl 하위 Module을 두고 Navigation Key를 API에, 실제 화면과 Entry Provider를 Impl에 두는 패턴을 안내한다.
예:
feature/
└── profile/
    ├── api/
    │   └── ProfileRoute.kt
    │
    └── impl/
        ├── ProfileScreen.kt
        └── ProfileEntryProvider.kt
하지만 모든 Feature를 처음부터 api/impl 두 개씩 만들 필요는 없다.
필요해질 때 분리한다.
26. Navigation도 Agent에게 연결하게 한다
멀티모듈 Navigation에서는 App이 각 Feature의 Navigation Entry를 조합하는 구조가 자연스럽다.
Android 공식 Navigation 가이드도 Feature Module이 자신의 Navigation Graph나 Destination을 캡슐화하고 App이 이를 조합하는 구조를 설명한다.
예:
app

↓

ProfileNavigation

HomeNavigation

SettingsNavigation
Agent Rule:
Feature가 다른 Feature의 화면 구현을 직접 호출하지 않는다.

Navigation은 공개 Route/Key 또는 App Navigation Layer를 통해 연결한다.
27. DI Wiring도 Agent가 할 수 있다
예:
@Module
@InstallIn(SingletonComponent::class)
abstract class ProfileRepositoryModule {

    @Binds
    abstract fun bindProfileRepository(
        implementation:
            DefaultProfileRepository
    ): ProfileRepository
}
Hilt를 사용하는 프로젝트라면 기존 DI Pattern을 Agent가 따라가게 한다.
새로운 DI 스타일을 임의로 만들지 않는다.
28. Agent 작업에서 가장 중요한 단계는 검증이다
파일이 만들어졌다고 끝이 아니다.
먼저 Module이 실제로 등록됐는지 확인한다.
./gradlew projects다음으로 Feature Unit Test.
./gradlew :feature:profile:testAndroid Plugin Variant에 따라 실제 Task 이름은 달라질 수 있으므로 Agent는 tasks를 확인해 적절한 Task를 선택해야 한다.
29. Lint도 실행한다
./gradlew :feature:profile:lint그리고 최종 앱 Build.
./gradlew assembleDebug실제 프로젝트에서는:
Flavor

Build Type

Module 구조
에 맞는 정확한 Task를 사용한다.
30. Agent가 Build Task를 추측하지 않게 한다
잘못된 방식:
무조건 assembleDebug 실행프로젝트가:
devDebug

stageDebug

prodRelease
를 사용할 수도 있다.
Agent에게:
먼저 사용 가능한 Gradle Task와 Build Variant를 확인한 뒤
현재 개발 환경에 맞는 Build를 실행한다.
고 둔다.
31. Android Studio가 Build Variant를 관리하는 이유도 여기에 있다
Android 프로젝트는 기본적으로 Debug/Release Build Type 외에도 Product Flavor를 조합할 수 있다. Android Studio의 Project 구조 역시 Module별 Build Variant를 별도로 관리한다.
따라서 Template에:
devDebug같은 값을 Hard Coding하지 않는다.
Repository에서 현재 규칙을 읽는다.
32. Agent 완료 보고 형식
작업이 끝나면 이런 식으로 보고하도록 한다.
FeatureProfile 생성 완료

Module:
- :feature:profile

Architecture:
- domain
- data
- presentation

Dependencies:
- :core:network
- :core:designsystem

Feature dependency:
- 없음

Navigation:
- app navigation layer에 Profile route 추가

Validation:
- Gradle projects: PASS
- Profile tests: PASS
- Profile lint: PASS
- Debug build: PASS

External dependencies:
- 추가 없음
사람은 이 결과와 실제 Diff를 확인한다.
33. AI에게 Architecture Review도 시킨다
Build 성공만으로 Architecture가 맞는 것은 아니다.
예를 들어:
Presentation

↓

Data
를 직접 참조해도 컴파일은 된다.
하지만 Rule 위반이다.
그래서 별도 Review를 한다.
다음 Dependency를 검사해.

Domain → Android Framework
Domain → Retrofit
Presentation → Data
Feature → Feature

하나라도 있으면 Build 성공 여부와 관계없이 Architecture violation으로 보고해.
34. 나중에는 Architecture Test를 자동화할 수 있다
프로젝트가 커지면 Agent Prompt보다 코드 기반 검사도 추가한다.
예:
Dependency Graph

↓

Architecture Validator
그리고:
Feature → Feature

DENY
Domain → Android
DENY같은 Rule을 CI에서 검사한다.
AI가 Rule을 기억하는 것보다 결정론적 Validation이 더 강하다.
35. Gradle 자체에도 Dependency Graph가 있다
Agent는 Gradle의 실제 Dependency 정보를 조회할 수 있다.
예:
./gradlew :feature:profile:dependencies특정 Configuration을 확인할 수도 있다.
./gradlew \
  :feature:profile:dependencies \
  --configuration debugRuntimeClasspath
Agent가 추측하지 않고 실제 Graph를 본다.
36. Convention Plugin을 쓰는 이유가 여기서 더 커진다
Agent가 Module 30개를 관리한다고 생각해보자.
모든 Module에서:
compileSdk

Java Version

Kotlin Setting

Compose Setting

Lint

Test Options
가 다르면 Agent도 매번 판단해야 한다.
Convention Plugin이 있으면:
myapp.android.feature

myapp.android.library

myapp.android.compose

myapp.android.hilt
몇 개만 이해하면 된다.
즉 Convention Plugin은 사람뿐 아니라 Agent에게도 Context Compression 역할을 한다.
37. AGENTS.md도 너무 크게 만들지 않는다
모든 Gradle 세부 정보를 AGENTS.md에 넣으면 안 된다.
500줄 Gradle 설명

800줄 Architecture

300줄 Navigation
보다:
# Build

Feature modules use:
`myapp.android.feature`

Compose modules additionally use:
`myapp.android.compose`

Detailed build rules:
@./docs/build-rules.md
처럼 Map을 준다.
Gemini의 AGENTS.md는 별도 Markdown 파일을 참조하는 방식도 지원한다.
38. Template도 너무 똑똑하게 만들지 않는다
나쁜 Template:
모든 Feature에

Retrofit

Room

Paging

Hilt

Analytics

Navigation

Worker
를 기본으로 넣는다.
좋은 Template:
Domain

Presentation

최소 DI
부터 만들고 필요한 Capability만 추가한다.
Agent에게:
Room 필요 없음.이라고 했다면 Data Module에 Room Dependency를 넣지 않는다.
39. Agent가 Template에서 벗어날 수 있는 범위를 정한다
고정:
Naming

Folder

Dependency Direction

Gradle Plugin

Test 기본 구조
Agent 판단:
Network 필요한가

Database 필요한가

Paging 필요한가

Navigation 필요한가

어떤 UseCase가 필요한가
이 정도가 적당하다.
40. 그래서 Agent는 Architecture Designer가 아니라 Architecture Executor다
좋지 않은 요청:
알아서 좋은 Android Architecture 만들어줘.결과가 매번 달라질 수 있다.
추천:
Repository의 Clean Architecture 규칙을 유지하면서
Profile Feature만 추가해줘.
즉:
Architecture

사람이 결정
반복 실행
Agent이다.
41. Scaffold CLI와 비교하면
기존 CLI:
createFeature("Profile")↓
정해진 파일 복사Agent:
Profile Feature 만들어줘.

Network O
Database X
Compose O
Navigation O
↓
Template

+

Repository Context

+

Architecture Rule

+

요구사항
↓
필요한 구조만 생성.
Agent 방식이 조금 더 유연하다.
42. 하지만 결정론적인 부분은 계속 Gradle이 맡는다
Agent:
Dependency는 맞아 보입니다.는 검증이 아니다.
Gradle:
BUILD SUCCESSFUL이어야 한다.
Agent:
Test를 추가했습니다.도 검증이 아니다.
Gradle Test가 실제로 실행되어야 한다.
이 원칙은 iOS와 똑같다.
43. 전체 역할을 다시 정리하면
Gradle

Build Graph
Dependency Resolution
Compile
Test
Version Catalog
Dependency VersionConvention Plugins
반복 Build LogicAGENTS.md
Architecture PolicyTemplate
Scaffold SkeletonAI Agent
생성
연결
수정
검증 실행이다.
44. 작은 프로젝트에서는 굳이 이 구조가 필요 없다
예:
app

core

feature 3~4개
정도라면 Module 생성 빈도가 낮다.
그냥 Android Studio에서 직접 만드는 편이 빠를 수도 있다.
Android 공식 문서도 코드베이스가 일정 규모 이상으로 커지지 않는다면 모듈화를 복잡하게 가져갈 실익이 적을 수 있다고 설명한다.
45. 언제부터 효과가 커질까
다음 조건이 많아지면 효과가 커진다.
Feature 10개 이상

개발자 여러 명

Compose

Hilt

Retrofit

Room

여러 Build Variant

공통 Convention Plugin

반복적인 Feature 추가

엄격한 Architecture Rule

CI
이 정도가 되면 Feature Scaffold 자체가 개발 업무가 된다.
46. 특히 큰 팀에서는 일관성이 더 중요하다
개발자 A:
ProfileViewModel개발자 B:
ProfileVM개발자 C:
ProfilePresenter처럼 같은 역할이 제각각이면 유지보수가 어렵다.
Template + AGENTS.md를 사용하면:
FeatureXXXViewModel

FeatureXXXUiState

FeatureXXXRepository
같은 기본 규칙을 유지하기 쉽다.
47. 신규 개발자 Onboarding에도 도움이 된다
기존:
우리 프로젝트에서 Feature를 만들려면
Wiki 12페이지 읽어야 해.
Agent 방식:
AGENTS.md

+

Template

↓

Agent가 구조를 생성
신규 개발자는 만들어진 Diff를 보면서 Architecture를 익힐 수 있다.
다만 Agent 결과를 이해하지 않고 그대로 Merge하는 방식은 피한다.
48. Agent에게 Refactor까지 맡길 수도 있다
예:
현재 feature:settings가
Presentation에서 Data를 직접 참조하고 있어.

AGENTS.md Architecture Rule에 맞게
Dependency를 정리해줘.

Public Behavior는 바꾸지 말고
Test와 Build까지 확인해.
Agent가 기존 Module도 규칙에 맞게 정리할 수 있다.
49. Architecture Drift 검사에도 사용할 수 있다
주기적으로:
전체 feature Module을 검사해서

Feature 간 직접 Dependency

Domain의 Android 의존

중복 Gradle 설정

Version Catalog를 우회한 Dependency

Convention Plugin 미사용

을 찾아줘.

수정하지 말고 목록만 만들어.
라고 할 수 있다.
Agent를 Architecture Auditor로 사용하는 것이다.
50. Gemini Agent Mode를 쓰면 IDE 안에서 바로 가능하다
2026년 Android Studio의 Agent Mode는 여러 파일 수정과 Tool 사용이 필요한 복합 작업을 직접 수행할 수 있도록 설계되어 있다.
따라서:
FeatureProfile 생성

↓

Gradle 수정

↓

Kotlin 파일 생성

↓

Build

↓

오류 발견

↓

수정

↓

재Build
같은 Loop를 IDE 안에서 수행할 수 있다.
51. Gemini Agent Mode만 고집할 필요는 없다
같은 Repository 구조라면:
Gemini Agent Mode

Codex

Claude Code
어느 쪽에서도 사용할 수 있다.
중요한 것은 특정 Agent Prompt를 수백 줄 만드는 것이 아니다.
Repository 자체에

Architecture

Template

Build Rule

Validation

을 남겨두는 것
이다.
52. Android에서 특히 AGENTS.md가 재미있는 이유
Google이 Android Studio에서 AGENTS.md를 직접 공식 지원하기 시작했기 때문이다.
Root:
AGENTS.mdFeature:
feature/AGENTS.mdNetwork:
core/network/AGENTS.md처럼 계층별 규칙을 둘 수 있다.
Agent 입장에서는 작업하는 Directory에 따라 필요한 Rule만 추가로 읽을 수 있다.
53. 예를 들어 core/network Rule
# Network Module

- Retrofit implementation belongs here.
- Feature modules must not define Retrofit instances.
- DTOs must not escape the Data boundary.
- Never expose Retrofit service types publicly.
Profile 작업 중 Network Module을 수정할 때만 이 Rule이 적용된다.
54. Feature용 AGENTS.md
# Feature Modules

Feature modules:

- own their UI
- own their Domain contracts
- may depend on core modules
- must not depend directly on another feature implementation

Navigation between features must use route contracts.
Architecture 설명이 상당히 깔끔해진다.
55. 테스트 규칙도 Template에 넣는다
Feature 생성 시 최소:
UseCase Test

ViewModel Test
정도는 만들게 할 수 있다.
예:
class GetProfileUseCaseTest {

    @Test
    fun returnsProfileFromRepository() =
        runTest {

            val repository =
                FakeProfileRepository()

            val useCase =
                GetProfileUseCase(repository)

            val result = useCase()

            assertEquals(
                "user-1",
                result.id
            )
        }
}
56. core:testing을 따로 두는 것도 좋다
반복되는:
Fake Repository

Test Dispatcher

Fixture

Test Data Builder
를:
core:testing으로 옮긴다.
Feature Test가 훨씬 작아진다.
57. Agent가 Test Fixture도 재사용하게 한다
AGENTS.md:
새 Fake를 만들기 전에
core:testing에 같은 Fixture가 있는지 확인한다.
중복 Test Utility가 생기는 것을 줄일 수 있다.
58. CI에도 같은 명령을 사용한다
로컬 Agent:
Gradle Test

Lint

Build
CI:
Gradle Test

Lint

Build
가 같아야 한다.
Agent 전용 검증과 CI 검증이 달라지면 안 된다.
59. Agent 결과를 PR로 올릴 때
PR에는 최소 다음이 있으면 좋다.
생성 Module

Dependency 변경

Navigation 변경

외부 Library 추가 여부

실행한 Test

Build 결과
Agent가 이 요약까지 작성할 수 있다.
60. AI Agent를 Module 생성기로 쓸 때 하지 말아야 할 것
첫째:
모든 Feature마다 다른 Architecture 생성둘째:
Agent 판단만 믿고 Gradle 검증 생략셋째:
외부 Dependency 자동 설치넷째:
Feature 간 Dependency 자유롭게 허용다섯째:
AGENTS.md에 프로젝트 전체 문서를 전부 넣기다.
61. 추천 적용 순서
처음부터 Agent Generator를 거창하게 만들 필요 없다.
1단계
기존 Feature 하나를 제대로 만든다.
feature:homeReference Implementation으로 사용한다.
2단계
공통 Gradle 설정을 Convention Plugin으로 뺀다.
3단계
Dependency Version을 Version Catalog로 정리한다.
4단계
Reference Feature에서 Template을 만든다.
5단계
Architecture Rule을 AGENTS.md에 작성한다.
6단계
Agent에게:
feature:profile 만들어줘.라고 한다.
7단계
Diff를 Review한다.
8단계
반복되는 Agent 실수가 있으면 Prompt를 매번 고치는 대신:
Template

AGENTS.md

Convention Plugin
중 하나를 수정한다.
62. Agent가 실패할수록 Repository가 좋아져야 한다
예를 들어 Agent가 계속:
Presentation

↓

Data
Dependency를 만든다.
매번:
이번에는 하지 마.라고 말하지 않는다.
AGENTS.md에:
Presentation must never depend on Data implementation.를 추가한다.
또 CI Architecture Test가 필요하다면 추가한다.
이렇게 해야 Agent 운용 경험이 프로젝트 자산으로 남는다.
63. 이 구조의 진짜 장점
단순히 Feature 생성 시간이 줄어드는 것만이 아니다.
더 큰 장점은 Architecture가 Repository 안에서 실행 가능한 형태로 문서화된다는 것이다.
기존:
Wiki

Architecture 문서

팀원 머릿속
↓
Agent 시대:
Convention Plugin

Version Catalog

Template

AGENTS.md

Tests
Architecture가 실제 Repository에 존재한다.
64. iOS 구조와 비교하면
iOS:
SwiftPM
→ Module

Xcode
→ App Target

AGENTS.md
→ Rule

Template
→ Scaffold

Agent
→ 생성
Android:
Gradle
→ Module / Build

Version Catalog
→ Dependency

Convention Plugin
→ Build Rule

AGENTS.md
→ Architecture Rule

Template
→ Scaffold

Agent
→ 생성
Android 쪽이 Build System은 이미 더 완성되어 있다.
그래서 Agent가 대체하는 영역은 더 좁다.
65. Android에서는 “Gradle을 없앤다”는 방향으로 가면 안 된다
이 글의 핵심은:
Gradle 없이 Android 개발

X
이다.
정확한 방향은:
Gradle 명령과
반복적인 Module Wiring을
개발자가 직접 덜 한다.

O
다.
66. CLI도 완전히 사라지는 것은 아니다
개발자가 CLI를 직접 칠 필요가 줄어드는 것이다.
뒤에서는 여전히:
./gradlew projects

./gradlew test

./gradlew lint

./gradlew assembleDebug
같은 Tool이 돌아간다.
즉:
CLI-less Developer Experience

+

CLI-backed Verification
이라는 구조다.
67. 개발자가 보는 인터페이스
기존:
./scripts/create-feature.sh profile

./gradlew :feature:profile:test

./gradlew :feature:profile:lint

./gradlew assembleDebug
Agent:
Profile Feature 만들어줘.

Clean Architecture Rule 사용하고
필요한 Dependency만 연결해서
테스트와 빌드까지 확인해줘.
결과는 같지만 사용자 경험이 달라진다.
68. 결론
Android에서는 iOS처럼 Tuist를 제거해야 하는 문제가 크지 않다.
Gradle이 이미:
Module

Dependency

Build

Variant

Test
를 관리하기 때문이다.
그래서 AI Agent의 역할은 Gradle을 대체하는 것이 아니다.
Gradle을 사람이 직접 관리하면서 발생하는
반복 작업을 줄이는 것
이 맞다.
가장 현실적인 조합은 다음과 같다.
Gradle

+

Version Catalog

+

Convention Plugin

+

Clean Architecture Template

+

AGENTS.md

+

Gemini Agent / Codex / Claude Code
그리고 실제 검증은 항상:
Gradle

Compiler

Test

Lint
가 담당한다.
한 줄로 정리하면:
Android에서 AI Agent는
새로운 Build System이 아니라,

Gradle 위에서
Architecture 규칙을 이해하고
Module을 만들고 연결하고 검증하는
개발 인터페이스가 된다.
작은 앱이라면 이 구조까지 만들 필요는 없다.
하지만 Feature와 팀원이 늘어나고 Clean Architecture·Compose·Hilt·여러 Core Module·Build Variant를 관리하기 시작하면 Scaffold CLI를 별도로 만드는 것보다 Repository Template + AGENTS.md + Agent 조합이 훨씬 유연한 선택이 될 수 있다.
특히 2026년 Android Studio가 Gemini Agent Mode와 AGENTS.md를 공식적으로 지원하고 있다는 점 때문에, 이제 이 방식은 단순한 아이디어가 아니라 실제 Android 개발 Workflow로 적용하기 좋은 단계까지 왔다.
참고 자료
-
Android Developers — Guide to Android app modularization
멀티모듈 Android 앱의 장단점과 Module을 지나치게 세분화했을 때 생기는 Build·관리 오버헤드를 설명하는 공식 가이드. -
Android Developers — Common modularization patterns
App·Feature·Core Module의 역할, 높은 응집력·낮은 결합력, Convention Plugin,implementation중심 Dependency 공개 범위 등 실무적인 Module 설계 원칙을 설명한다. -
Android Developers — Agent Mode in Android Studio
Gemini Agent가 높은 수준의 목표를 받아 계획을 세우고 여러 파일을 수정하며 Tool을 호출하고 반복적으로 문제를 해결하는 Agent Mode 공식 문서. -
Android Developers — Customize Gemini using AGENTS.md files
프로젝트와 Module별AGENTS.md를 VCS에 저장해 Architecture·Coding Rule·작업 지침을 Gemini와 팀에서 공유하는 공식 기능. -
Android Developers — Navigation best practices for multi-module projects
Feature가 자신의 Navigation 책임을 캡슐화하고 App에서 여러 Feature Navigation을 조합하는 멀티모듈 Navigation 구조를 설명한다. -
Android Developers — Modularize navigation code
Navigation 3 기반 프로젝트에서 Feature를api와implModule로 분리하고 Navigation Key와 실제 UI 구현의 의존성을 분리하는 최신 가이드.
핵심 참고 포인트
Android 공식 Modularization 가이드는 모든 프로젝트에 동일한 Module 구조를 적용하는 것을 권장하지 않는다. 코드 규모가 작거나 확장 가능성이 낮다면 모듈화의 Build Configuration과 관리 비용이 이점보다 커질 수 있다. 따라서 AI Agent 자동 생성도 많은 Module을 만드는 수단이 아니라 필요한 경계를 일관되게 생성하는 수단으로 사용하는 편이 적절하다.
Google은 현재 Android Studio의 Gemini Agent Mode를 복잡한 다단계 개발 작업을 처리하는 기능으로 설명하고 있으며, Agent가 계획을 만들고 여러 파일을 수정하고 Tool을 호출한 뒤 개발자가 변경을 승인하는 Workflow를 공식 지원한다.
또 AGENTS.md를 프로젝트 코드와 함께 Commit해 팀 단위 Instructions를 공유할 수 있고, Root와 하위 Module에 서로 다른 파일을 두어 Scope별 Architecture Rule을 적용할 수 있다. Google은 팀과 공유해야 하는 지침이라면 IDE 개인 Rules보다 AGENTS.md 사용을 권장한다.
따라서 2026년 Android에서 가장 자연스러운 구조는 새로운 Scaffold Generator를 계속 만드는 것이 아니라 Gradle을 Source of Truth로 유지하고 Convention Plugin·Version Catalog로 반복 Build Logic을 정리한 뒤, Agent가 Repository Template과 AGENTS.md를 읽어 Module 생성·Dependency Wiring·Validation을 수행하게 하는 것이다.