1. Object
1. Object 개요
1-1. Object 란?
💡 자바에서 Object 는 최상위 부모 클래스이다. Object 클래스에는 다양한 메소드로 구성되어 있다. 모든 클래스는 Object 클래스를 상속하고 있으므로 Object 안에 있는 메소드를 사용할 수 있다. 또한 Object 클래스가 가지는 메소드를 오버라이딩 해서 사용하는 것도 가능하다.1-2. Object 주요 메소드
| 메소드 | 설명 |
|---|---|
| boolean equals(Object obj) | 전달 받은 객체와 같은지 여부를 반환한다.(동일하면 true, 다르면 false) |
| int hashCode() | 객체의 해시 코드를 반환한다. |
| String toString() | 객체의 정보를 문자열로 반환한다. |
import java.util.Objects;

public class BookDTO {
    private int number;
    private String title;
    private String author;
    private int price;

    public BookDTO() {
    }

    public BookDTO(int number, String title, String author, int price) {
        this.number = number;
        this.title = title;
        this.author = author;
        this.price = price;
    }

    public int getNumber() {
        return number;
    }

    public void setNumber(int number) {
        this.number = number;
    }

    public String getTitle() {
        return title;
    }

    public void setTitle(String title) {
        this.title = title;
    }

    public String getAuthor() {
        return author;
    }

    public void setAuthor(String author) {
        this.author = author;
    }

    public int getPrice() {
        return price;
    }

    public void setPrice(int price) {
        this.price = price;
    }

    /* 목차. 1. toString() 오버라이딩 */
    @Override
    public String toString() {
        return "BookDTO{" +
                "number=" + number +
                ", title='" + title + '\'' +
                ", author='" + author + '\'' +
                ", price=" + price +
                '}';
    }

    /* 목차. 2. equals() 오버라이딩 */
//    @Override
//    public boolean equals(Object obj) {
//        return this.author.equals(((BookDTO)obj).getAuthor()) && this.price == ((BookDTO)obj).getPrice();
////        return false;
//    }

    /* 설명. 우리가 BookDTo 타입의 객체가 동등하다라는 것에 대한 기준을 정하기 위해 오버라이딩 */
    @Override
    public boolean equals(Object o) {
        if (this == o) return true;
        if (o == null || getClass() != o.getClass()) return false;
        BookDTO bookDTO = (BookDTO) o;
        return number == bookDTO.number && price == bookDTO.price && Objects.equals(title, bookDTO.title) && Objects.equals(author, bookDTO.author);
    }

    /* 목차. 3. hashCode() 오버라이딩 */
    /* 설명. 우리가 정한 동등 기준을 만족하면 같은 값이 나오도록 오버라이딩 */
    @Override
    public int hashCode() {
        return Objects.hash(number, title, author, price);
    }
}
// Application1
import com.ohgiraffers.section01.object.dto.BookDTO;

public class Application1 {
    public static void main(String[] args) {

        /* 수업목표. Object 클래스의 toString() 메소드 오버라이딩 목적을 이해하고 활용할 수 있다. */
        BookDTO book1 = new BookDTO(1,"홍길동전", "허균", 50000);
        BookDTO book2 = new BookDTO(2,"목민심서", "정약용", 30000);
        BookDTO book3 = new BookDTO(3,"목민심서", "정약용", 30000);

        /* 설명. 각 인스턴스의 toString()을 호출하면 각 인스턴스가 가진 필드 값을 문자열로 반환한다. */
        System.out.println(book1.toString());
        System.out.println(book2.toString());
        System.out.println(book3.toString());

        /* 설명. 참조 자료형 변수를 print 또는 println으로 출력하면 해당 객체의 toString()을 자동호출한다. */
        System.out.println(book1);
        System.out.println(book2);
        System.out.println(book3);

    }
}

// Application2
import com.ohgiraffers.section01.object.dto.BookDTO;

public class Application2 {
    public static void main(String[] args) {

        /* 수업목표. Object 클래스의 equals() 메소드 오버라이딩 목적을 이해하고 활용할 수 있다. */
        BookDTO book1 = new BookDTO(1, "홍길동전", "허균", 50000);
        BookDTO book2 = new BookDTO(2, "홍길동전1", "허균", 50000);

        System.out.println("두 인스턴스를 == 연산자로 비교: " + (book1 == book2));
        System.out.println("두 인스턴스를 equals() 메소드로 비교: " + book1.equals(book2));
    }
}

// Application3
import com.ohgiraffers.section01.object.dto.BookDTO;

public class Application3 {
    public static void main(String[] args) {

        /* 수업목표. Object 클래스의 hashCode()  메소드 오버라이딩 목적을 이해하고 활용할 수 있다. */
        BookDTO book1 = new BookDTO(1, "홍길동전", "허균", 50000);
        BookDTO book2 = new BookDTO(1, "홍길동전", "허균", 50000);

        System.out.println("book1의 hashCode: " + book1.hashCode());
        System.out.println("book2의 hashCode: " + book2.hashCode());
    }
}
2. Object 활용
2-1. toString()
- toString() 메소드는 인스턴스의 정보를 문자열로 반환한다.
- 반환되는 문자열은 클래스 이름과 구분자 ‘@’를 사용하며, 그 뒤로 16진수 해시코드가 붙게된다. (해시코드는 인스턴스 주소)
예) 클래스명@16진수해시코드 - toString 메서드를 사용할 때 해시코드가 아닌 인스턴스 안에 값을 확인하고 싶다면 오버라이딩(재정의)를 하면 된다.
2-2. equals()
- equals 메소드는 매개변수로 전달받은 인스턴스와 == 연산해서
true,false로 반환한다. 즉, 동일한 인스턴스인지를 비교하는 기능이다.- 동일 객체와 동등 객체
- 동일 객체 : 주소가 동일한 인스턴스를 동일 객체라고 한다
- 동등 객체 : 주소는 다르더라도 필드값이 동일한 객체를 동등 객체라고 한다.
- 동일 객체와 동등 객체
- 경우에 따라서는 동등객체를 동일 객체로 취급해서 비교하고 싶은 경우가 발생한다. 즉, 동일한 필드값을 가지는 객체를 같은 객체로 판단할 수 있도록 하는 경우를 말한다. 그러한 경우 equals() 메소드를 오버라이딩하여, 각각의 필드가 동일한 값을 가지는지를 확인하고 모든 필드값이 같은 값을 가지는 경우
true, 아닌 경우false를 반환하도록 작성한다.
2-3. hashCode()
- 해시코드는 객체를 식별하는 값이다. Object의 hashCode() 메소드는 객체의 메모리 주소값을 이용해 해시코드를 만들어서 반환한다.
- Object 클래스의 명세에 작성된 일반 규약에 따르면 equals() 메소드를 재정의 하는 경우 반드시 hashCode() 메소드도 재정의 하도록 되어 있다.
- 만약 hashCode()를 재정의 하지 않으면 같은 값을 가지는 동등 객체는 같은 해시코드 값을 가져야 한다는 규약에 위반되게 된다.
(강제성은 없지만 규약대로 작성하는 것이 좋다)
2. String
1. String 클래스 개요
1-1. String 클래스란?
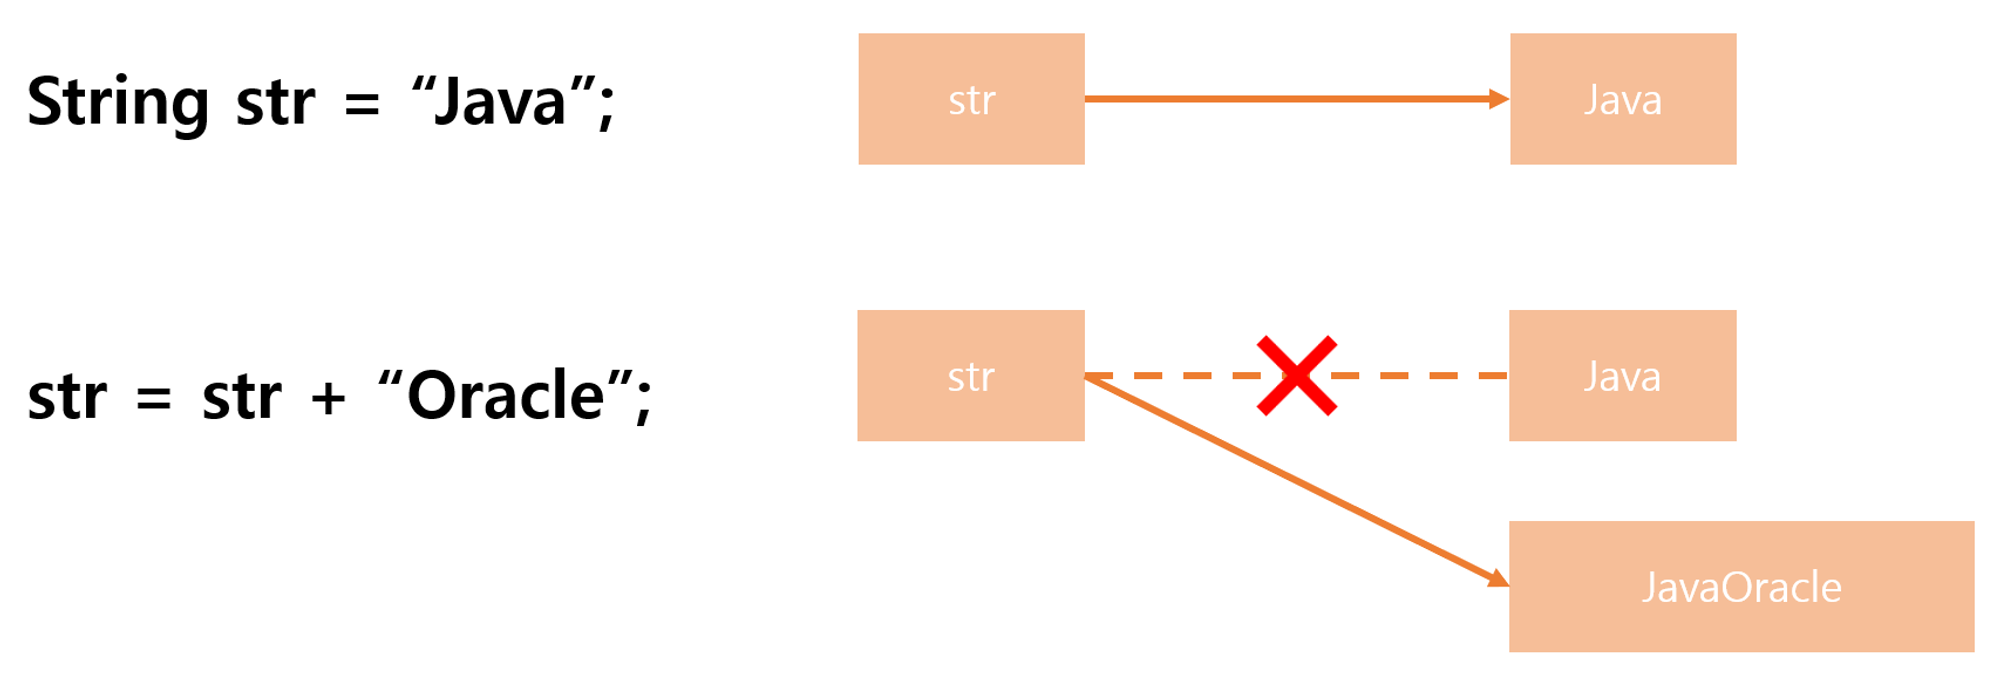
💡 자바에서 String 클래스는 문자열을 나타내는 자료형이다. String 클래스에는 문자열 관련된 작업을 할 때 유용하게 사용할 수 있는 다양한 메소드가 포함되어 있다. String 인스턴스는 한 번 생성되면 그 값을 읽기만 가능하고 변경할 수는 없다. 이러한 객체를 불변 객체(immutable object) 라고 한다.즉, 자바에서 덧셈(+) 연산자를 이용하여 문자열 결합을 하는 경우
기존 문자열이 변경되는 것이 아닌 문자열이 합쳐진 새로운 String 인스턴스가 생성되는 것이다.
1-2. String 주요 메소드
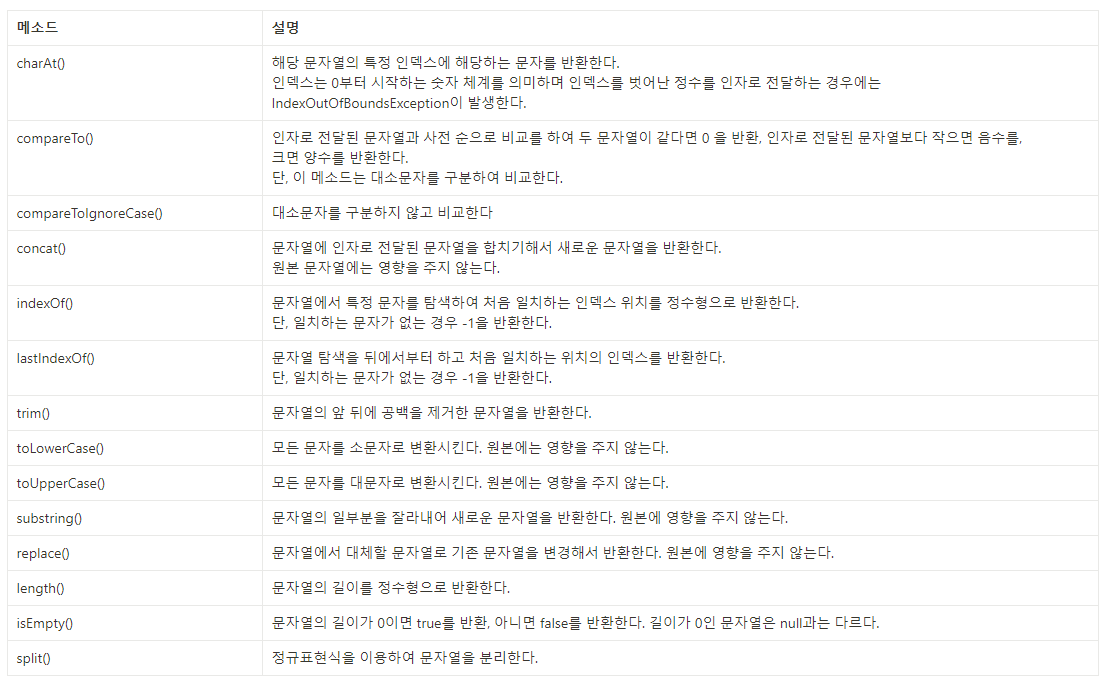
public class Application1 {
    public static void main(String[] args) {

        /* 수업목표. String 클래스의 자주 사용하는 메소드에 대해 숙지하고 응용할 수 있다. */

        /* 필기.
         *  chatAt(): 해당 문자열의 특정 인덱스에 해당하는 문자를 반환한다.
         *            (인덱스 체계: 0부터 시작)
        * */
        String str1 = "apple";

        for (int i = 0; i < str1.length(); i++) {
            System.out.println("charAt(" + i + "): " + str1.charAt(i));
        }

        /* 필기.
         *  compareTo(): 인자로 전달된 문자열과 사전 순으로 비교
        * */

        String str2 = "java";
        String str3 = "java";
        String str4 = "JAVA";
        String str5 = "mariaDB";

        System.out.println(str2.compareTo(str3));   // 0
        System.out.println(str2.compareTo(str4));   // 32
        System.out.println(str4.compareTo(str2));   // -32
        System.out.println(str2.compareTo(str5));   // -3
        System.out.println(str5.compareTo(str2));   // 3

        /* 필기.
         *  concat(): 문자열에 인자로 전달된 문자열을 합쳐서 새로운 문자열 반환
        * */
        System.out.println("concat(): " + str2.concat(str5));
        System.out.println("str2 = " + str2);

        /* 필기.
         *  indexOf(): 문자열에서 특정 문자를 탐색하여 처음 일치하는 인덱스 위치를 정수형으로 반환한다.
         *             (일치하지 않으면 -1 반환)
        * */
        String indexOf = "java mariaDB";
        System.out.println("indexOf('a'): " + indexOf.indexOf('a'));
        System.out.println("indexOf('z'): " + indexOf.indexOf('z'));

        /* 필기.
         *  lastIndexOf(): 문자열 탐색을 뒤에서부터 하고 처음 일치하는 위치의 인덱스를 반환한다.
         *                 (일치하지 않으면 -1 반환)
        * */
        System.out.println("LastIndexOf('a'): " + indexOf.lastIndexOf('a'));
        System.out.println("LastIndexOf('z'): " + indexOf.lastIndexOf('z'));

        /* 필기.
         *   trim(): 문자열의 앞 뒤에 공백을 제거한 문자열을 반환한다.
        * */
        String trimStr = "   java   ";
        System.out.println("trimStr : #" + trimStr + "#");
        System.out.println("trim() : #" + trimStr.trim() + "#");

        /* 필기.
         *  toLowerCase(): 모든 문자를 소문자로 변환
         *  toUpperCase(): 모든 문자를 대문자로 변환
        * */

        String caseStr = "javamariaDB";

        System.out.println("toLowerCase(): " + caseStr.toLowerCase());
        System.out.println("toUpperCase(): " + caseStr.toUpperCase());

        System.out.println("caseStr: " + caseStr);

        /* 필기.
         *  subString(): 문자열의 일부분을 잘라내어 새로운 문자열을 반환한다.
        * */

        String javamariaDB = "javamariaDB";

        System.out.println("subString(3, 6): " + javamariaDB.substring(3, 6));
        System.out.println("subString(3): " + javamariaDB.substring(3));

        System.out.println("javamariaDB: " + javamariaDB);

        /* 필기.
         *  replace(): 문자열에서 대체할 문자열로 기존 문자열을 변경해서 반환한다.
        * */
        System.out.println("replace(): " + javamariaDB.replace("java", "python"));
        System.out.println("javamariaDB: " + javamariaDB);

        /* 필기.
         *  length(): 문자열의 길이를 정수형으로 반환한다.
        * */
        System.out.println("length(): " + javamariaDB.length());    // 배열과 다르게 String은 length 뒤에 ()를 붙임
        System.out.println("빈 문자열 길이: " + "".length());

        /* 필기.
         *  isEmpty(): 문자열의 길이가 0이면 true를 반환, 아니면 false를 반환(null과 다름)
        * */
        System.out.println("isEmpty(): " + "".isEmpty());
        System.out.println("isEmpty(): " + "abc".isEmpty());
    }
}
public class Application2 {
public static void main(String[] args) {
/* 수업목표. 문자열 객체를 생성하는 다양한 방법을 숙지하고 인스턴스가 생성되는 방식을 이해할 수 있다. */
/* 필기.
* 문자열 객체를 만드는 방법
* "" 리터럴 형태: 동일한 값을 가지는 인스턴스를 단일 인스턴스로 관리한다.(singleton 개념)
* new String(""): 매번 새로운 인스턴스를 생성한다.(주소값이 다름)
* */
String str1 = "java";
String str2 = "java";
String str3 = new String("java");
String str4 = new String("java");
System.out.println("str1 == str2: " + (str1 == str2)); // true
System.out.println("str2 == str3: " + (str2 == str3)); // false
System.out.println("str3 == str4: " + (str3 == str4)); // false
/* 필기.
* String 객체는 리터럴로 생성될 때는 heap 영역의 상수풀(constant pool)에 생성된다.
* 상수풀은 동등한 String 객체를 하나만 저장하는(중복 제거) 공간으로 동일한 String 변수를 효율적으로 사용할 수 있도록 제공한다.
* (String의 equals()와 hashCode()를 통해 적용)
* */
/* 설명. 위의 네가지 경우 모두 동등한 String 객체이므로 equals는 true, hashcode는 같은 값이 나온다. */
System.out.println("str1.equals(str3): " + str1.equals(str3));
System.out.println("str1.hashCode() == str3.hashCode(): " + (str1.hashCode() == str3.hashCode()));
/* 필기.
* String은 불변객체(immutable class)이다.
* */
String str = "apple";
str += ", banana";
System.out.println("fruit: " + str);
}
}import java.util.Arrays;
import java.util.StringTokenizer;
public class Application3 {
public static void main(String[] args) {
/* 수업목표. 문자열 분리에 대해 이해하고 적용할 수 있다. */
/* 필기.
* 문자열을 특정 구분자로하여 분리한 문자열을 반환하는 기능을 한다.
* split(): 정규표현식을 이용하여 비정형화된 문자열을 분리한다.
* (String을 파싱하여 String[]로 만들어줌)
* StringTokenizer: 문자열의 모든 문자들을 구분자를 활용하여 문자열을 분리한다.
* */
String emp1 = "100/홍길동/서울/영업부";
String emp2 = "200/유관순//총무부";
String emp3 = "300/이순신/경기도/";
String[] empArr1 = emp1.split("/");
String[] empArr2 = emp1.split("/");
String[] empArr3 = emp1.split("/");
System.out.println(Arrays.toString(empArr1));
System.out.println(Arrays.toString(empArr2));
System.out.println(Arrays.toString(empArr3));
System.out.println();
/* 설명. StringTokenizer를 통해 문자열에서 구분자를 통해 토큰 단위로 구분하여 활용하기 */
String colors = "red, yellow, green, purple, blue";
StringTokenizer colorStringTokenizer = new StringTokenizer(colors, ",");
while (colorStringTokenizer.hasMoreElements()) {
System.out.println(colorStringTokenizer.nextToken());
}
}
}public class Application4 {
public static void main(String[] args) {
/* 수업목표. 이스케이프(escape) 문자에 대해 이해하고 적용할 수 있다. */
/* 필기.
* 이스케이프(escape) 문자
* 문자열 내에서 사용하는 특수기능을 위한 문자이다.
*
* 필기.
* \n: 개행
* \t: 탭
* \': 작은 따옴표
* \": 큰 따옴표
* \\: 역슬래쉬 표시
* */
System.out.println("안녕하세요. \n저는 홍길동 입니다");
System.out.println("안녕하세요. \t저는 홍길동 입니다");
System.out.println("안녕하세요 저는 '홍길동'입니다.");
System.out.println('\'');
System.out.println("안녕하세요 저는 \"홍길동\"입니다");
System.out.println("역슬래쉬(\\)입니다");
/* 설명. 이스케이프 문자 외에도 printf관련 문법도 있으니 참고하자. */
System.out.printf("원주율은 %.2f입니다. 우린 %d로 하죠", 3.141592, 3);
}
}3. StringBuilder & StringBuffer
1. String Builder & String Buffer 개요
1-1. String vs StringBuilder/StringBuffer
💡 자바에서 문자열 처리를 할 때 가장 많이 사용하게 되는 클래스는 String, StringBuffer, StringBuilder 가 있다. 이 각각의 클래스는 특징이 있다. String은 불변하기 때문에 값을 변경할 수가 없다. 이를 해결하기 위해서 StringBuffer와 StringBuilder가 등장했다.그러면 StringBuffer와 StringBuilder의 차이점은 무엇일까? Thread safe에 있다.
StringBuffer는 Thread Safe 하지만, StringBuilder는 그렇지 않다.
StringBuffer는 synchronized 키워드가 선언되어 있기 때문에 멀티스레드에서 안전하지만 속도는 StringBuilder에 비해 느리다.
| String | StringBuilder | StringBuffer | |
|---|---|---|---|
| modifiable | X | O | O |
| thread safe | O | X | O |
| synchronized | X | X | O |
| performance | 빠름 | 빠름 | 느림 |
public class Application1 {
    public static void main(String[] args) {

        /* 수업목표. String과 StringBuilder의 차이점에 대해 이해하고 사용할 수 있다. */
        /* 필기.
         *  StringBuilder: StringBuffer보다 성능이 좋음
         *  StringBuffer: thread safe 기능이 추가적으로 동작함.(상대적으로 성능이 안좋음)
        * */
        StringBuilder sb1 = new StringBuilder("java");
//        StringBuilder sb2 = "java";       // StringBuilder는 문자열을 다루지만 리터럴은 다루지 않음
        System.out.println(sb1);

        /* 설명. String과 StringBuilder로 수정시 객체 주소값 변화 살펴보기 */
        String testStr = "java";
        StringBuilder testSb = new StringBuilder("kotlin");

        for (int i = 0; i < 9; i++) {
            testStr += i;
            testSb.append(i);

            /* 필기.
             *  String은 hashCode() 메소드가 동등 비교를 위해 오버라이딩이 되어 있어 주소값 확인을 하기 힘들다.
             *  따라서 System.identityHashCode() 메소드를 활용해 String으로 관리되는 문자열과 StringBuilder로
             *  관리되는 문자열이 각각 변화를 줄 떄 새로운 객체를 생성하는지 살펴보자.
            * */
            System.out.println("String의 경우: " + System.identityHashCode(testStr));
            System.out.println("StringBuilder의 경우: " + System.identityHashCode(testSb));
        }

        System.out.println("String의 결과: " + testStr);
        System.out.println("StringBuilder의 결과: " + testSb);
    }
}
public class Application2 {
public static void main(String[] args) {
/* 수업목표. StringBuilder의 자주 사용되는 메소드의 용법을 이해할 수 있다. */
StringBuilder sb = new StringBuilder();
System.out.println(sb.capacity());
/* 필기. capacity(): 용량을 정수형으로 반환하는 메소드(초기 16byte 할당) */
for (int i = 0; i < 50; i++) {
sb.append(i);
/* 설명. 용량은 초과할 것 같으면 (X2 + 1)만큼씩 증가한다. */
System.out.println("sb: " + sb);
System.out.println("capacity: " + sb.capacity());
System.out.println("hashCode: " + System.identityHashCode(sb));
}
// StringBuilder sb2 = new StringBuilder("javamariaDB"); // 문자열 크기 + 16byte
StringBuffer sb2 = new StringBuffer("javamariaDB"); // 문자열 크기 + 16byte
/* 필기.
* delete(): 시작 인덱스와 종료 인덱스를 이용해서 문자열에서 원하는 부분의 문자열을 제거한다.
* deleteCharAt(): 문자열 인덱스를 이용해서 문자 하나를 제거한다.
* */
// System.out.println("delete(): " + sb2.delete(2, 5)); // jaariaDB
// System.out.println("deleteCharAt(): " + sb2.deleteCharAt(0)); //avamariaDB
/* 필기.
* insert(): 인자로 전달된 값을 문자열로 변환 후 지정한 인덱스 위치에 추가한다.
* */
// System.out.println("insert(): " + sb2.insert(1, "vao"));
// System.out.println("insert(): " + sb2.insert(0, "j"));
// System.out.println("insert(): " + sb2.insert(sb2.length(), "jdbc"));
/* 필기.
* reverse(): 문자열 인덱스 순번을 역순으로 재배열한다.
* */
System.out.println("reverse(): " + sb2.reverse());
/* 필기. String 클래스와 동일한 메소드도 일부 제공된다. */
}
}4. Wrapper
1. Wrapper 개요
1-1. Wrapper 클래스란?
💡 래퍼클래스는 기본 타입의 데이터를 인스턴스화 해야 하는 경우에 사용한다. 예를 들어 특정 메소드가 매개변수로 객체 타입만 요구하게 되면 기본 타입의 데이터를 먼저 인스턴스로 변환 후 넘겨줘야한다. 이 때 8가지에 해당하는 기본 타입의 데이터를 인스턴스화 할 수 있도록 하는 클래스를 래퍼클래스 (Wrapper class) 라고 한다. (주방에서 사용하는 랩(Wrap)과 같은 의미로 감싼다는 의미이다.)1-2. 래퍼 클래스 종류
| 기본 타입 | 래퍼 클래스 |
|---|---|
| byte | Byte |
| short | Short |
| int | Integer |
| long | Long |
| float | Float |
| double | Double |
| char | Character |
| boolean | Boolean |
1-3. 박싱(Boxing)과 언박싱(UnBoxing)
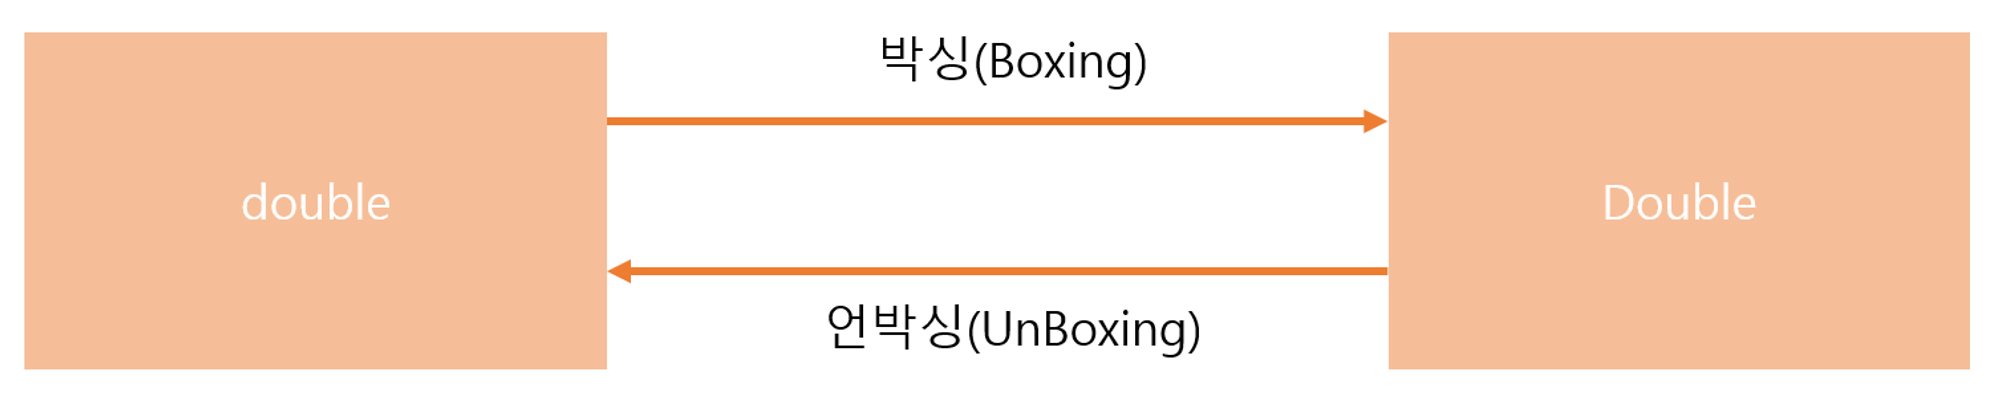
- 박싱(Boxing)과 언박싱(UnBoxing)
- 기본타입을 래퍼클래스의 인스턴스로 인스턴스화 하는 것을 박싱(Boxing)이라 한다.
- 래퍼클래스 타입의 인스턴스를 기본 타입으로 변경하는 것을 언박싱(UnBoxing)이라고 한다.
- 오토 박싱(AutoBoxing)과 오토 언박싱(AutoUnBoxing)
- JDK 1.5부터는 박싱과 언박싱이 필요한 상황에서 자바 컴파일러가 이를 자동으로 처리해준다.
- 자동화된 박싱과 언박싱을 오토박싱, 오토 언박싱 이라고 부른다.
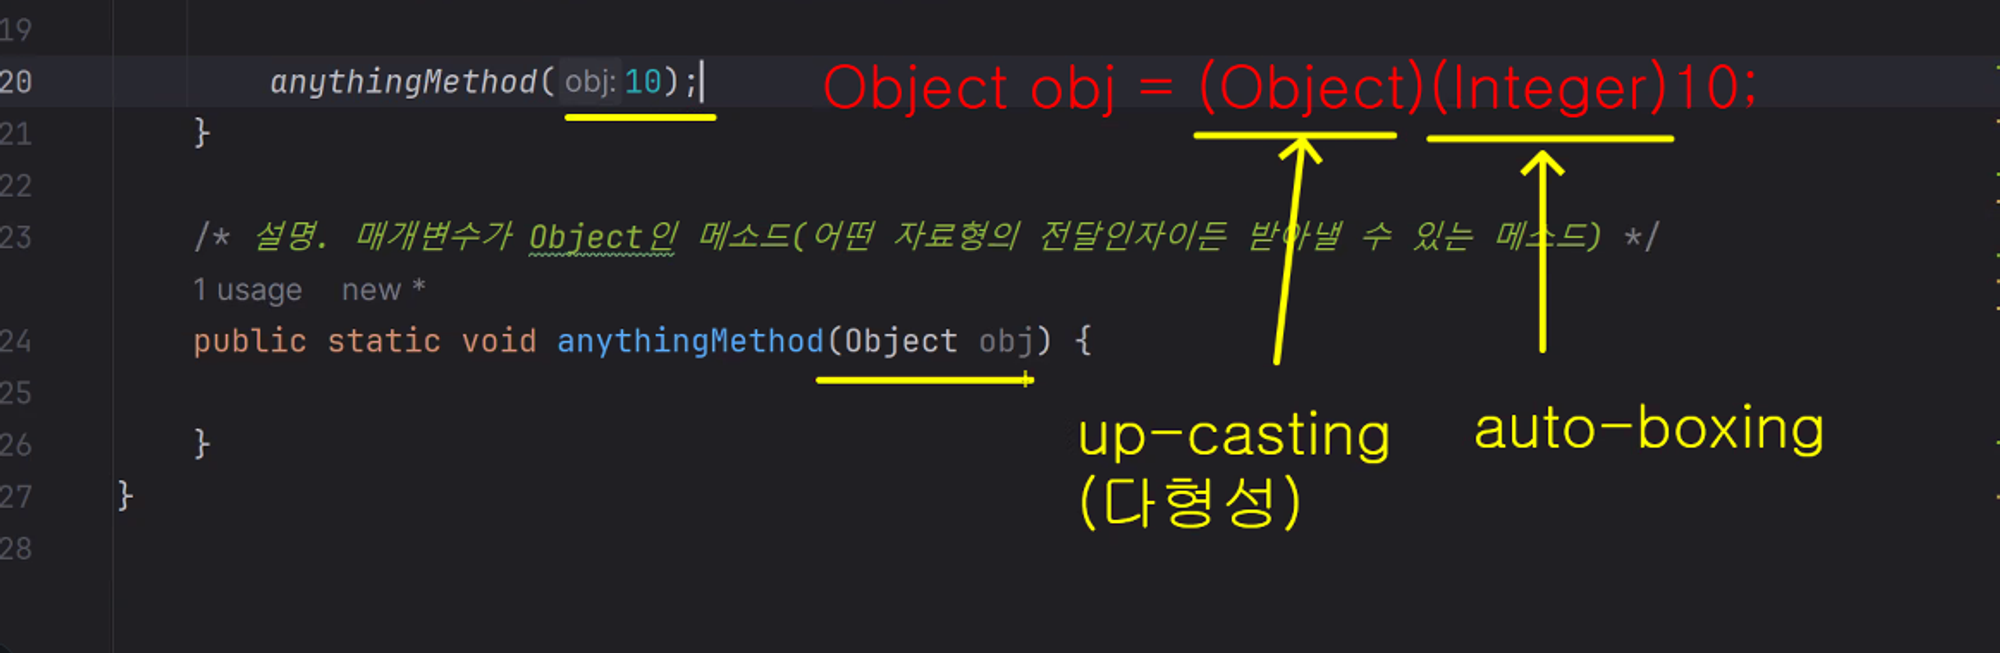
public class Application1 {
    public static void main(String[] args) {

        /* 수업목표. Wrapper 클래스에 대해 이해할 수 있다. */
        int intValue = 20;

        /* 설명. 기본자료형을 Wrapper클래스 자료형으로 변환할 수 있다.(박싱, boxing) */
        Integer boxingInt = (Integer)20;
        Integer boxingInt2 = Integer.valueOf(intValue);

        /* 설명. Wrapper클래스 자료형을 기본자료형으로 변환할 수 있다.(언박싱, unboxing) */
        int unboxingValue = boxingInt.intValue();

        /* 설명. 기본자료형과 Wrapper 클래스는 자동으로 박싱 및 언박싱이 일어난다.(autoboxing, auto-unboxing) */
        Integer autoBoxingInt = intValue;
        int autoUnboxingValue = autoBoxingInt;

        AnythingMethod(10);

        /* 설명. Wrapper 클래스 값 비교 */
        /* 설명. Wrapper 클래스들도 리터럴(literal) 값으로 오토박싱하면 결국 동일한 객체 하나만 관리된다. */
        Integer integerTest = (Integer)30;
        Integer integerTest2 = (Integer)30;
        System.out.println(" == 비교: " + (integerTest == integerTest2));
//        System.out.println(" equals() 비교: " + integerTest.equals(integerTest2));
        System.out.println("integerTest 주소: " + System.identityHashCode(integerTest));
        System.out.println("integerTest2 주소: " + System.identityHashCode(integerTest2));
    }

    /* 설명. 매개변수가 Object인 메소드(어떤 자료형의 전달인자이든 받아낼 수 있는 메소드) */
    public static void AnythingMethod(Object obj) {     // 10 -> Integer(오토박싱) -> Object(다형성)
        System.out.println("obj: " + obj);              // Object의 toString()이 아닌 Integer의 toString()이 실행됨(동적 바인딩)
    }
}
public class Application2 {
public static void main(String[] args) {
byte b = Byte.parseByte("1");
short s = Short.parseShort("2");
int i = Integer.parseInt("4");
long l = Long.parseLong("8");
float f = Float.parseFloat("4.0");
double d = Double.parseDouble("8.0");
boolean bl = Boolean.parseBoolean("true");
char c = "abc".charAt(0);
}
}public class Application3 {
public static void main(String[] args) {
String b = Byte.valueOf((byte)1).toString();
String s = Short.valueOf((short)2).toString();
String i = Integer.valueOf(4).toString();
String l = Long.valueOf(8L).toString();
String f = Float.valueOf(4.0f).toString();
String d = Double.valueOf(8.0).toString();
String bl = Boolean.valueOf(true).toString();
String c = Character.valueOf('a').toString();
String str = String.valueOf(10);
String str2 = 123 + "";
}
}5. Time 패키지
1. Time 패키지 들어가기 전
Java에서 기본적으로 사용했던 날짜와 시간을 다루는 API는 java.util.Date 와 java.util.Calendar 였다.
하지만 Date, Calendar 는 사용하기 불편하고 여러가지 문제가 많아서 JDK 8 에서 개선된 날짜와 시간 API(java.time 패키지)를 제공하였다.
이 챕터에서는 기존의 시간/날짜 관련 패키지를 간단하게 보고 개선된 이후 달라진 점을 알아보도록 하겠다.
2. Date 와 Calendar 클래스
2-1. Date 클래스는 Deprecated
💡 Date 클래스는 JDK 1.0 부터 날짜를 가볍게 취급하기 위해 사용되던 클래스(`java.util` 에 속한 클래스)이다. 지금은 생성자를 비롯해 대부분의 메소드가 Deprecated 되어있다.Deprecated란?
향후 버전이 업데이트 되면서 사라지게 될 기능이니 가급적이면 사용을 권장하지 않는다는 의미이다.
하지만 하위 버젼의 호환성 때문에 한 번에 제거된 것은 아니고 남겨두었기 때문에 사용하는 것은 가능하다.
Date 는 JDK1.0 부터 제공된 날짜/시간 관련 클래스이다. 해당 클래스의 기능은 정말 기능이 적어서 개발에 적용하기 쉽지 않았다.
그래서 자바에서는 JDK 1.1 부터 Calendar 라는 새로운 클래스를 제공하였다.
Date 클래스는 간단하게 인스턴스 생성하는 방법만 보도록 하겠다.
2-3. Calendar 클래스란?
💡 Calendar 클래스는 JDK 1.1 부터 새롭게 제공되는 시간과 날짜에 관한 처리를 담당하는 클래스이다. Calendar 클래스가 추가되면서 Date의 많은 메소드는 Deprecated 되었다.Calendar 클래스가 등장하면서 Date 클래스보다는 많은 보완이 되었지만, 여전히 다양한 단점이 존재하고 있었다.
-
Calendar 인스턴스는 불변객체가 아니기 때문에 값을 수정할 수 있다.
set 메소드를 통해 값을 변경할 수 있기 때문에 어느 흐름에 중간에 값이 바뀐다고 하면 알아채기가 힘들고 사이드 이팩트가 발생할 가능성이 높다.
또한 멀티 스레드 환경에서도 안전하지 않다. -
윤초(leap second)를 고려하지 않는다.
윤초란?
협정 세계시에서 사용하는 세슘 원자 시계와 실제 지구의 자전/공전 속도를 기준으로 한 태양시의 차이로 인해 발생한 오차를 보정하기 위해 추가하는 1초이다. 12월 31일의 마지막에 추가하거나, 혹은 6월 30일의 마지막에 추가한다. 윤초는 사소해 보이지만 실제 2012년 링크드인 과 같은 대규모 서비스의 서버를 마비시킨 버그를 발생한 적 도 있다. -
Calendar 클래스는 월을 나타낼 때 0 부터 11까지로 표현하는 불편함이 있다.
하지만 일주일을 나타내는 숫자는 1부터 시작이다. 즉, 일관성이 부족하다.
이러한 단점들이 존재함에도 Calendar 와 Date 클래스는 꽤나 오랫동안 사용된 클래스이기 때문에 아직도 사용되는 곳이 생각보다 많이 존재한다.
따라서 Calendar 로 구현되어 있는 소스도 이해할 수 있을 정도는 되어야 한다. 간단하게 예제를 통해 알아보도록 하자.
-
Date와 Calendar 간의 변환
위에서 언급했듯이 Calendar 클래스가 추가되면서 Date의 많은 메소드가 deprecated가 되었다. 그럼에도 불구하고 Date 를 사용해야 하는 경우가 있기 때문에 서로 변환하는 방법도 간단하게 알아보자
public static void main(String[] args) { /* Calendar 를 Date 로 변환 */ Calendar calendar = Calendar.getInstance(); System.out.println("calendar = " + calendar); Date date = new Date(calendar.getTimeInMillis()); System.out.println("date = " + date); }- 실행결과
calendar = java.util.GregorianCalendar[time=1665536333516,areFieldsSet=true,areAllFieldsSet=true,lenient=true,zone=sun.util.calendar.ZoneInfo[id="Asia/Seoul",offset=32400000,dstSavings=0,useDaylight=false,transitions=22,lastRule=null],firstDayOfWeek=1,minimalDaysInFirstWeek=1,ERA=1,YEAR=2022,MONTH=9,WEEK_OF_YEAR=42,WEEK_OF_MONTH=3,DAY_OF_MONTH=12,DAY_OF_YEAR=285,DAY_OF_WEEK=4,DAY_OF_WEEK_IN_MONTH=2,AM_PM=0,HOUR=9,HOUR_OF_DAY=9,MINUTE=58,SECOND=53,MILLISECOND=516,ZONE_OFFSET=32400000,DST_OFFSET=0]
date = Wed Oct 12 09:58:53 KST 2022
- 실행결과
public static void main(String[] args) {

    /* Date 를 Calendar 로 변환 */
    Date date = new Date();

    System.out.println("date = " + date);

    Calendar calendar = Calendar.getInstance();
    calendar.setTime(date);

    System.out.println("calendar = " + calendar);
}- 실행결과
date = Wed Oct 12 10:01:20 KST 2022
calendar = java.util.GregorianCalendar[time=1665536480924,areFieldsSet=true,areAllFieldsSet=true,lenient=true,zone=sun.util.calendar.ZoneInfo[id="Asia/Seoul",offset=32400000,dstSavings=0,useDaylight=false,transitions=22,lastRule=null],firstDayOfWeek=1,minimalDaysInFirstWeek=1,ERA=1,YEAR=2022,MONTH=9,WEEK_OF_YEAR=42,WEEK_OF_MONTH=3,DAY_OF_MONTH=12,DAY_OF_YEAR=285,DAY_OF_WEEK=4,DAY_OF_WEEK_IN_MONTH=2,AM_PM=0,HOUR=10,HOUR_OF_DAY=10,MINUTE=1,SECOND=20,MILLISECOND=924,ZONE_OFFSET=32400000,DST_OFFSET=0]
- java.util.Date 클래스 및 java.util.Calendar 클래스 이해하는 코드
import java.text.SimpleDateFormat;
import java.util.Date;

public class Application1 {
    public static void main(String[] args) {

        /* 수업목표. java.util.Date 클래스 사용법을 이해하고 사용할 수 있다. */
        Date today = new Date();
        System.out.println("today = " + today);

        System.out.println("long 타입 시간: " + today.getTime());
        System.out.println("long 타입 시간을 활용한 Date형: " + new Date(today.getTime()));
        System.out.println("기준시간(1970년 9시 0분 0초): " + new Date(0L));

        /* 설명. 우리가 원하는 형태로 출력해 보기(feat.SimpleDateFormat, long타입 활용하기) */
//        SimpleDateFormat sdf = new SimpleDateFormat("yyyy/MM/dd hh:mm:ss");
        SimpleDateFormat sdf = new SimpleDateFormat("yyyy년 MM월 dd일 hh:mm:ss E요일");
        String todayFormat = sdf.format(today);
        System.out.println("todayFormat = " + todayFormat);

        /* 설명. java.util.Date -> java.sql.Date */
        java.sql.Date sqlDate = new java.sql.Date(today.getTime()); // java.util.Date를 long형으로 변환 sql.Date
//        java.sql.Date sqlDate2 = (java.sql.Date)today;            // 실제로는 sql.Date형이었던 날짜형을 Util.Date형인 today에 담겨 있었다면 이 방법도 가능하다.

        /* 설명. java.sql.Date -> java.java.Date */
        java.util.Date utilDate = sqlDate;                          // 다형성이 적용된다.
    }
}
import java.sql.SQLOutput; import java.text.SimpleDateFormat; import java.util.Calendar; import java.util.Date; import java.util.GregorianCalendar; public class Application2 { public static void main(String[] args) { /* 수업목표. java.util.Calendar 클래스 사용법을 이해하고 사용할 수 있다. */ /* 필기. * Date형 대비 개선점 * 1. timezone과 관련된 기능이 추가되었다. * 2. 윤년 관련 기능이 내부적으로 추가되었다. * 3. 날짜 및 시간 필드타입 개념을 추가해 불필요한 메소드명을 줄였다. * */ /* 설명. Calendar 자료형은 생성자를 통해 객체를 생성할 수 없다. */ Calendar cal = Calendar.getInstance(); System.out.println("cal = " + cal); Calendar cal2 = new GregorianCalendar(); System.out.println("cal2 = " + cal2); int year = 1998; int month = 6; // 입력하고자 하는 월 - 1 int dayOfMonth = 21; int hour = 16; int min = 0; int second = 0; Calendar birthDay = new GregorianCalendar(year, month, dayOfMonth, hour, min, second); System.out.println(birthDay); /* 설명. GregorianCalendar 객체가 가진 값 확인 */ System.out.println("태어난 해: " + birthDay.get(1)); System.out.println("태어난 해: " + birthDay.get(Calendar.YEAR)); System.out.println("태어난 월: " + (birthDay.get(2) + 1)); // get() 메소드로 반환받은 값에 + 1을 해줘야 우리가 생각하는 월의 개념이 된다. System.out.println("태어난 월: " + (birthDay.get(Calendar.MONTH) + 1)); // get() 메소드로 반환받은 값에 + 1을 해줘야 우리가 생각하는 월의 개념이 된다. System.out.println("태어난 일: " + birthDay.get(5)); System.out.println("태어난 일: " + birthDay.get(Calendar.DAY_OF_MONTH)); /* 설명. 요일에 대해 알아보자. */ String day = ""; switch (birthDay.get(Calendar.DAY_OF_WEEK)) { case Calendar.SUNDAY: day = "일"; break; case Calendar.MONDAY: day = "월"; break; case Calendar.TUESDAY: day = "화"; break; case Calendar.WEDNESDAY: day = "수"; break; case Calendar.THURSDAY: day = "목"; break; case Calendar.FRIDAY: day = "금"; break; case Calendar.SATURDAY: day = "토"; } System.out.println("내 생일은 " + day + "요일이야"); /* 설명. 하나씩 불러와 보자. */ System.out.println("AM/PM: " + birthDay.get(Calendar.AM_PM)); // 0은 오전, 1은 오후 System.out.println("hourOfDay: " + birthDay.get(Calendar.HOUR_OF_DAY)); // 24시간 체계 System.out.println("hour: " + birthDay.get(Calendar.HOUR)); // 12시간 체계 System.out.println("min: " + birthDay.get(Calendar.MINUTE)); System.out.println("second: " + birthDay.get(Calendar.SECOND)); /* 설명. SimpleDateFormat 활용하기(feat. java.util.Date형으로 변환 후 활용) */ SimpleDateFormat sdf = new SimpleDateFormat("yyyy/MM/dd hh:mm:ss E요일"); String birthDayString = sdf.format(new java.util.Date(birthDay.getTimeInMillis())); System.out.println("birthDayString = " + birthDayString); } }
3 Time 패키지
지금까지 간단하게 Date, Calendar 클래스에 대해 간단하게 알아보았다.
JDK 1.8 버전에 추가된 Time 패키지는 기존에 Date, Calendar 가 가지고 있는 단점들을 해소하기 위해서 탄생되었다.
3-1. Time 패키지
Time 패키지는 4개의 하위 패키지를 가지고 있다.
| 패키지 | 설명 |
|---|---|
| java.time | 날짜와 시간 관련 클래스들을 제공한다 |
| java.time.chrono | ISO-8601 에 정의된 외에 달력 시스템을 위한 클래스들을 제공한다 |
| java.time.format | 날짜와 시간 파싱과 형식화 관련 클래스들을 제공한다 |
| java.time.temporal | 날짜와 시간의 필드와 단위 관련 클래스들을 제공한다 |
| java.time.zone | 시간대 관련된 클래스들을 제공한다 |
Time 패키지의 가장 큰 장점은 Date와 Calendar와 다르게 불변하다. 즉 String 처럼 날짜와 시간을 변경을 하면 기존의 객체가 변경되는 것이 아닌 새로운 객체가 반환된다. 불변함으로 멀티스레드 환경에서도 안전하다.
3-2. Time 패키지의 핵심 클래스
| 클래스명 | 설명 |
|---|---|
| LocalTime | 시간 관련 작업할 때 사용하는 클래스. LocalTime 객체는 두 개의 정적 메소드를 통해 반환 받을 수 있다. |
| LocalDate | 날짜 관련 작업할 때 사용하는 클래스. LocalDate 객체도 두 개의 정적 메소드로 반환 받는다. |
| LocalDateTime | 시간과 날짜를 함께 작업해야할 때 사용하는 클래스 |
| ZonedDateTime | 시간대(Time Zone) 을 활용한 작업해야할 때 사용하는 클래스 |
- Time 패키지 핵심 클래스 코드
import java.time.*;

public class Application1 {
    public static void main(String[] args) {

        /* 수업목표. time 패키지에서 제공하는 클래스들의 사용법을 이해할 수 있다. */
        LocalTime timeNow = LocalTime.now();
        LocalTime timeOf = LocalTime.of(18, 30, 20);
        System.out.println("timeNow = " + timeNow);     // 현재 시간
        System.out.println("timeOf = " + timeOf);       // 지정한 시간

        LocalDate dateNow = LocalDate.now();
        LocalDate dateOf = LocalDate.of(2024, 1, 22);
        System.out.println("dateNow = " + dateNow);
        System.out.println("dateOf = " + dateOf);

        LocalDateTime dateTimeNow = LocalDateTime.now();
        LocalDateTime dateTimeOf = LocalDateTime.of(dateNow, timeNow);
        System.out.println("dateTimeNow = " + dateTimeNow);
        System.out.println("dateTimeOf = " + dateTimeOf);

        ZonedDateTime zonedDateTimeNow = ZonedDateTime.now();
        ZonedDateTime zonedDateTimeOf = ZonedDateTime.of(dateOf, timeOf, ZoneId.of("Asia/Seoul"));
        System.out.println("zonedDateTimeNow = " + zonedDateTimeNow);
        System.out.println("zonedDateTimeOf = " + zonedDateTimeOf);

    }
}
import java.time.LocalDate; import java.time.LocalTime; import java.time.ZonedDateTime; public class Application2 { public static void main(String[] args) { /* 수업목표. time 패키지의 클래스들이 가지고 있는 필드값들을 확인할 수 있다. */ LocalTime localTime = LocalTime.now(); System.out.println("localTime = " + localTime); System.out.println("시간: " + localTime.getHour()); System.out.println("분: " + localTime.getMinute()); System.out.println("초: " + localTime.getSecond()); System.out.println("나노초: " + localTime.getNano()); LocalDate localDate = LocalDate.now(); System.out.println("localDate = " + localDate); System.out.println("년: " + localDate.getYear()); System.out.println("월: " + localDate.getMonth()); System.out.println("월 숫자: " + localDate.getMonthValue()); System.out.println("월 중에 몇 번째 일: " + localDate.getMonthValue()); System.out.println("1년 중에 몇 번째 일: " + localDate.getDayOfYear()); System.out.println("한 주의 몇 번째 일: " + localDate.getDayOfWeek()); ZonedDateTime zonedDateTime = ZonedDateTime.now(); System.out.println("zonedDateTime = " + zonedDateTime); System.out.println("zone 정보: " + zonedDateTime.getZone()); System.out.println("시차: " + zonedDateTime.getOffset()); } }import java.time.LocalDateTime; public class Application3 { public static void main(String[] args) { /* 수업목표. time 패키지 클래스를 활용한 덧셈, 뺄셈 및 불변 특성을 이해할 수 있다. */ LocalDateTime localDateTime = LocalDateTime.now(); System.out.println("현재 시간: " + localDateTime); System.out.println("주소값 : " + System.identityHashCode(localDateTime)); LocalDateTime localDateTime2 = localDateTime.plusMinutes(30); System.out.println("30분 후: " + localDateTime2); System.out.println("주소값: " + System.identityHashCode(localDateTime2)); LocalDateTime localDateTime3 = localDateTime.minusHours(3); System.out.println("3시간 전: " + localDateTime3); System.out.println("주소값: " + System.identityHashCode(localDateTime3)); } }import java.time.LocalDate; import java.time.LocalDateTime; import java.time.ZonedDateTime; public class Application4 { public static void main(String[] args) { /* 수업목표. time 패키지의 클래스가 제공하는 날짜 비교 연산 메소드를 활용할 수 있다. */ LocalDate localDate = LocalDate.now(); LocalDateTime localDateTime = LocalDateTime.now(); ZonedDateTime zonedDateTime = ZonedDateTime.now(); LocalDate past = LocalDate.of(2022, 11, 11); LocalDateTime future = LocalDateTime.of(2024, 6, 14, 18, 0,0); ZonedDateTime now = ZonedDateTime.now(); /* 설명. 이전, 이후, 같은 날짜 확인(각 time 패키지 자료형마다 메소드를 제공하지만 전달인자는 같은 타입이어야 한다.) */ System.out.println(localDate.isAfter(past)); System.out.println(localDateTime.isBefore(future)); System.out.println(zonedDateTime.isEqual(now)); } }import java.time.LocalDate; import java.time.LocalDateTime; import java.time.LocalTime; import java.time.format.DateTimeFormatter; public class Application5 { public static void main(String[] args) { /* 수업목표. time 패키지의 클래스들에 포매팅을 적용하여 출력할 수 있다. */ /* 설명. 문자열을 time패키지 자료형으로 파싱할 수 있다. (자동 인식 가능한 문자열 패턴)*/ String timeNow = "14:05:10"; String dateNow = "2022-10-12"; LocalTime localTime = LocalTime.parse(timeNow); LocalDate localDate = LocalDate.parse(dateNow); LocalDateTime localDateTime = LocalDateTime.parse(dateNow + "T" + timeNow); System.out.println(localTime); System.out.println(localDate); System.out.println(localDateTime); /* 설명. 기본 패턴이 아닌 경우 */ String timeNow2 = "14-05-10"; String dateNow2 = "221005"; LocalTime localTime2 = LocalTime.parse(timeNow2, DateTimeFormatter.ofPattern("HH-mm-ss")); LocalDate localDate2 = LocalDate.parse(dateNow2, DateTimeFormatter.ofPattern("yyMMdd")); System.out.println(localTime2); System.out.println(localDate2); /* 설명. time패키지가 인식한 날짜 및 시간을 원하는 문자열로 반환하기 */ String dateFormat = localDate2.format(DateTimeFormatter.ofPattern("yyyy-MM-dd")); String timeFormat = localTime2.format(DateTimeFormatter.ofPattern("HH mm")); System.out.println(dateFormat); System.out.println(timeFormat); } }