1. 메소드
1. 메소드 개요
1-1. 메소드란?
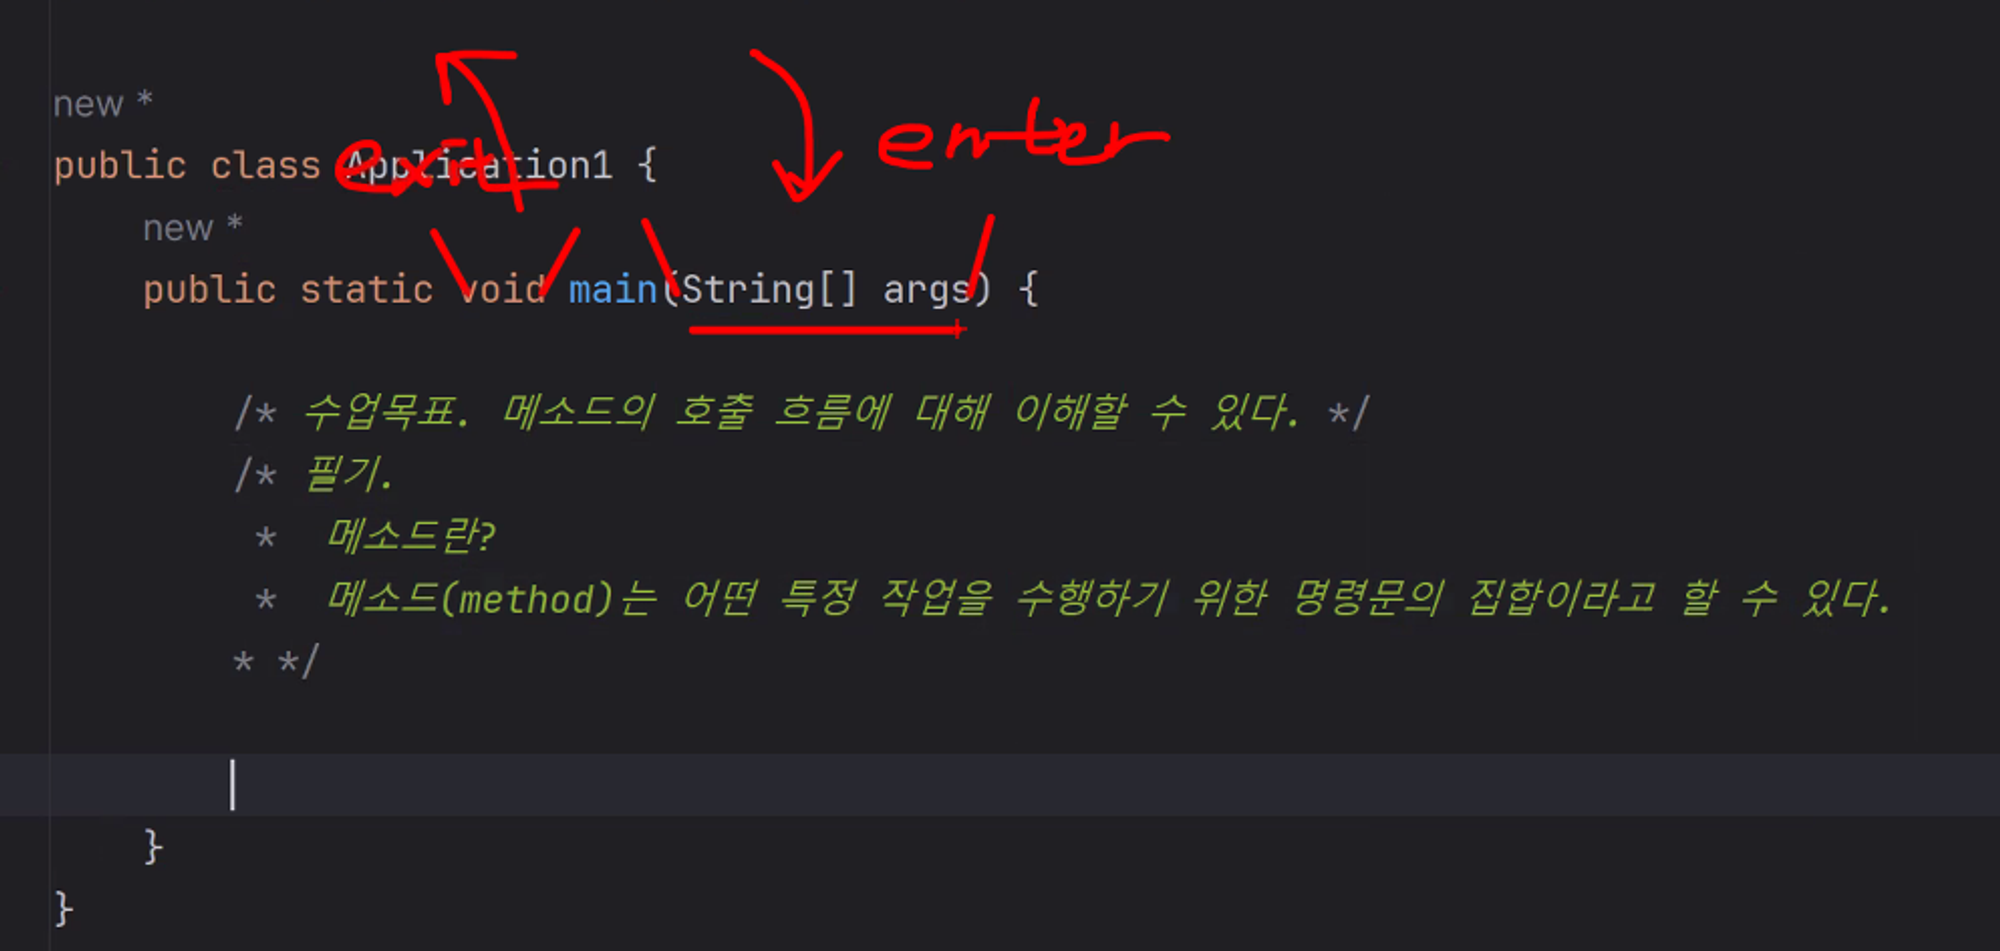
💡 메소드(method)는 어떤 특정 작업을 수행하기 위한 명령문의 집합이라고 할 수 있다. 자세한 메소드 사용법은 객체 부분에서 다루게 되니 지금은 호출 흐름에 대해 이해할 수 있도록 하자.- 자바에서 기능을 하는 것 = 메소드
- 모든 메소드는 클래스 안에 존재해야 함(ex: main)
1-2. 메소드의 사용 목적
- 중복되는 코드를 메소드로 만들어 코드의 반복 사용을 피할 수 있다.
- 코드의 가독성이 좋아진다.
- 기능의 변경이 필요한 경우 메소드 부분만 수정하면 되기 때문에, 손쉬운 유지보수가 가능하다.
1-3. 메소드 선언
접근제어자 반환타입 메소드이름 (매개변수 목록) {

		// 실행할 코드

		// 반환타입이 있을경우 반환타입에 맞게 return 작성
		// 반환타입이 void인 경우 생략
		return ...;
}-
접근 제어자 : 메소드에 접근할 수 있는 범위
A. public : 어디서나 접근 가능
B. protected : 상속관계이거나 같은 패키지에서 접근 가능
C. default(생략가능) : 같은 패키지에서 접근 가능
D. private : 같은 클래스 내부에서만 접근 가능
-
반환 타입(return type) : 메소드가 모든 작업을 마치고 반환하는 데이터의 타입
A. void : 리턴값 없음
B. 기본 변수 자료형 : int, float, 등등
C. 오브젝트형 : String, 이외 사용자 정의타입
-
메소드 이름 : 메소드를 호출하기 위한 이름
-
매개변수 목록(parameters) : 메소드 호출 시에 전달되는 인수의 값을 저장할 변수들
-
실행할 코드 : 메소드의 기능을 수행하는 코드
1-4. 메소드 호출
- 미리 정의한 메소드는 참조연산자(.)를 통해 호출할 수 있다.
public class Application {

   public static void main(String[] args) {

      Application app = new Application();

			//레퍼런스변수이름.메소드이름();
      app.methodA();
			//레퍼런스변수이름.메소드이름(매개변수1, 매개변수2, ...)
      app.methodB(10);
   }

   public void methodA(){
      System.out.println("method A 호출됨....");
   }

   public void methodB(int x) {
      System.out.println("method B 로 " + x + " 값 넘어옴...");
   }

}-
실행결과
method A 호출됨.... method B 로 10 값 넘어옴... -
내가 작성한 코드
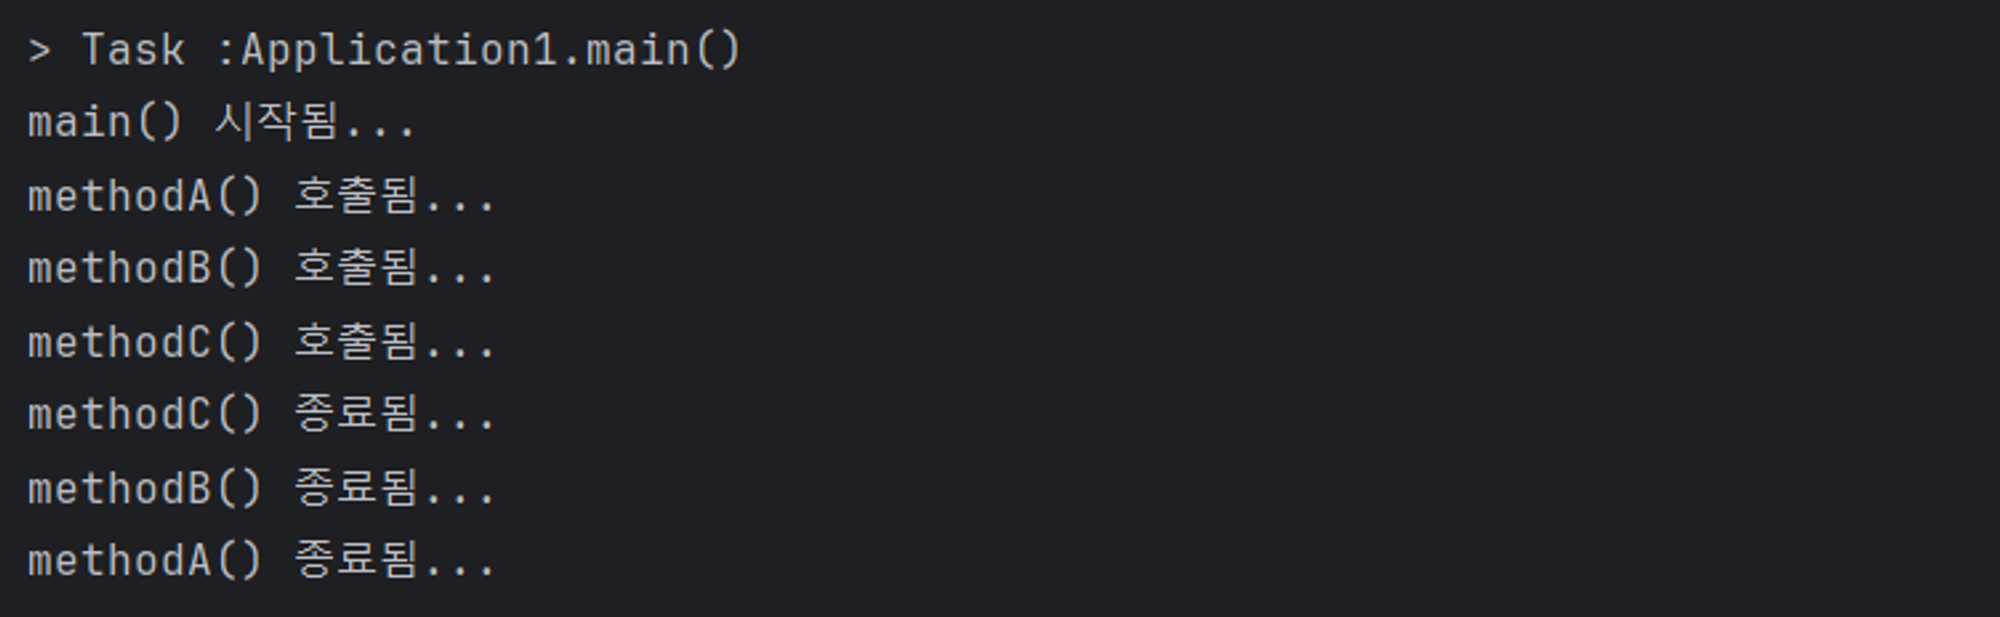
public class Application1 { public static void main(String[] args) { /* 수업목표. 메소드의 호출 흐름에 대해 이해할 수 있다.(메소드 호출 시 내부에서 또 다른 메소드 다시 호출하기) */ /* 필기. * 메소드란? * 메소드(method)는 어떤 특정 작업을 수행하기 위한 명령문의 집합이라고 할 수 있다. * */ System.out.println("main() 시작됨..."); methodA(); } public static void methodA() { System.out.println("methodA() 호출됨..."); // 메인에서 호출이 되어야 하는데 호출이 되지 않아서 결과값을 호출 할 수 없음 // 호출이 되려면 메인에서 호출 해야 함 methodA() methodB(); System.out.println("methodA() 종료됨..."); } public static void methodB() { System.out.println("methodB() 호출됨..."); methodC(); System.out.println("methodB() 종료됨..."); } public static void methodC() { System.out.println("methodC() 호출됨..."); System.out.println("methodC() 종료됨..."); } }-
결과
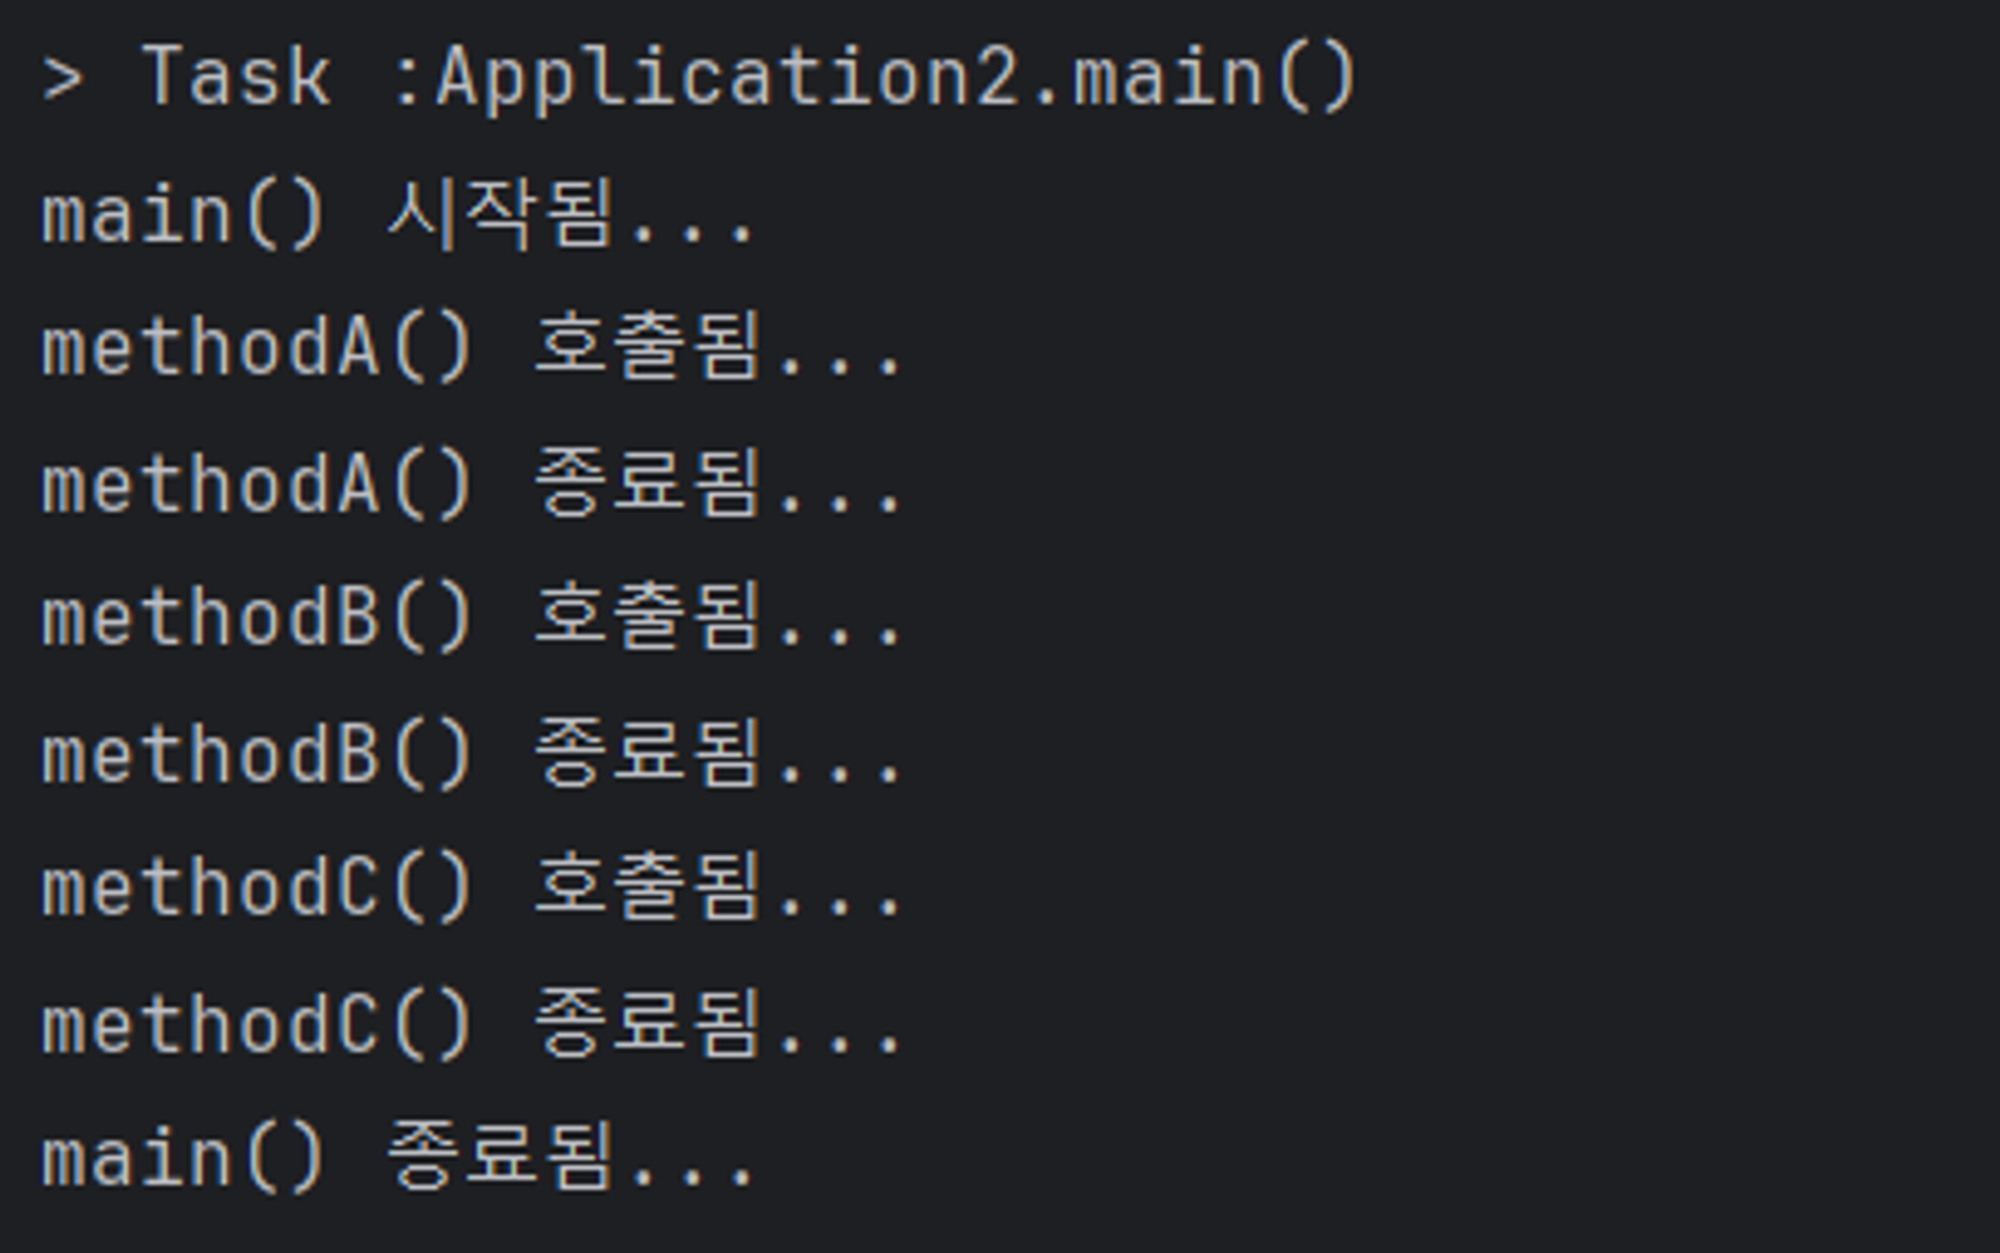
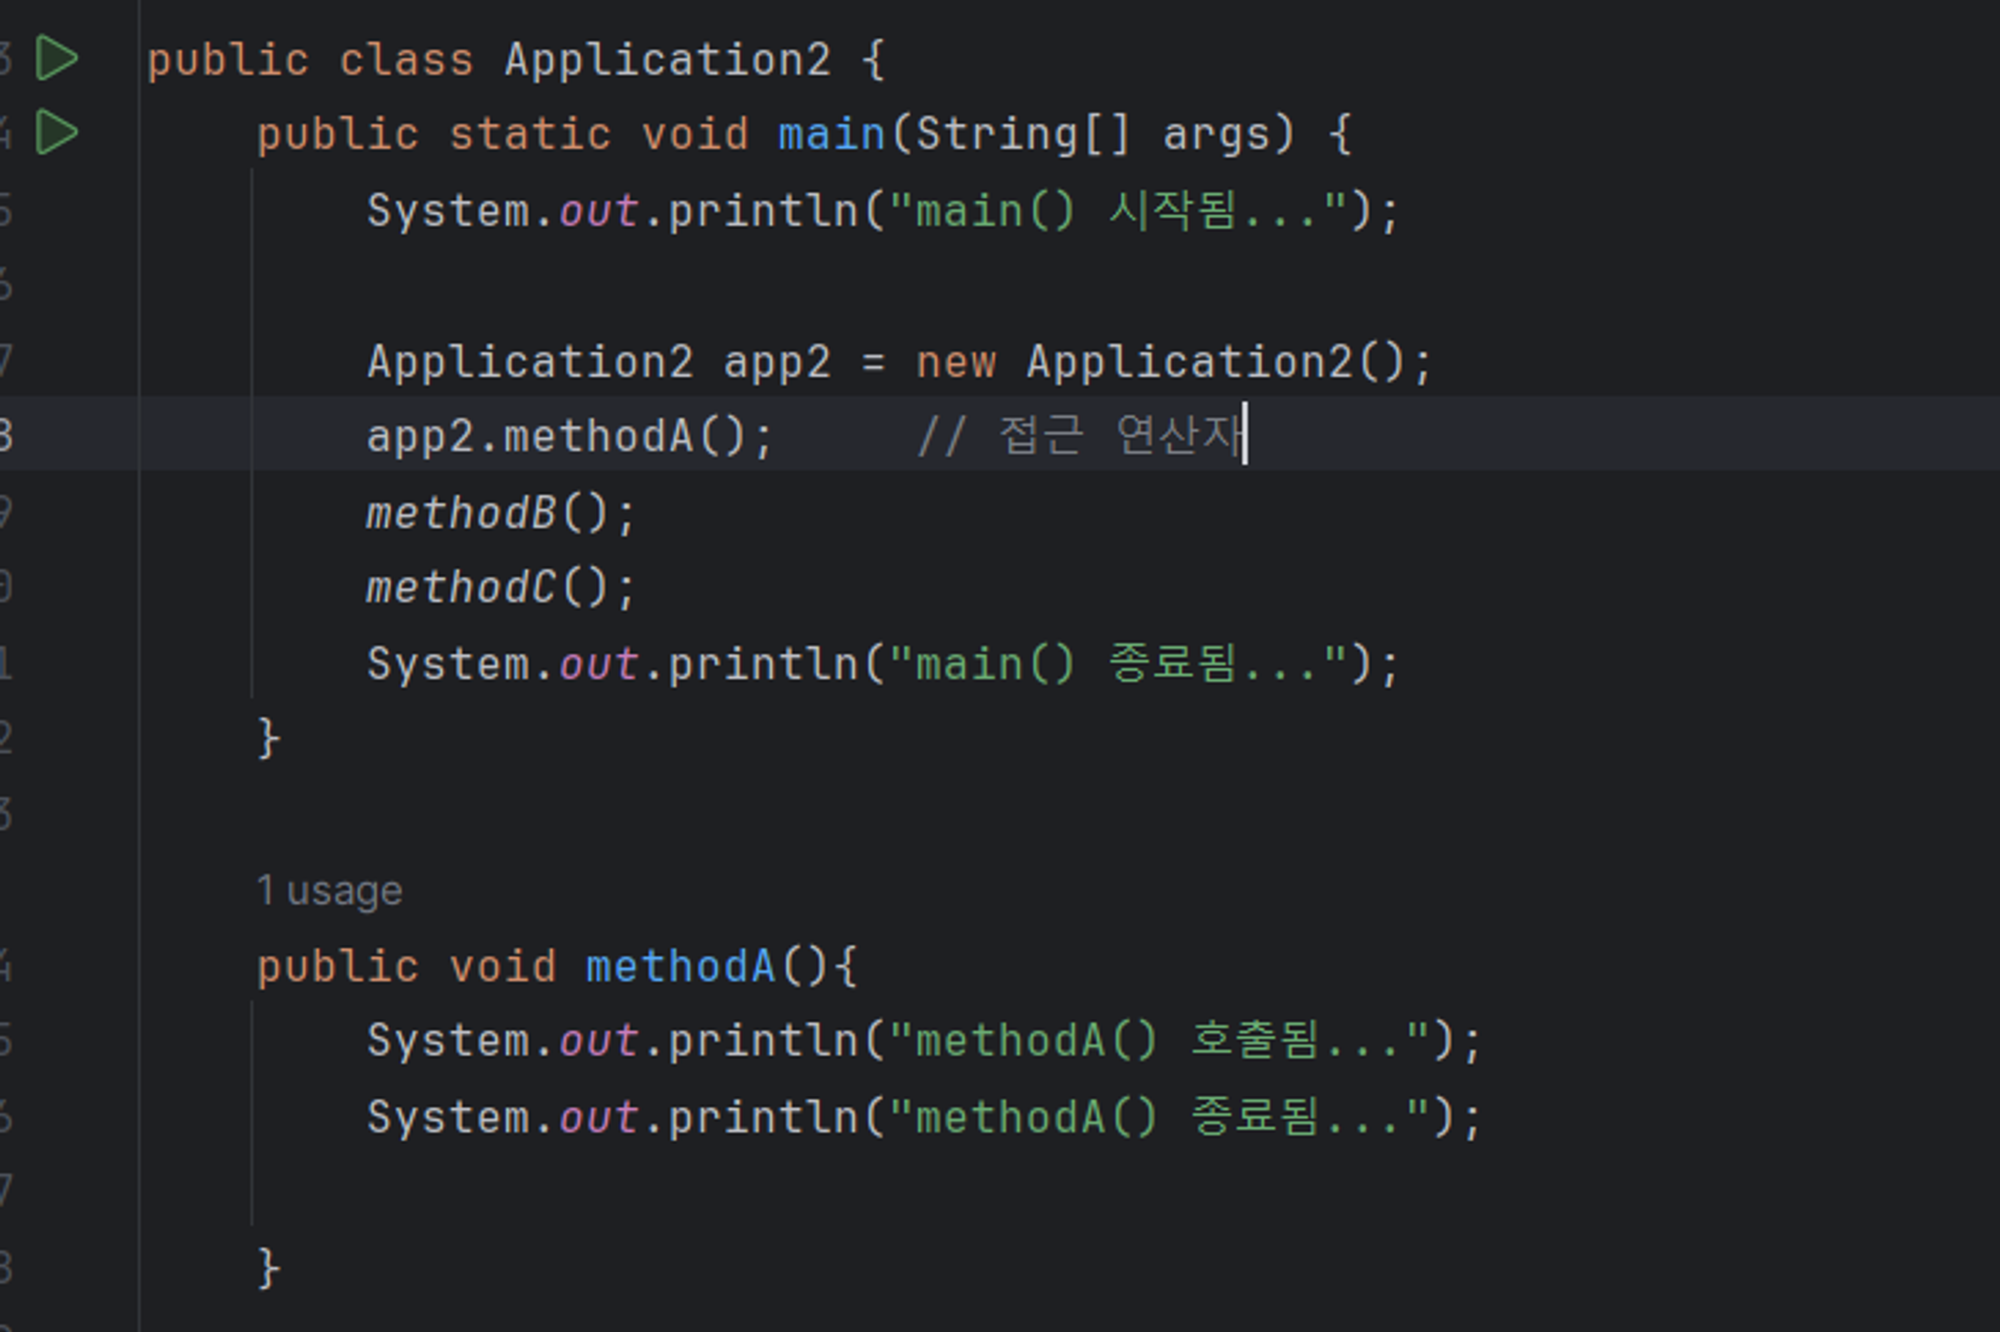
public class Application2 { /* 수업목표. 메소드의 호출 흐름에 대해 이해할 수 있다.(main메소드에서 한번에 순차적으로 여러 메소드 호출해 보기) */ /* 설명. * static이 붙어 있지 않은 메소드는 <클래스명 변수명 = new 클래스명();>을 활용해 메소드를 호출해야 한다. * (접근 연산자(.)도 활용) * */ public static void main(String[] args) { System.out.println("main() 시작됨..."); methodA(); methodB(); methodC(); System.out.println("main() 종료됨..."); } public static void methodA(){ System.out.println("methodA() 호출됨..."); System.out.println("methodA() 종료됨..."); } public static void methodB(){ System.out.println("methodB() 호출됨..."); System.out.println("methodB() 종료됨..."); } public static void methodC(){ System.out.println("methodC() 호출됨..."); System.out.println("methodC() 종료됨..."); } } -
결과(메소드의 구조를 잘 알아두기!)
public class Application3 {

    static int global = 10;                             //전역변수이자 클래스 변수

    public static void main(String[] args) {

//        int global =20;                               // 지역변수
        System.out.println("global 출력: " + global);    // 지역변수 > 전역변수
        System.out.println("global 출력: " + Application3.global);    // 클래스명.변수명을 하면 클래스 변수를 호출할 수 있다.
    /* 수업목표. 메소드 전달 인자와 매개변수에 대해 이해하고 메소드 호출 시 활용할 수 있다. */
    /*  필기.
     *    전달인자(argument)와 매개변수(parameter)를 이용한 메소드 호출
     *    지금까지 우리가 배운 변수는 지역변수에 해당한다.
    * */

    /* 필기.
     *   변수의 종류(자료형과는 다른 구분방식)
     *   1. 지역변수
     *   2. 매개변수
     *   3. 전역변수(필드)
     *   4. 클래스(static) 변수
    * */
        Application3 app3 = new Application3();
        app3.testMethod(25);        //25는 전달인자이다.
        app3.testMethod(18);
        app3.testMethod('a');
        app3.testMethod((int)12.7);
        app3.testMethod(3 * 2);
    }

    /* 설명. 정수를 주면 나이를 출력해주는 기능을 가진 메소드(non-static) */
    public void testMethod(int age) {   // int age는 전달인자를 받는 지역변수인 매개변수이다.
        System.out.println("당신의 나이는 " + age + "세 입니다.");
    }

}
-
1-5. 메소드 호출 흐름
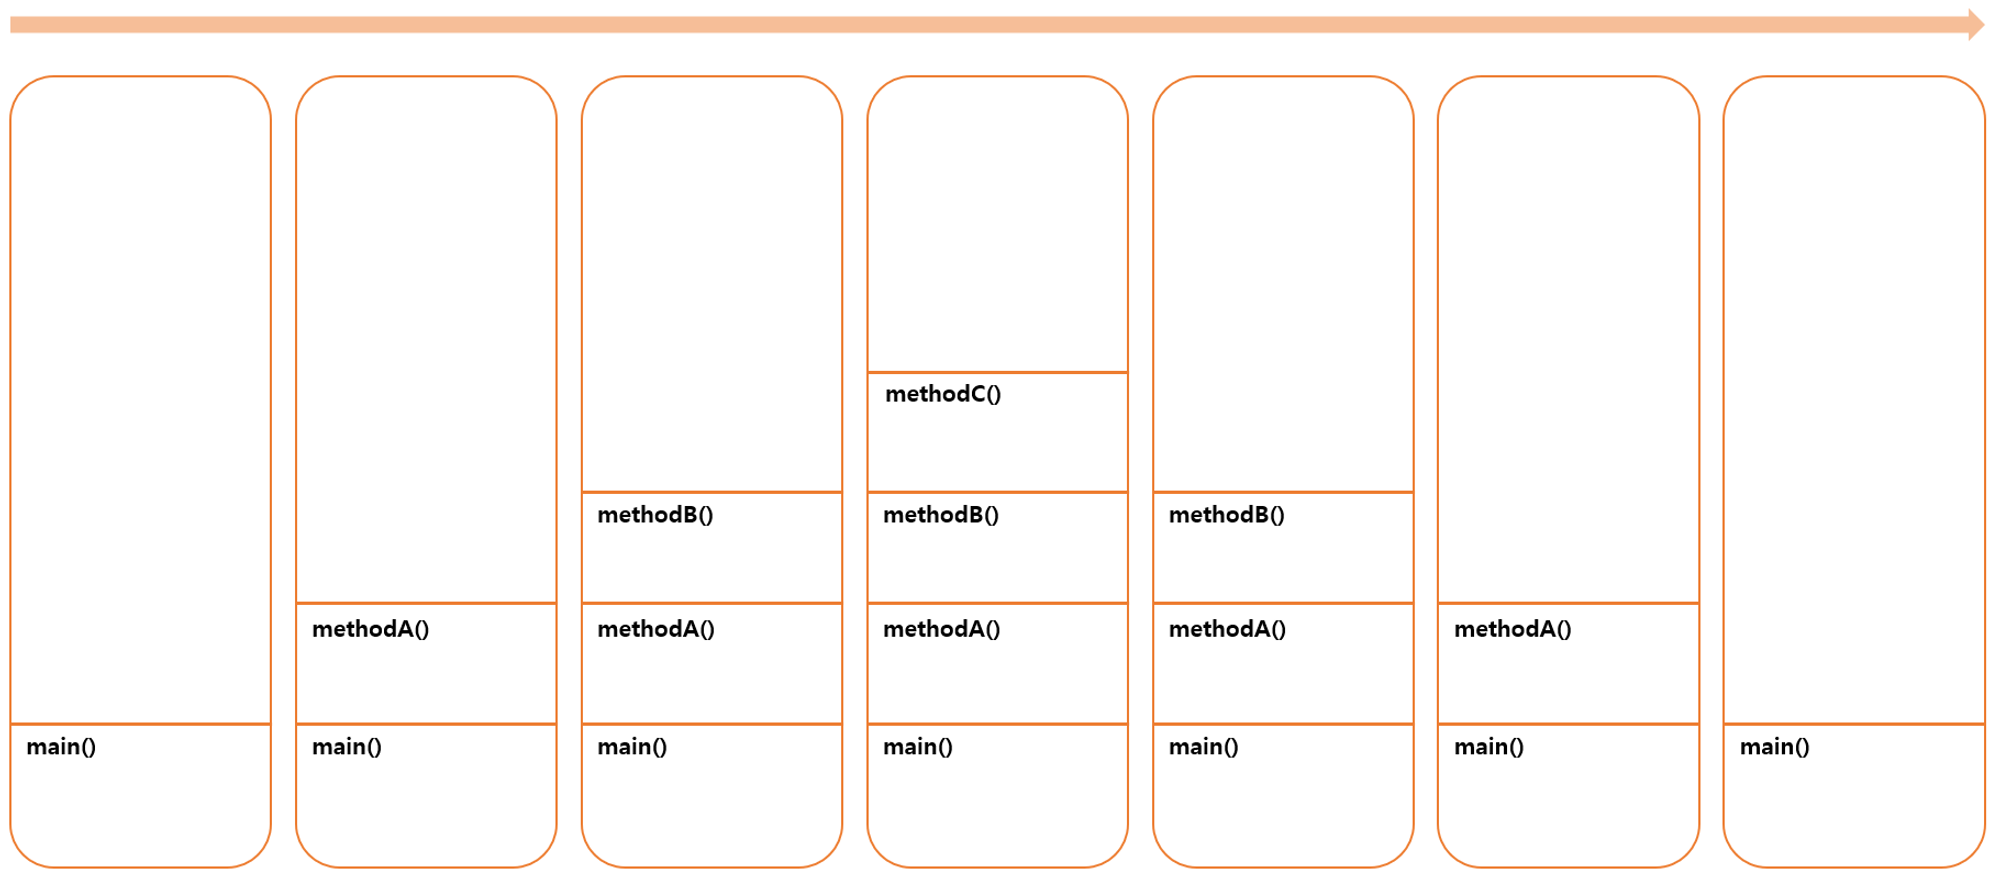
- 아래와 같은 코드가 있을 때, 실행 결과가 어떤지 예상해보자.
public class Application { public static void main(String[] args) { System.out.println("main() 시작됨..."); Application app = new Application(); app.methodA(); System.out.println("main() 종료됨..."); } public void methodA() { System.out.println("methodA() 호출함..."); methodB(); System.out.println("methodA() 종료됨..."); } public void methodB() { System.out.println("methodB() 호출함..."); methodC(); System.out.println("methodB() 종료됨..."); } public void methodC() { System.out.println("methodC() 호출함..."); System.out.println("methodC() 종료됨..."); } }- 실행결과
main() 시작됨...
methodA() 호출함...
methodB() 호출함...
methodC() 호출함...
methodC() 종료됨...
methodB() 종료됨...
methodA() 종료됨...
main() 종료됨...
- 실행결과
- 아래 그림은 해당 코드가 실행되는 동안 stack 메모리 영역에서 일어나는 일(메소드가 실행되기 위한 공간을 할당해주는 것이라고 생각하면 편하다)이다. 메소드가 호출되면 stack 영역에 메소드를 위한 영역이 할당되고, 호출된 메소드들이 실행이 완료되면 stack 영역에 할당된 메모리 공간은 사라진다. 메소드가 완료된 이후에는 호출했던 위치로 다시 돌아가서 그 이후 작업을 실행하는데, methodA() → methodB() → methodC() 와 같이 호출되었기 때문에 메소드가 끝날 때는 methodC() → methodB() → methodA() 와 같이 돌아가게 된다.
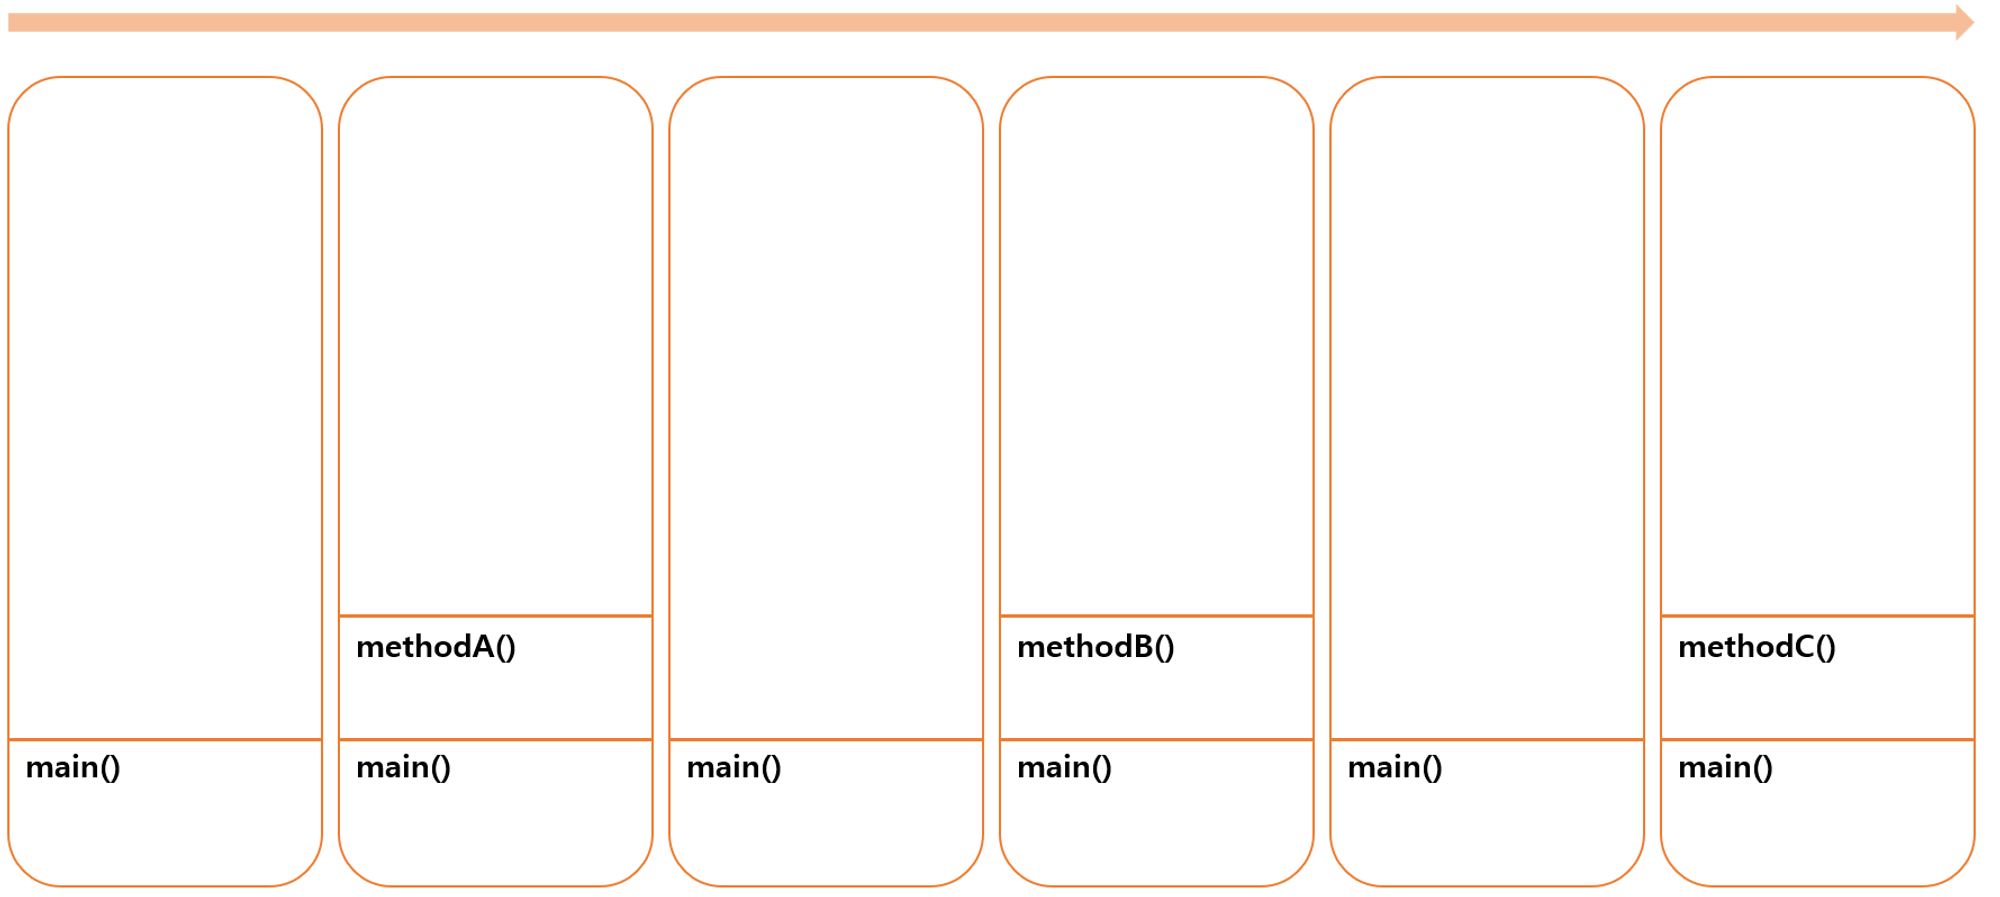
- 위의 예제와 비슷하지만 다른 흐름을 확인해보자.
public class Application { public static void main(String[] args) { System.out.println("main() 시작함..."); Application app = new Application(); app.methodA(); app.methodB(); app.methodC(); System.out.println("main() 종료됨..."); } public void methodA() { System.out.println("methodA() 호출됨..."); System.out.println("methodA() 종료됨..."); } public void methodB() { System.out.println("methodB() 호출됨..."); System.out.println("methodB() 종료됨..."); } public void methodC() { System.out.println("methodC() 호출됨..."); System.out.println("methodC() 종료됨..."); } }- 실행결과
main() 시작함...
methodA() 호출됨...
methodA() 종료됨...
methodB() 호출됨...
methodB() 종료됨...
methodC() 호출됨...
methodC() 종료됨...
main() 종료됨...
- 실행결과
- 아까와는 출력 결과가 다르다. 왜 그런걸까? 이전의 소스는 메소드 안에서 다른 메소드를 호출했었다.
하지만 지금은 모든 메소드를 main()에서 호출하고 있고, 각 메소드 작업이 완료된 후 다른 메소드를 호출하기 때문에 결과가 다를 수밖에 없다.
1-6. 전달인자(argument)와 매개변수(parameter)를 이용한 메소드 호출
- 지금까지 우리가 배운 변수는 지역변수에 해당한다. 다양한 변수의 종류들이 존재하는데 차차 배워 나갈 것이다.
- 변수의 종류
- 지역변수
- 매개변수
- 전역변수(필드)
- 클래스(static)변수
- 지역변수는 선언한 메소드 블럭 내부에서만 사용이 가능하다. 이것을 지역변수의 스코프라고 한다.
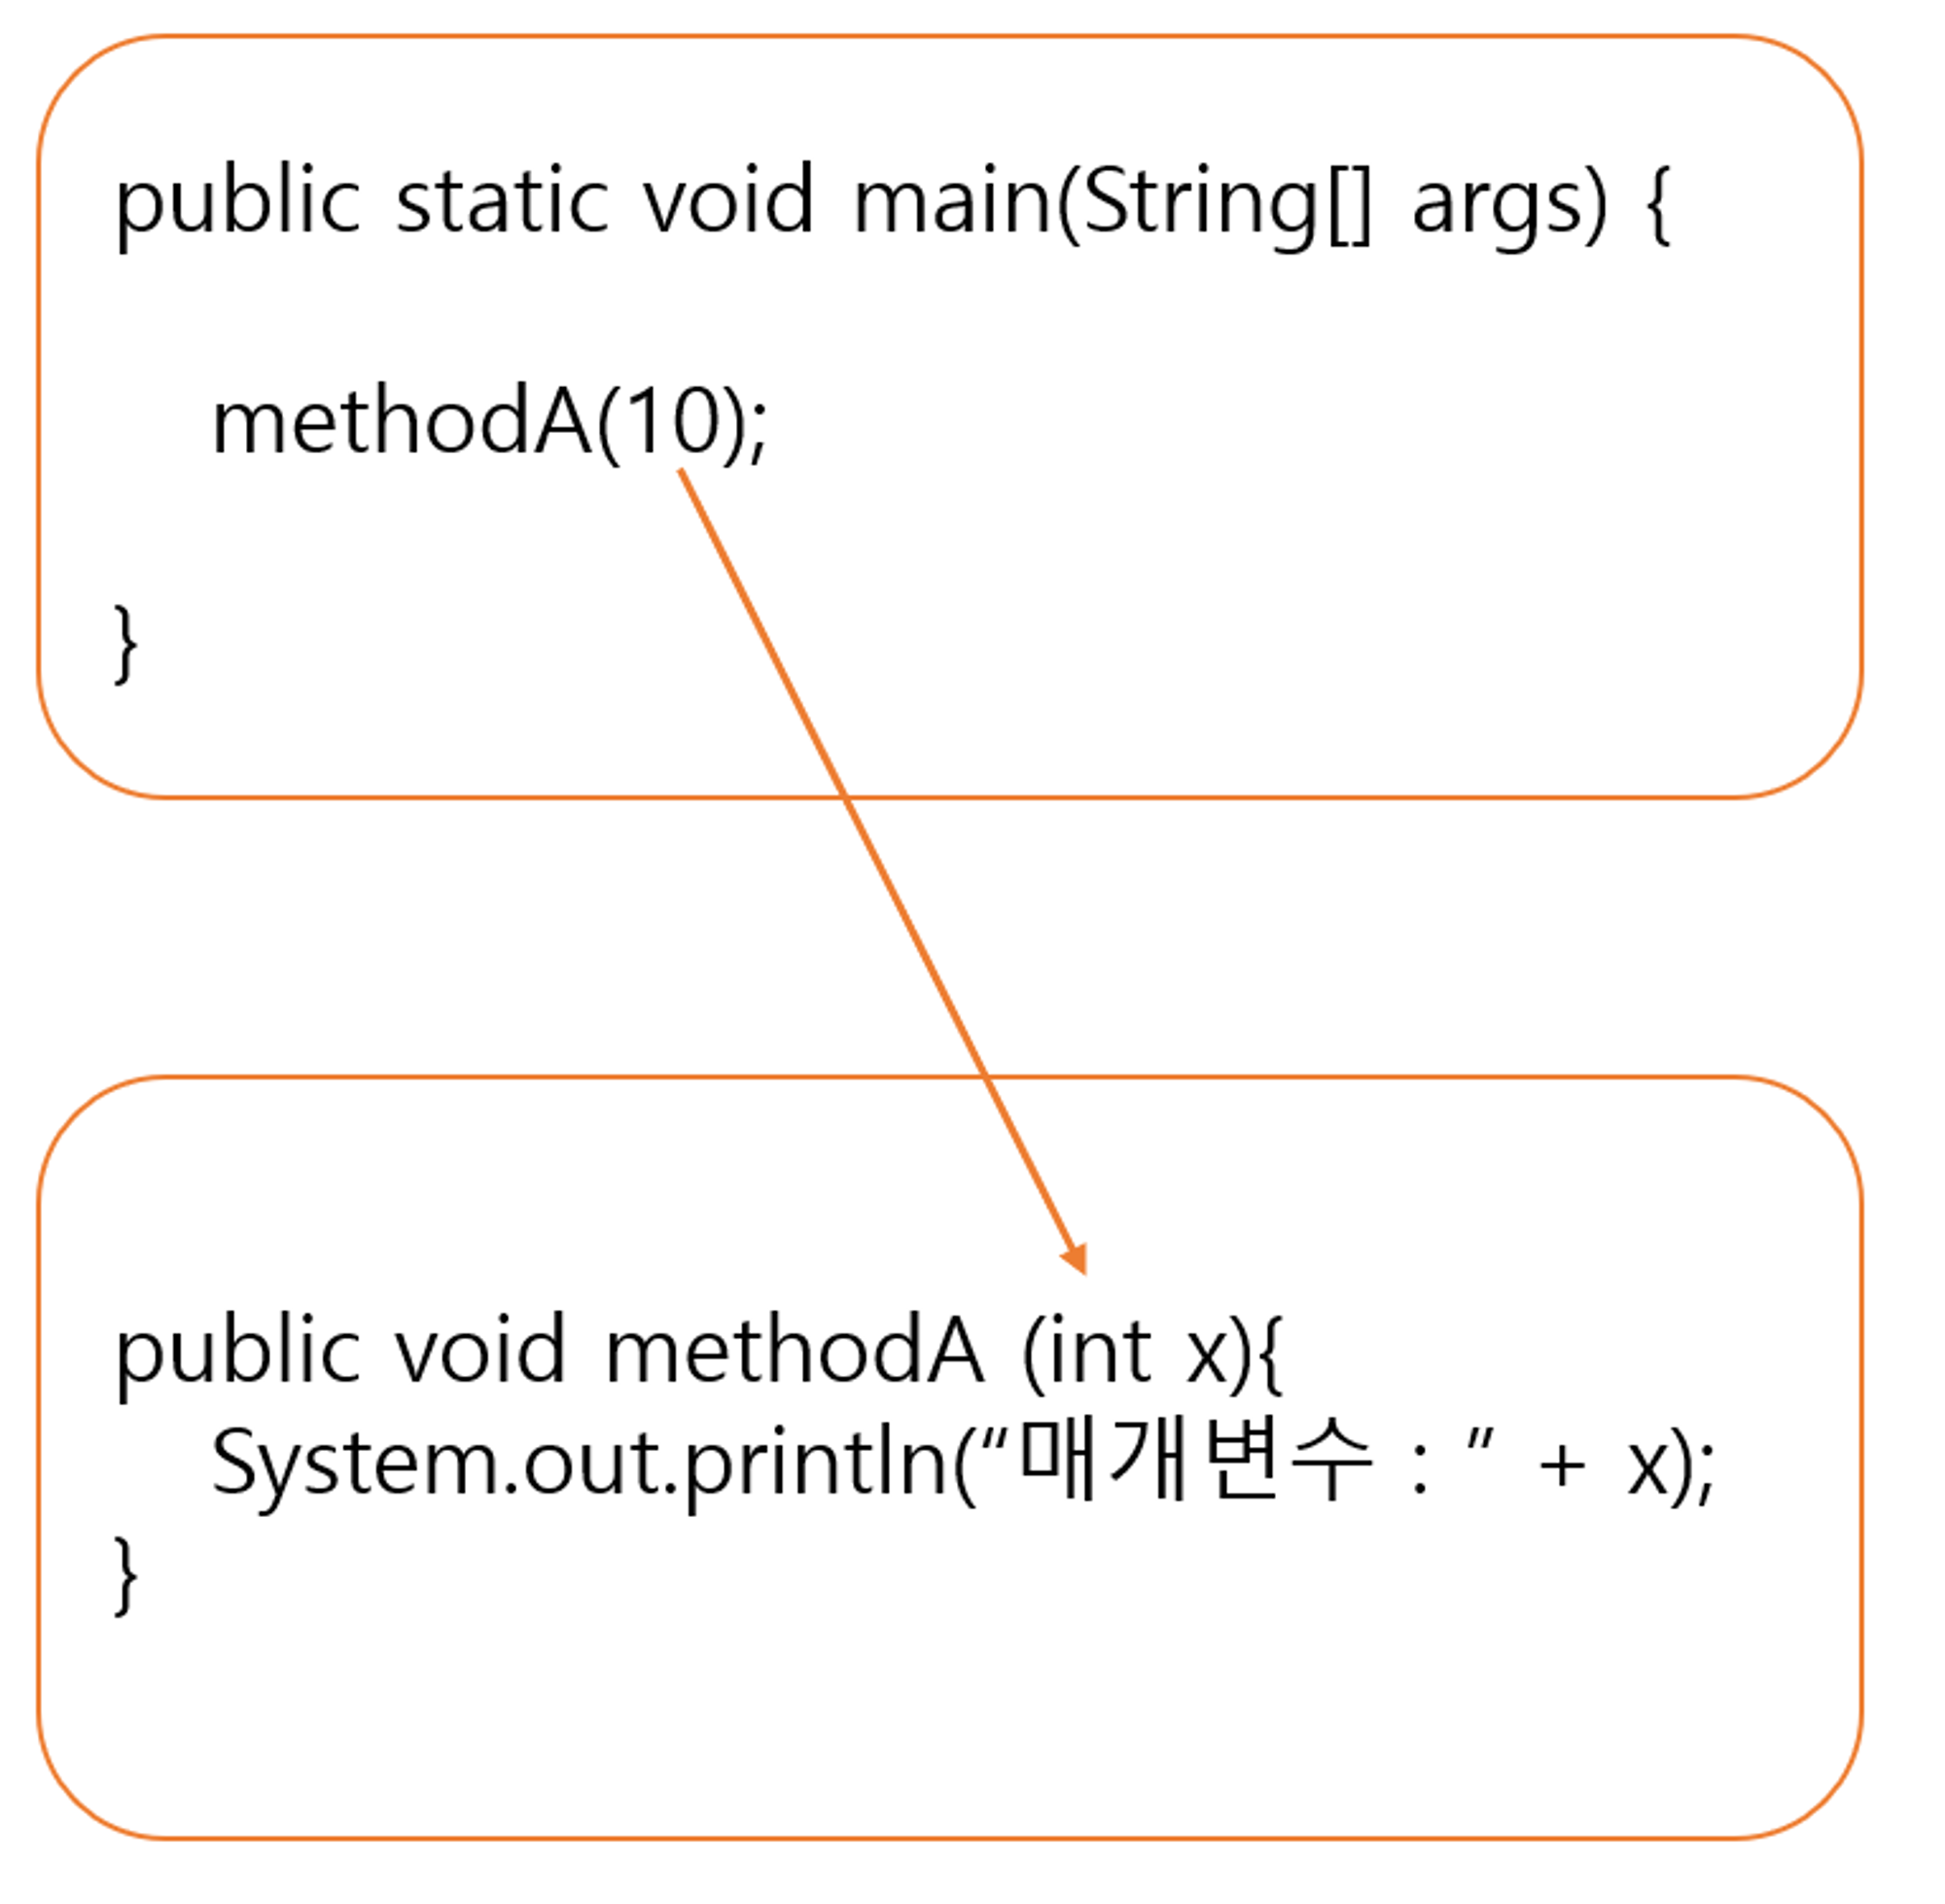
- 다른 메소드간 서로 공유해야 하는 값이 존재하는 경우 메소드 호출 시 사용하는 괄호를 이용해서 값을 전달할 수 있다.
이 때 전달하는 값을 전달인자(argument) 라고 부르고, 메소드 선언부 괄호 안에 전달 인자를 받기 위해 선언하는 변수를 매개변수(parameter)라고 부른다.
- 내가 작성한 코드
public class Application4 {
    public static void main(String[] args) {
        /* 수업목표. 여러 개의 전달 인자를 이용한 메소드 호출을 할 수 있다. */

        /* 목차. 1. 여러 개의 매개변수를 가진 메소드 호출 */
        Application4 app4 = new Application4();
        app4.testMethod("홍길동", 20, '남');

        /* 목차. 2. 변수에 저장된 값을 전달하여 호출할 수 있다. */
        String name = "유관순";
        int age = 20;
        char gender = '여';
        app4.testMethod(name, age, gender);
    }

    private void testMethod(String name, int age, char gender) {
        System.out.println("당신의 이름은 " + name + "이고, 나이는 " + age + "세 이며, 성별은 " + gender + "입니다.");
    }
}
1-7. 메소드 리턴
- 메소드는 항상 마지막에
return명령어가 존재한다. return은 자신을 호출한 구문으로 복귀하는 것을 의미한다.- 복귀를 할 때 그냥 복귀를 할 수도 있지만, 값을 가지고 복귀할 수 도 있다. 이 때 가지고 가는 값을 리턴값 이라고 한다.
return값을 반환받기 위해서는 메소드 선언부에 리턴 타입을 명시해 주어야 한다.void는 아무 반환값도 가지지 않겠다는 리턴타입에 사용할 수 있는 키워드이다.- 반환값이 없는 경우
return구문은 생략해도 컴파일러가 자동으로 추가해주지만, 반환값이 있는 경우는return구문을 반드시 명시적으로 작성해야 한다.
또한 메소드 선언부에 선언한 리턴타입 반환값의 자료형은 반드시 일치해야 한다. - 메소드 리턴 예시
public class Application { public static void main(String[] args) { Application app = new Application(); app.testMethod(); String returnText = app.testMethod(); System.out.println(returnText); //hello world 출력됨 /* 변수에 저장하지 않고 바로 출력도 가능하다. */ System.out.println(app.testMethod()); System.out.println("main() 메소드 종료됨..."); } public String testMethod() { /* public 뒤에 바로 return으로 가지고 갈 타입을 명시한다. * 아무 값도 리턴하지 않는 경우 void, 값을 반환하는 경우에는 반환값의 자료형을 작성해야 한다. * */ return "hello world"; } }- 실행결과
hello world hello world main() 메소드 종료됨... - 내가 작성한 코드
public class Application5 {
    public static void main(String[] args) {
        /* 수업목표. 메소드 리턴에 대해 이해할 수 있다. */
        System.out.println("Main() 메소드 시작됨...");

        Application5 app5 = new Application5();
        app5.testMethod();

        System.out.println("Main() 메소드 종료됨...");
    }

    private void testMethod() {
        System.out.println("testMethod() 동작 확인...");

        return;

//        System.out.println("졸령");     // return 이후 코드는 동작하지 않는다. ( 컴파일 에러 )
    }
}
- 실행결과
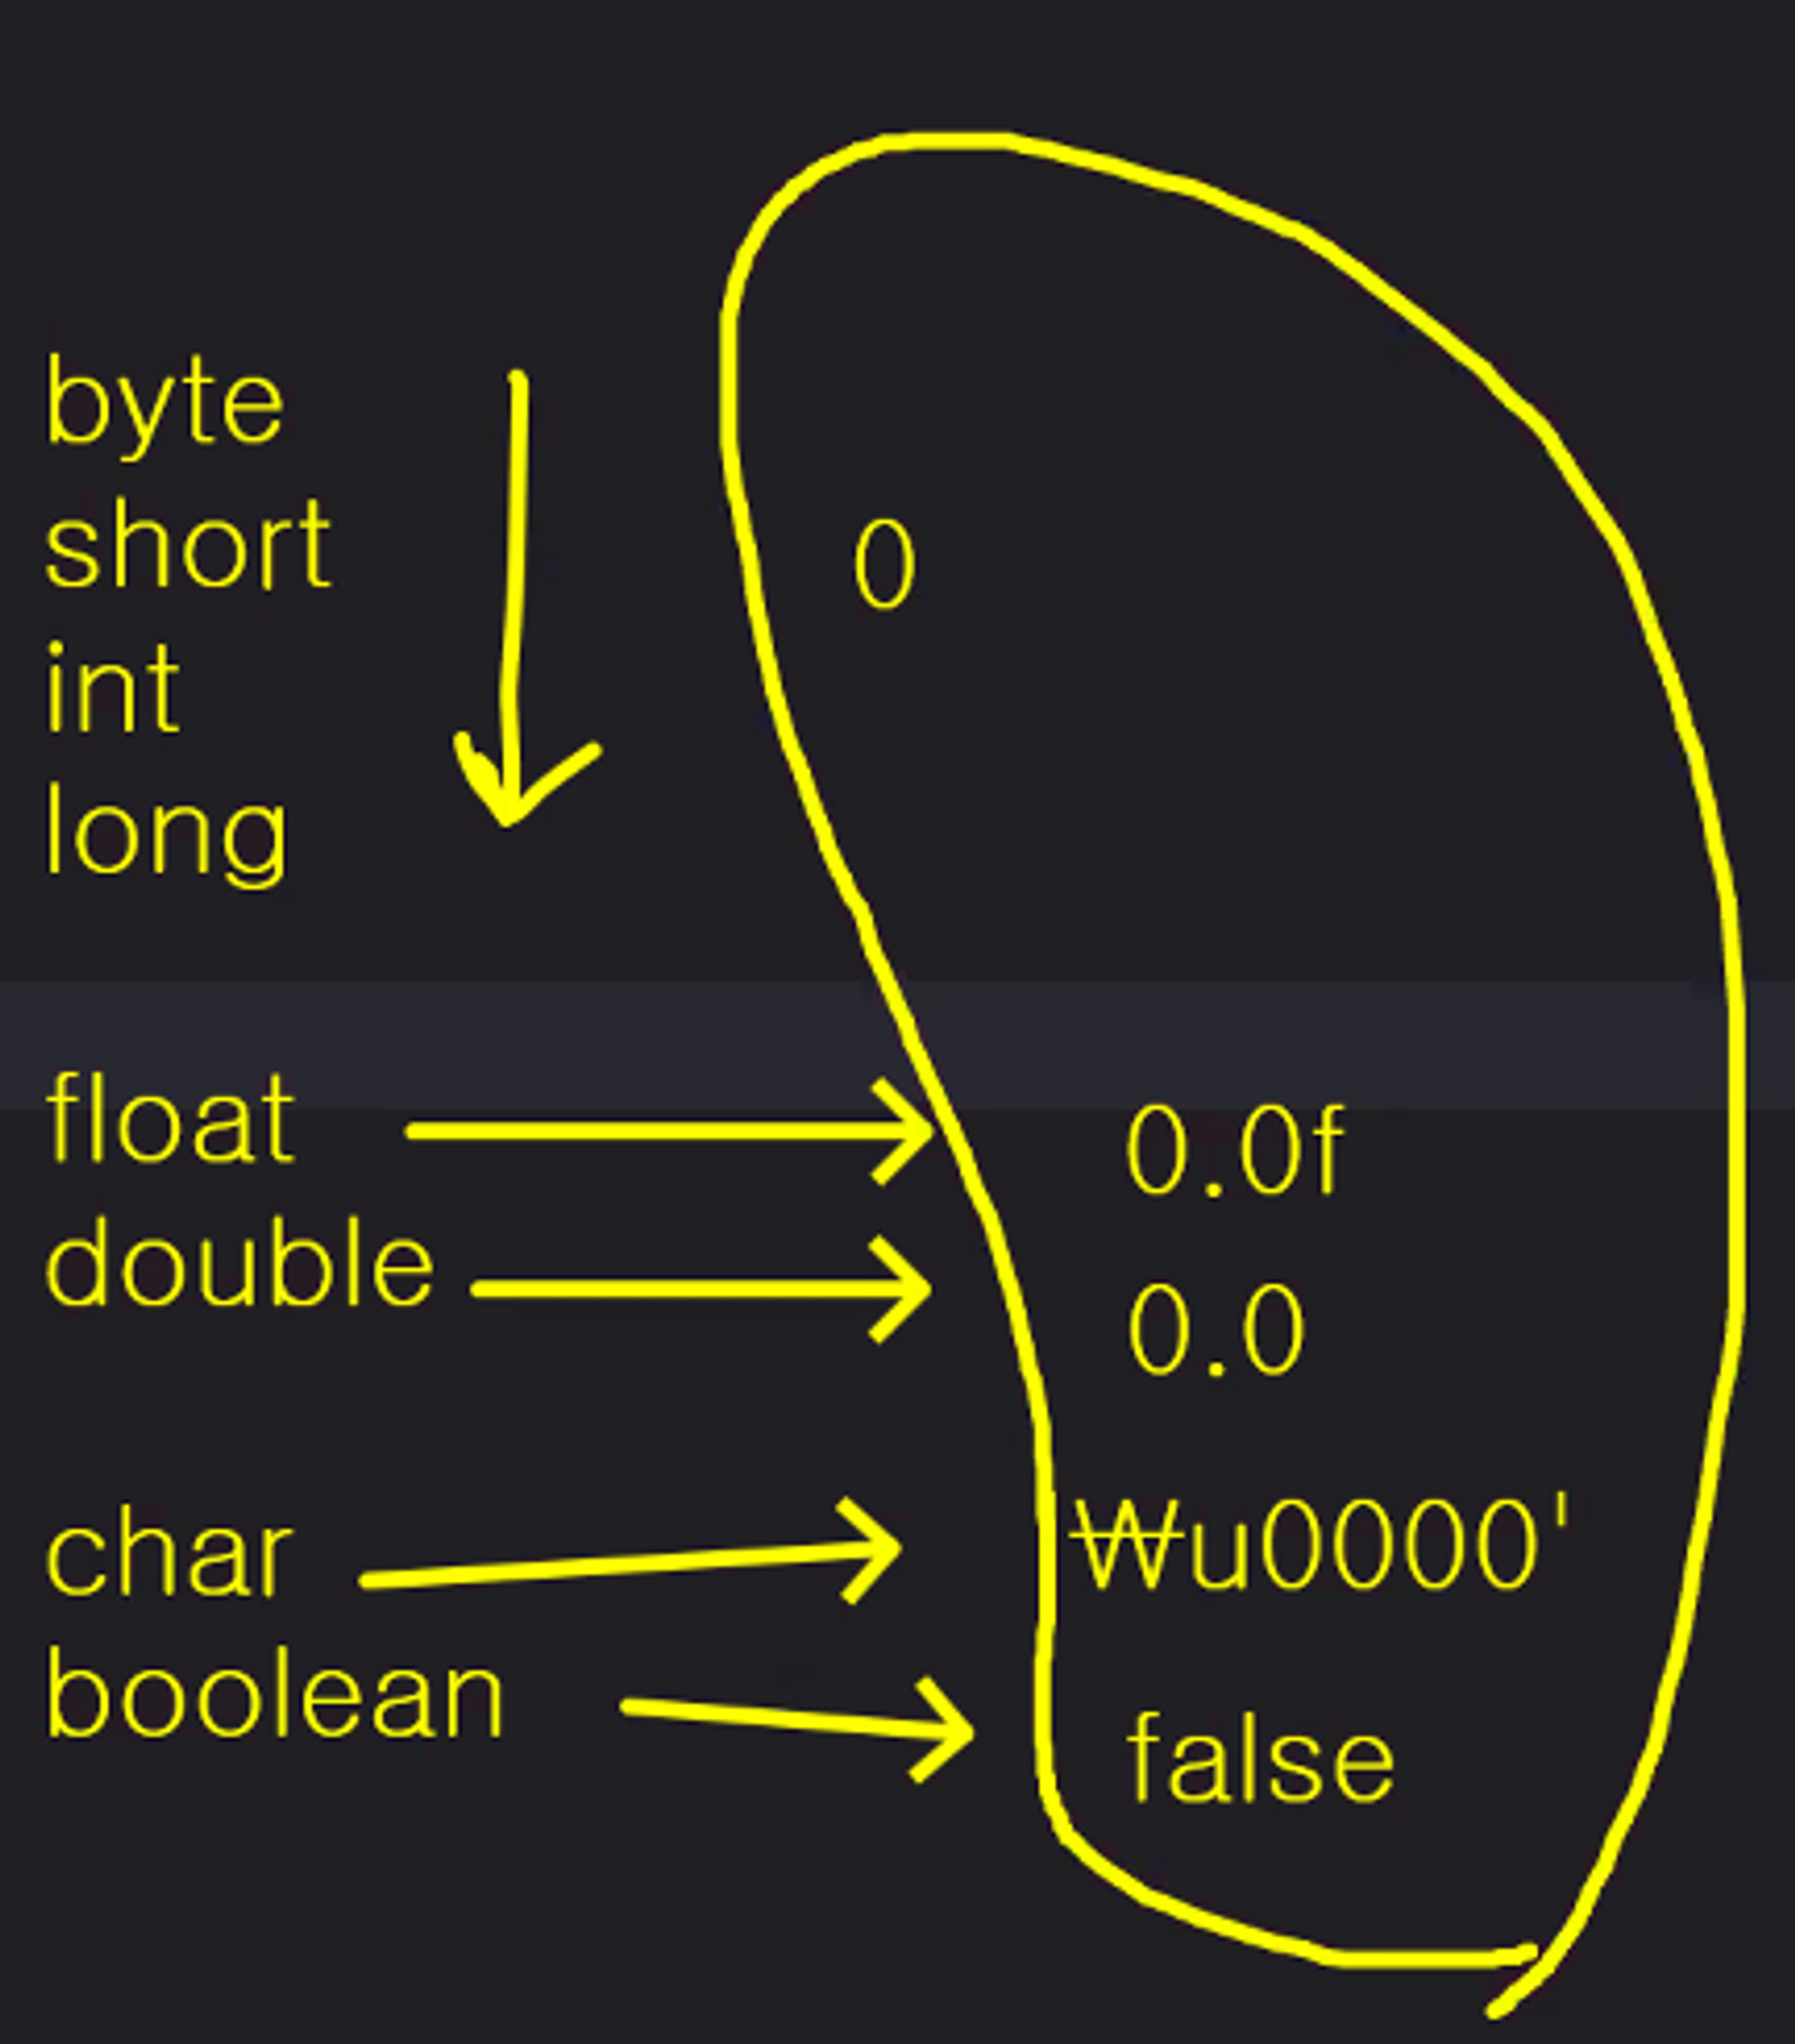
각 자료형들의 기본값
2. 메소드 활용
-
전달인자와 매개변수 테스트
public class Application { public static void main(String[] args) { Application app = new Application(); /* 전달인자와 매개변수를 이용한 메소드 호출 테스트 */ /* 1. 전달인자로 값 전달 테스트 */ /* 호출하려는 메소드의 매개변수 선언부에 미리 선언해둔 자료형과, 갯수, 순서가 일치하게 값을 넣어 호출해야 한다. */ app.testMethod(40); //app.testMethod1("40"); //매개변수는 int형이지만 인자가 String 형이기 때문에 호출할 수 없다. //app.testMethod1(20, 30, 40); //매개변수는 int형 1개 이지만 인자는 3개이기 때문에 호출할 수 없다. //app.testMethod1(); //매개변수는 선언되어 있지만 인자로 값을 전달하지 않으면 호출할 수 없다. /* 2. 변수에 저장한 값 전달 테스트 */ /* 2-1. 변수에 저장된 값을 이용하여 값을 전달할 수 있다. */ int age = 20; app.testMethod(age); /* 2-2. 자동형변환을 이용하여 값 전달을 할 수 있다. */ byte byteAge = 10; app.testMethod(byteAge); /* 2-3. 강제형변환을 이용해서 값 전달을 할 수 있다. */ long longAge = 80; //app.testMethod(longAge); //자동 형변환을 할 수 없어서 에러 발생 app.testMethod((int) longAge); //강제 형변환을 이용하여 자료형을 맞춘 후 호출할 수 있다. (데이터 손실 주의) /* 2-4. 연산 결과를 이용해서 값 전달을 할 수 있다. */ app.testMethod(age * 3); } public void testMethod(int age) { System.out.println("당신의 나이는 " + age + "세 입니다."); } }- 실행결과
당신의 나이는 40세 입니다.
당신의 나이는 20세 입니다.
당신의 나이는 10세 입니다.
당신의 나이는 80세 입니다.
당신의 나이는 60세 입니다.
- 실행결과
-
여러 개의 전달인자를 가진 메소드 테스트
public class Application { public static void main(String[] args) { /* 여러 개의 전달인자를 이용한 메소드 호출 테스트 */ /* 1. 여러 개의 매개변수를 가진 메소드 호출 */ Application app = new Application(); app.testMethod("홍길동", 20, '남'); //app.testMethod(20, "유관순", '여'); //값의 갯수는 맞지만 순서가 다르게 전달되면 호출하지 못한다. /* 2. 변수에 저장된 값을 전달하며 호출할 수 있다. */ String name = "유관순"; int age = 20; char gender = '여'; app.testMethod(name, age, gender); } public void testMethod(String name, int age, final char gender) { /* 매개변수도 일종의 지역변수로 분류된다. * 매개변수 역시 final 키워드를 사용할 수 있다. * 지역변수에 final 키워드를 붙여 상수를 만드는 것과 동일하다. * final 매개변수는 상수 네이밍 규칙을 선택적으로 따르는 경향이 있다. (써도 되고 안써도 됨) * */ System.out.println("당신의 이름은 " + name + "이고, 나이는 " + age + "세 이며, 성별은 " + gender + "입니다."); /* 메소드 주석도 달아주자. 호출구문에 마우스를 올리면 메소드에 대한 설명을 볼 수 있다. */ } }- 실행결과
당신의 이름은 홍길동이고, 나이는 20세 이며, 성별은 남입니다.
당신의 이름은 유관순이고, 나이는 20세 이며, 성별은 여입니다.
- 실행결과
-
메소드 리턴 테스트
public class Application { public static void main(String[] args) { /* 메소드 리턴 테스트 */ /* 모든 메소드 내부에는 return; 이 존재한다. * void 메소드의 경우 return;을 명시적으로 작성하지 않아도 마지막줄에 컴파일러가 자동으로 추가를 해준다. * return은 현재 메소드를 강제 종료하고 호출한 구문으로 다시 돌아가는 명령어이다. * */ /* main() 메소드가 시작하는지 확인하기 위해 출력 구문 작성 */ System.out.println("main() 메소드 시작함..."); Application app = new Application(); app.testMethod(); /* main() 메소드가 종료되는지 확인하기 위해 출력 구문 작성 */ System.out.println("main() 메소드 종료됨..."); } public void testMethod() { System.out.println("testMethod() 동작 확인..."); /* 컴파일러에 의해 자동으로 추가되는 구문이다. * 가장 마지막에 작성해야 하고, 마지막에 작성되지 않을 경우 컴파일 에러를 발생시킨다. * */ return; //System.out.println("test"); // return 아래 다른 구문이 있을 경우 에러 발생, return은 메소드 가장 마지막에 작성해야 한다. } }- 실행결과
main() 메소드 시작함...
testMethod() 동작 확인...
main() 메소드 종료됨...
- 실행결과
-
매개변수와 리턴값 복합 활용
public class Application { public static void main(String[] args) { /* 매개변수와 리턴값 복합 활용 */ /* 매개변수도 존재하고 리턴값도 존재하는 메소드를 이용하여 간단한 계산기 만들기 */ /* 숫자 두 개를 매개변수로 입력 받아 연산하는 메소드를 * 사칙연산별로 추가해서 호출하는 테스트를 해보자 * */ int first = 20; int second = 10; Application app = new Application(); System.out.println("두 수를 더한 결과 : " + app.plusTwoNumbers(first, second)); System.out.println("두 수를 뺀 결과 : " + app.minusTwoNumbers(first, second)); System.out.println("두 수를 곱한 결과 : " + app.multipleTwoNumbers(first, second)); System.out.println("두 수를 나눈 결과 : " + app.divideTwoNumbers(first, second)); } public int plusTwoNumbers(int first, int second) { return first + second; } public int minusTwoNumbers(int first, int second) { return first - second; } public int multipleTwoNumbers(int first, int second) { return first * second; } public int divideTwoNumbers(int first, int second) { return first / second; } }- 실행결과
두 수를 더한 결과 : 30
두 수를 뺀 결과 : 10
두 수를 곱한 결과 : 200
두 수를 나눈 결과 : 2
- 실행결과
-
static 메소드 테스트
public class Application { public static void main(String[] args) { /* static 메소드 호출 */ /* 우리가 지금 작성하고 있는 메소드를 보면 public과 void 사이에 static이라고 하는 키워드가 있다. * static 키워드에 대해서는 뒤에서 다시 다루게 될 예정이지만, * static 메소드를 호출하는 방법부터 먼저 학습해보자. * static이 있는 메소드이건 non-static 메소드이건 메소드의 동작 흐름은 동일하다. * */ /* 메소드를 작성한 이후 static 메소드를 호출해보자 */ /* static 메소드를 호출하는 방법 * 클래스명.메소드명(); <- 이런 방식으로 호출한다. * */ System.out.println("10과 20의 합 : " + Application.sumTwoNumbers(10, 20)); /* 동일한 클래스 내에 작성된 static 메소드는 클래스명 생략이 가능하다. */ System.out.println("20과 30의 합 : " +sumTwoNumbers(20, 30)); } public static int sumTwoNumbers(int first, int second) { return first + second; } }- 실행결과
10과 20의 합 : 30
20과 30의 합 : 50
- 실행결과
-
다른 클래스에 작성한 non-static메소드와 static 메소드 호출 테스트
public class Calculator {

    public int minNumberOf(int first, int second) {

        return (first > second)? second : first;
    }

    public static int maxNumberOf(int first, int second) {

        return (first > second)? first : second;
    }

}
public class Application { public static void main(String[] args) { /* 다른 클래스에 작성한 메소드 호출 */ /* 최대값 최솟값을 비교할 두 정수를 변수로 선언 */ int first = 100; int second = 50; /* 두 메소드를 차례로 호출해보자 */ /* 1. non-static 메소드의 경우 */ /* 클래스가 다르더라도 사용하는 방법은 동일하다 * 클래스명 사용할이름 = new 클래스명(); * 사용할이름.메소드명(); * */ Calculator calc = new Calculator(); int min = calc.minNumberOf(first, second); System.out.println("두 수 중 최소값은 : " + min); /* 2. static 메소드인 경우 */ /* 다른 클래스에 작성한 static 메소드의 경우 호출할 때 클래스명을 반드시 기술해야 한다. * 클래스명.메소드명(); * */ //int max = maxNumberOf(first, second); //클래스명을 생략하면 에러 발생한다. int max = Calculator.maxNumberOf(first, second); System.out.println("두 수 중 최대값은 : " + max); /* 주의! * static 메소드도 non-static 메소드처럼 호출은 가능하다. * 하지만 권장하지 않는다. * 이미 메모리에 로딩되어 있는 static 메소드는 여러 객체가 공유하게 된다. * 그 때 객체로 접근하게 되면 인스턴스가 가진 값으로 공유된 값에 예상치 못하는 동작을 유발할 수 있기 때문에 * 사용을 제한해 달라는 경고이다. 시스템이 복잡해질 수록 이런 에러를 찾기 힘들어지게 된다. * */ int max2 = calc.maxNumberOf(first, second); System.out.println("두 수 중 더 큰 값은 : " + max2); //하지만 정상적으로 실행은 가능하다. } }- 실행결과
두 수 중 최소값은 : 50 두 수 중 최대값은 : 100 두 수 중 더 큰 값은 : 100 - 내가 작성한 코드
public class Application6 {
    public static void main(String[] args) {

        /* 수업목표. 반환값이 있는 메소드 테스트 해보기 */
        System.out.println("main() 메소드 시작됨...");

        Application6 app6 = new Application6();
        String returnText = app6.testMethod();

        System.out.println("returnText = " + returnText);

        /* 설명. 변수에 굳이 담을 필요없이 메소드의 반환값을 한번만 사용할 거라면 바로 호출해서 반환값을 활용할 수 있다. */
        System.out.println("returnText = " + app6.testMethod());        // 표현식: 하나의 리터럴로 치환될 식

        System.out.println("main() 메소드 종료됨...");
    }

    private String testMethod() {
        System.out.println("test() 메소드 실행됨...");

        return "test";
    }
}
public class Application7 { public static void main(String[] args) { /* 수업목표. 매개변수와 리턴값을 복합적으로 활용하는 것을 이해하고 활용할 수 있다. */ int first = 20; int second = 10; Application7 app7 = new Application7(); System.out.println("두 수를 더한 결과: " + app7.plusTwoNumbers(first, second)); System.out.println("두 수를 뺀 결과: " + app7.subTwoNumbers(first, second)); System.out.println("두 수를 곱한 결과: " + app7.multiTwoNumbers(first, second)); System.out.println("두 수를 나눈 결과: " + app7.divideTwoNumbers(first, second)); } private int plusTwoNumbers(int first, int second) { // int result = first + second; // return result; return first + second; } private int subTwoNumbers(int first, int second) { return first - second; } private int multiTwoNumbers(int first, int second) { return first * second; } private int divideTwoNumbers(int first, int second) { return first / second; } }public class Application8 { public static void main(String[] args) { /* 수업목표. static 메소드를 호출할 수 있다. */ // System.out.println("10과 20의 합: " + Application8.sumTwoNumbers(10, 20)); System.out.println("10과 20의 합: " + sumTwoNumbers(10, 20)); // 호출하는 static 메소드가 같은 클래스에 존재하면 '클래스명.'을 생략할 수 있다. } public static int sumTwoNumbers(int fist, int second) { return fist + second; } }public class Application9 { public static void main(String[] args) { /* 수업목표. 다른 클래스에 작성한 메소드를 호출할 수 있다. */ int first = 100; int second = 50; /* 설명. non-static 메소드 호출하기 */ Calculator cal = new Calculator(); System.out.println("두 수의 합: " + cal.plusTwoNumber(first, second)); /* 설명. private와 같이 접근 제어자에 따라 다른 클래스에서 접근이 불가능한 메소드가 있을 수 있다. */ // System.out.println("두 수 중 작은값은: " + cal.minNumberOf(first, second)); /* 설명. static 메소드는 클래스명.을 붙여 호출한다. */ System.out.println("두 수 중 큰 값은: " + Calculator.maxNumberOf(first, second)); } }public class Calculator { public int plusTwoNumber(int first, int second) { return first + second; } public int subTwoNumber(int first, int second) { return first - second; } public int multiTwoNumber(int first, int second) { return first * second; } public int divideTwoNumber(int first, int second) { return first / second; } private int minNumberOf(int first, int second) { return (first > second) ? second : first; } public static int maxNumberOf(int first, int second) { return (first > second) ? first : second; } }
- 실행결과
2. 패키지(package)
1. 패키지(package) 개요
1-1. 패키지란?
💡 패키지란 서로 관련 있는 클래스 또는 인터페이스 등을 모아 하나의 묶음(그룹)으로 단위를 구성하는 것을 말한다.- 같은 패키지 내에서는 동일한 이름의 클래스를 만들 수 없지만, 패키지가 다르면 동일한 이름을 가진 클래스를 만들 수도 있다.
- 클래스명은 원래 패키지명을 포함하고 있다.
예) kr.ac.samhyook.method.Calculator (이게 클래스명) - 지금까지 클래스 명에 패키지 명을 함께 사용하지 않은 이유는 동일한 패키지 내에서 사용했기 때문이다.
그렇기 때문에 서로 다른 패키지에 존재하는 클래스를 사용하는 경우에는 클래스명 앞에 패키지명을 명시해서 풀 클래스 이름으로 사용해야 한다.
1-2. 패키지의 선언
package 패키지명;- 클래스나 인터페이스의 소스파일(
.java)의 최상단에 선언되어야 한다. - 클래스 명명규칙과 다르게 소문자로만 작성하는 것을 원칙으로 한다.
- 패키지 명을 지정하지 않으면 자동적으로 이름 없는 패키지에 속하게 된다.
2. 패키지 확인
-
패키지 확인
package ac.kr.samhyook.calculator;

public class Calculator {
		...
}
package ac.kr.samhyook.method; public class Application { public static void main(String[] args) { // 사용해야하는 클래스의 패키지가 다른 경우 풀 클래스 이름을 사용해야 한다. ac.kr.samhyook.method.Calculator cal = new ac.kr.samhyook.method.Calculator(); /* non-static 메소드의 경우 */ int min = cal.minNumberOf(30, 20); System.out.println("30과 20중 더 작은 값은 : " + min); /* static 메소드의 경우 */ int max = ac.kr.samhyook.method.Calculator.maxNumberOf(30, 20); System.out.println("30과 20중 더 큰 값은 : " + max); }
- 내가 작성한 코드
public class Application1 {
    public static void main(String[] args) {

        /* 수업목표. 패키지에 대해 이해할 수 있다. */

        /* 목차. 1. non-static 메소드 호출 */
        com.ohgiraffers.section01.method.Calculator cal     //다른 클래스를 호출할 때 써야 함
                = new com.ohgiraffers.section01.method.Calculator();

        int plusresult = cal.plusTwoNumber(100, 20);
        System.out.println("100과 20의 합: " + plusresult);

        /* 목차. 2. static 메소드 호출 */
        int maxResult
                = com.ohgiraffers.section01.method.Calculator.maxNumberOf(100, 20);
        System.out.println("두 수 중 큰 값: " + maxResult);
    }
}
3. 임포트(import)
1. 임포트 개요
1-1. 임포트란?
💡 서로 다른 패키지에 존재하는 클래스를 사용하는 경우 패키지명을 포함한 풀 클래스 이름을 사용해야 한다. 하지만 매번 다른 클래스의 패키지명까지 기술하기에는 번거롭다. 그래서 패키지명을 생략하고 사용할 수 있도록 한 구문이 import 구문이다.1-2. 임포트 선언
package 패키지명;

import 패키지명.*;
import 패키지명.클래스명;
import static 패키지명.클래스명;

...클래스- import 문은 여러 개 명시할 수 있다.
- import 는 package 선언문과 class 선언문 사이에 작성하며 어떠한 패키지 내에 있는 클래스를 사용할 것인지에 대해 미리 선언하는 효과를 가진다.
- import 문은 소스파일(
.java) 에서 package 문과 클래스 선언문 사이에 명시한다. - static import 문은 static 메소드를 호출할 때 사용한다.
2. 임포트 확인
-
임포트 확인
package ac.kr.samhyook.calculator;

public class Calculator {
		...
}
package ac.kr.samhyook.method; /* 사용하려는 클래스까지를 작성해야 한다. */ import ac.kr.samhyook.calculator.Calculator; /* static import의 경우 사용하려는 static method까지 전부 써줘야 한다. */ import static ac.kr.samhyook.calculator.Calculator.maxNumberOf; public class Application { public static void main(String[] args) { Calculator cal = new Calculator(); /* non-static 메소드의 경우 */ int min = cal.minNumberOf(30, 20); System.out.println("30과 20중 더 작은 값은 : " + min); /* static 메소드를 static 임포트 한 경우 클래스명도 생략하고 사용할 수 있다. */ int max = maxNumberOf(30, 20); System.out.println("30과 20중 더 큰 값은 : " + max); } }
- 내가 작성한 코드
import com.ohgiraffers.section01.method.Calculator;

public class Application2 {
    public static void main(String[] args) {

        /* 수업목표. import에 대해 이해할 수 있다. */

        /* 목차. 1. non-static method의 경우 */
        Calculator cal = new Calculator();      // import를 활용해 줄여쓴 Calculator
        int sub = cal.subTwoNumber(80, 21);
        System.out.println("80 - 21 = " + sub);

        /* 목차. 2. static method의 경우 */
        System.out.println("두 수 중 큰 값은: " + Calculator.maxNumberOf(22, 80));
    }
}
4. API
1. API 개요
1-1. API 란?
💡 **Application Programming Interface(API)**는 응용프로그램에서 사용할 수 있도록, 운영체제나 프로그래밍 언어가 제공하는 기능을 제어할 수 있도록 만든 인터페이스를 뜻한다.- 쉽게 말해 우리가 구현할 수 없거나 구현하기 번거로운 기능들을 JDK를 설치하면 사용할 수 있도록 제공한 소스코드(클래스나 인터페이스)들을 의미한다.
- 더 쉽게 말해 누가 작성해 놓은 소스코드이니 가져다 쓰는 방법을 제공해 주는 것이다.
- 모든 코드를 우리가 다 외울 수 없으니 API 문서를 별도로 제공해주고 있다.
2. Math 클래스
2-1. Math 클래스란?
💡 Math 클래스는 수학에서 자주 사용하는 상수들과 함수 들을 미리 구현해 놓은 클래스이다. API문서를 확인해보자.(https://docs.oracle.com/en/java/javase/11/docs/api/java.base/java/lang/Math.html)Math 클래스는 static member로만 구성되어 있다.
즉, Math.메소드() 와 같이 Math 클래스에서 제공하는 API를 사용할 수 있다.
2-2. Math 클래스 확인
-
java.lang.Math 클래스에서 제공하는 API 확인
public static void main(String[] args) { /* 절대값 출력 */ /* 클래스의 full-name을 다 적은 경우 */ System.out.println("-7의 절대값 : " + (java.lang.Math.abs(-7))); /* java.lang패키지는 import 하지 않고 사용할 수 있도록 해 놓았다. * 컴파일러가 import java.lang.*; 이 코드를 자동으로 추가해서 컴파일을 하기 때문이다. * */ System.out.println("-1.25의 절대값 : " + (Math.abs(-1.25))); /* 우리가 Calculator에 만든 min과 max를 구하는 기능도 이미 제공하고 있다. */ System.out.println("10과 20중 더 작은 것은 : " + Math.min(10, 20)); System.out.println("20과 30중 더 큰 것은 : " + Math.max(20, 30)); /* 수학적으로 많이 사용하는 고정된 값들도 이미 Math 안에 정의된 것이 있다. * 필드 라는 것을 이용한 것인데 이 부분은 나중에 다루게 되니 걱정하지 말자 * */ System.out.println("원주율 : " + Math.PI); //원의 둘레나 이런거 계산할 때 미리 정의된 값이니 그냥 불러다 쓰면 된다. /* 난수를 발생시키는 것도 있다 * 0부터 1 전까지의 실수 형태의 난수를 발생시킨다. * 얘는 호출할 때마다 다른 값을 가진다. * */ System.out.println("난수 발생 : " + Math.random()); }- 실행결과
-7의 절대값 : 7
-1.25의 절대값 : 1.25
10과 20중 더 작은 것은 : 10
20과 30중 더 큰 것은 : 30
원주율 : 3.141592653589793
난수 발생 : 0.24173158411816165
- 실행결과
-
java.lang.Math 클래스에서 제공하는 난수 활용
public static void main(String[] args) { /* 난수의 활용 */ /* Math.random()을 이용해 발생한 난수는 0부터 1전까지의 실수 범위의 난수값을 반환한다. * 원하는 범위의 난수를 구하는 공식 *(int) (Math.random * 구하려는 난수의 갯수) + 구하려는 난수의 최소값 */ /* 0 ~ 9까지의 난수 발생 */ int random1 = (int) (Math.random() * 10); System.out.println("0 부터 9 사이의 난수 : " + random1); /* 1 ~ 10까지의 난수 발생 */ int random2 = (int) (Math.random() * 10) + 1; System.out.println("1 부터 10 사이의 난수 : " + random2); /* 10 ~ 15까지의 난수 발생 */ int random3 = (int) (Math.random() * 6) + 10; System.out.println("10 부터 15 사이의 난수 : " + random3); /* -128 ~ 127까지의 난수 발생 */ //int random4 = (int) (Math.random() * 256) + (-128); int random4 = (int) (Math.random() * 256) - 128; System.out.println("-128 부터 127까지의 난수 발생 : " + random4); }- 실행결과
0 부터 9 사이의 난수 : 6
1 부터 10 사이의 난수 : 5
10 부터 15 사이의 난수 : 11
-128 부터 127까지의 난수 발생 : 56
- 실행결과
-
java.util.Random 을 이용한 난수의 활용
public static void main(String[] args) { /* java.util.Random 클래스 */ /* java.util.Random 클래스의 nextInt() 메소드를 이용한 난수 발생 * nextInt(int bound) : 0부터 매개변수로 전달받은 정수 범위까지의 난수를 발생시켜서 정수 형태로 반환 */ /* 원하는 범위의 난수를 구하는 공식 * random.nextInt(구하려는 난수의 갯수) + 구하려는 난수의 최소값 * */ Random random = new Random(); /* 0 부터 9까지 난수 발생 */ int randomNumber1 = random.nextInt(10); System.out.println("0 부터 9 까지의 난수 : " + randomNumber1); /* 1부터 10까지 난수 발생 */ int randomNumber2 = random.nextInt(10) + 1; System.out.println("1 부터 10 까지의 난수 : " + randomNumber2); /* 20 부터 45까지의 난수 발생 */ int randomNumber3 = random.nextInt(26) + 20; System.out.println("20 부터 45 까지의 난수 : " + randomNumber3); /* -128 부터 127까지의 난수 발생 */ //int randomNumber4 = random.nextInt(256) - 128; int randomNumber4 = new Random().nextInt(256) - 128; //객체를 생성하자마자 바로 메소드 호출도 할 수 있다. System.out.println("-128 부터 127 까지의 난수 : " + randomNumber4); }- 실행결과
0 부터 9 까지의 난수 : 7
1 부터 10 까지의 난수 : 8
20 부터 45 까지의 난수 : 34
-128 부터 127 까지의 난수 : 102
- 실행결과
- 내가 작성한 코드
public class Application1 {
    public static void main(String[] args) {
        /* 수업목표. Math 클래스에서 제공하는 static 메소드를 호출할 수 있다. */

        /* 목차. 1. 절대값 출력 */
        System.out.println("-32.1의 절대값: " + Math.abs(-32.1));

        /* 목차. 2. 최대값, 최소값 출력 */
        System.out.println("10과 20 중 더 작은 것은: " + Math.min(10, 20));
        System.out.println("20과 30 중 더 작은 것은: " + Math.max(20,30));

        /* 목차. 3. 난수 생성 */
        System.out.println("난수 발생: " + Math.random());
    }

}
public class Application2 { public static void main(String[] args) { /* 수업목표. 사용자 지정 범위의 난수를 발생시킬 수 있다.(ver. java.lang.Math 클래스) */ /* 목차. 1. 0 ~ 9까지의 난수 생성 */ int random1 = (int)(Math.random() * 10); /* 목차. 2. 1 ~ 10까지의 난수 생성 */ int random2 = (int)(Math.random() * 10) + 1; /* 목차. 3. 10 ~ 15까지의 난수 생성 */ int random3 = (int)(Math.random() * 6) + 10; /* 목차. 4. -120 ~ 127까지의 난수 생성 */ int random4 = (int)(Math.random() * 256) + -128; System.out.println("목차1의 결과: " + random1); System.out.println("목차2의 결과: " + random2); System.out.println("목차3의 결과: " + random3); System.out.println("목차4의 결과: " + random4); } }import java.util.Random; public class Application3 { public static void main(String[] args) { /* 수업목표. 사용자 지정 범위의 난수를 발생시킬 수 있다.(ver. java.util.random 클래스) */ /* 설명. java.util.Random 클래스는 메소드를 non-static 메소드로 제공한다. */ Random random = new Random(10); /* 목차. 1. 0 ~ 9까지의 난수 생성 */ int random1 = random.nextInt(10) + 1; /* 목차. 2. 1 ~ 10까지의 난수 생성 */ int random2 = random.nextInt(6) + 10; /* 목차. 3. 10 ~ 15까지의 난수 생성 */ int random3 = random.nextInt(256) + -128; /* 목차. 4. -120 ~ 127까지의 난수 생성 */ int random4 = (int)(Math.random() * 256) + -128; System.out.println("목차1의 결과: " + random1); System.out.println("목차2의 결과: " + random2); System.out.println("목차3의 결과: " + random3); System.out.println("목차4의 결과: " + random4); } }
4. Scanner 클래스
4-1. 스캐너(Scanner) 란?
💡 스캐너(Scanner)란 java.util.Scanner 클래스를 말한다. 이 클래스는 읽은 바이트를 **문자, 숫자, 실수, boolean, 문자열 등 다양한 타입으로 변환하여 리턴하는 클래스**이다.- Scanner는 “토큰 단위”로 데이터를 읽어 온다. (토큰 : 공백문자 - Spacebar/Tab/Enter 로 구분 되는 요소)
4-2. Scanner에서 자주 쓰이는 메서드
| 메서드 | 기능 |
|---|---|
| next() | String으로 읽어온다.(띄어쓰기 이후는 읽지 않음) |
| nextLine() | String으로 읽어온다.(띄어쓰기 포함 한 줄을 읽는다. Enter 이전까지) |
| nextInt() | int로 읽어온다. |
| nextBoolean() | boolean으로 읽어온다 |
| nextByte() | byte로 읽어온다 |
| nextShort() | short로 읽어온다 |
| nextLong() | long을 읽어온다 |
| nextFloat() | float로 읽어온다 |
| nextDouble() | double로 읽어온다 |
4-3. Scanner 확인
-
Scanner를 이용해 다양한 값 입력 테스트
public static void main(String[] args) { /* java.util.Scanner를 이용한 다양한 자료형 값 입력 받기 */ /* 콘솔 화면에 값을 입력 받아 출력해보기 * 이런 어려운 기능 또한 미리 JDK를 설치하면 손쉽게 사용할 수 있도록 구현 해 놓았다. * */ /* 1. Scanner 객체 생성 */ /* 1-1. 원래 이렇게 Scanner 객체를 만들어야 함 */ //java.util.Scanner sc = new java.util.Scanner(java.lang.System.in); /* 1-2. 하지만 java.lang은 패키지이름 생략 가능하다 */ //java.util.Scanner sc = new java.util.Scanner(System.in); /* 1-3. 다른 패키지에 있는 클래스 사용 시 패키지명 생략하기 위해 사용하는 구문은 바로 import이다. (import) */ Scanner sc = new Scanner(System.in); //java.util.Scanner import하면 사용 준비 끝 /* 2. 자료형별 값 입력받기 */ /* 입력받을 때 안내문구는 별도로 출력해주지 않으니 우리가 작성해줘야 한다. */ /* print와 println은 줄 바꿈 차이 이다. * 다음 줄에 입력을 대기시키는 것이 아니고 줄바꿈하지 않고 입력받게 하기 위해 print를 사용했다 * */ /* 2-1. 문자열 입력 받기 */ /* nextLine() : 입력받은 값을 문자열로 반환해준다 */ System.out.print("이름을 입력하세요 : "); String name = sc.nextLine(); System.out.println("입력하신 이름은 " + name + "입니다."); /* 2-2. 정수형 값 입력 받기 */ /* nextInt() : 입력받은 값을 int형으로 반환한다. nextByte()/nextShort()는 생략한다. * 숫자가 아닌 값을 입력하게 되면 InputMismatchException이 발생한다. * int 범위를 초과한 값을 입력받게 되면 역시 InputMismatchException이 발생한다. * Exception은 나중에 다시 다루게 되겠지만 쉽게 표현하자면 에러 같은 개념이라고 생각하자. * */ System.out.print("나이를 입력하세요 : "); int age = sc.nextInt(); System.out.println("입력하신 나이는 " + age + "입니다."); /* nextLong() : 입력받은 값을 long 형으로 반환한다. * nextInt와 Exception이 발생하는 이유는 동일하다. * */ System.out.print("금액을 입력해주세요 : "); //만약 안내 구문을 작성하지 않으면 그냥 멈춘것 처럼 보인다. 사실 기다리는 중이다. long money = sc.nextLong(); System.out.println("입력하신 금액은 " + money + "원 입니다."); /* 2-3. 실수형 값 입력 받기 */ /* nextFloat() : 입력받은 값을 float 형으로 반환한다. */ /* 정수 형태로 입력받으면 실수로 변환 후 정상 동작 * 길이를 길게 입력하면 소수점 8째 자리까지만 표현 * 숫자형태의 값이 아닌 경우 InputMismatchException 발생 * */ System.out.print("키를 입력해주세요 : "); float height = sc.nextFloat(); System.out.println("입력하신 키는 " + height + "cm 입니다."); /* nextDouble() : 입력받은 값을 double 형으로 반환한다. */ /* 정수 형태로 입력받으면 실수로 변환 후 정상 동작 * 길이를 길게 입력하면 소수점 17째 자리까지만 표현 * 숫자형태의 값이 아닌 경우 InputMismatchException 발생 * */ System.out.print("원하는 실수를 입력하세요 : "); double number = sc.nextDouble(); System.out.println("입력하신 실수는 " + number + "입니다."); /* 2-4. 논리형 값 입력받기 */ /* nextBoolean() : 입력받은 값을 boolean형으로 반환한다. * true or false 외에 다른 값을 입력하게 되면 InputMismatchException 발생함 * */ System.out.print("참과 거짓 중에 한 가지를 true or false로 입력해주세요 : "); boolean isTrue = sc.nextBoolean(); System.out.println("입력하신 논리 값은 " + isTrue + "입니다."); /* 2-5. 문자형 값 입력받기 */ /* 아쉽게도 문자를 직접 입력 받는 기능을 제공하지는 않는다. * 따라서 문자열로 입력을 받고, 입력받은 문자에서 원하는 순번째 문자를 분리해서 사용해야 한다. * java.lang.String에 charAt(int index)를 사용한다. * index를 정수형으로 입력하면 문자열에서 해당 인덱스에 있는 한 문자를 문자 형으로 반환해주는 기능을 한다. * * index는 0부터 시작하는 숫자 체계이며 컴퓨터에서 주로 사용되는 방식이다. * 만약 존재하지 않는 인덱스를 입력하게 되면 IndexOutOfBoundsException이 발생한다. * */ sc.nextLine(); //이건 뒤에서 설명할 예정이다 System.out.print("아무 문자나 입력 해주세요 : "); char ch = sc.nextLine().charAt(0); System.out.println("입력하신 문자는 " + ch + "입니다."); }- 실행결과
이름을 입력하세요 : **오지라퍼**
입력하신 이름은 오지라퍼입니다.
나이를 입력하세요 : **30**
입력하신 나이는 30입니다.
금액을 입력해주세요 : **900**
입력하신 금액은 900원 입니다.
키를 입력해주세요 : **180**
입력하신 키는 180.0cm 입니다.
원하는 실수를 입력하세요 : **10.24**
입력하신 실수는 10.24입니다.
참과 거짓 중에 한 가지를 true or false로 입력해주세요 : **true**
입력하신 논리 값은 true입니다.
아무 문자나 입력 해주세요 : **ohgiraffer**
입력하신 문자는 o입니다.
- 실행결과
-
nextLine()과 next() 테스트
public static void main(String[] args) { /* Scanner의 nextLine()과 next() */ /* nextLine() : 공백을 포함한 한 줄을 입력을 위한 개행문자 전 까지 읽어서 문자열로 반환한다. (공백문자 포함) * next() : 공백문자나 개행문자 전 까지를 읽어서 문자열로 반환한다. (공백문자 포함하지 않음) * */ /* 1. Scanner 객체 생성 */ Scanner sc = new Scanner(System.in); /* 2. 문자열 입력 */ /* 2-1. nextLine() */ System.out.print("인사말을 입력해주세요 : "); String greeting1 = sc.nextLine(); System.out.println(greeting1); /* 2-2. next() */ System.out.print("인사말을 입력해주세요 : "); String greeting2 = sc.next(); System.out.println(greeting2); }- 실행결과
인사말을 입력해주세요 : **안녕하세요 반갑습니다**
안녕하세요 반갑습니다
인사말을 입력해주세요 : **안녕하세요 반갑습니다**
안녕하세요
- 실행결과
-
Scanner 사용시 주의사항 테스트 (1)
public static void main(String[] args) { /* 스캐너 주의 사항 */ /* 스캐너의 next 메소드들은 입력한 내용을 버퍼로부터 토큰단위로 분리해서 읽어온다. * 그래서 크게 두 가지 사항을 주의해야 한다. * 1. next()로 문자열 입력 받은 후 정수, 실수, 논리값 입력 받을 때 * 2. 정수, 실수, 논리값 입력 후 next()로 문자열 입력받을 때 * */ /* 스캐너 객체 생성 */ Scanner sc = new Scanner(System.in); /* 1. next()로 문자열 입력 받은 후 정수, 실수, 논리값 입력 받을 때 */ System.out.print("문자열을 입력해주세요 : "); String str1 = sc.next(); //공백이나 개행문자 전 까지를 읽어온다. System.out.println("str1 : " + str1); System.out.print("숫자를 입력해주세요 : "); int num1 = sc.nextInt(); //정수 값을 읽어온다. System.out.println("num1 : " + num1); }- 실행결과
문자열을 입력해주세요 : **안녕**
str1 : 안녕
숫자를 입력해주세요 : **123**
num1 : 123

문자열을 입력해주세요 : **안녕하세요 반갑습니다**
str1 : 안녕하세요
숫자를 입력해주세요 : Exception in thread "main" java.util.InputMismatchException
	at java.base/java.util.Scanner.throwFor(Scanner.java:939)
	at java.base/java.util.Scanner.next(Scanner.java:1594)
	at java.base/java.util.Scanner.nextInt(Scanner.java:2258)
	at java.base/java.util.Scanner.nextInt(Scanner.java:2212)
	at com.ohgiraffers.method.Application.main(Application.java:25)
여기까지 작성하고 나면 코드 작성 시에(compile 시)는 문제되지 않는다.
처음 실행할 때 문자열에 "안녕" 이라고 입력하고 정수를 입력하면 정상적으로 동작한다.
하지만, "안녕하세요 반갑습니다" 입력 하면 동작 시(Runtime) 숫자를 입력하기도 전에 InputMismatchException이 발생한다.해당 Exception이 언제 발생했을까? 정수를 입력해야 하는데 숫자를 입력하지 않은 경우였다. 근데 아무것도 입력 안했는데 왜 발생했을까?
"안녕하세요 반갑습니다" ← 입력 시 공백을 기준으로 두 개의 토큰 "안녕하세요"와 "반갑습니다" 로 분리가 된다.
next()는 다음 토큰인 "안녕하세요"를 읽었고, nextInt()는 다음 토큰을 정수로 읽어야 하는데 "반갑습니다"가 나왔다.
정수를 입력해야 하는데 "반갑습니다"를 읽으면 당연히 InputMismatchException이 발생한다.공백이 있는 문자열을 받을거면 nextLine()을 이용하자.
혹은 입력 받은 버퍼를 줄 단위로 토큰을 분리하기 때문에 해당 라인의 토큰을 다 읽고 다음 줄로 이동시키고 싶을 때는
한 라인의 모든 토큰을 읽어오는 sc.nextLine(); 호출을 중간에 한 번 넣어줘도 해결은 된다. - 실행결과
-
Scanner 사용시 주의사항 테스트 (2)
public static void main(String[] args) { /* 스캐너 주의 사항 */ /* 스캐너의 next 메소드들은 입력한 내용을 버퍼로부터 토큰단위로 분리해서 읽어온다. * 그래서 크게 두 가지 사항을 주의해야 한다. * 1. next()로 문자열 입력 받은 후 정수, 실수, 논리값 입력 받을 때 * 2. 정수, 실수, 논리값 입력 후 nextLine()로 문자열 입력받을 때 * */ /* 스캐너 객체 생성 */ Scanner sc = new Scanner(System.in); /* 2. 정수, 실수, 논리값 입력 후 nextLine()로 문자열 입력받을 때 */ System.out.print("다시 숫자를 입력해주세요 : "); int num2 = sc.nextInt(); System.out.println("num2 : " + num2); System.out.print("공백이 있는 문자열을 하나 입력해주세요 : "); String str2 = sc.nextLine(); System.out.println("str2 : " + str2); }- 실행결과
다시 숫자를 입력해주세요 : **12**
num2 : 12
공백이 있는 문자열을 하나 입력해주세요 : str2 :
실행 해보면 두번째 입력을 받기 전에 바로 다음 줄을 출력해버린다.
앞에서 남긴 개행을 nextLine()이 읽고 넘어가서 입력전 프로그램이 종료된다.
해결하는 방법은 개행을 받아줄 nextLine()을 한 줄 더 명시해줌으로 버퍼를 비우면 된다.
public static void main(String[] args) { Scanner sc = new Scanner(System.in); System.out.print("다시 숫자를 입력해주세요 : "); int num2 = sc.nextInt(); System.out.println("num2 : " + num2); System.out.print("공백이 있는 문자열을 하나 입력해주세요 : "); sc.nextLine(); // 이 부분을 추가해준다. String str2 = sc.nextLine(); System.out.println("str2 : " + str2); }- 실행결과
다시 숫자를 입력해주세요 : **13** num2 : 13 공백이 있는 문자열을 하나 입력해주세요 : **ohgiraffers** str2 : ohgiraffers - 내가 작성한 코드
import java.util.Scanner;

public class Application1 {

    public static void main(String[] args) {
        /* 수업목표. java.util.Scanner를 이용한 다양한 자료형 값 입력 받기 */
//        java.util.Scanner sc = new java.util.Scanner(System.in);
        Scanner sc = new Scanner(System.in);

//        /* 목차. 1. 문자열 입력받기 */
//        System.out.print("이름을 입력하세요: ");
//        String name1 = sc.next();       // 공백이나 개행 전까지 문자열 반환
//        String name2 = sc.nextLine();   // 공백이나 개행을 포함한 한 줄의 문자열 모두 반환
//        System.out.println("입력하신 이름은: " + name1);
//        System.out.println("입력하신 이름은: " + name2);
//
//        /* 목차. 2. 정수형 입력받기 */
//        System.out.print("나이를 입력하세요: ");
//        int age = sc.nextInt();
//        System.out.println("입력하신 나이는: " + age);
//
//        /* 목차. 3. 실수형 입력받기 */
//        System.out.print("키를 입력하세요: ");
//        double height = sc.nextDouble();
//        System.out.println("입력하신 키는: " + height);
//
//        /* 목차. 4. 논리형 입력받기 */
//        System.out.print("참과 거짓 중에 한가지를 true 또는 false로 입력하세요: ");
//        boolean isTrue = sc.nextBoolean();
//        System.out.println("입력하신 논리 값은: " + isTrue + "입니다");
//
//        sc.nextLine();      // 중간에 버퍼에 남은 공백 및 개행 제거용 nextLine();

        /* 목차. 5. 문자형 입력받기 */
        System.out.print("아무 문자나 입력 해주세요");
        char answer = sc.next().charAt(0);      // 메소드 체이닝 방식으로 사용자의 입력값에서 인덱스 번째의 문자를 char형으로 반환
        System.out.println("입력하신 문자는: " + answer + "입니다");
    }
}
- 실행결과