09 find, find_all 메서드
Beautiful Soup 에서 필요한 태그를 선택하는 두 가지 방법.
select_one(),.select()메소드 활용.find(),.find_all()메소드 활용
find : 매칭되는 태그를 하나만 가져옴. 태그나 None 을 반환
find_all() : 매칭되는 모든 태그를 가져옴. 리스트를 반환
공통점 : CSS 선택자가 아닌 파라미터 활용.
🍀 태그 이름 사용
find 나 find_all 모두
태그,soup에 모두 활용 가능하다.
soup.find_all('tagname')
# 예: soup.find_all('p')

soup.find_all(['tagname1', 'tagname2'])
# 예: soup.find_all(['p', 'a'])- 태그 이름을 리스트로 넣어주는 것도 가능하다.
🍀 속성 사용(class_, 속성만 적기, 불리언 전달하기)
soup.find_all('tagname', attr1='val1', attr2='val2', ...)
# 예: soup.find_all('p', id="some-id", class_="some-class")
CSS 선택자는 id 나 class 를 각각 # 이나 . dmfh 써줬다.
그러나 find, findall 에선 파라미터를 다음과 같이 전달!
특이한 점은 id 는 그대로 쓰는데 class 는 꼭 `class` 로 써줘야 정의가 된다.
위의 예시에서는 id 가 some-id 이고 class 가 some-class 인 p 태그를 모두 찾는 것.
- 밑의 예시처럼 속성만 적어주는 것도 가능.
soup.find_all(attr1='val1', attr2='val2', ...)
# 예: soup.find_all(id="some-id", class_="some-class")
id 는 some-id 이고 class_ 는 some-class 인 모든 태그를 찾는다는 것.
- 불리언 값을 넣어주는 것도 가능.
# 예: soup.find_all('p', id=True, class_=False)id 속성은 있고 class 속성은 없는 p 태그 모두 찾는다는 것!
🍀 중첩 태그
find 와 find_all 은 중첩이 불가능해서 코드를 다음과 같이 두 번 써줘야 한다. 차이를 비교해보자.
...
    <div class="some-class">
      <p>Paragraph 1</p>
      <p>Paragraph 2</p>
      <p>Paragraph 3</p>
    </div>
...
# select - 선택자로 중첩된 p 태그 선택
soup.select('div.some-class p')
# find_all - 먼저 div 태그를 가져온 후 div 태그에 find_all()
div_tag = soup.find('div', class_='some-class')
div_tag.find_all('p')10 태그 중복성 확인하기
현재 [인기아티스트] 에 있는 가수들 10명을 가져오고 싶다. 개발자 도구에서 확인해봤더니 해당 아티스트 이름은 li 태그 안에 있다.

그런데 무조건 li 태그가 보인다고 그걸로 추출하면 안된다. 다른 li 태그들이 있을 수 있기 때문이다. 이러한 태그 중복성을 확인할 수 있는 게, 윈도우에선 개발자 도구에서 ctrl + F 를 이용하는 것이다.
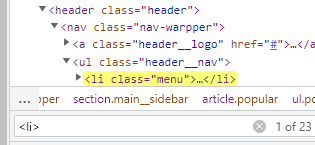
23개나 나왔다. 중복이 많다는 것이다. 이럴땐 찾고 싶은 태그의 하나 부모 태그로 가자
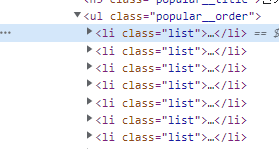
내가 찾고싶은 li 태그는 특히 ul 태그의 popular__order 클래스에 담겨있다.
import requests
from bs4 import BeautifulSoup

response = requests.get("https://workey.codeit.kr/music")
rating_page = response.text

soup = BeautifulSoup(rating_page, 'html.parser')

print(soup.select('ul.popular__order li'))'ul.popluaroder li' 는 하나하나 파헤쳐보면
ul 태그의 popularorder 클래스의 안에 있는 li 태그라는 뜻이다.
11 태그에서 텍스트 빼오기
✅ 방법 1) get_text()
get_text() 는 태그 안에 있는 모든 문자열을 붙여서 반환* 한다.
response = requests.get("https://workey.codeit.kr/music")
rating_page = response.text

soup = BeautifulSoup(rating_page, 'html.parser')

popular_artists = []
for tag in soup.select('ul.popular__order li'):
    popular_artists.append(tag.get_text())
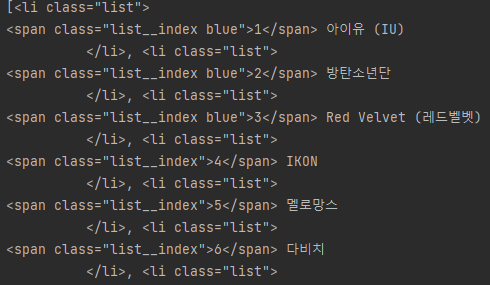
기존에는 1과 아이유, 2와 방탄소년단이 태그로 다 떨어져 있었지만 li 로 하나로 묶어 나온다.
['\n1 아이유 (IU)\n ', '\n2 방탄소년단\n ', '\n3 Red Velvet (레드벨벳)\n ', '\n4 IKON\n ', '\n5 멜로망스\n ', '\n6 다비치\n ', '\n7 윤딴딴\n ', '\n8 수지 (SUZY)\n ', '\n9 김동률\n ', '\n10 폴킴\n ']
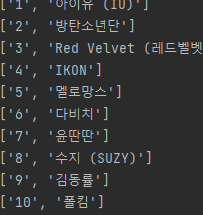
그런데.. 이쁘지 않다. get_text().strip() 추가해보자.
['1 아이유 (IU)', '2 방탄소년단', '3 Red Velvet (레드벨벳)', '4 IKON', '5 멜로망스', '6 다비치', '7 윤딴딴', '8 수지 (SUZY)', '9 김동률', '10 폴킴']
\n 이나 공백을 제거하고 문자만 깔끔하게 추출된다!
방법 2) strings (stripped_strings)
for tag in soup.select('ul.popular__order li'):
    print(list(tag.strings))
strings 메서드는 태그 사이를 합치지 않고 따로 리스트로 반환한다. 결과는 다음과 같다.
['\n', '1', ' 아이유 (IU)\n ']['\n', '2', ' 방탄소년단\n ']
['\n', '3', ' Red Velvet (레드벨벳)\n ']['\n', '4', ' IKON\n ']
['\n', '5', ' 멜로망스\n ']['\n', '6', ' 다비치\n ']
['\n', '7', ' 윤딴딴\n ']['\n', '8', ' 수지 (SUZY)\n ']
['\n', '9', ' 김동률\n ']['\n', '10', ' 폴킴\n ']
여전히 이쁘지 않으므로 tag.stripped_strings 로 바꿔주자.
반복문이니 뒤에 stirngs[1] 을 추가해 이름만 뽑을 수도 있다.
12. 파이썬 문자열 다루기
13. 검색어 순위 받아오기
import requests
from bs4 import BeautifulSoup

# 여기에 코드를 작성하세요
popular_searches = []
response = requests.get('https://workey.codeit.kr/music/index')
page = response.text

soup = BeautifulSoup(page, 'html.parser')
for tag in soup.select('ul.rank__order li'):
    popular_searches.append(tag.get_text().strip().split()[2])
# 테스트 코드
print(popular_searches)
soup = BeautifulSoup(response.text, 'html.parser')
popular_searches = []
# <ul class="rank__order">에 중첩된 <li> 태그 선택
for tag in soup.select('ul.rank__order li'):
# li 태그의 텍스트 요소 중 세 번째 가져오기
search_word = list(tag.stripped_strings)[2]
popular_searches.append(search_word)
# 출력 코드
print(popular_searches).stripped_strings[2] 를 하면 가수만 나온다. 리스트를 변수에 담고 또다시 리스트에 담아도 가능!
14. 태그에서 속성 빼오기
태그에서 속성을 빼오는 방법은 대괄호를 이용하거나 .attrs 를 이용하는 것이다.
✅ 대괄호 이용
이미지 태그에 있는 src = '주소' 속성을 빼오자.
soup = BeautifulSoup(rating_page, 'html.parser')

print(soup.select_one('img')['src'])

이렇게 출력이 된다.
✅ .attrs 이용
.attrs 를 이용하면 속성을 딕셔너리로 반환한다.
soup = BeautifulSoup(rating_page, 'html.parser')

print(soup.select_one('img').attrs)

15 Beautiful Soup 간결하게
✅ .tagname 문법
soup.tagname # soup.select_one('tagname')과 동일
tag.tagname # tag.select_one('tagname')과 동일
각각 h2, p, a 태그를 가져온다고 해보자.
...
    <div class="data">
      <h2>제목</h2>
      <p>내용</p>
      <a href="www.example.com">링크</a>
    </div>
...
select_one 을 이용하면 다음과 같다.
div_tag = soup.select_one('div.data')
title = div_tag.select_one('h2').get_text()
content = div_tag.select_one('p').get_text()
link = div_tag.select_one('a')['href']
.tagname 을 쓰면 다음과 같이 h2, p, a 를 따옴표가 아니라 그냥 뒤에 이어서 쓴다.
div_tag = soup.select_one('div.data')
title = div_tag.h2.get_text()
content = div_tag.p.get_text()
link = div_tag.a['href']
✅ 메소드 체이닝
체인처럼 이어서 쓸 수 있다. select_one , select , get_text 등에 적용 가능!
...
    <div class="data">
      <div>
        <h2>제목</h2>
        <p>내용<b>키워드</b>내용</p>
        <a href="www.example.com">링크</a>
      </div>
    </div>
...
여기서 b 태그의 키워드를 가져온다고 해보자.
div_tag = soup.select_one('div.data')
keyword = div_tag.div.p.b.get_text()
print(keyword)
tagname 문법과 메서드 체이닝 을 이용해서 쉽게 접근했다.
16 Beautiful Soup 정리 노트
17 데이터를 엑셀 파일로
import requests
from bs4 import BeautifulSoup
from openpyxl import Workbook


wb = Workbook(write_only = True)
ws = wb.create_sheet('TV Ratings')
ws.append(['순위', '채널', '프로그램', '시청률'])

response = requests.get("https://workey.codeit.kr/ratings/index")
rating_page = response.text

soup = BeautifulSoup(rating_page, 'html.parser')
for tr_tag in soup.select('tr')[1:]:
    td_tags = tr_tag.select('td')
    row = [
        td_tags[0].get_text(),
        td_tags[1].get_text(),
        td_tags[2].get_text(),
        td_tags[3].get_text()
    ]
    ws.append(row)
wb.save('시청률_2010년1월1주차.xlsx')
openxl 을 사용하는 방법이다.
from openxl import Workbook✅ 워크북 열기
wb = Workbook(write_only = True)
✅ 시트 만들기
ws = wb.create_sheet('TV Ratings')
✅ 행 만들기
ws.append(['순위', '채널', '프로그램', '시청률'])
✅ 한 줄씩 쓰기
ws.append(row)
✅ 저장하기
wb.save('원하는 파일 이름')
18 openxl 정리노트
19 데이터를 csv 파일로
import csv
import requests
from bs4 import BeautifulSoup

# CSV 파일 생성
csv_file = open('시청률_2010년1월1주차.csv', 'w')
csv_writer = csv.writer(csv_file)

# 헤더 행 추가
csv_writer.writerow(['순위', '채널', '프로그램', '시청률'])

response = requests.get("https://workey.codeit.kr/ratings/index")
rating_page = response.text

soup = BeautifulSoup(rating_page, 'html.parser')

for tr_tag in soup.select('tr')[1:]:
    td_tags = tr_tag.select('td')
    row = [
        td_tags[0].get_text(),
        td_tags[1].get_text(),
        td_tags[2].get_text(),
        td_tags[3].get_text()
    ]
    # 데이터 행 추가
    csv_writer.writerow(row)

# CSV 파일 닫기
csv_file.close()
✅csv 파일 생성
# CSV 파일 생성
csv_file = open('file_name.csv', 'w')
csv_writer = csv.writer(csv_file)
open 메서드로 연 다음, csv.writer 로 쓸 수 있는 변수를 추가한다. 나중에 그 변수에 .writerow 를 할 거다.
✅ 행 추가
# CSV 파일에 행 추가
csv_writer.writerow([data1, data2, ...])
쓰기 변수.writerow 를 해준다. 리스트에 넣어 행 단위 추가!
✅ CSV 파일 닫기
# CSV 파일 닫기
csv_file.close()
open 넣은 변수로 닫아준다.
20 꿈의 직장 전화번호 모으기
import requests
from bs4 import BeautifulSoup
from openpyxl import Workbook


wb = Workbook(write_only = True)
ws = wb.create_sheet()
ws.append(['지점이름', '주소', '전화번호'])


# HTML 코드 받아오기
response = requests.get("https://workey.codeit.kr/orangebottle/index")

# BeautifulSoup 사용해서 HTML 코드 정리
soup = BeautifulSoup(response.text, 'html.parser')

branch_infos = []

# 모든 지점에 대한 태그 가져오기
branch_tags = soup.select('div.branch')

for branch_tag in branch_tags:
    # 각 태그에서 지점 이름, 전화번호 가져오기
    branch_name = branch_tag.select_one('p.city').get_text()
    address = branch_tag.select_one('p.address').get_text()
    phone_number = branch_tag.select_one('span.phoneNum').get_text()
    branch_infos.append([branch_name, address, phone_number])
    ws.append([branch_name, address, phone_number])
wb.save('오렌지_보틀.xlsx')

# 테스트 코드
21 연도별 시청률 데이터 엑셀 파일로 저장해보기
import requests
from bs4 import BeautifulSoup
from openpyxl import Workbook

wb = Workbook(write_only= True)


for year in range(2010, 2019):
    ws = wb.create_sheet("{}년".format(year))
    ws.append(['기간', '순위', '채널', '프로그램', '시청률'])
    for month in range(1,13):
        for weekIndex in range(0,5):
            url= 'https://workey.codeit.kr/ratings/index?year={}&month={}&weekIndex={}'.format(year, month, weekIndex)
            response = requests.get(url)
            rating_page = response.text
            soup = BeautifulSoup(rating_page, 'html.parser')

            for tr_tag in soup.select('tr')[1:]:
                td_tags = tr_tag.select('td')
                period = "{}년 {}월 {}주차 ".format(year, month, weekIndex+1)
                row = [
                    period,
                    td_tags[0].get_text(),
                    td_tags[1].get_text(),
                    td_tags[2].get_text(),
                    td_tags[3].get_text()
                ]
                ws.append(row)
wb.save('시청률.xlsx')