전에 프로젝트를 진행하면서 구현해보고 싶었던 회원가입 시 인증 과정을 구현해봤다.
휴대폰 인증을 해보고 싶었고 휴대폰 인증 전 이메일 인증을 먼저 구현해봤다.
추후 휴대폰 인증도 구현 예정이고 인증번호를 Redis에 저장하는 방법도 구현해 볼 예정이다.
1. 의존성 추가
- buid.gradle
https://mvnrepository.com/ 에서 Spring Boot Starter Mail 검색 후 가장 많이 사용했던 버전으로 추가했다.
implementation 'org.springframework.boot:spring-boot-starter-mail:2.7.0'2. MailConfig
Spirng에서 메일 서버를 사용하기 위해서는 메일 서버와 연결해야 한다.
보통 gmail을 많이들 사용했는데 언제부터인지 모르게 보안 수준 설정이 불가하여 네이버를 통해 연결해줬다.
2-1. pop3 / SMTP 설정
- 환경설정으로 들어간다.

- POP3/IMAP 설정으로 들어간 후 아래와 같이 설정해준다.
SMTP 서버명, SMTP포트, 아이디 확인 후 properties 설정을 아래와 같이 해준다.

- properties 설정
spring.mail.host=smtp.naver.com
spring.mail.port=465
spring.mail.username=abcd@naver.com
spring.mail.password=abcdef
spring.mail.properties.debug=true
spring.mail.properties.mail.smtp.auth=true
spring.mail.properties.mail.smtp.ssl.enable= true
spring.mail.properties.mail.smtp.starttls.enable=true
spring.mail.properties.mail.smtp.ssl.trust=smtp.naver.com
3. MailConfig
@Configuration
@PropertySource("classpath:application.properties")
public class EmailConfig {

    @Value("${spring.mail.username}")
    private String id;
    @Value("${spring.mail.password}")
    private String password;
    @Value("${spring.mail.host}")
    private String host;
    @Value("${spring.mail.port}")
    private int port;

    @Bean
    public JavaMailSender javaMailService() {
        JavaMailSenderImpl javaMailSender = new JavaMailSenderImpl();

        javaMailSender.setHost(host); // smtp 서버 주소
        javaMailSender.setUsername(id); // 설정(발신) 메일 아이디
        javaMailSender.setPassword(password); // 설정(발신) 메일 패스워드
        javaMailSender.setPort(port); //smtp port
        javaMailSender.setJavaMailProperties(getMailProperties()); // 메일 인증서버 정보 가져온다.
        javaMailSender.setDefaultEncoding("UTF-8");
        return javaMailSender;
    }

    private Properties getMailProperties() {
        Properties properties = new Properties();
        properties.setProperty("mail.transport.protocol", "smtp"); // 프로토콜 설정
        properties.setProperty("mail.smtp.auth", "true"); // smtp 인증
        properties.setProperty("mail.smtp.starttls.enable", "true"); // smtp starttls 사용
        properties.setProperty("mail.debug", "true"); // 디버그 사용
        properties.setProperty("mail.smtp.ssl.trust","smtp.mailplug.co.kr"); // ssl 인증 서버 주소
        properties.setProperty("mail.smtp.ssl.enable","true"); // ssl 사용
        return properties;
    }
}
4. EmailService
- 메일 내용 작성 및 발송 클래스 구현
- 클래스내의 주석을 보면 내용이 이해될거고 sendSimpleMessage는 실제 메일을 발송하는 메서드고 ePw를 return하는 이유는 메일로 보낸 인증 코드를 서버에서 저장하고 있다가 사용자가 인증번호를 입력하였을때 인증하기 위함이다.
@PropertySource("classpath:application.properties")
@Slf4j
@RequiredArgsConstructor
@Service
public class EmailService {

    private final JavaMailSender javaMailSender;

    //인증번호 생성
    private final String ePw = createKey();

    @Value("${spring.mail.username}")
    private String id;

    public MimeMessage createMessage(String to)throws MessagingException, UnsupportedEncodingException {
        log.info("보내는 대상 : "+ to);
        log.info("인증 번호 : " + ePw);
        MimeMessage  message = javaMailSender.createMimeMessage();

        message.addRecipients(MimeMessage.RecipientType.TO, to); // to 보내는 대상
        message.setSubject("ㅇㅇㅇ 회원가입 인증 코드: "); //메일 제목

        // 메일 내용 메일의 subtype을 html로 지정하여 html문법 사용 가능
        String msg="";
        msg += "<h1 style=\"font-size: 30px; padding-right: 30px; padding-left: 30px;\">이메일 주소 확인</h1>";
        msg += "<p style=\"font-size: 17px; padding-right: 30px; padding-left: 30px;\">아래 확인 코드를 회원가입 화면에서 입력해주세요.</p>";
        msg += "<div style=\"padding-right: 30px; padding-left: 30px; margin: 32px 0 40px;\"><table style=\"border-collapse: collapse; border: 0; background-color: #F4F4F4; height: 70px; table-layout: fixed; word-wrap: break-word; border-radius: 6px;\"><tbody><tr><td style=\"text-align: center; vertical-align: middle; font-size: 30px;\">";
        msg += ePw;
        msg += "</td></tr></tbody></table></div>";

        message.setText(msg, "utf-8", "html"); //내용, charset타입, subtype
        message.setFrom(new InternetAddress(id,"prac_Admin")); //보내는 사람의 메일 주소, 보내는 사람 이름

        return message;
    }

    // 인증코드 만들기
    public static String createKey() {
        StringBuffer key = new StringBuffer();
        Random rnd = new Random();

        for (int i = 0; i < 6; i++) { // 인증코드 6자리
            key.append((rnd.nextInt(10)));
        }
        return key.toString();
    }

    /*
        메일 발송
        sendSimpleMessage의 매개변수로 들어온 to는 인증번호를 받을 메일주소
        MimeMessage 객체 안에 내가 전송할 메일의 내용을 담아준다.
        bean으로 등록해둔 javaMailSender 객체를 사용하여 이메일 send
     */
    public String sendSimpleMessage(String to)throws Exception {
        MimeMessage message = createMessage(to);
        try{
            javaMailSender.send(message); // 메일 발송
        }catch(MailException es){
            es.printStackTrace();
            throw new IllegalArgumentException();
        }
        return ePw; // 메일로 보냈던 인증 코드를 서버로 리턴
    }
}
5. AccountController
@Slf4j
@RequiredArgsConstructor
@RestController
public class AccountController {
private final EmailService emailService;
@PostMapping("login/mailConfirm")
@ResponseBody
public String mailConfirm(@RequestParam String email) throws Exception {
String code = emailService.sendSimpleMessage(email);
log.info("인증코드 : " + code);
return code;
}
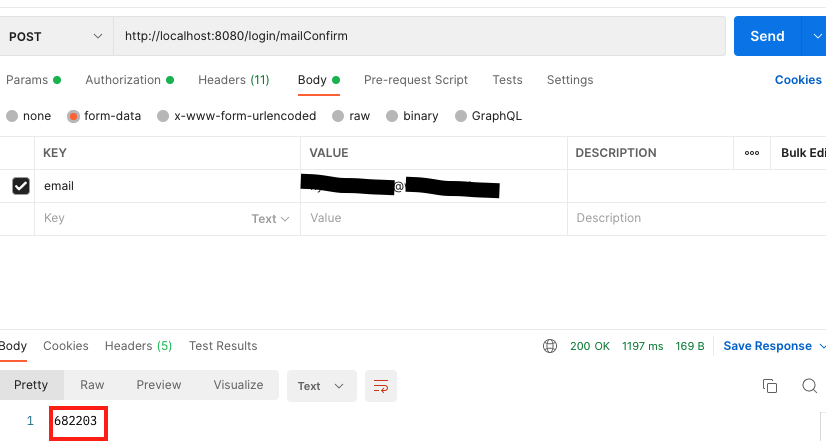
}6. Test
구현을 완료했으니 테스트해보자


마치며
이메일로 인증번호를 발송하는 기능을 구현했고 이제 추가로 인증번호 유효기간 설정과 Redis를 활용하여 인증번호를 저장하는 방법으로 구현해 볼 예정이다.

동료들과 함께하는 개발의 중요성에 관심이 많습니다. 언제나 호기심을 갖고 꾸준히 노력하는 개발자로서 성장하고 있습니다.