📌 모듈 & 파일 엑세스 이해하기
const fs = require("fs");

fs.readFile("Taemin.txt", (err, data) => {
  if (err) {
    console.log(err);
    return;
  }
  console.log(data.toString()); // name=Taemin
});

// fs.writeFile('Taemin.txt', 'name=Taemin', err => {
//     if (err) {
//         console.log(err)
//     } else {
//         console.log('Wrote to file')
//     }
// });
📌 HTTP
const http = require("http");

const server = http.createServer((request, response) => {
  response.setHeader("Content-Type", "text/html");
  response.write("<h1>hello there!</h1>");
  response.end(); // 데이터에 응답 추가가 끝났음을 node.js에 알려서 응답을 닫고 보냄.
});

server.listen(3000); // 서버를 시작하여 들어오는 요청을 리스닝.-
http.createServer는 requestListener라는 인수를 요청 → 이는 들어오는 모든 요청을 트리거하는 함수이다.- request : nodejs로 들어오는 요청을 반영하고 요청의 일부인 헤더와 요청의 일부가 될 수 있는 데이터 등이 있다.
- response : nodejs에서 전달되며 다시 보내는 응답을 구성하려 사용할 수 있고 결국 다시 보내기 위해 사용할 수 있는 객체이다.
-
setHeader의text/html은 html로 분석한다. → 렌더링 -
setHeader의text/plain은 일반적인 텍스트로 html로 분석하지 않는다.
const http = require("http");

const server = http.createServer((request, response) => {
  let body = [];
  request.on("data", (chunk) => {
    // 이벤트가 발생할 때 실행
    body.push(chunk);
  });
  request.on("end", () => {
    // 이벤트가 발생할 때 실행
    body = Buffer.concat(body).toString();
    console.log(body);
    let userName = "Unknown user";
    if (body) {
      userName = body.split("=")[1];
    }
    response.setHeader("Content-Type", "text/html");
    response.write(
      `<h1>Hi ${userName}</h1><form method="POST" action="/"><input name="username" type="text"><button type="submit">Send</button></form>`
    );
    response.end(); // 데이터에 응답 추가가 끝났음을 node.js에 알려서 응답을 닫고 보냄.
  });
});
// 기본은 GET, method="POST"로 설정해서 포스트 요청을 보낼 수 있다.
// action="/" : 브라우저에 어떤 url로 http 요청을 보낼지..

server.listen(3000); // 서버를 시작하여 들어오는 요청을 리스닝.
📌 Express.js
📖 기초
npm initnpm install express --save
-
express는 미들웨어 기반 프레임워크
-
express는 여러 다른 함수들을 통해 들어오는 요청을 전달하는 역할을 한다. 함수들은 모든 요청을 수신하고 무언가를 할 수 있는데, 각 함수들은 요청을 중지하거나 응답을 보낼 수 있다.
-
미들웨어는 단순히 함수로 요청을 받고 무언가를 실행.
const express = require("express"); const app = express(); app.use((req, res, next) => { res.setHeader("Content-Type", "text/html"); next(); }); app.use((req, res, next) => { res.send("<h1>Hello world</h1>"); }); app.listen(3000); -
app.use를 통해 미들웨어를 등록 가능. use 메서드는 인자로 함수를 받는다. -
req: createServer 함수의 request와 비슷하거나 같지만 조금 더 풍부해진 기능 ->res(response)도 마찬가지. -
next(): express.js에게 아직 작업이 완료되지 않았다고 이야기함. 대신, 다음 인라인 미들웨어로 이동하여 req,res,next를 인자로 받는다. -
두번째 미들웨어에서는 next();를 호출하지 않는데 응답과 요청 작업이 완료되었기 때문
📖 데이터 추출하기
-
npm install body-parser --saveconst express = require("express"); const bodyParser = require("body-parser"); const app = express(); app.use(bodyParser.urlencoded({ extended: false })); app.use((req, res, next) => { res.setHeader("Content-Type", "text/html"); next(); }); app.use((req, res, next) => { const userName = req.body.username || "Unknown User"; // input name="username"이니까 res.send( `<h1>Hi ${userName}</h1><form method="POST" action="/"><input name="username" type="text"><button type="submit">Send</button></form>` ); }); app.listen(3000);
app.use(bodyParser): 기본 미들웨어로 추가가 됨.- 들어오는 body, 요청 body를 분석하고 추출함.
- 분석된 body를 req 객체의 body 필드에 보냄.
📌 템플릿 & EJS 이용하기
-
npm install --save ejs -
views/index.ejs
 <!DOCTYPE html>
 <html lang="en">
 <head>
     <meta charset="UTF-8" />
     <meta name="viewport" content="width=device-width, initial-scale=1.0" />
     <title>NodeJS Demo</title>
 </head>
 <body>
     <h1>Hello <%= user %></h1>
     <form method="POST" action="/">
     <input name="username" type="text" /><button type="submit">Send</button>
     </form>
 </body>
 </html>
-
app.js
const express = require("express");
const bodyParser = require("body-parser");
const app = express();

app.set("view engine", "ejs"); // 뷰와 템플릿을 분석하는 엔진이 ejs라고 알림.
app.set("views", "views"); // 뷰 폴더 지정

app.use(bodyParser.urlencoded({ extended: false }));

app.use((req, res, next) => {
  res.setHeader("Content-Type", "text/html");
  next();
});

app.use((req, res, next) => {
  const userName = req.body.username || "Unknown User"; // input name="username"이니까
  res.render("index", {
    user: userName,
  }); // view 이름, 전체 프로퍼티가 있는 객체 (또는 해당 템플릿에 제공하고자 하는 전체 데이터가 있는 객체)
});

app.listen(3000);
📌 프로젝트 향상시키기
📖 기본 REST 경로 추가하기
- 26_NodeJS/app.js
const express = require("express");
const bodyParser = require("body-parser");
const locationRoutes = require("./routes/location"); // 파일 확장자는 적지 않음.

const app = express();

app.use(bodyParser.json());

app.use(locationRoutes); // express router가 express 어플리케이션에 등록할 수 있는 미들웨어

app.listen(3000);- 26_NodeJS/routes/location.js
const express = require("express");

const router = express.Router();

const locationStorage = {
  locations: [],
};

router.post("/add-location", (req, res, next) => {
  locationStorage.locations.push({
    id: Math.random(),
    address: req.body.address,
    coords: { lat: req.body.lat, lng: req.body.lng },
  });
  res.json({ message: "Stored Location" });
}); // 오직 이 주소로 post 요청이 들어와야만 해당 함수에 입력될 수 있다.

router.get("/location", (req, res, next) => {});

module.exports = router;- 23_Practice/src/SharePlace.js
selectPlace(coordinates, address) {

    fetch("http://localhost:3000/add-location", {
      method: "POST",
      body: JSON.stringify({
        address: address,
        lat: coordinates.lat,
        lng: coordinates.lng,
      }),
      headers: {
        "Content-Type": "application/json",
      },
    })
      .then((response) => {
        return response.json();
      })
      .then((data) => {
        console.log(data);
      });

}- 23_Practice에서
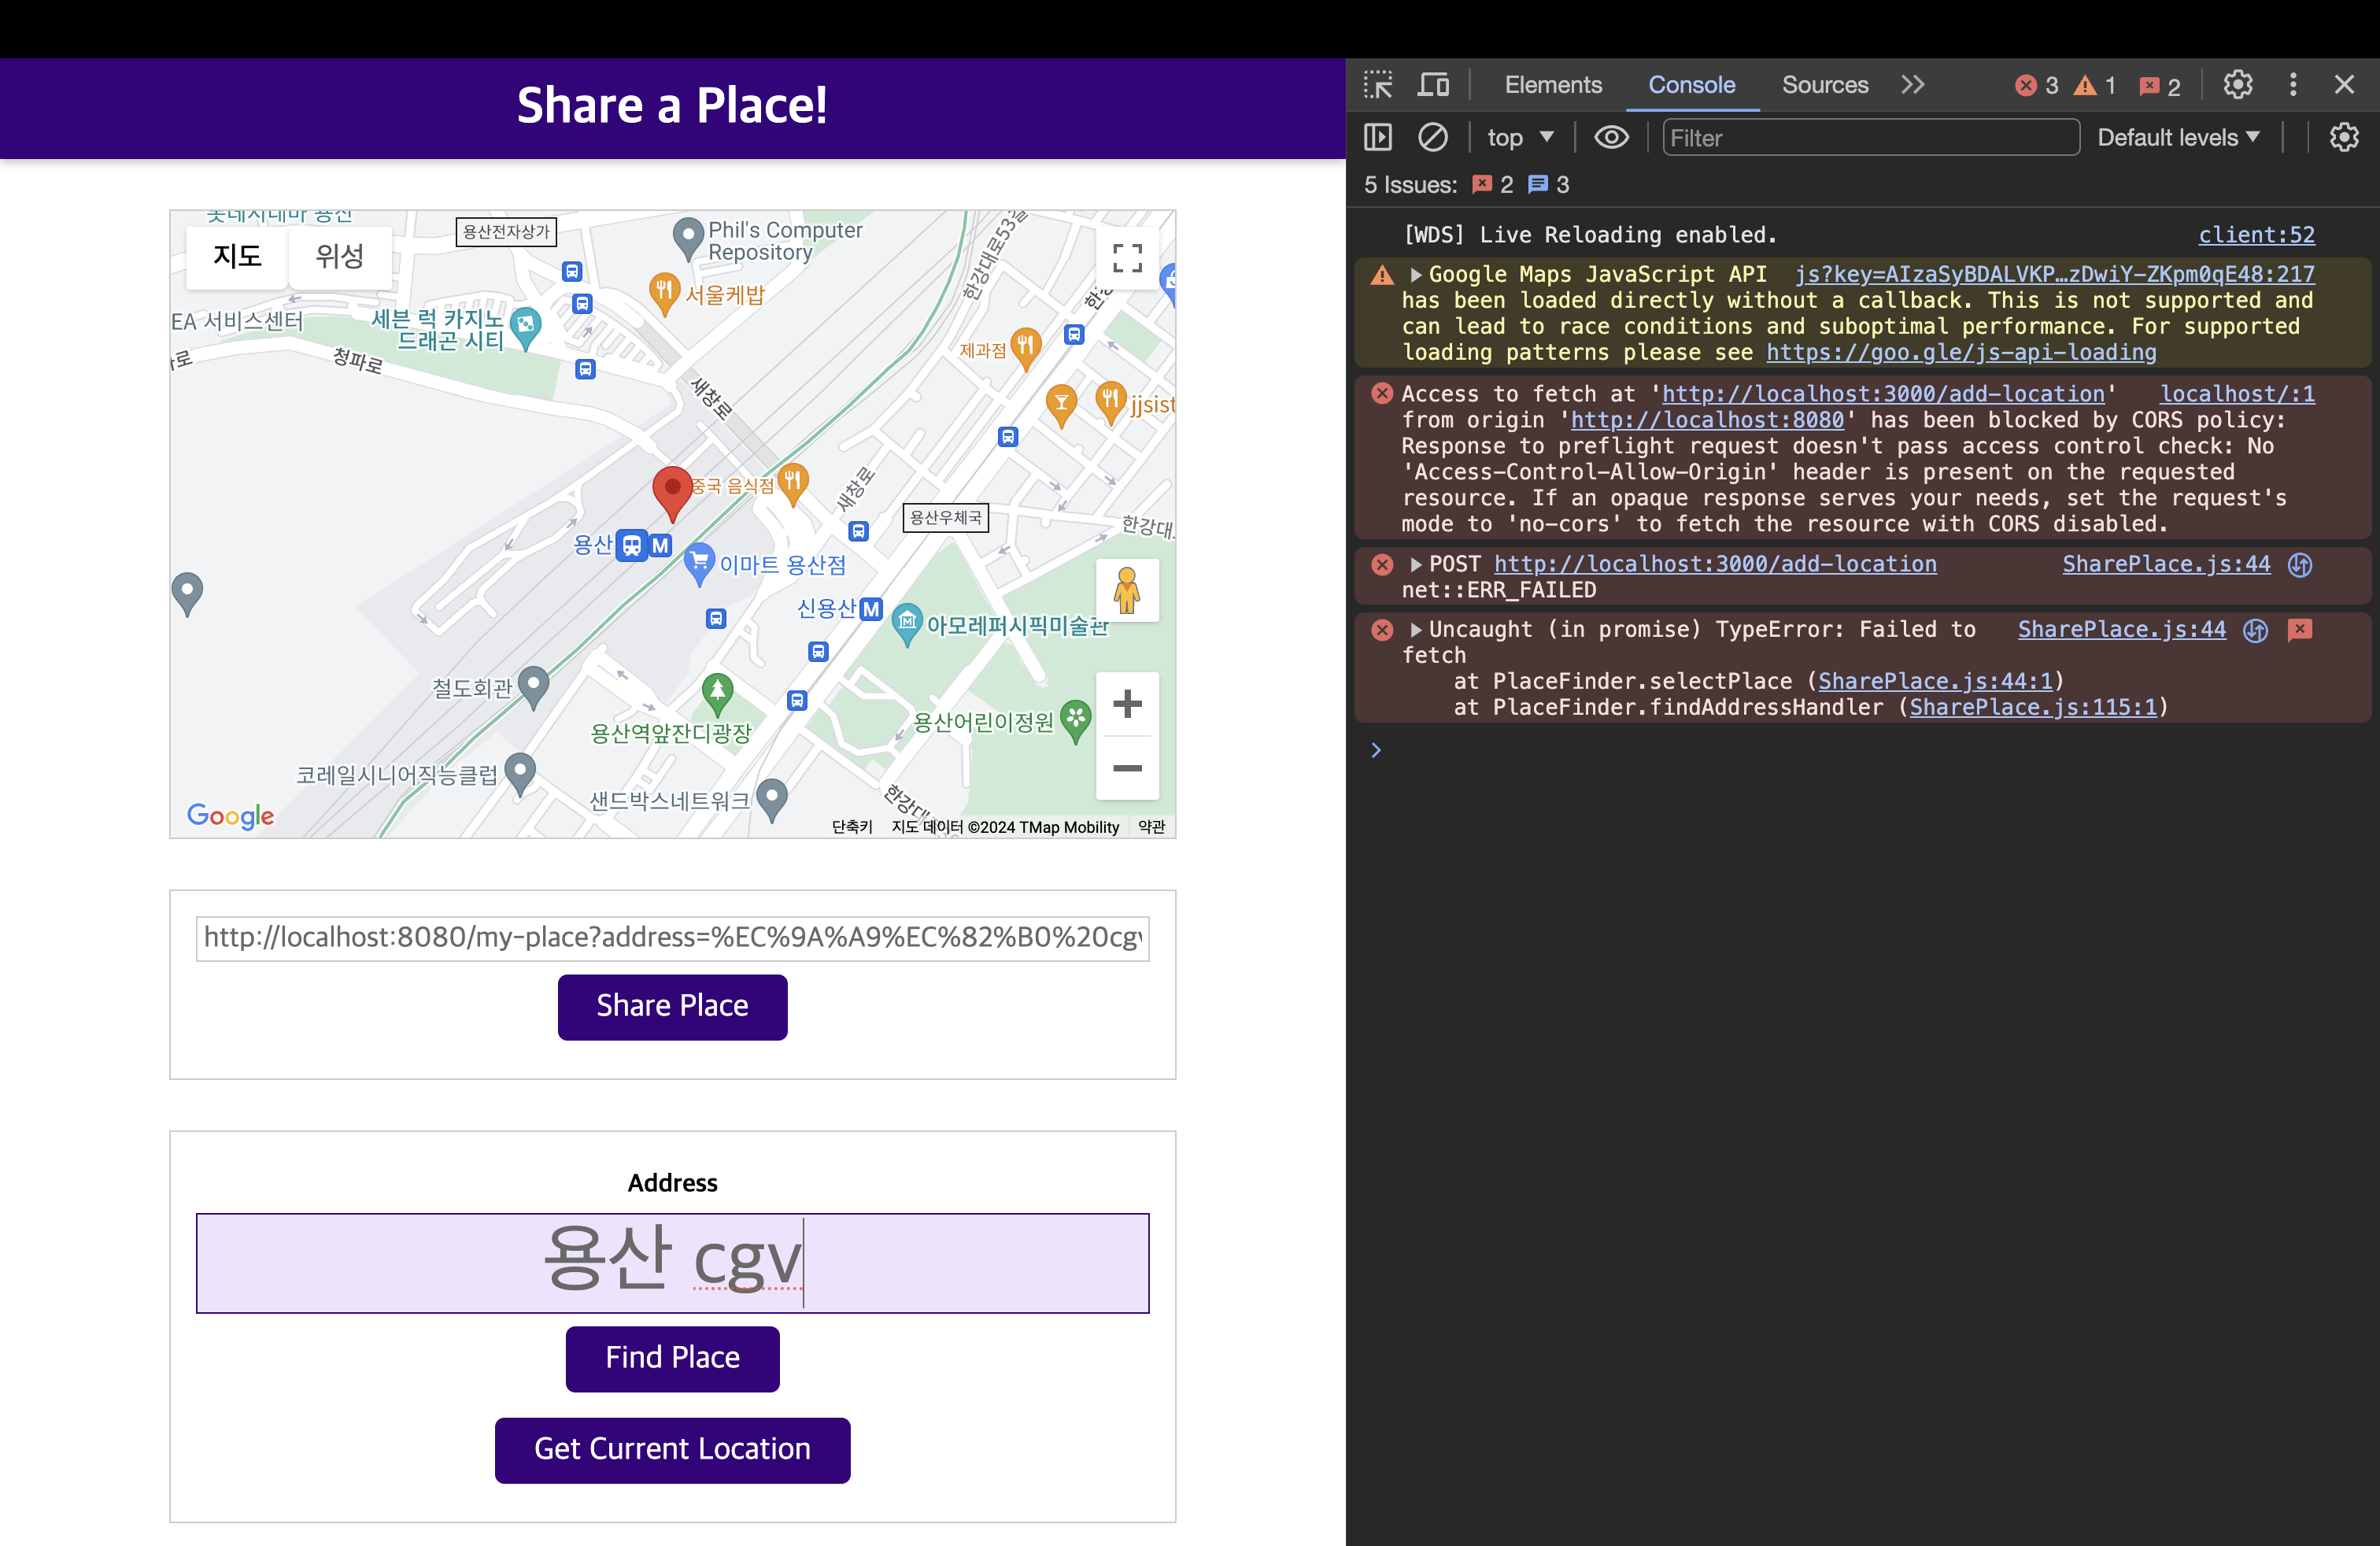
npm run build:dev실행 후, 브라우저 'localhost:8080'에 접속
결과 : CORS (교차 출처 요청 정책) 오류 발생
📖 CORS (교차 출처 요청 정책) 이해하기
- CORS(Cross-Origin Resource Sharing) : 기술적으로 다른 두 개의 서버를 사용. 기본적으로 브라우저들은 교차 출처 요청을 막는다. 출처가 같고 도메인이 같은 요청만 승인된다.
- 이러한 교차 출처 요청이 괜찮다는 신호를 보낼 필요가 있다.
- 26_NodeJS/app.js
app.use((req, res, next) => {
  res.setHeader("Access-Control-Allow-Origin", "*"); // 요청을 보내고자 하는 모든 서버를 허용
  res.setHeader("Access-Control-Allow-Method", "POST, GET, OPTIONS"); // Post, get 요청만 공용으로 노출시키길 원함.
  res.setHeader("Access-Control-Allow-Headers", "Content-Type"); // 클라이언트가 보낼만한 헤더를 정의
  next();
});
📖 프론트엔드로 위치 ID 보내기
- 26_NodeJS/routes/location.js
router.post("/add-location", (req, res, next) => {
  const id = Math.random(); // 상수로 아이디를 따로 뺌
  locationStorage.locations.push({
    id: id,
    address: req.body.address,
    coords: { lat: req.body.lat, lng: req.body.lng },
  });
  res.json({ message: "Stored Location", locId: id }); // 아이디를 전달
});- 23_Practice/SharePlace.js
fetch("http://localhost:3000/add-location", {
  method: "POST",
  body: JSON.stringify({
    address: address,
    lat: coordinates.lat,
    lng: coordinates.lng,
  }),
  headers: {
    "Content-Type": "application/json",
  },
})
  .then((response) => {
    return response.json();
  })
  .then((data) => {
    // 해당 부분 수정
    const locationId = data.locId; // 받아온 데이터(json)에서 locId를 가져옴
    this.shareBtn.disabled = false;
    const sharedLinkInputElement = document.getElementById("share-link");
    sharedLinkInputElement.value = `${location.origin}/my-place?location=${locationId}`; // 도메인 수정
  });
📖 GET 위치 경로 추가하기
- 23_Practice/MyPlace.js
import { Map } from "./UI/Map.js";

class LoadedPlace {
  constructor(coordinates, address) {
    new Map(coordinates);
    const headerTitleEl = document.querySelector("header h1");
    headerTitleEl.textContent = address;
  }
}

const url = new URL(location.href); // location.href -> 브라우저에서 로드된 현재 위치. 현재 url
const queryParams = url.searchParams; // ?뒤에 있는 값들을 키-값 형식으로 queryParams에 저장.

// 새롭게 작성된 부분.
const locId = queryParams.get("location"); // location뒤로 locId를 전달 받을 것.
fetch("http://localhost:3000/location/" + locId)
  .then((response) => {
    if (response.status === 404) {
      throw new Error("Could not found the location");
    }
    return response.json();
  })
  .then((data) => {
    new LoadedPlace(data.coordinates, data.address);
  })
  .catch((err) => {
    alert(err.message);
});- 26_NodeJS/routes/location.js
router.get("/location/:locId", (req, res, next) => {
  const locationId = +req.params.locId; // /location/:locId => 해당 url에서 가져옴 && 문자열 -> 숫자로 변환
  const location = locationStorage.locations.find((loc) => {
    return loc.id === locationId;
  });
  if (!location) {
    return res.status(404).json({ message: "Not Found!" });
  }
  res.json({ address: location.address, coordinates: location.coords });
});