
📌 React 와 Next.js에서의 Authentication
- 사용자가 브라우저를 통해 페이지를 방문하고 서버는 해당 페이지를 제공한다.
- 로그인 폼에서 아이디와 비밀번호를 입력 및 제출하면 JavaScript를 통해 서버에 Request가 전달 된다.
- 서버에서는 해당 입력값의 유효성을 검사한다. 데이터베이스에 접근하여 관련된 계정이 있는지 확인하는 등의 작업을 수행한다.
- 만약 데이터베이스에서 아이디/비밀번호를 찾았다면, 유저의 크리덴셜(credentials)은 올바르고 인증이 완료되었다는 Response를 클라이언트로 보낸다. 그러나 동일한 데이터를 찾지 못하면 credentials이 올바르지 않다는 Response를 보낸다.
서버가 클라이언트로 보내는 Response는 단순히 예/아니오로 보낼 순 없다. 인증을 요구하는 몇몇 API 엔드포인트가 있을 수 있으므로, 인증된 사용자라는 증거가 필요하다. → 인증에는 권한을 위한 크리델셜 교환이 수반된다.
📖 서버사이드 세션(Server-side Sessions)
서버에 고유 식별자를 저장하는 방식으로 작동된다.
- 고유한 세션 ID를 생성하고 그것을 데이터베이스와 같은 서버에 저장한다.
- 크리덴셜을 전송하는 클라이언트에 동일한 식별자를 보낸다.
- 클라이언트는 해당 ID, 해당 식별자를 저장한다.
- 서버에 보호된 리소스에 요청을 보낼 때 저장된 식별자를 첨부한다.
📖 인증 토큰(Authentication Tokens)
서버가 어떤 식별자도 저장하지 않는다. 대신 서버는 임의의 문자열이라 할 수 있는 토큰을 생성한다.
- 인증 토큰을 서버에서 생성(저장하지 않음)하고 이를 클라이언트로 전송한다.
- 클라이언트는 해당 토큰을 저장하고 나가는 요청에 다시 첨부하여 서버에게 엑세스를 허가해도 된다고 알린다.
📖 JWT(JSON Web Tokens) 이해하기
- JWT는 세 개의 주요 블록으로 구성된다.
- Issuer Data (발급자 데이터) : 토큰이 생성될 때 서버에 의해 토큰에 자동으로 추가되는 데이터이다.
- Custom Data (커스텀 데이터) : 사용자 정보와 같은 커스텀 데이터.
- Secret Signing Key (비밀 키) : 비밀 키를 서버에 설정한다. 클라이언트는 절대 비밀 키를 볼 수 없다. 해당 키가 있어야만 서버가 인정하는 유효 토큰을 생성할 수 있다. 서버만이 그 키를 알고 있다.
- 이 모든 데이터를 포함하는 임의의 문자열을 만들어낸다.→ 비밀 키로 서명을 하여 토큰을 생성한다.
서명(Signing)은 암호화된 것이 아니다. JSON 웹 토큰은 암호화되지 않는다. - 토큰은 클라이언트 사이드 브라우저에 저장되어 서버의 보호된 리소스에 대한 요청에 첨부된다.
- 해당 토큰은 서버에서 차후에 유효성 검사를 실시하여 엑세스 승인/거부를 결정한다.
📌 NextAuth.js를 이용하여 Authentication 작업하기 - 회원가입
- NextAuth는 서버 사이드 및 클라이언트 사이드 기능 둘 다 지원한다.
- 설치 :
npm install next-auth
📖 사용자 가입 API 라우트 추가하기
- /pages/api/auth/signup.js, /lib/db.js, /lib/auth.js 생성
💎 /lib/db.js : MongoDB에 connect
import { MongoClient } from "mongodb";

export async function connectToDatabase() {
  const client = await MongoClient.connect(
    "mongodb+srv://<username>:<password>@cluster0.stdfag3.mongodb.net/auth-demo?retryWrites=true&w=majority&appName=Cluster0"
  );
  return client;
}
💎 /lib/auth.js : bcryptjs를 이용하여 암호화된 비밀번호를 리턴
import { hash } from "bcryptjs";

export async function hashPassword(password) {
  const hashedPassword = await hash(password, 12);
  return hashedPassword;
}
💎 /pages/api/auth/signup.js
import { hashPassword } from "@/lib/auth";
import { connectToDatabase } from "@/lib/db";
export default async function handler(req, res) {
const data = req.body;
const { email, password } = data;
if (
!email ||
!email.includes("@") ||
!password ||
password.trim().length < 7
) {
res.status(422).json({
message:
"Invalid Input - Password should also be at least 7 characters long.",
});
return;
}
const client = await connectToDatabase();
const db = client.db();
const hashedPassword = await hashPassword(password);
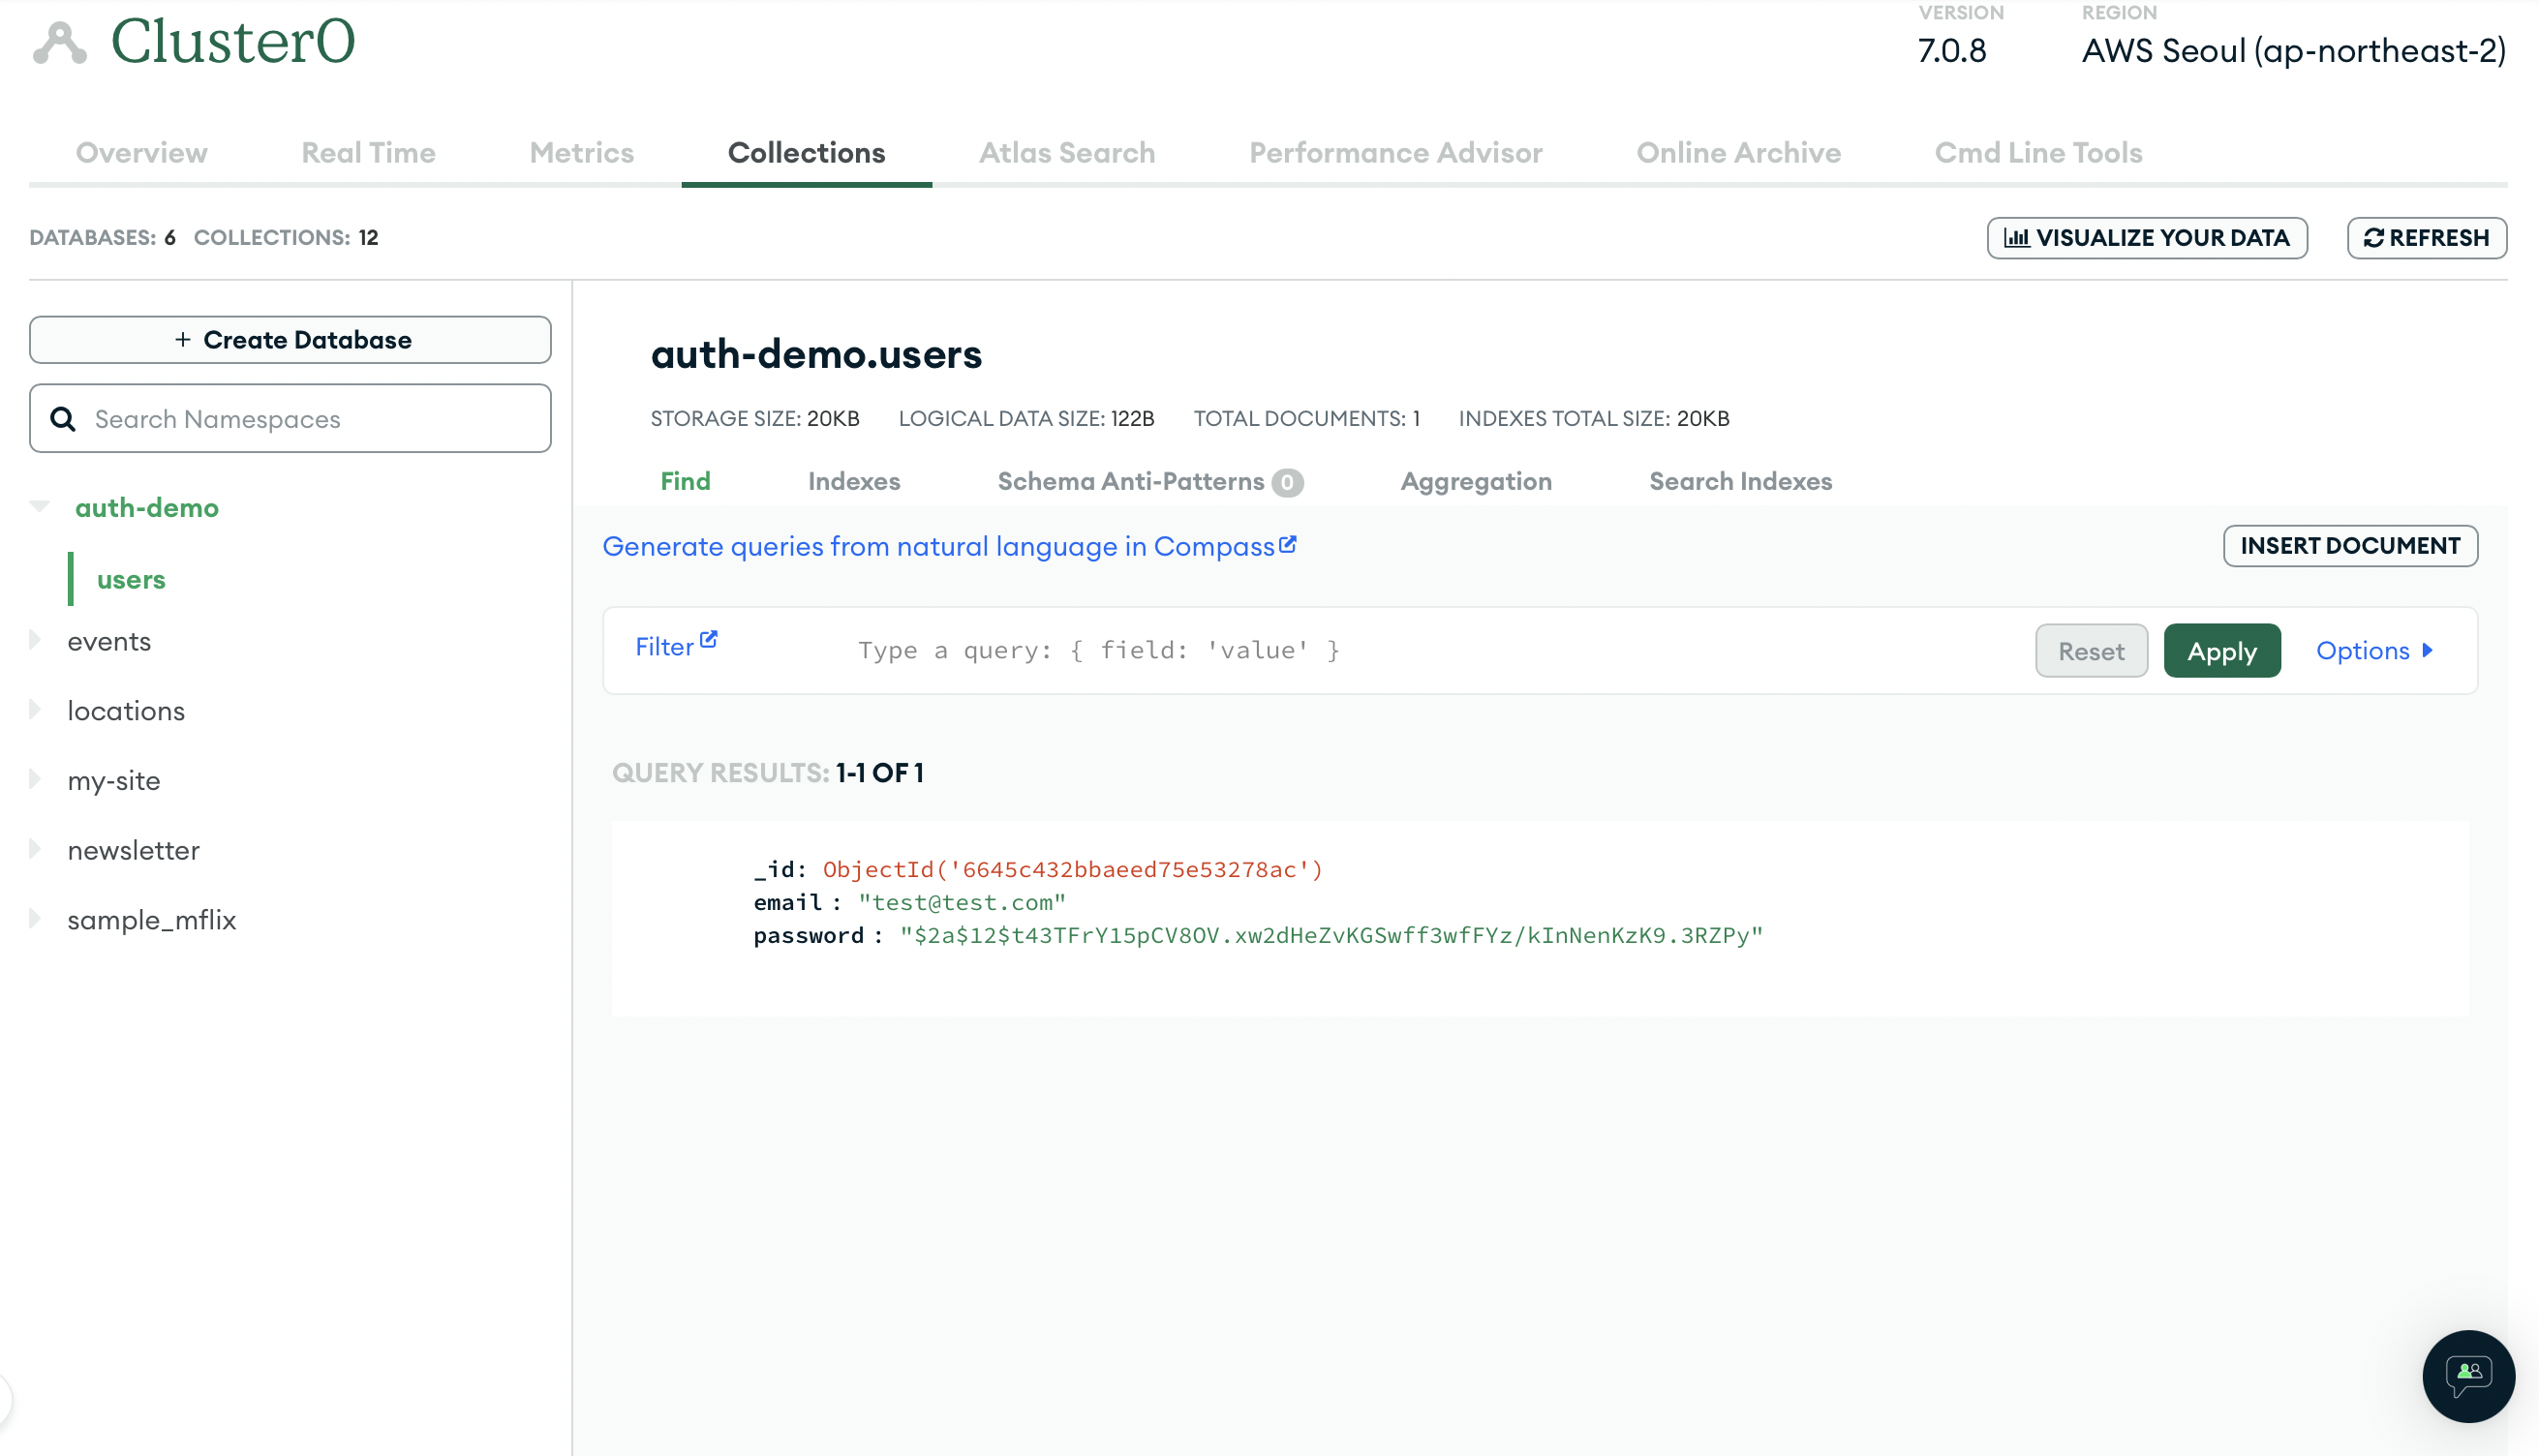
const result = await db.collection("users").insertOne({
email: email,
password: hashedPassword, // 비밀번호는 비밀번호 그 자체로 저장하면 안된다. 암호화한 뒤에 저장한다.
});
res.status(200).json({ message: "Created User" });
}📖 프론트엔드로부터 가입 요청 전송하기
💎 components/auth/auth-form.js
import { useState, useRef } from "react";
import classes from "./auth-form.module.css";

async function createUser(email, password) {
  const response = await fetch("/api/auth/signup", {
    method: "POST",
    headers: { "Content-Type": "application/json" },
    body: JSON.stringify({ email, password }),
  });

  const data = await response.json();
  if (!response.ok) {
    throw new Error(data.message || "Somethine went wrong!");
  }
  return data;
}

function AuthForm() {
  const [isLogin, setIsLogin] = useState(true);
  const emailInputRef = useRef();
  const passwordInputRef = useRef();

  function switchAuthModeHandler() {
    setIsLogin((prevState) => !prevState);
  }

  async function submitHandler(event) {
    event.preventDefault();
    const enteredEmail = emailInputRef.current.value;
    const enteredPassword = passwordInputRef.current.value;

    if (isLogin) {
    } else {
      try {
        const result = await createUser(enteredEmail, enteredPassword);
        console.log(result);
      } catch (err) {
        console.log(err);
      }
    }
  }

  return (
    <section className={classes.auth}>
      <h1>{isLogin ? "Login" : "Sign Up"}</h1>
      <form onSubmit={submitHandler}>
        <div className={classes.control}>
          <label htmlFor="email">Your Email</label>
          <input type="email" id="email" required ref={emailInputRef} />
        </div>
        <div className={classes.control}>
          <label htmlFor="password">Your Password</label>
          <input
            type="password"
            id="password"
            required
            ref={passwordInputRef}
          />
        </div>
        <div className={classes.actions}>
          <button>{isLogin ? "Login" : "Create Account"}</button>
          <button
            type="button"
            className={classes.toggle}
            onClick={switchAuthModeHandler}
          >
            {isLogin ? "Create new account" : "Login with existing account"}
          </button>
        </div>
      </form>
    </section>
  );
}

export default AuthForm;
💎 /pages/api/auth/signup.js
export default async function handler(req, res) {
  if (req.method === "POST") {
    // ...
  }
}
📖 고유 이메일 주소를 통해 가입 절차 개선하기
- 동일한 이메일 주소를 갖는 유저가 있는지 파악해야한다. (중복 가입 방지)
💎 /pages/api/auth/signup.js
import { hashPassword } from "@/lib/auth";
import { connectToDatabase } from "@/lib/db";
export default async function handler(req, res) {
if (req.method === "POST") {
const data = req.body;
const { email, password } = data;
if (
!email ||
!email.includes("@") ||
!password ||
password.trim().length < 7
) {
res.status(422).json({
message:
"Invalid Input - Password should also be at least 7 characters long.",
});
return;
}
const client = await connectToDatabase();
const db = client.db();
// 사용자가 이미 존재하는지 파악하기
const existingUser = await db.collection("users").findOne({ email: email });
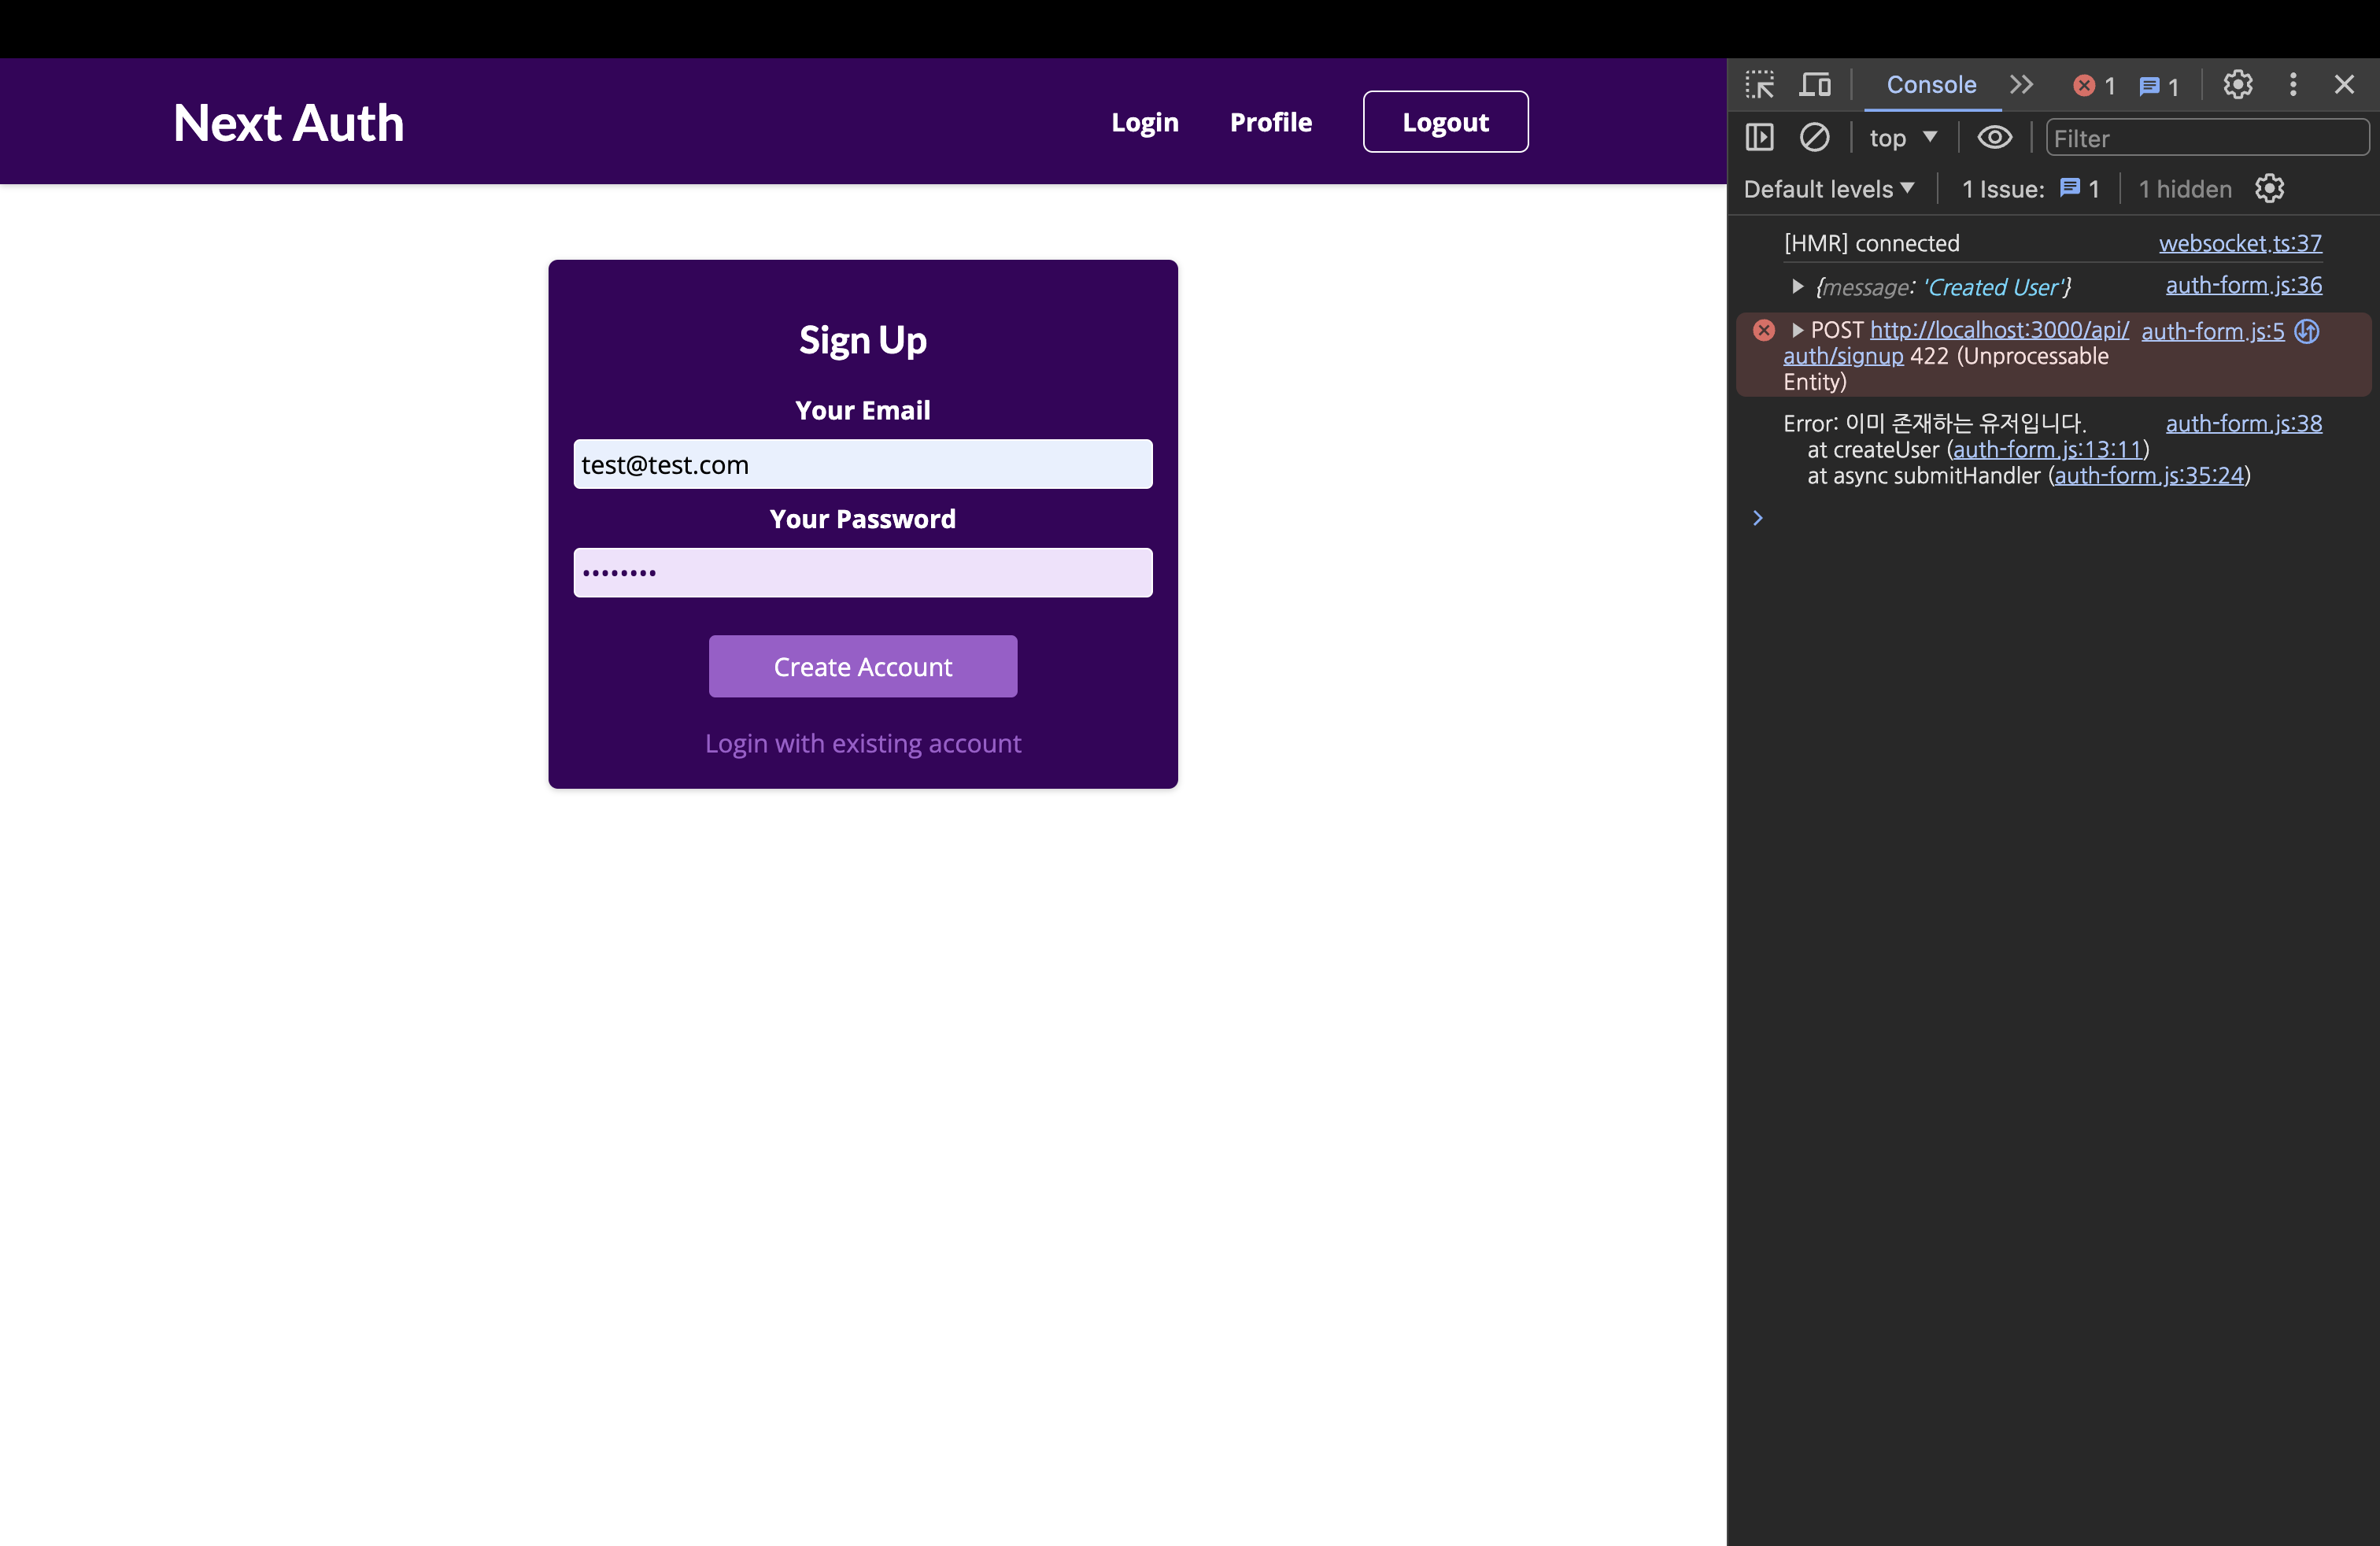
if (existingUser) {
res.status(422).json({ message: "이미 존재하는 유저입니다." });
client.close();
return;
}
// ========================
const hashedPassword = await hashPassword(password);
const result = await db.collection("users").insertOne({
email: email,
password: hashedPassword, // 비밀번호는 비밀번호 그 자체로 저장하면 안된다. 암호화한 뒤에 저장한다.
});
res.status(200).json({ message: "Created User" });
client.close();
}
}
📌 NextAuth.js를 이용하여 Authentication 작업하기 - 로그인
📖 크리덴셜 인증 제공자 & 사용자 로그인 논리 추가하기
- 설치한 NextAuth 패키지를 통해 사용자를 인증하고 사용자가 권한을 가지는지 여부를 확인할 수 있다.
- /pages/api/auth/[...nextauth].js 생성 → NextAuth 패키지가 내부에서 여러 라우트를 활용한다.
💎 /lib/auth.js
import { hash, compare } from "bcryptjs";

export async function verifyPassword(password, hashedPassword) {
  // compare ; plain text 비밀번호가 해싱된 비밀번호와 일치하는지 확인하도록 도와준다.
  const isValid = await compare(password, hashedPassword);
  return isValid;
}
💎 /pages/api/auth/[...nextauth].js
import { verifyPassword } from "@/lib/auth";
import { connectToDatabase } from "@/lib/db";
import NextAuth from "next-auth";
import CredentialsProvider from "next-auth/providers/credentials";
export default NextAuth({
// NextAuth()를 통해 handler가 리턴된다.
session: {
strategy: "jwt", // JSON Web Token 사용 - default 값
},
providers: [
CredentialsProvider({
// credentials: {} // -> 자동으로 NextAuth에서 로그인 폼 생성
async authorize(credentials) {
// 들어오는 로그인 요청을 Next.js가 수신할 때 Next.js가 개발자 대신 호출해주는 메서드이다.
const client = await connectToDatabase();
const usersCollection = client.db().collection("users");
const user = await usersCollection.findOne({
email: credentials.email,
});
if (!user) {
client.close();
throw new Error("No user found!");
// 만약 authorize 내에서 오류가 발생하면 authorize가 생성한 프로미스를 거부하고 기본적으로 클라이언트를 다른 페이지에 리디렉션한다.
}
const isValid = await verifyPassword(
credentials.password,
user.password
);
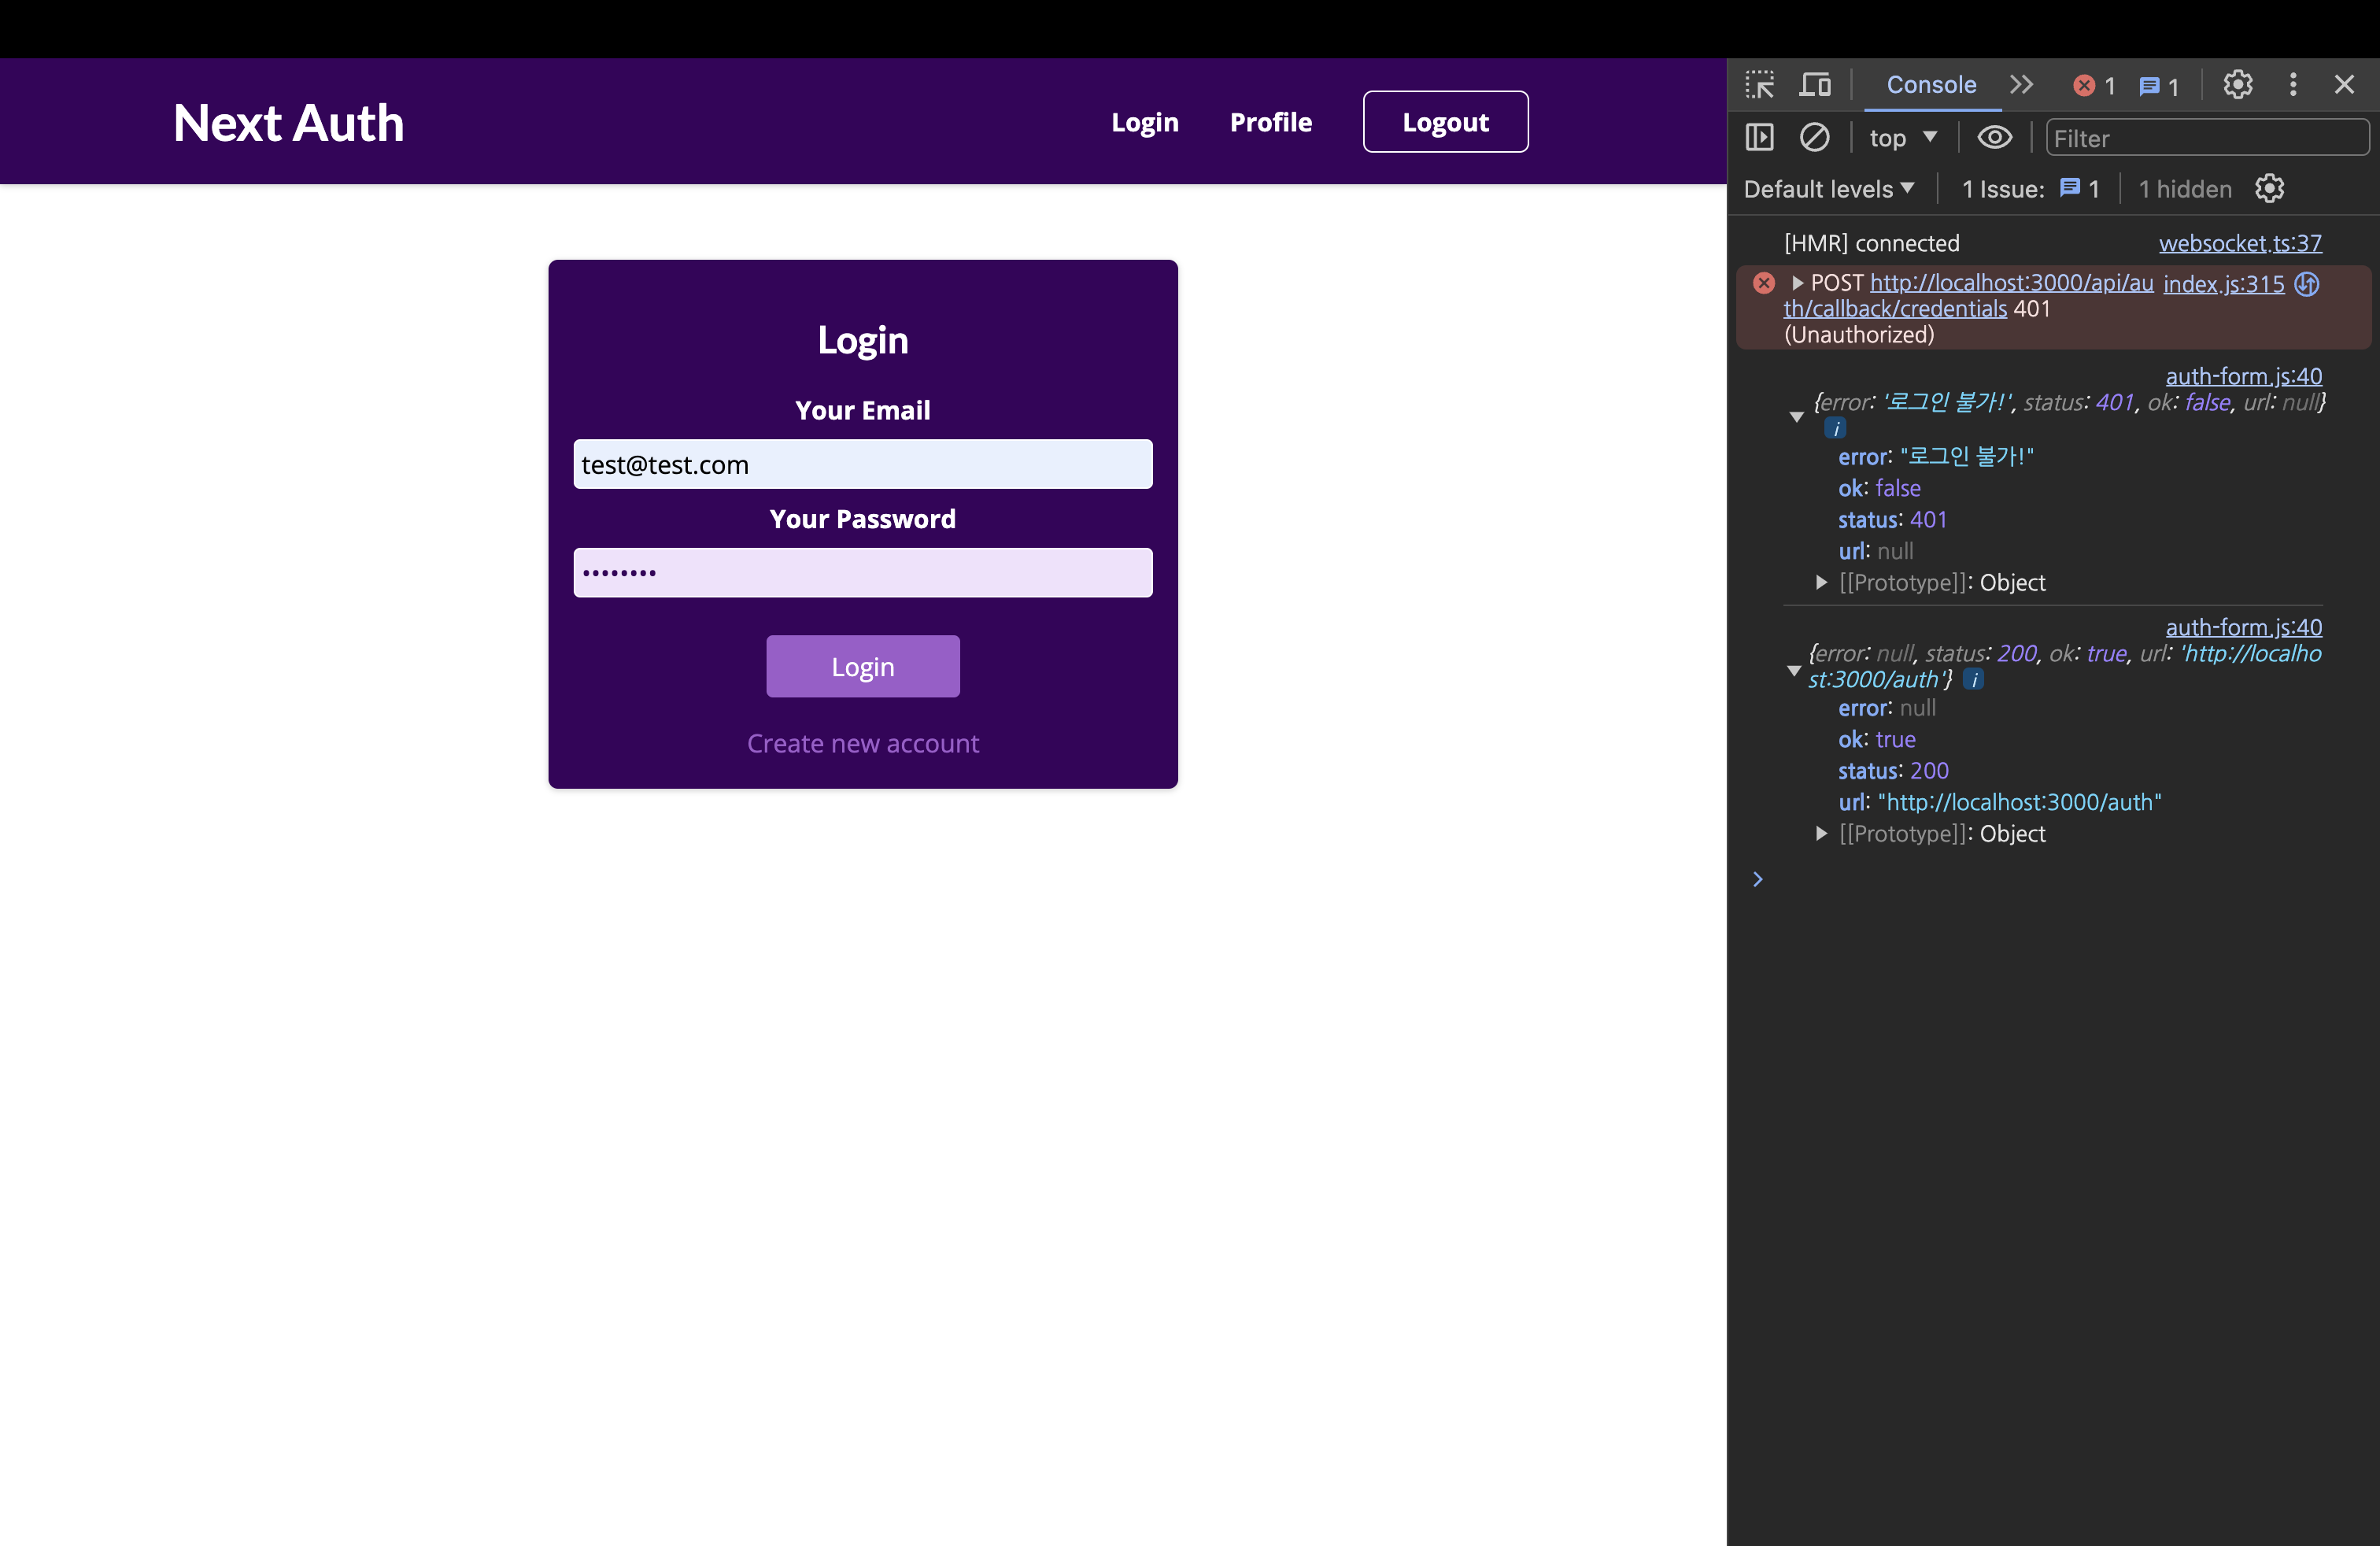
if (!isValid) {
client.close();
throw new Error("로그인 불가!");
}
client.close();
// 로그인 성공
return { email: user.email }; // authorize내에서 object return함으로써 NextAuth에 인증이 성공했다고 알림
},
}),
],
});📖 프론트엔드로부터 로그인 요청 전송하기
💎 /components/auth/auth-form.js
import { useState, useRef } from "react";
import { signIn } from "next-auth/react";
import classes from "./auth-form.module.css";

async function createUser(email, password) {
  const response = await fetch("/api/auth/signup", {
    method: "POST",
    headers: { "Content-Type": "application/json" },
    body: JSON.stringify({ email, password }),
  });

  const data = await response.json();
  if (!response.ok) {
    throw new Error(data.message || "Somethine went wrong!");
  }
  return data;
}

function AuthForm() {
  const [isLogin, setIsLogin] = useState(true);
  const emailInputRef = useRef();
  const passwordInputRef = useRef();

  function switchAuthModeHandler() {
    setIsLogin((prevState) => !prevState);
  }

  async function submitHandler(event) {
    event.preventDefault();
    const enteredEmail = emailInputRef.current.value;
    const enteredPassword = passwordInputRef.current.value;

    // ===== LOGIN =====
    if (isLogin) {
      // 여기선 HTTP Request를 사용하지 않는다.
      const result = await signIn("credentials", {
        redirect: false,
        email: enteredEmail,
        password: enteredPassword,
      }); // 이 함수를 컴포넌트에서 호출하면 signIn 요청을 자동으로 전송하는 역할을 한다.
      console.log(result);
      // ===============
    } else {
      try {
        const result = await createUser(enteredEmail, enteredPassword);
        console.log(result);
      } catch (err) {
        console.log(err);
      }
    }
  }

  return {
    /* ... */
  };
}

export default AuthForm;- NextAuth에서 인증에 실패하여 에러가 발생했을 때 redirect는 기본적으로 에러페이지로 연결된다. →
{redirect:false}로 설정하여 입력란에 메시지만 출력할 수 있도록 한다.- redirect를 false로 설정하면 Promise를 리턴한다. 🔗 참고
- /pages/api/auth/[...nextauth].js에서
authorize(credentials)의 credentials라는 매개변수는 signIn의 인수에서 전달받는다.
📖 프론트엔드 상에서 활성 세션 관리하기
- 새로고침을 하면 로그인이 유지되지 않는다. 따라서 로그인 상태를 유지하기 위한 작업이 필요하다.
- 우선 프론트엔드 상에선 해당 페이지의 사용자가 인증이 되었는지 판단하는 것이 필요하다.
- 로그인에 성공했을 때 Next.js에서 자동으로 생성되는 쿠키(토큰)가 있다. 이 토큰 값을 기반으로 화면에 표시되는 내용을 바꾸거나 보호된 리소스에 요청을 전송하는데 활용할 수 있다.
💎 /pages/_app.js
import Layout from "../components/layout/layout";
import "../styles/globals.css";
import { SessionProvider } from "next-auth/react";

function MyApp({ Component, pageProps: { session, ...pageProps } }) {
  return (
    <SessionProvider session={session}>
      <Layout>
        <Component {...pageProps} />
      </Layout>
    </SessionProvider>
  );
}

export default MyApp;
💎 /components/layout/main-navigation.js
import Link from "next/link";
import { useSession } from "next-auth/react";
import classes from "./main-navigation.module.css";

function MainNavigation() {
  // session : 세션의 활성 상태를 나타냄, status: 사용자가 현재 페이지에 로그인된 상태인지 아닌지 확인
  const { data: session, status } = useSession();
  console.log(status);
  console.log(session);

  return (
    <header className={classes.header}>
      <Link href="/">
        <div className={classes.logo}>Next Auth</div>
      </Link>
      <nav>
        <ul>
          {!session && status === "unauthenticated" && (
            <li>
              <Link href="/auth">Login</Link>
            </li>
          )}
          {session && status === "authenticated" && (
            <li>
              <Link href="/profile">Profile</Link>
            </li>
          )}
          {session && status === "authenticated" && (
            <li>
              <button>Logout</button>
            </li>
          )}
        </ul>
      </nav>
    </header>
  );
}

export default MainNavigation;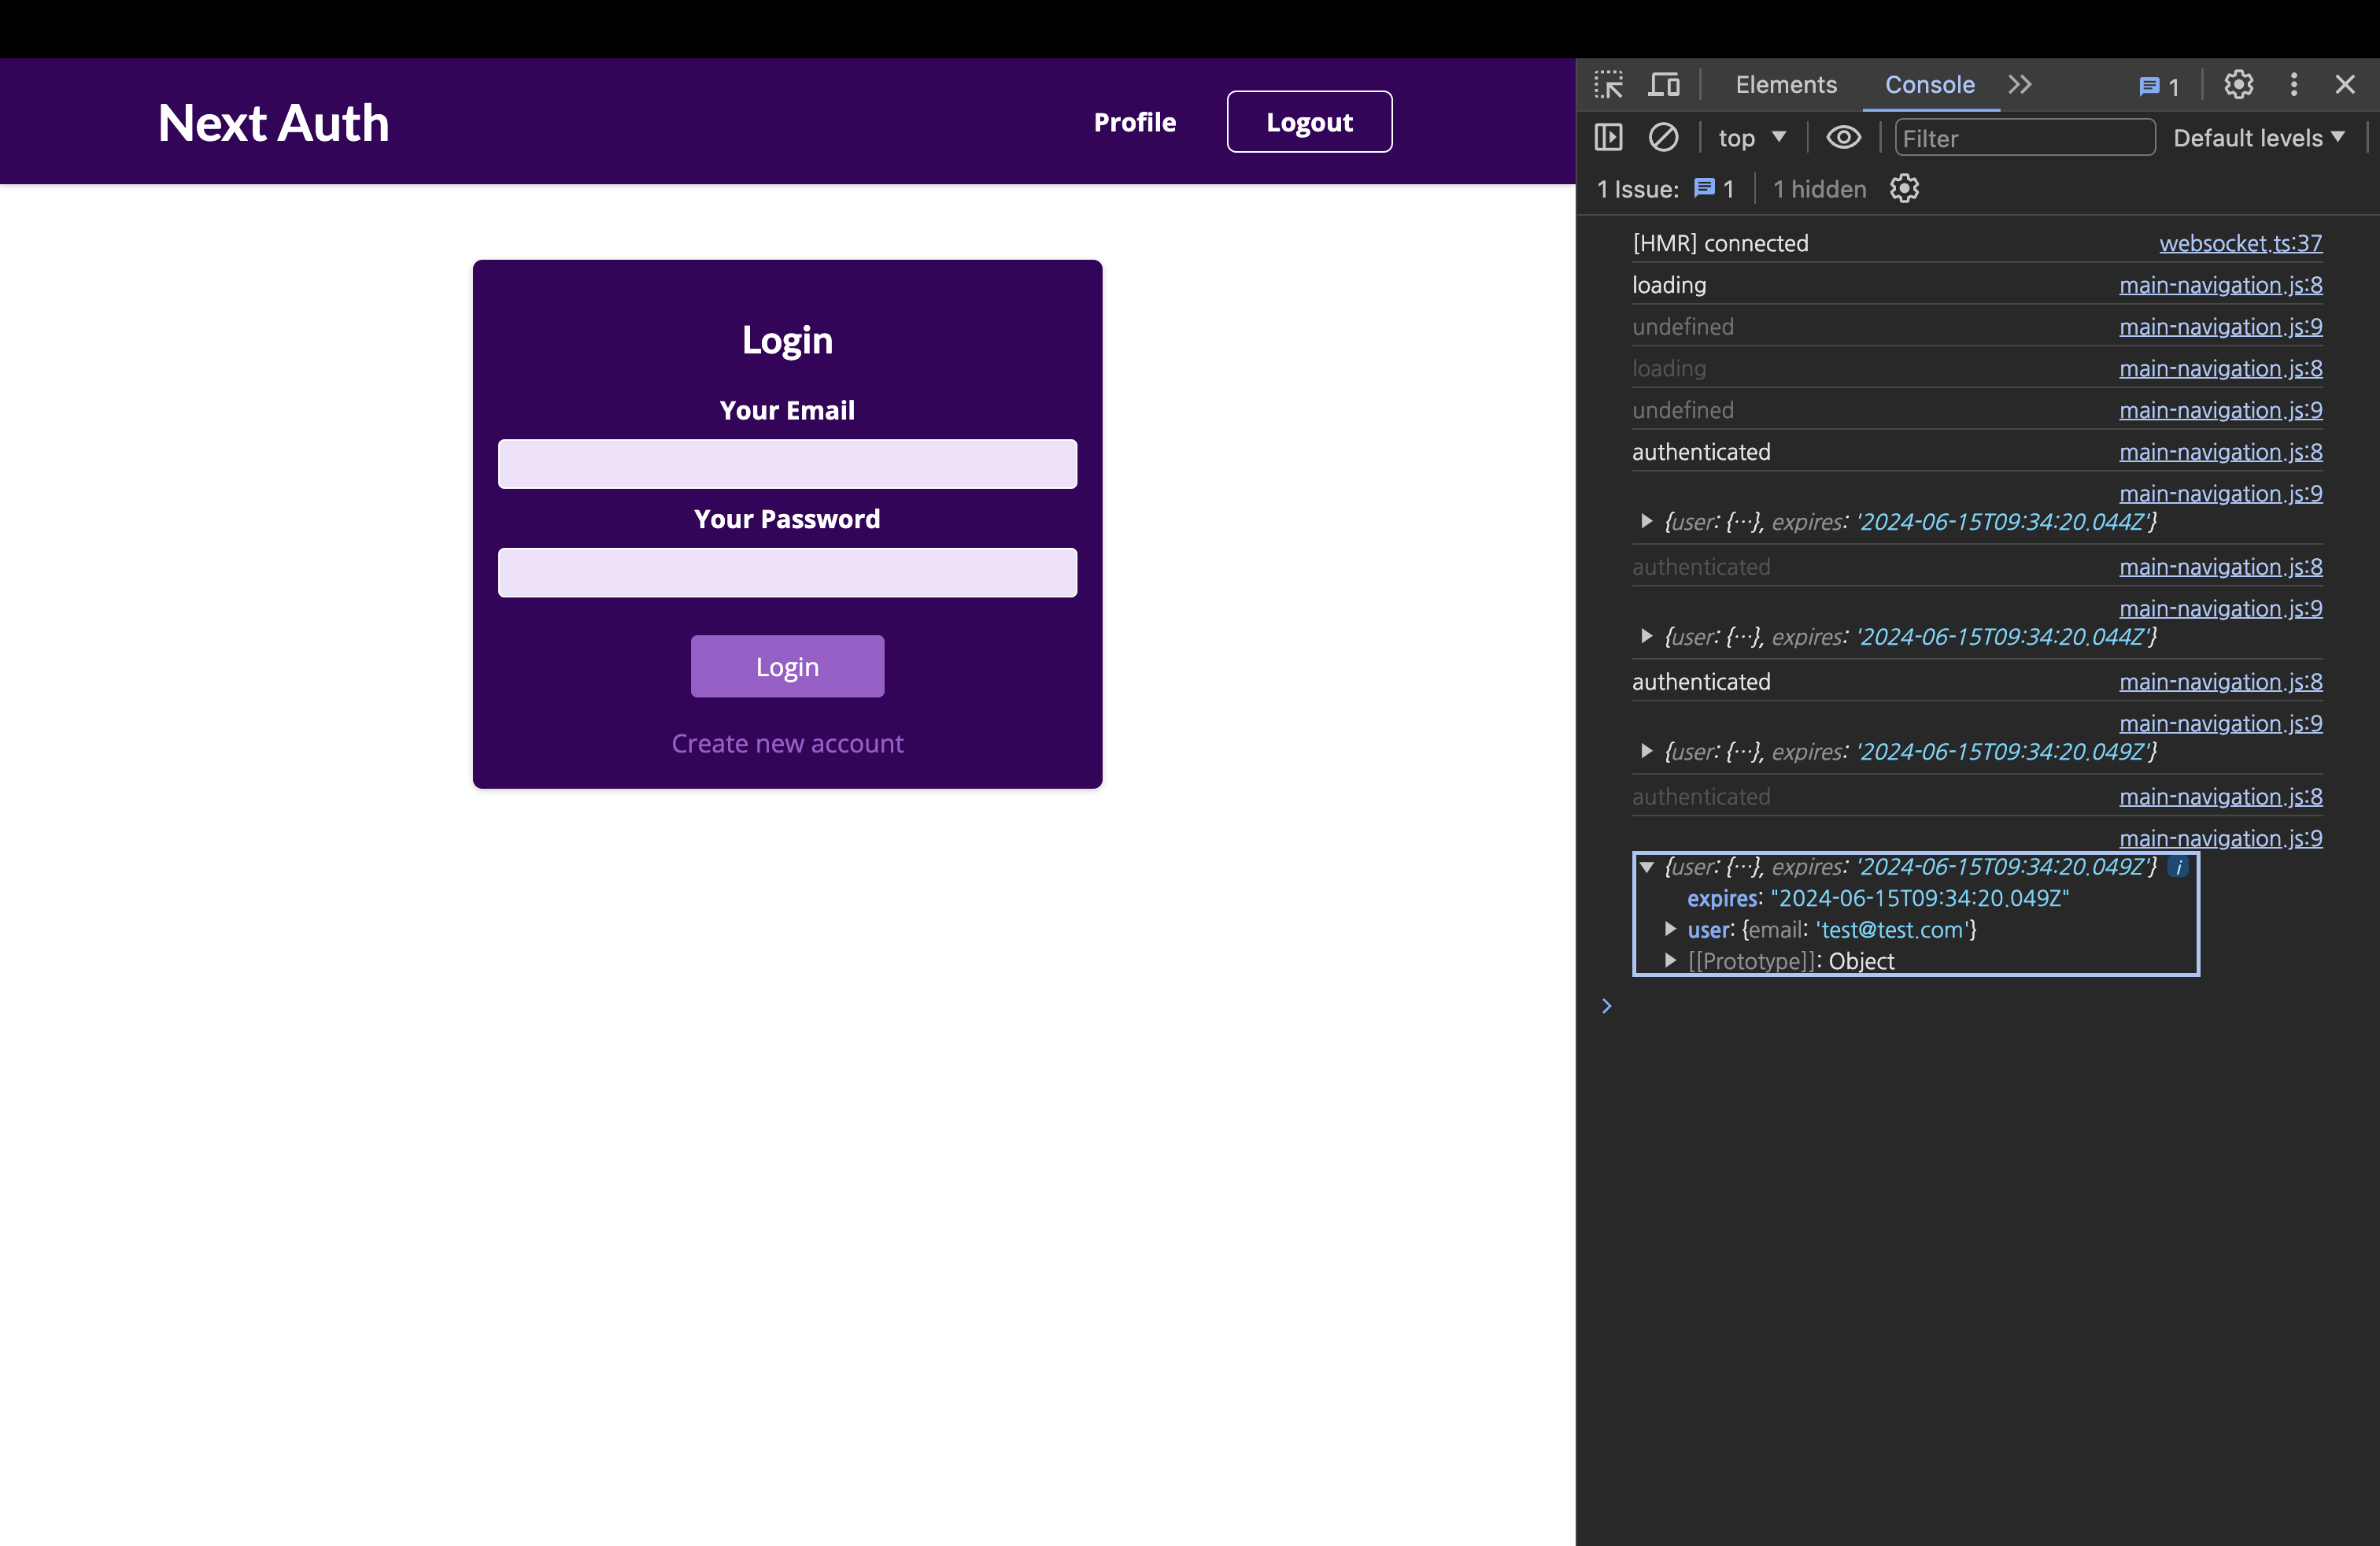
📌 NextAuth.js를 이용하여 Authentication 작업하기 - 로그아웃
import Link from "next/link";
import { useSession, signOut } from "next-auth/react";
import classes from "./main-navigation.module.css";

function MainNavigation() {
  // session : 세션의 활성 상태를 나타냄, status: 사용자가 현재 페이지에 로그인된 상태인지 아닌지 확인
  const { data: session, status } = useSession();

  function logoutHandler() {
    signOut();
  }

  return (
    <header className={classes.header}>
      <Link href="/">
        <div className={classes.logo}>Next Auth</div>
      </Link>
      <nav>
        <ul>
          {!session && status === "unauthenticated" && (
            <li>
              <Link href="/auth">Login</Link>
            </li>
          )}
          {session && status === "authenticated" && (
            <li>
              <Link href="/profile">Profile</Link>
            </li>
          )}
          {session && status === "authenticated" && (
            <li>
              <button onClick={logoutHandler}>Logout</button>
            </li>
          )}
        </ul>
      </nav>
    </header>
  );
}

export default MainNavigation;signOut: 프로미스를 반환하여 처리가 완료됨을 알려준다.- 현재 useSession을 사용하므로, 활성화된 세션에 변화가 있을 때 컴포넌트가 자동으로 업데이트되고 로그아웃 때도 마찬가지로 업데이트 된다.
- 쿠키와 세션 정보를 Next.js가 삭제 -> 활성화된 사용자의 기록을 없애준다.