Next.js로 Edukit 프로젝트를 개발하면서 겪었던 다양한 문제들과 해결 과정을 공유하려고 합니다.
그 첫 번째 이야기로 서비스 전반에서 사용하는 API 로직을 왜 공통화했는지와 어떤 방식으로 구현했는지, 개선 효과에 대해 작성하겠습니다.
🤔 문제 상황들
프로젝트를 진행하면서 다음과 같은 문제들에 직면했습니다.
1. 환경별 Url 분기 코드 필요
- 서버 컴포넌트인지, 클라이언트 컴포넌트인지, 테스트 환경인지에 따라 URL을 다르게 설정해야 했습니다.
- 이를 각 서비스 로직에서 반복해서 구현하면 코드가 중복되고 실수할 여지가 많았습니다.

2. 커스텀 훅마다 accessToken을 직접 주입하는 코드 구조상의 문제
TanStack Query로 fetch api 로직을 감싼 커스텀 훅에서auth context를 가져와 accessToken을 파라미터로 전달하고 있었습니다.- 따라서 type이 복잡해지고, auth context의 관심사가 모든 커스텀 훅에 퍼져있었습니다.
import { useAuth } from '@/contexts/auth/use-auth';

export const useCreateRecords = () => {
  const { accessToken } = useAuth();

  return useMutation<Response<null>, Error, CreateRecordsInput>({
    mutationFn: (params) => createRecords({ ...params, accessToken }),
  });
};
export const createRecords = async ({
recordType, studentRecords, semester, accessToken
}: CreateRecords) => {
return fetch(..., {
headers: {
Authorization: `Bearer ${accessToken}`,
},
});
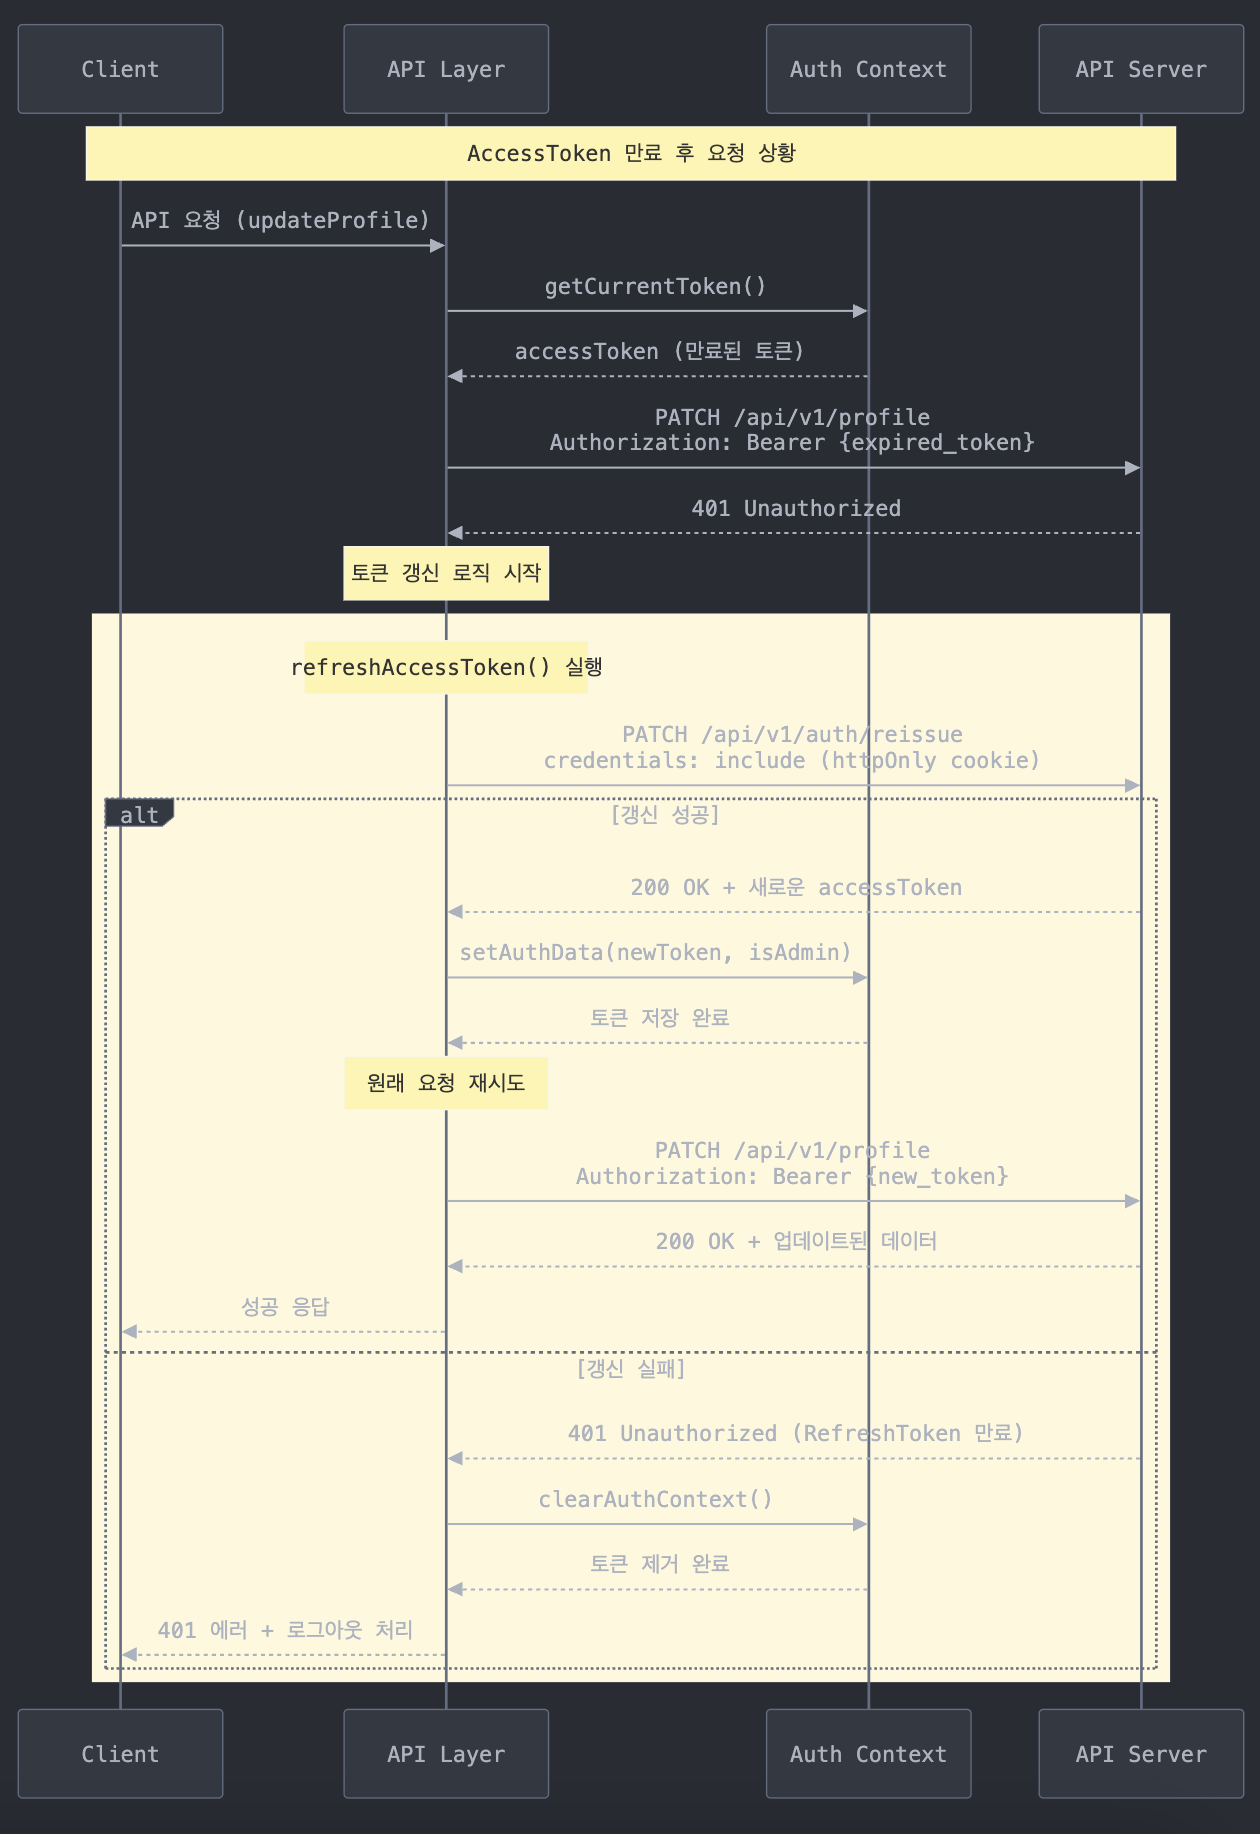
};3. JWT accessToken 만료에 대한 재요청 처리 로직의 부재
- accessToken 만료 시간이 30분이라, 만료 후 요청 시 401 에러가 발생했습니다.
- 이를 자동으로 처리하려면 refreshToken 기반으로 토큰을 갱신하고, 이전 요청을 재실행하는 Interceptor 로직이 필요했습니다.
4. 에러 처리 로직의 중복
- 각 서비스 함수에서 비슷한 방식으로 response를 파싱하고, 에러를 던졌습니다.
- 중복 코드를 제거하고 일관된 에러 처리 방식이 필요했습니다.
❓axios 라이브러리를 쓰는게 아닌 fetch를 사용한 이유
위의 4가지 문제들은 사실 axios의 Interceptor나 기본 설정 기능으로 쉽게 해결할 수 있습니다.
하지만 fetch에서 제공하는 cache?: 'force-cache' | 'no-store' | 'no-cache' | 'reload'; 옵션을 통해 캐싱 / 재검증 기능을 활용할 예정이였고, 서버 컴포넌트와 클라이언트 컴포넌트간의 일관된 로직을 작성하고자 프로젝트 초기에 fetch를 선택했습니다.
🛠️ 요구사항에 맞춘 공통 API 로직 구현
1. 환경에 맞는 URL 생성 - buildURL
function buildURL(endpoint: string, params?: Record<string, string | number | boolean>): string {
  const isMSWEnabled = process.env.NEXT_PUBLIC_API_MOCKING === 'enabled';
  const isServer = typeof window === 'undefined';

  if (isMSWEnabled) {
    if (isServer) {
      // MSW 서버: Mock 서버로 직접 요청
      const fullUrl = `http://localhost:9090${endpoint}`;
      return addQueryParams(fullUrl, params);
    } else {
      // MSW 클라이언트: 상대 경로만 필요 (MSW가 인터셉트)
      return addQueryParams(endpoint, params);
    }
  }

  // 실제 API 환경 (서버 컴포넌트인지, 클라이언트 컴포넌트인지에 따라 분기 처리)
  const baseURL = isServer ? process.env.API_URL! : process.env.NEXT_PUBLIC_API_URL!;
  const fullUrl = `${baseURL}${endpoint}`;
  return addQueryParams(fullUrl, params);
}- 환경(MSW, 서버/클라이언트)에 따라 endpoint를 적절히 분기해줍니다.
- 서비스 코드에서는 URL 구성 방식에 신경 쓰지 않아도 됩니다.
addQueryParams()는 쿼리 파라미터를 URL에 추가하는 함수입니다.
2. accessToken을 공통으로 넣어주고 적절한 헤더 생성 - buildHeaders
// HTTP 헤더를 빌드하는 함수
function buildHeaders(options: FetchOptions): HeadersInit {
  const headers: Record<string, string> = {};

	// 1. 기본 Content-Type 설정 (FormData가 아닌 경우에만)
  if (!(options.body instanceof FormData)) {
    headers['Content-Type'] = 'application/json';
  }

	// 2. 기존에 직접 넣어주는 사용자 정의 헤더 병합
  if (options.headers) {
    Object.assign(headers, options.headers);
  }

	// 3. Authorization 헤더 추가 (토큰이 있는 경우)
  const token = getCurrentToken();
  if (token) {
    headers.Authorization = `Bearer ${token}`;
  }

  return headers;
}- 커스텀 훅에서 accessToken을 직접 넣지 않아도 되고, 헤더를 만들때 토큰이 있으면 가져와서 넣어줍니다.
getCurrentToken()은 토큰 저장소에서 토큰을 가져오는 함수입니다.
3. accessToken 만료 시 자동으로 갱신해주는 interceptor - refreshAccessToken
async function refreshAccessToken(): Promise<string | null> {
  if (tokenRefreshPromise) {
    return tokenRefreshPromise;
  }

  tokenRefreshPromise = (async () => {
    const authData = await reissue();

    if (authData) {
      if (authContextRef) {
        authContextRef.setAuthData(authData.accessToken, authData.isAdmin);
      }
      return authData.accessToken;
    } else {
      if (authContextRef) {
        clearAuthContext();
      }
      return null;
    }
  })();

  return tokenRefreshPromise;
}- 여러 요청이 동시에 토큰 갱신을 시도할 때 Promise를 공유해 중복 요청을 방지합니다.
- context 상태도 함께 갱신해주므로 인증 상태에 따른 적잘한 UI가 반영됩니다.
4. 공통으로 Response를 파싱하여 처리 - handleResponse
async function handleResponse<T>(response: globalThis.Response): Promise<T> {
  if (!response.ok) {
    let errorData;
    try {
      errorData = await response.json();
    } catch {
      throw new Error(`HTTP ${response.status}: ${response.statusText}`);
    }

    if (errorData.status && errorData.code) {
      throw new ApiError(errorData.status, errorData.code, errorData.message);
    }

    throw new Error(errorData.message || `HTTP ${response.status}: ${response.statusText}`);
  }

  const json = await response.json();

  if ('data' in json) {
    return json.data as T;
  } else {
    return json as T;
  }
}- HTTP 상태 코드와 응답에 따라 에러 객체를 만들어 던져줍니다.
- API 응답의
data필드만 추출하므로 서비스 코드가 간결해집니다.
✨ 개선 결과 비교
Before: 기존 방식
// services 폴더에 있는 createRecords 함수에 accessToken을 주입해주기 위해
// auth context 에서 accessToken을 가져오면서 accessToken이 추가된 타입 코드를 따로 생성,
// context에 커스텀 훅이 의존되어 있는 좋지 않은 구조 발생

// hooks/api/useCreateRecords.tsx
import { useMutation } from '@tanstack/react-query';
import { useAuth } from '@/contexts/auth/use-auth';
import { createRecords } from '@/services/student-manage/create-records';

export const useCreateRecords = () => {
  const { accessToken } = useAuth();

  return useMutation<Response<null>, Error, CreateRecordsInput>({
    mutationFn: (params) => createRecords({ ...params, accessToken }),
    // 성공 후 처리 로직 onSuccess:
    // 실패 후 처리 로직 onError:
  });
};

// services/student-manage/create-records.tsx
import type { Response } from '@/types/api/response';
import type { CreateRecords } from '@/types/api/student-record';

export const createRecords = async ({
  recordType,
  studentRecords,
  semester,
  accessToken,
}: CreateRecords): Promise<Response<null>> => {
  const res = await fetch(
    `${process.env.NEXT_PUBLIC_API_URL}/api/v1/student-records/${recordType}/students/batch`,
    {
      method: 'POST',
      headers: {
        'Content-Type': 'application/json',
        ...(accessToken ? { Authorization: `Bearer ${accessToken}` } : {}),
      },
      body: JSON.stringify({ recordType, studentRecords, semester }),
    },
  );

  const json: Response<null> = await res.json();

  if (!res.ok) {
    throw new Error(json.message || '학생 기록 생성 실패');
  }
  return json;
};
After: 공통 API 로직 적용
// hooks/api/useCreateRecords.tsx
import { useMutation } from '@tanstack/react-query';
import { createRecords } from '@/services/student-manage/create-records';

export const useCreateRecords = () => {
  return useMutation<ApiResponseWithoutData, Error, CreateRecords>({
    mutationFn: createRecords,
    // 성공 후 처리 로직 onSuccess:
    // 실패 후 처리 로직 onError:
  });
};

// services/student-manage/create-records.tsx
import { api } from '@/lib/api';
import type { ApiResponseWithoutData } from '@/types/api/response';
import type { CreateRecords } from '@/types/api/student-record';

export const createRecords = async ({ recordType, studentRecords, semester }: CreateRecords) => {
  return api.post<ApiResponseWithoutData>(`/api/v1/student-records/${recordType}/students/batch`, {
    recordType,
    studentRecords,
    semester,
  });
};
🎯 개선 효과
1. 의존성 해결
- hooks 폴더에서 accessToken을 주입하는 로직을 제거하면서, auth context에 대한 의존성을 완전하게 분리했습니다.
- 동일한 타입을 커스텀 훅과 서비스에서 공통으로 사용할 수 있게 되었습니다.
2. 코드 간소화
- 서비스 코드가 평균적으로 26줄에서 7줄로 대폭 감소하였습니다.
- URL 분기 처리, 에러 처리, Interceptor 로직을 분리하면서, 테스트 코드에도 코드 수정 없이 동작하며, 중복된 코드를 제거하고 코드의 가독성을 높였습니다.
https://github.com/Team-bbangbbangs/Edukit-FE/blob/develop/src/shared/lib/api.ts - 전체 코드
마무리
- 1차 MVP를 마무리하고, 2차 MVP를 시작하기전 쌓여있던 가장 큰 기술 부채를 해결하였다고 생각했습니다.
- axios 라이브러리의 소중함을 깨달았고, 구현에 어려움은 있었지만, 장기적으로 코드 생산성을 높이고 유연한 구조를 만들었다고 생각합니다.
- class나 클로저를 활용하면 더욱 견고한 코드 구조를 만들 수 있다고 생각하여 앞으로 한 차례 더 개선할 예정입니다..!

소통하며 성장하는 프론트엔드 개발자 이승섭입니다! 👋