[새싹x코딩온] 풀스택 웹 융합 개발자 양성 과정 | Spring Security로 회원가입 & 로그인 & 로그아웃 구현하기
[새싹x코딩온] 풀스택 웹 융합 개발자 양성 과정

Spring Security로 회원가입 & 로그인 & 로그아웃을 구현해보자
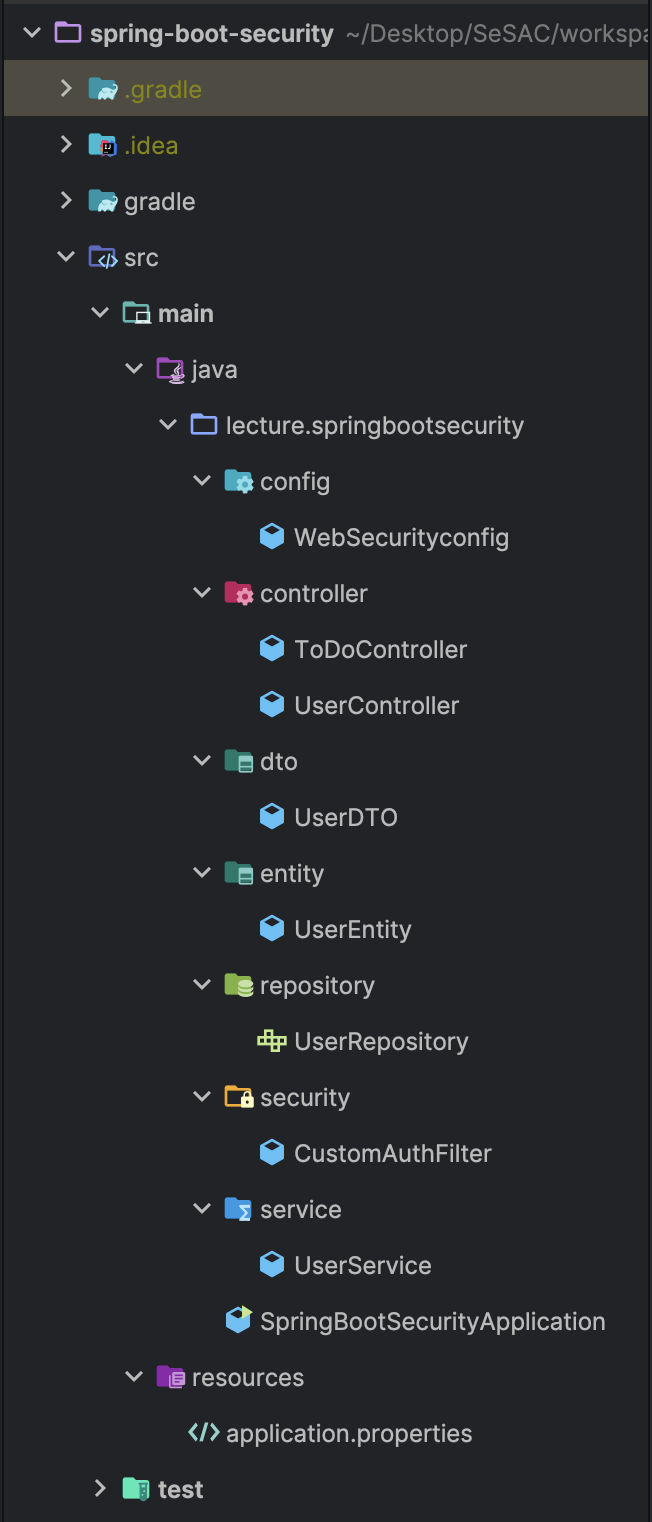
0. 전체 폴더 구조
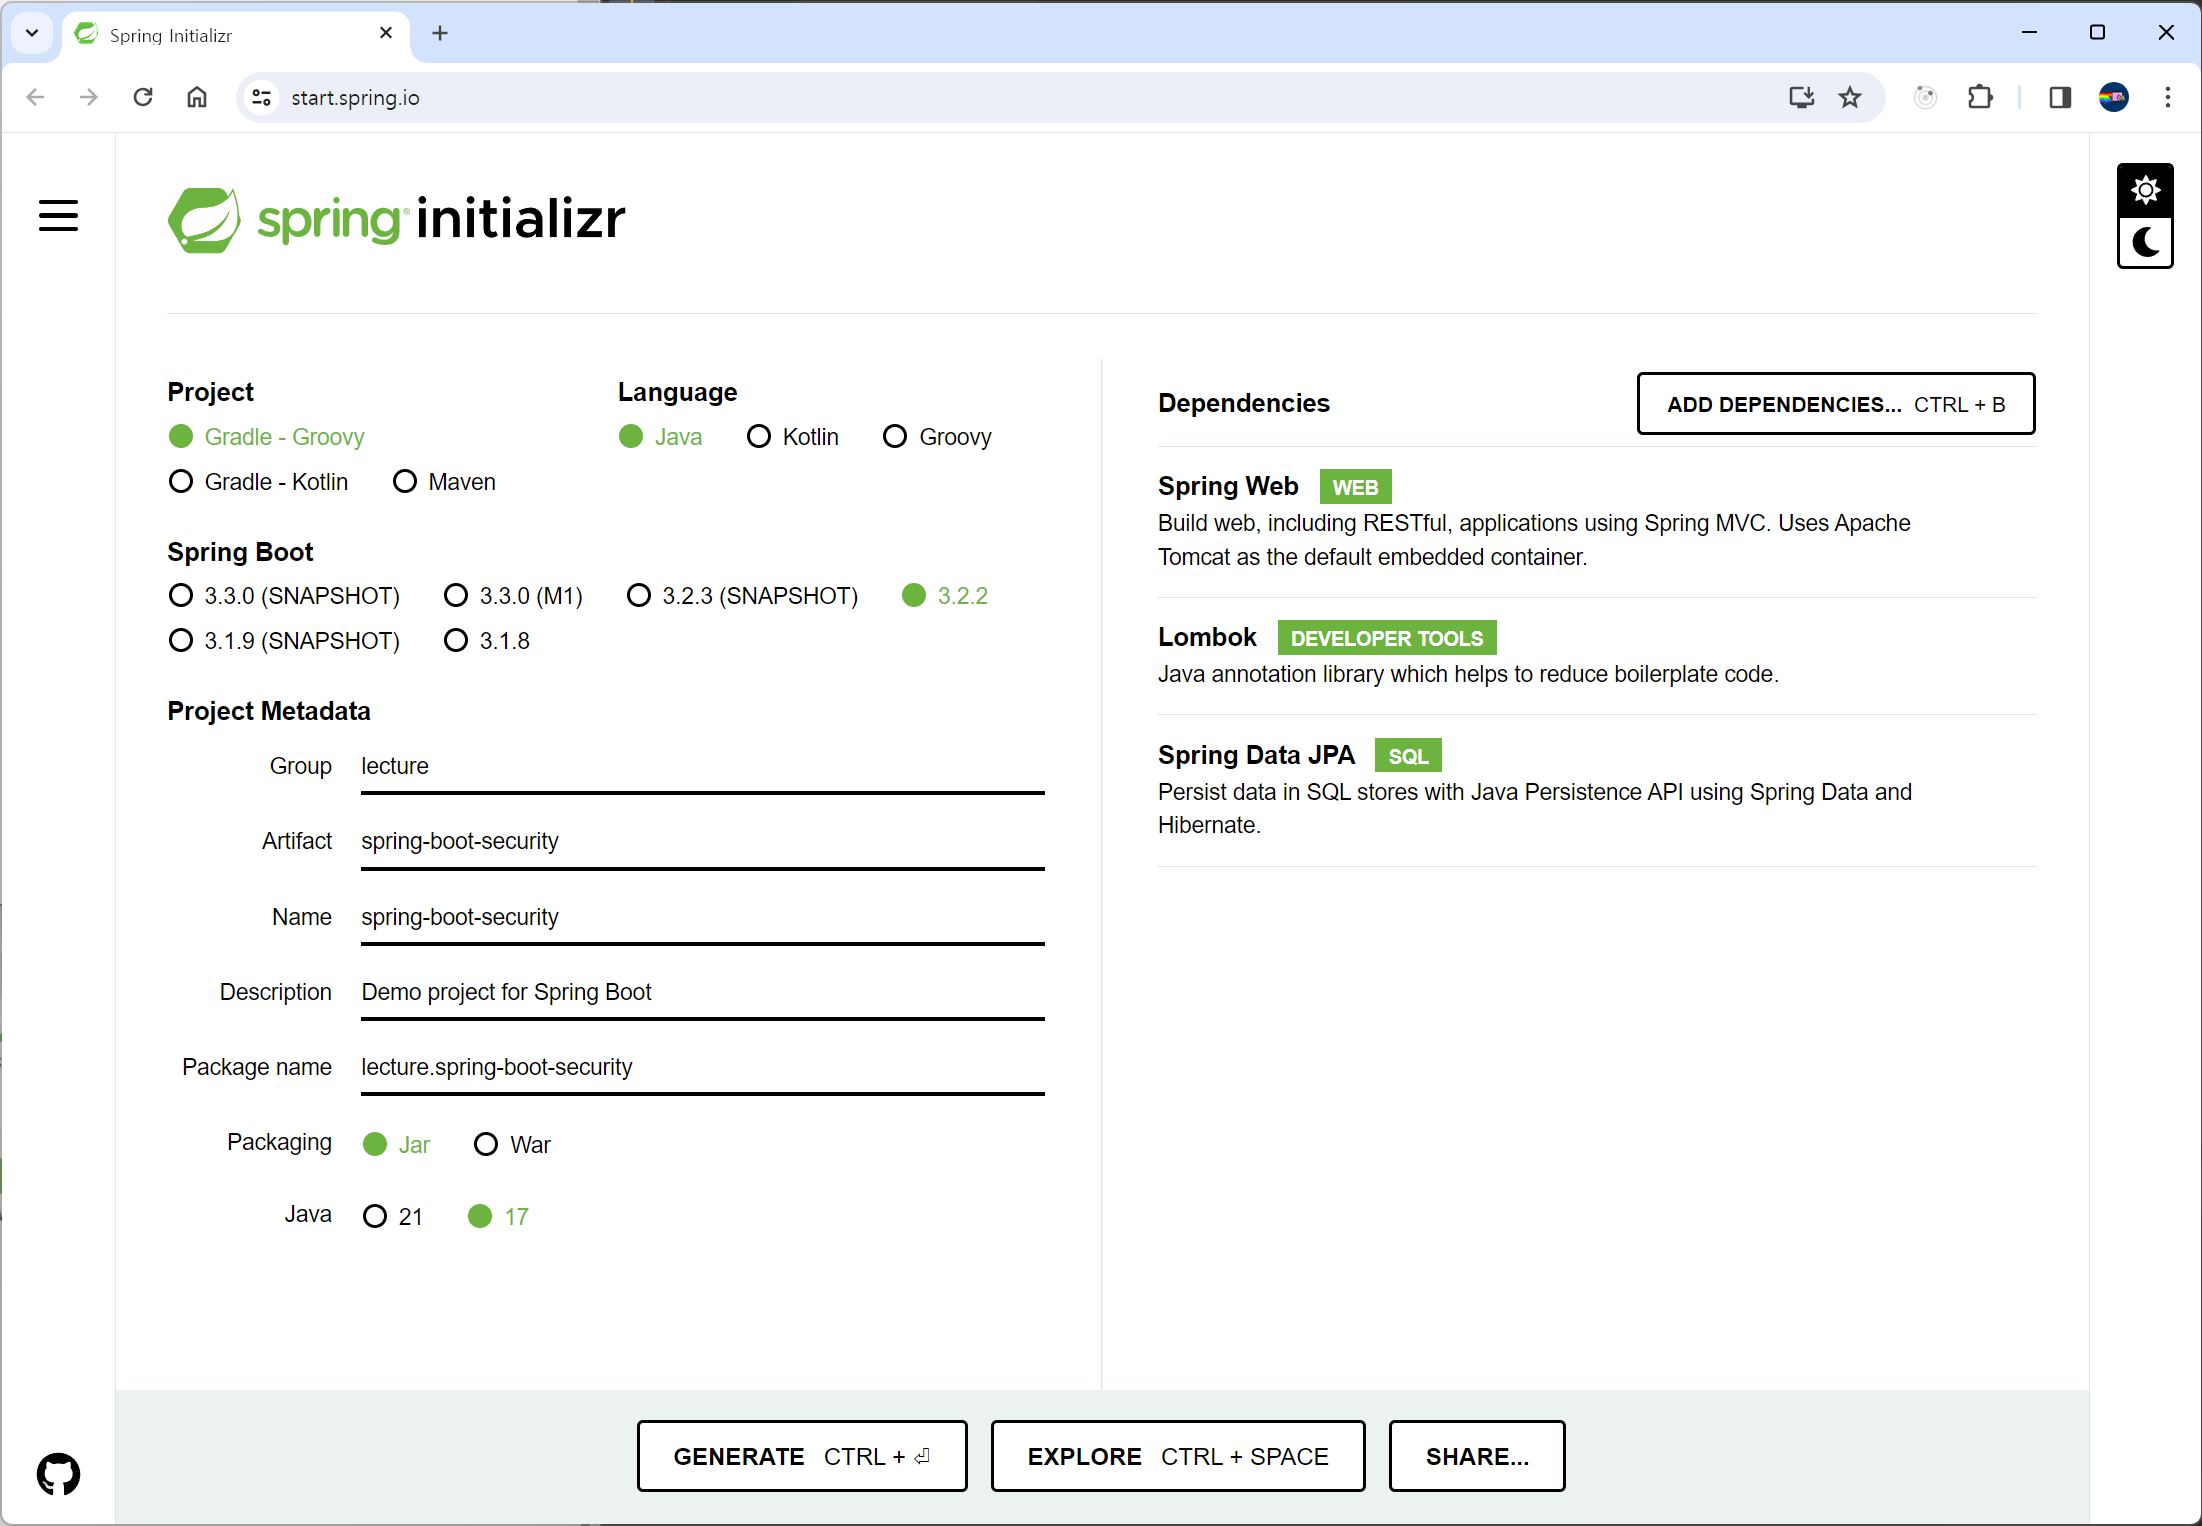
1. 프로젝트 생성하기
스프링부트를 이용한다
여기서 프로젝트 생성
프로젝트 생성에 관한 자세한 내용은 이 게시글 참조
DB (user table)
create table user (
id bigint primary key not null auto_increment,
username varchar(20) not null,
email varchar(100) not null,
password varchar(255) not null
);
build.gradle
dependencies {
implementation 'org.springframework.boot:spring-boot-starter-data-jpa'
runtimeOnly 'com.mysql:mysql-connector-j' // 커넥터 설정 (이 한 줄을 추가)
implementation 'org.springframework.boot:spring-boot-starter-web'
compileOnly 'org.projectlombok:lombok'
annotationProcessor 'org.projectlombok:lombok'
testImplementation 'org.springframework.boot:spring-boot-starter-test'
}
application.properties
spring.datasource.url=jdbc:mysql://localhost:3306/sesac?useSSL=false&characterEncoding=UTF-8&serverTimezone=UTC
spring.datasource.username=root
spring.datasource.password=1234
spring.datasource.driver-class-name=com.mysql.cj.jdbc.Driver
spring.jpa.show-sql=true
spring.jpa.hibernate.ddl-auto=update
(데이터베이스 아이디 비번 바꾸기)
폴더 생성하기
controller
dto
entity
repository
service
5개의 패키지 생성
2. 본격적으로 Spring Security 사용하기
-
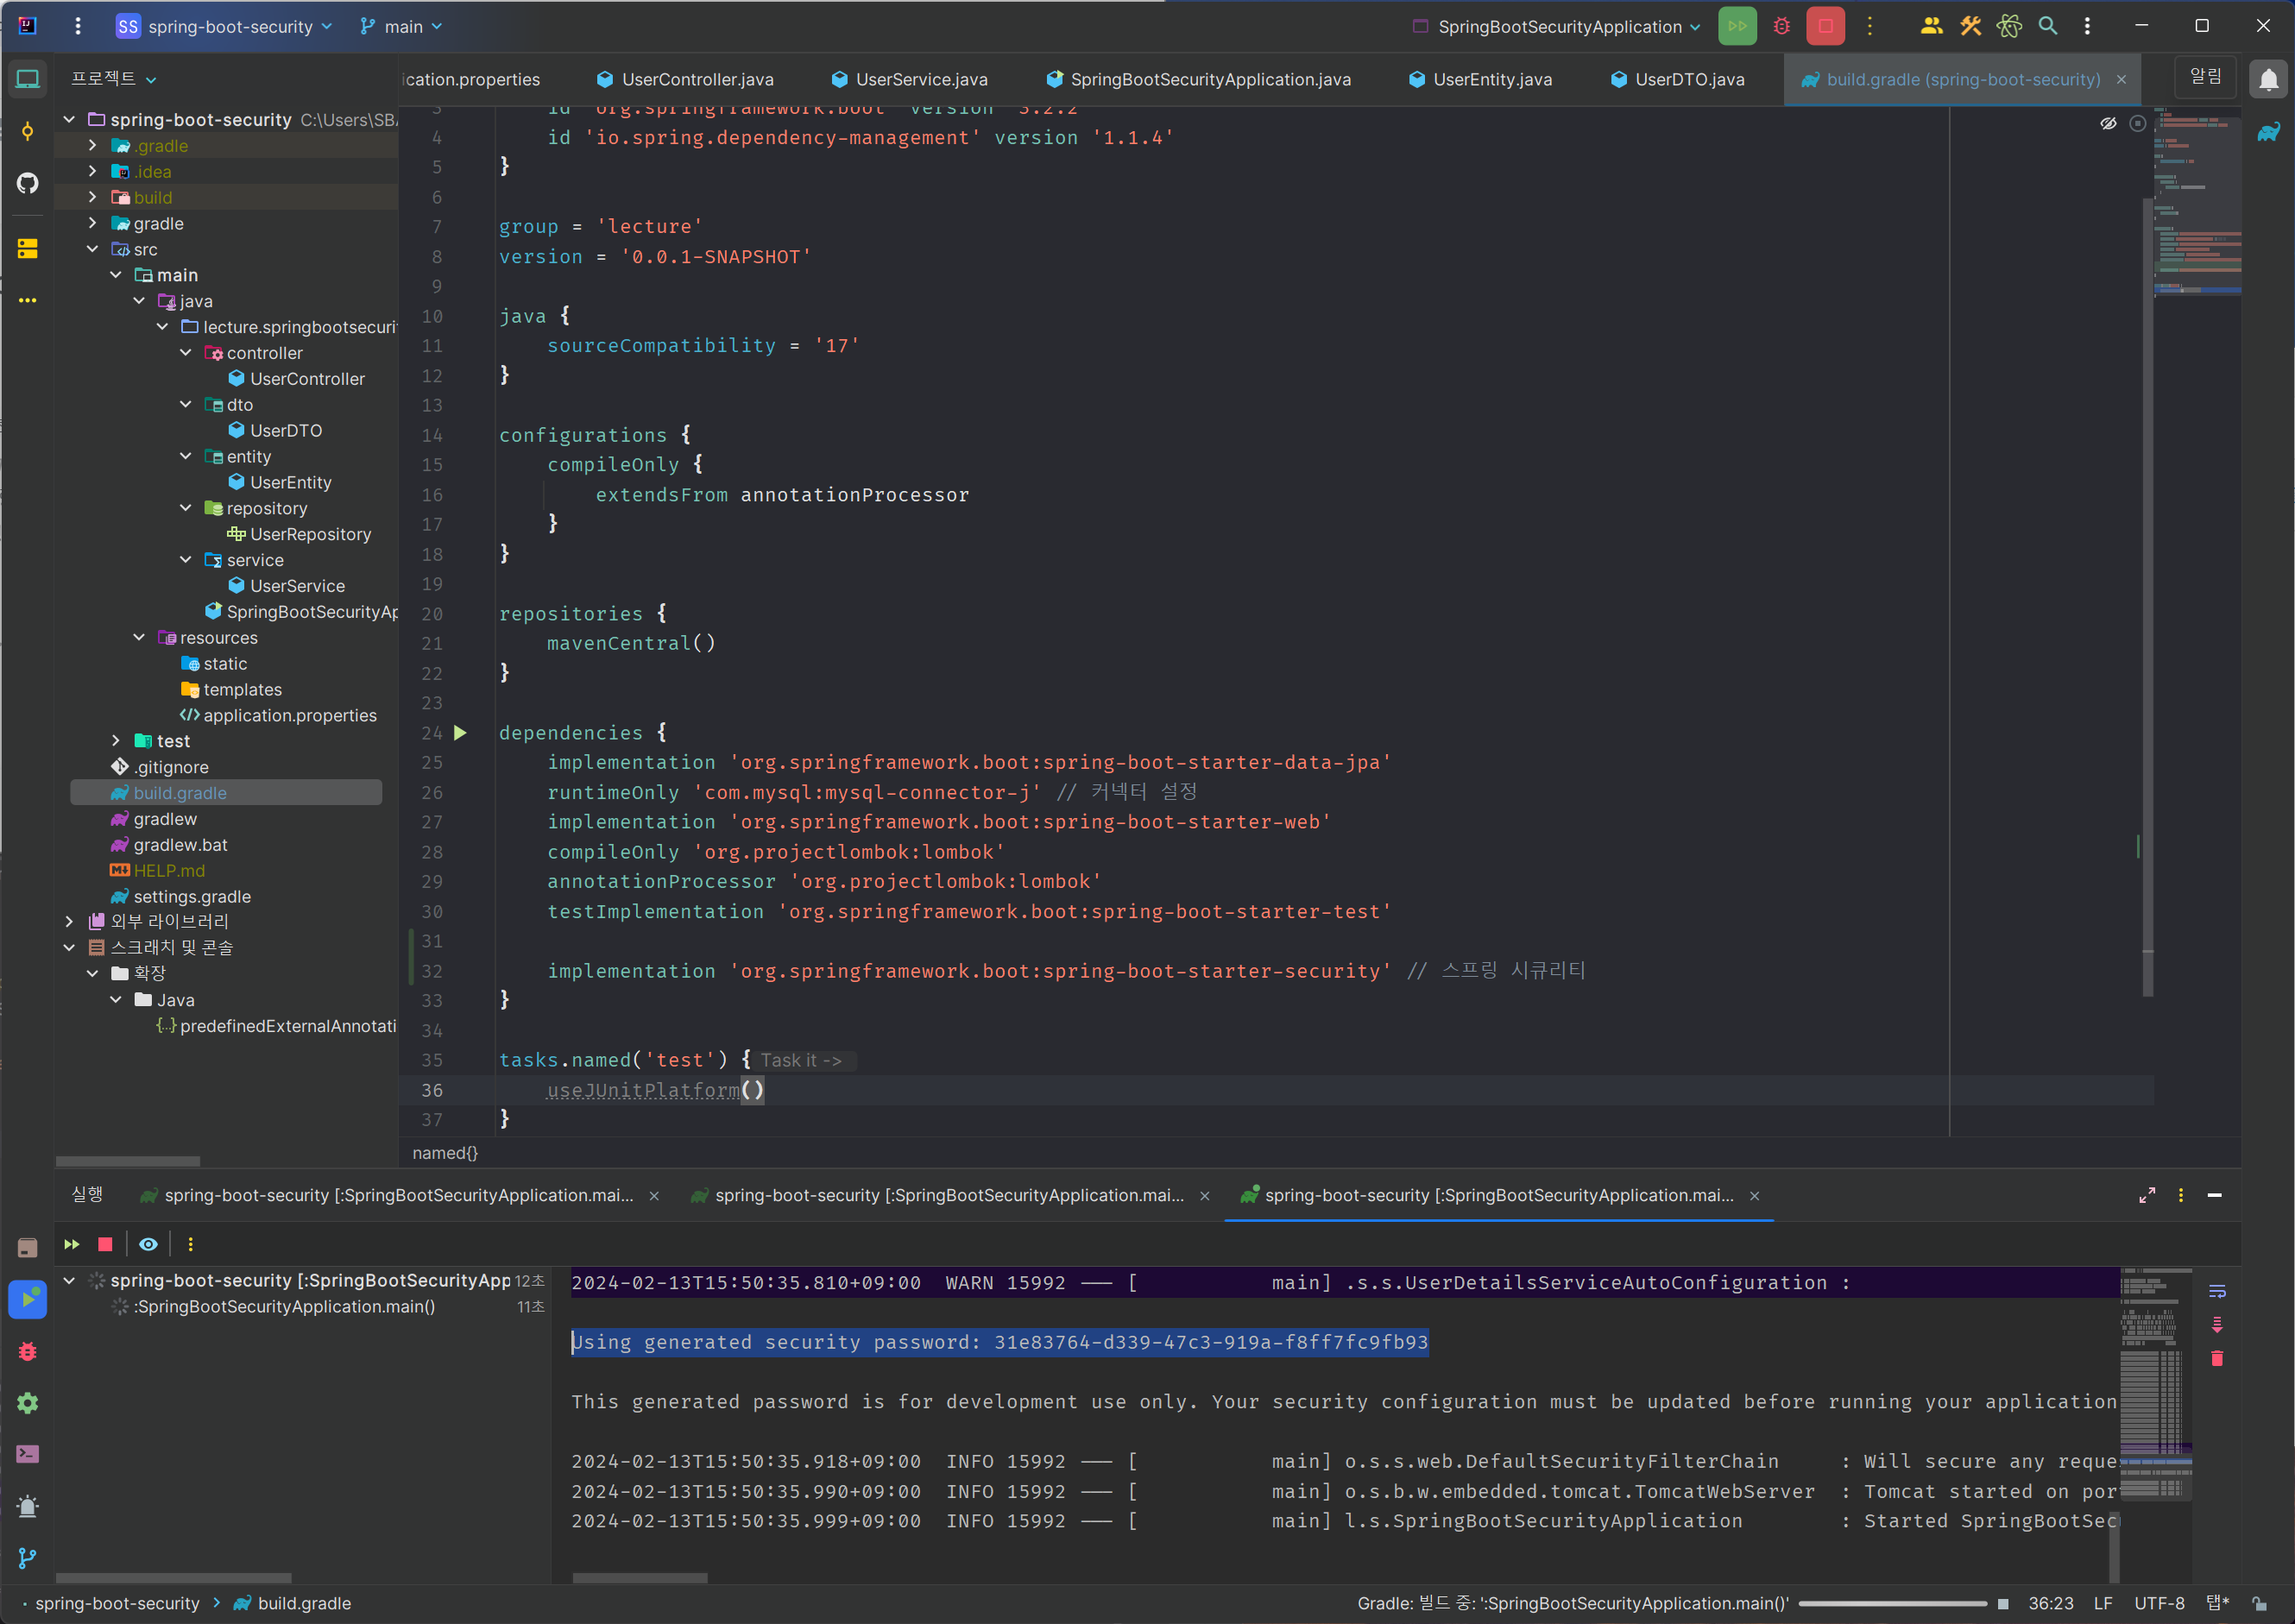
build.gradle에 dependencies 추가
implementation 'org.springframework.boot:spring-boot-starter-security'// 스프링 시큐리티
(코끼리 버튼 눌러서 다시 실행시키기!) -
참고) Thymeleaf 에서 Spring Security 를 사용한다면?
implementation 'org.thymeleaf.extras:thymeleaf-extras-springsecurity6'
실행시키고 나서 콘솔에 패스워드가 잘 나오면 dependency가 잘 추가가 된 것임!
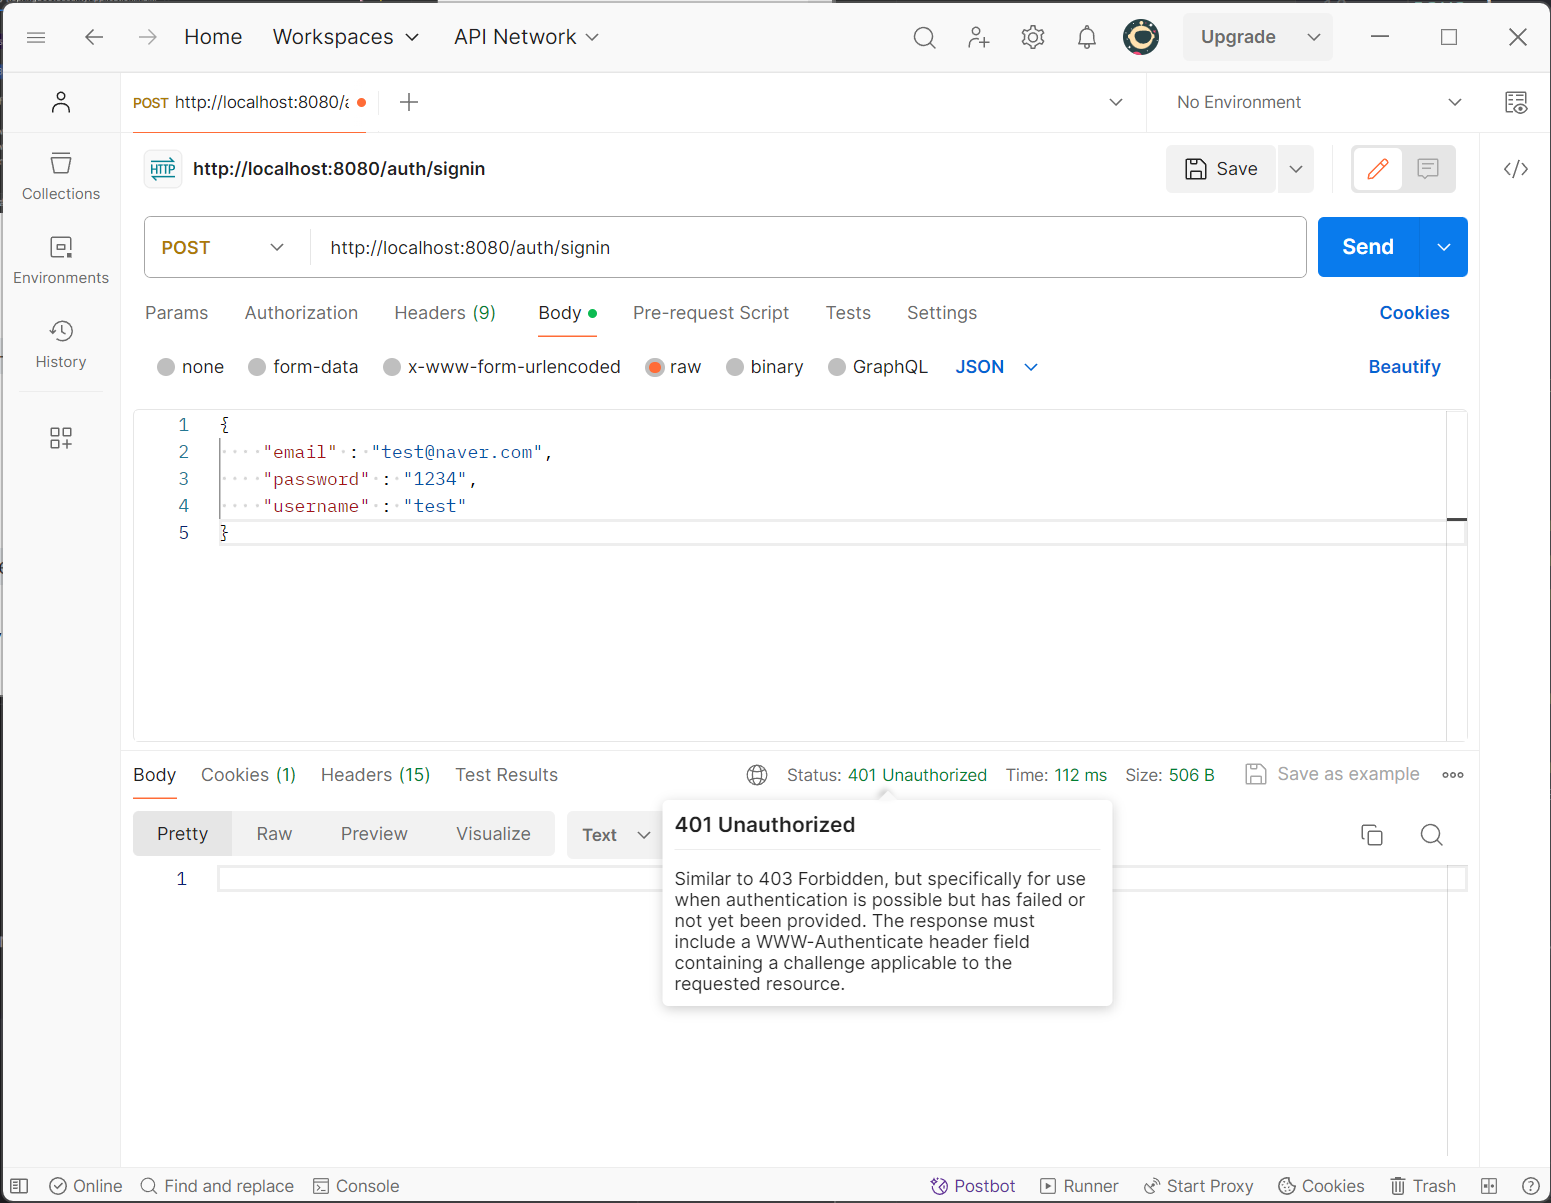
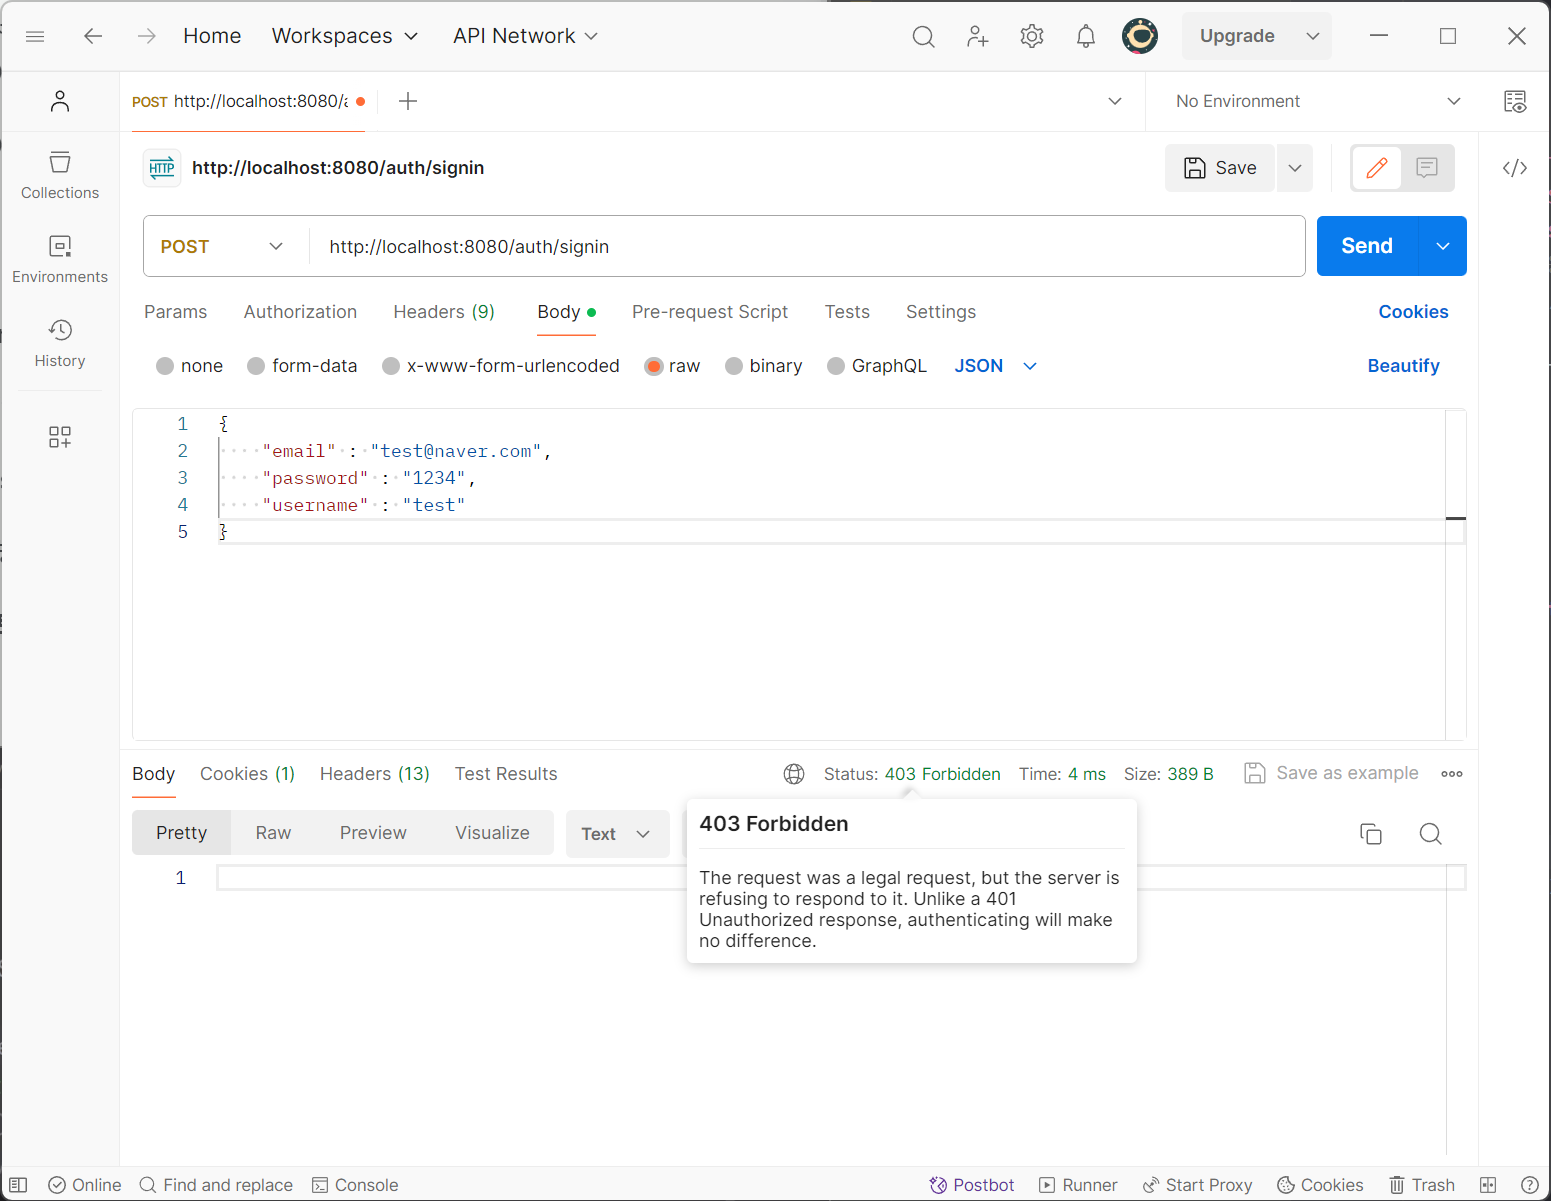
여기서 postman 으로 signin을 해 보면, 401 코드가 뜬다
권한이 없기 때문
권한이 없어도 실행되도록, 스프링 시큐리티 설정을 해 주어야 한다
그럼 진짜로 본격적으로 사용하기
1) config/WebSecurityConfig 파일 생성
security 세부 설정을 진행함
2) Custom Filter 생성
인증 방식에 따라 상황에 맞는 로직 생성 (session, jwt token 등)
3) 컨트롤러에서 로그인 된 유저 정보 가져오기?
설정을 해 주었지만 403 에러?!
.csrf(CsrfConfigurer::disable) // post, put 요청을 허용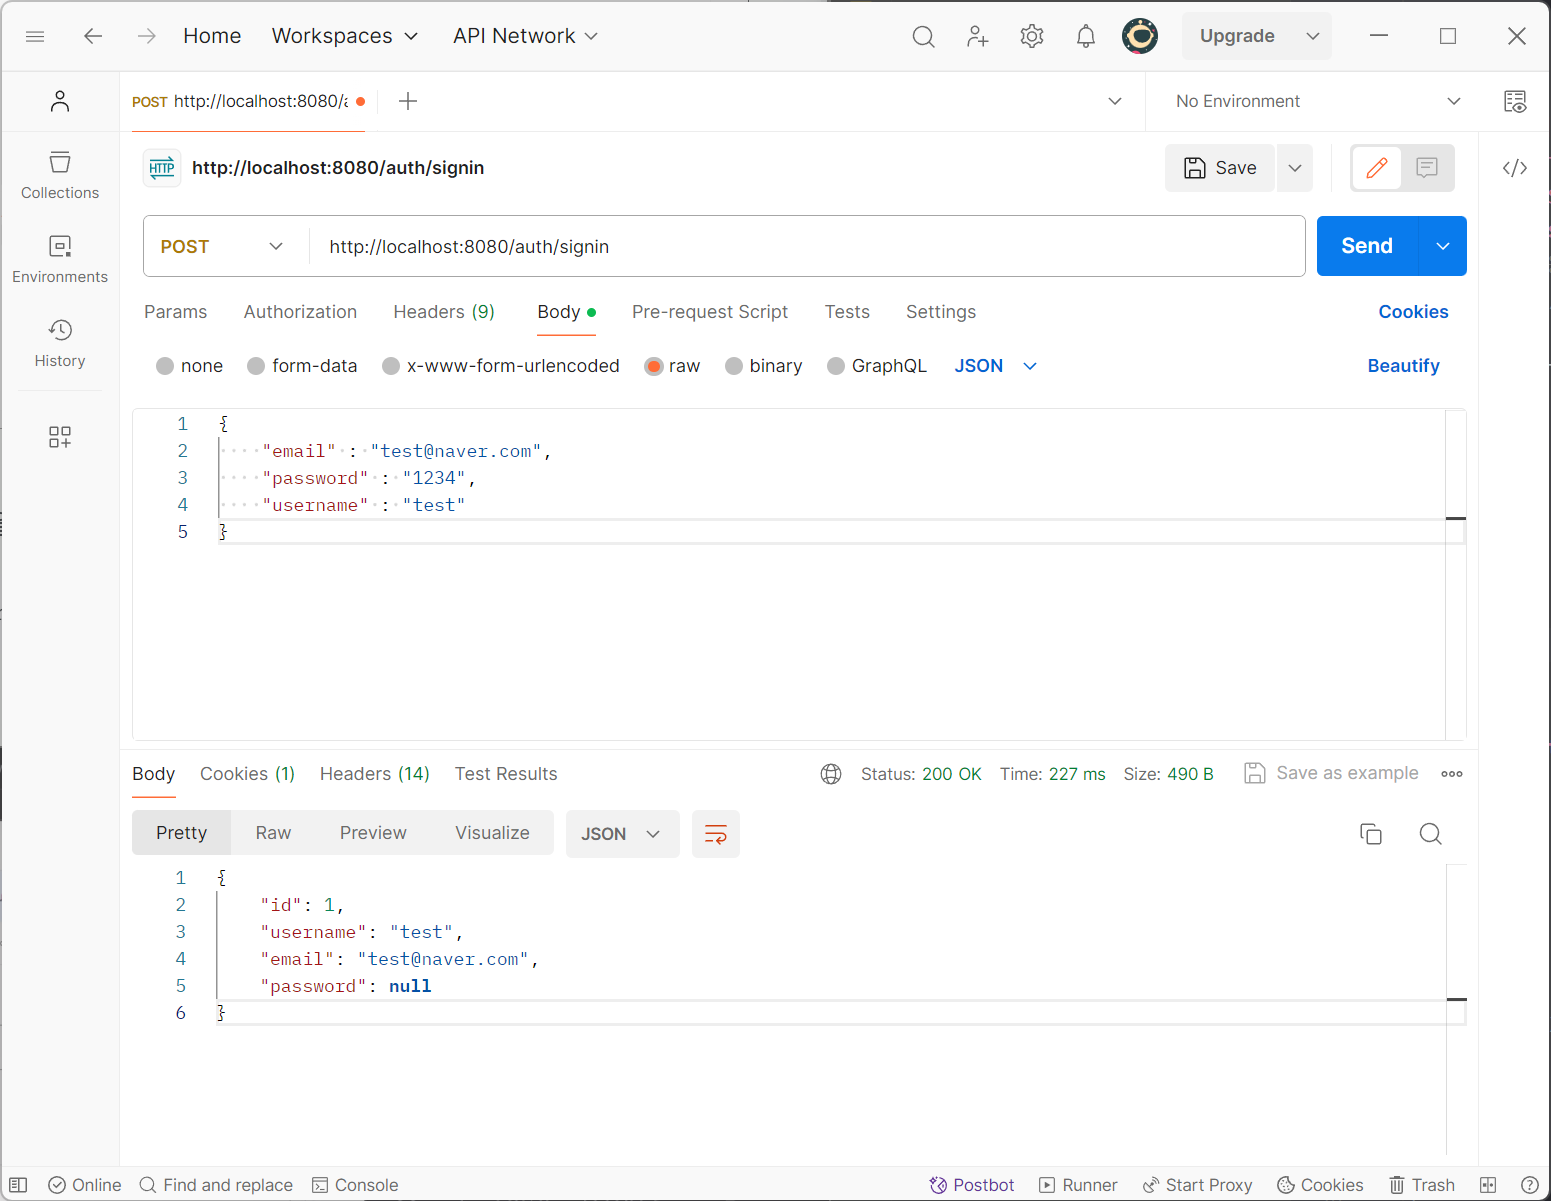
성공적으로 실행된다!
config/WebSecurityConfig.java 전체 코드
package lecture.springbootsecurity.config;

import org.springframework.context.annotation.Bean;
import org.springframework.context.annotation.Configuration;
import org.springframework.security.config.annotation.SecurityConfigurerAdapter;
import org.springframework.security.config.annotation.web.builders.HttpSecurity;
import org.springframework.security.config.annotation.web.configuration.EnableWebSecurity;
import org.springframework.security.config.annotation.web.configurers.CsrfConfigurer;
import org.springframework.security.web.SecurityFilterChain;

// 3.X 버전
@Configuration // 스프링 설정 클래스라는 뜻
@EnableWebSecurity // Spring Security 를 사용한다는 뜻
public class WebSecurityconfig {
    @Bean // 스프링 컨테이너에서 관리
    public SecurityFilterChain filterChain(HttpSecurity http) throws Exception {
        // 스프링 시큐리티를 적용하면 기본적으로 모든 경로에 인증이 있어야 접근이 가능해진다
        // 특정 경로에서 인증 없이 접근할 수 있도록 설정 (인가 설정)
        http
                .csrf(CsrfConfigurer::disable) // post, put 요청을 허용
                .authorizeHttpRequests(authorize -> authorize
                                .requestMatchers("/auth/**").permitAll() // 인가 없이 접속할 주소 (** : 모든 주소) 는 권한 없이 접속 가능
//                .requestMatchers("/admin/**").hasRole("ADMIN") // 예시
                                .anyRequest().authenticated() // anyRequest() : 나머지 모든 주소 (제일 마지막에 위치해야 함) 는 로그인이 필요
                );
        return http.build(); // build 의 반환값이 SecurityFilterChain 이 된다

        // .permitAll() : 권한 없이 접속 가능하다
        // .authenticated() : 로그인이 필요하다
        // .hasRole("권한? ex. ADMIN") : 특정 권한이 있어야 접속 가능하다
    }
}

// 주의) 2.X 버전에서 사용하는 문법. 인터넷에서 많이 보이는데, 3.X 버전에서 이걸 그대로 가져와 사용하면 안 된다
/*
    public class WebSecurityconfig extends SecurityConfigurerAdapter {
    public configure() {}
}
*/
비밀번호 암호화
@Autowired
BCryptPasswordEncoder passwordEncoder;
// service/UserService.java
// [after] 암호화 적용 후
public UserEntity login(String email, String password) {
UserEntity searchUser = userRepository.findByEmail(email);
// matches(암호화가 안 된 패스워드, 된 패스워드)
if(searchUser != null && passwordEncoder.matches(password, searchUser.getPassword())) {
return searchUser;
}
return null;
}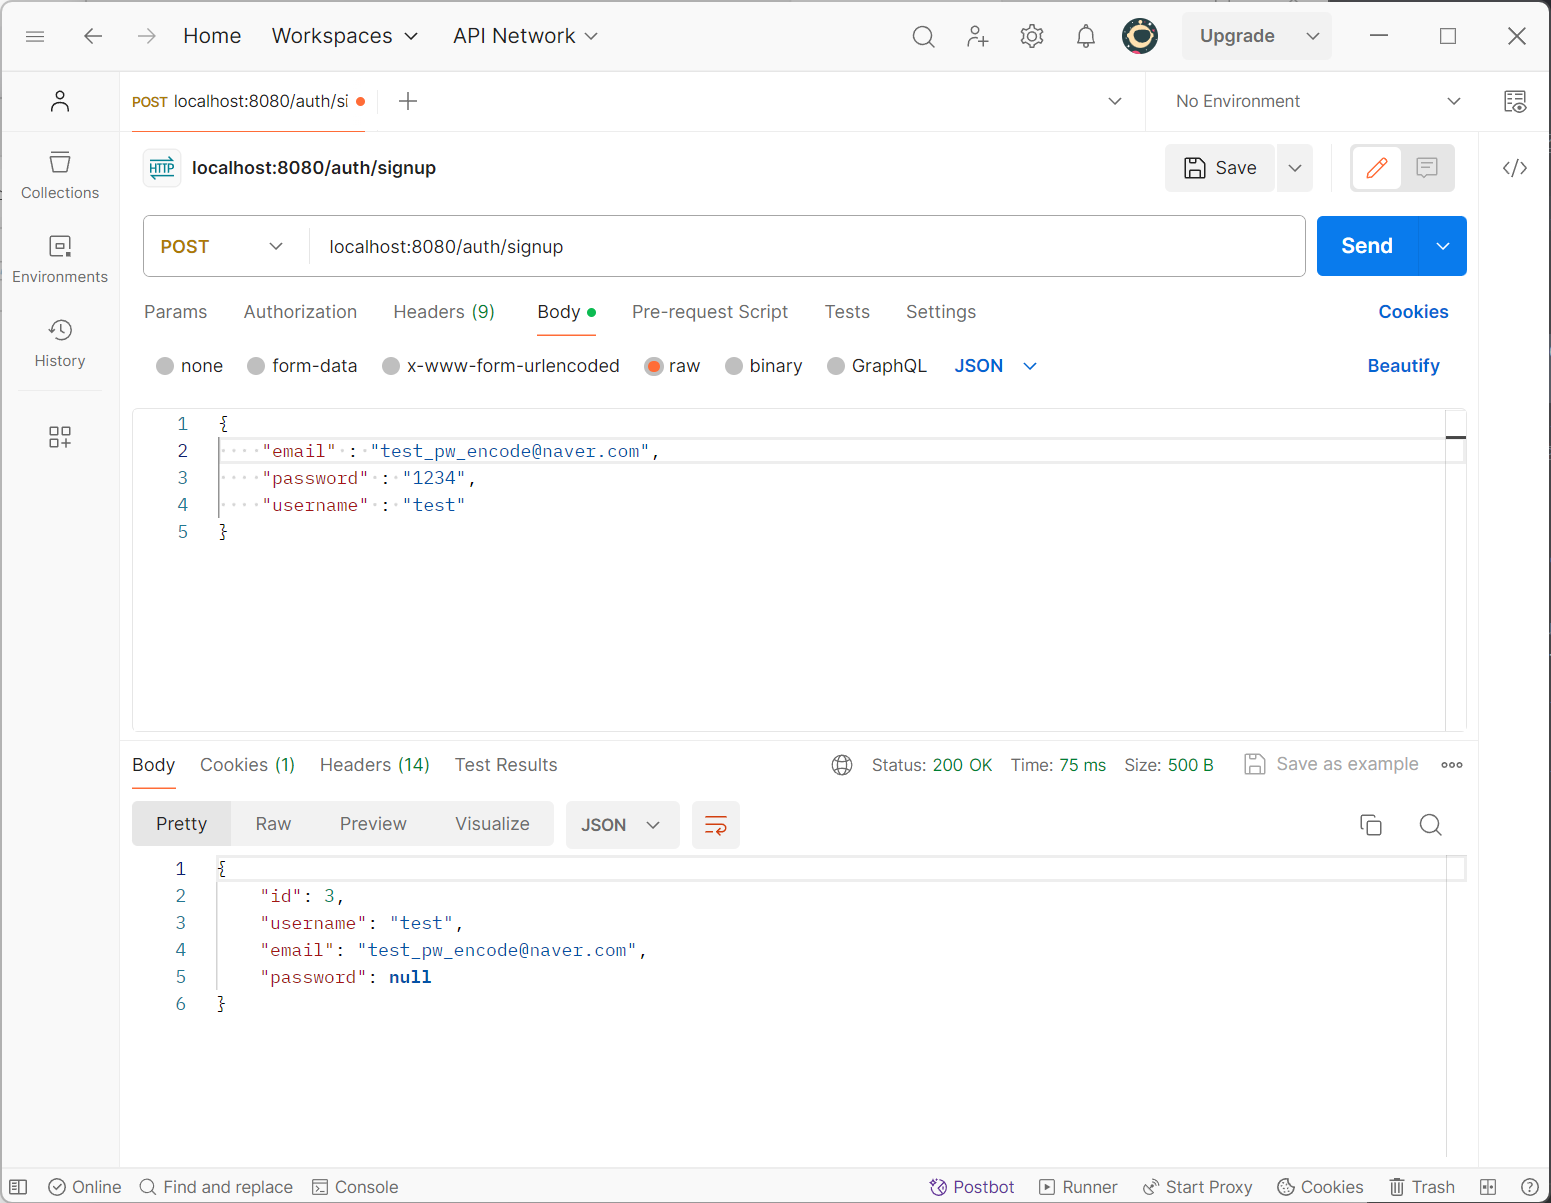
postman으로 보면 이렇게 잘 뜬다
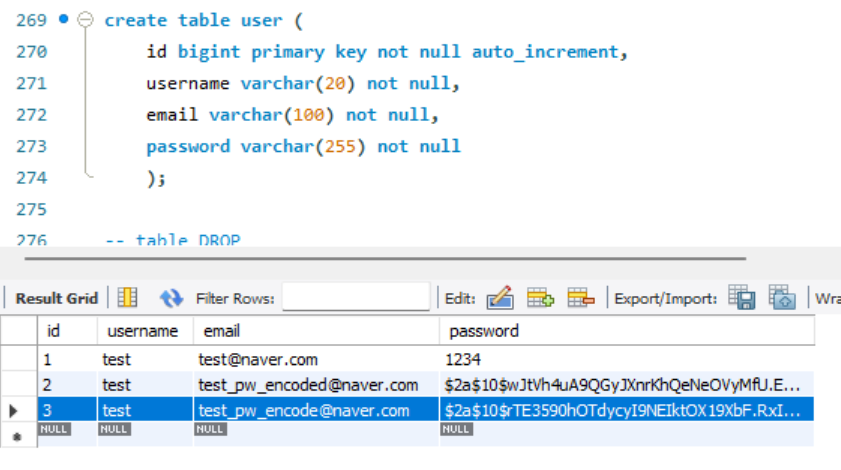
DB에도 잘 들어와 있는 것을 확인할 수 있다
비밀번호가 암호화 돼서 id: 3 으로 잘 들어와 있다
세션 기반 인증 방식
security 패키지 생성
CustomAuthFilter 클래스 생성
security/CustomAuthFilter.java 전체 코드
package lecture.springbootsecurity.security;
// 1. 세션 기반 인증 방식
// -- 로그인에 성공 -> session 에 userId 저장
// -- 로그인 여부를 판단하고 싶을 때 -> session 에 userId 가 있는지 없는지에 따라서
// ---- 존재하면 로그인을 한 사람, 존재하지 않으면 로그인을 하지 않은 사람

import jakarta.servlet.FilterChain;
import jakarta.servlet.ServletException;
import jakarta.servlet.http.HttpServletRequest;
import jakarta.servlet.http.HttpServletResponse;
import jakarta.servlet.http.HttpSession;
import lombok.extern.slf4j.Slf4j;
import org.springframework.security.authentication.UsernamePasswordAuthenticationToken;
import org.springframework.security.core.Authentication;
import org.springframework.security.core.authority.AuthorityUtils;
import org.springframework.security.core.context.SecurityContextHolder;
import org.springframework.stereotype.Component;
import org.springframework.web.filter.OncePerRequestFilter;

import java.io.IOException;

// security filter 로 이용되도록 처리하기
// OncePerRequestFilter 는 추상 메서드이므로, 구현해야 함
// 왼쪽 아래 빨간색 경고등 버튼 누르고 > 빨간색 느낌표 버튼 우클릭 > 빠른 수정 표시 > 메서드 구현 > 자동으로 메서드 구현 됨
@Component
@Slf4j
public class CustomAuthFilter extends OncePerRequestFilter {

    @Override
    protected void doFilterInternal(HttpServletRequest request, HttpServletResponse response, FilterChain filterChain) throws ServletException, IOException {
        try {
            HttpSession session = request.getSession();
            log.warn("session id {}", session.getId());
            Object userId = session.getAttribute("userId");

            // session 에 userId 가 있는지 없는지 확인
            if (userId != null) {
                // 1. 사용자 정보를 담는 공간(토큰) 생성
                Authentication authentication = new UsernamePasswordAuthenticationToken(String.valueOf(userId), null, AuthorityUtils.NO_AUTHORITIES);

                // 2. SecurityContextHolder 에 authentication 정보를 담는다 (set)
                // SecurityContextHolder : 클라이언트의 요청 -> 응답 사이에 일시적으로 auth 정보를 저장할 수 있는 공간
                SecurityContextHolder.getContext().setAuthentication(authentication);
            }

        } catch (Exception e) {
            log.error("filter error{}", e.getMessage());
        }

        filterChain.doFilter(request, response);
    }
}
CORS 이슈 해결 방법
WebSecurityconfig.java
 public SecurityFilterChain filterChain(HttpSecurity http) throws Exception {
        http.cors(Customizer.withDefaults()) // CORS 이슈 해결

        ...

}
@Bean
public CorsConfigurationSource corsConfigurationSource() {
CorsConfiguration config = new CorsConfiguration();
// cors 설정
config.setAllowCredentials(true); // 실제 응답을 보낼 때, 브라우저에게 자격 증명과 함께 요청을 보낼 수 있도록 허용합니다.
config.setAllowedOriginPatterns(Arrays.asList("*")); // 모든 원본에서의 요청을 허용합니다.
config.setAllowedMethods(Arrays.asList("HEAD","POST","GET","DELETE","PUT", "PATCH")); // 허용할 HTTP 메서드를 설정합니다.
config.setAllowedHeaders(Arrays.asList("*")); // 모든 헤더의 요청을 허용합니다.
UrlBasedCorsConfigurationSource source = new UrlBasedCorsConfigurationSource();
source.registerCorsConfiguration("/**", config); // 모든 경로에 대해 위에서 설정한 CORS 설정을 적용합니다.
return source;
};로그아웃 구현하기
로그아웃 구현은 간단하다
WebSecurityconfig.java
.logout(auth -> auth
.logoutUrl("/auth/logout") // 로그아웃 구현
.logoutSuccessHandler(((request, response, authentication) -> {
response.setStatus(200); // 200번 상태 코드 전송
}))
)마지막으로 다시 한 번 WebSecurityconfig.java 전체 코드 (feat. 친절한 주석)
package lecture.springbootsecurity.config;
import lecture.springbootsecurity.security.CustomAuthFilter;
import org.springframework.beans.factory.annotation.Autowired;
import org.springframework.context.annotation.Bean;
import org.springframework.context.annotation.Configuration;
import org.springframework.security.config.Customizer;
import org.springframework.security.config.annotation.SecurityConfigurerAdapter;
import org.springframework.security.config.annotation.web.builders.HttpSecurity;
import org.springframework.security.config.annotation.web.configuration.EnableWebSecurity;
import org.springframework.security.config.annotation.web.configurers.CsrfConfigurer;
import org.springframework.security.crypto.bcrypt.BCryptPasswordEncoder;
import org.springframework.security.web.SecurityFilterChain;
import org.springframework.security.web.authentication.UsernamePasswordAuthenticationFilter;
import org.springframework.web.cors.CorsConfiguration;
import org.springframework.web.cors.CorsConfigurationSource;
import org.springframework.web.cors.UrlBasedCorsConfigurationSource;
import java.util.Arrays;
// 3.X 버전
@Configuration // 스프링 설정 클래스라는 뜻
@EnableWebSecurity // Spring Security 를 사용한다는 뜻
public class WebSecurityconfig {
@Autowired
CustomAuthFilter customAuthFilter; // customAuthFilter 의존성 주입
@Bean
// 암호화
public BCryptPasswordEncoder passwordEncoder() {
return new BCryptPasswordEncoder();
}
// Spring Security 설정
@Bean // 스프링 컨테이너에서 관리
public SecurityFilterChain filterChain(HttpSecurity http) throws Exception {
// 스프링 시큐리티를 적용하면 기본적으로 모든 경로에 인증이 있어야 접근이 가능해진다
// 특정 경로에서 인증 없이 접근할 수 있도록 설정 (인가 설정)
http
.cors(Customizer.withDefaults()) // CORS 이슈 해결
.csrf(CsrfConfigurer::disable) // post, put 요청을 허용
.authorizeHttpRequests(authorize -> authorize
.requestMatchers("/auth/**").permitAll() // 인가 없이 접속할 주소 (** : 모든 주소) 는 권한 없이 접속 가능
// .requestMatchers("/admin/**").hasRole("ADMIN") // 예시
.anyRequest().authenticated() // anyRequest() : 나머지 모든 주소 (제일 마지막에 위치해야 함) 는 로그인이 필요
);
// .permitAll() : 권한 없이 접속 가능하다
// .authenticated() : 로그인이 필요하다
// .hasRole("권한? ex. ADMIN") : 특정 권한이 있어야 접속 가능하다
// 만들어둔 custom 필터 등록
http.addFilterAfter(customAuthFilter, UsernamePasswordAuthenticationFilter.class);
return http.build(); // build 의 반환값이 SecurityFilterChain 이 된다
}
// CORS 이슈 해결
@Bean
    public CorsConfigurationSource corsConfigurationSource() {
        CorsConfiguration config = new CorsConfiguration();

        // cors 설정
        config.setAllowCredentials(true); // 실제 응답을 보낼 때, 브라우저에게 자격 증명과 함께 요청을 보낼 수 있도록 허용합니다.
        config.setAllowedOriginPatterns(Arrays.asList("*")); // 모든 원본에서의 요청을 허용합니다.
        config.setAllowedMethods(Arrays.asList("HEAD","POST","GET","DELETE","PUT", "PATCH")); // 허용할 HTTP 메서드를 설정합니다.
        config.setAllowedHeaders(Arrays.asList("*")); // 모든 헤더의 요청을 허용합니다.


        UrlBasedCorsConfigurationSource source = new UrlBasedCorsConfigurationSource();
        source.registerCorsConfiguration("/**", config); // 모든 경로에 대해 위에서 설정한 CORS 설정을 적용합니다.

        return source;
    };
}
// 주의) 2.X 버전에서 사용하는 문법. 인터넷에서 많이 보이는데, 3.X 버전에서 이걸 그대로 가져와 사용하면 안 된다
/*
public class WebSecurityconfig extends SecurityConfigurerAdapter {
public configure() {}
}
*/