타임리프 특징
- 서버 사이드 HTML 렌더링(SSR)
--> 타임리프는 백엔드 서버에서 HTML을 동적으로 렌더링하는 용도로 사용횐다. - 네츄럴 템플릿
--> 타임리프는 순수 HTML을 최대한 유지하는 특징이 있다. 타임리프로 작성한 파일은 HTML을 유지하기 때문에 웹 브라우저에서 파일을 직접 열어도 내용을 확인할 수 있고, 서버를 통해 뷰 템플릿을 거치면 동적으로 변경된 결과를 확인할 수 있다. - 스프링 통합 지원
--> 타임리프는 스프링과 자연스럽게 통합되고, 스프링의 다양한 기능을 편리하게 사용할 수 있도록 지원한다.
타임리프 기본 기능
- 타임리프 사용 선언 :
<html xmlns:th="http//www.thymeleaf.org"> - 기본 표현식 : 다음과 같은 다양한 기본 표현식을 제공한다.
간단한 표현
- 변수 표현식: ${...}
- 선택 변수 표현식: *{...}
- 메시지 표현식: #{...}
- 링크 URL 표현식: @{...}
- 조각 표현식: ~{...}
(참고) 선택 변수 표현식과 메시지 표현식은 이번 섹션에서는 다루지 않는다. 뒤에서 알아볼 것.
리터럴
- 텍스트: 'one text', 'Another one!',…
- 숫자: 0, 34, 3.0, 12.3,…
- 불린: true, false
- 널: null
- 리터럴 토큰: one, sometext, main,…
문자 연산
- 문자 합치기: +
- 리터럴 대체: |The name is ${name}|
산술 연산
- Binary operators: +, -, *, /, %
- Minus sign (unary operator): -
불린 연산
- Binary operators: and, or
- Boolean negation (unary operator): !, not
비교와 동등
- 비교: >, <, >=, <= (gt, lt, ge, le)
- 동등 연산: ==, != (eq, ne)
조건 연산
- If-then: (if) ? (then)
- If-then-else: (if) ? (then) : (else)
- Default: (value) ?: (defaultvalue)
특별한 토큰
- No-Operation: _
텍스트 - text,utext
타임리프의 가장 기본 기능인 텍스트를 출력하는 기능을 먼저 알아보자
- 타임리프는 기본저긍로 HTML 태그의 속성에 기능을 정의해서 동작한다.
HTML콘텐츠(content)에 데이터를 출력할 때,th:text를 사용하면 된다.
예)<span th:text = "${data}"> - HTML 태그의 속성이 아니라 HTML 콘텐츠 영역안에서 직접 데이터를 출려갛고 싶으면,
[[...]]를 사용하면 된다
예) 컨텐츠 안에서 직접 출력하기 =[[${data}]]
BasicController
@GetMapping("/text-basic")
    public String textBasic(Model model){
        model.addAttribute("data", "hello spring");

        return "basic/text-basic";
    }
text-basic.html
<h1>컨텐츠에 데이터 출력하기</h1>
<ul>
    <li>th:text 사용 <span th:text="${data}"></span></li>
    <li>태그의 속성이 아닌 컨텐츠 영역 안에서 직접 출력하기 = [[${data}]]</li>
</ul>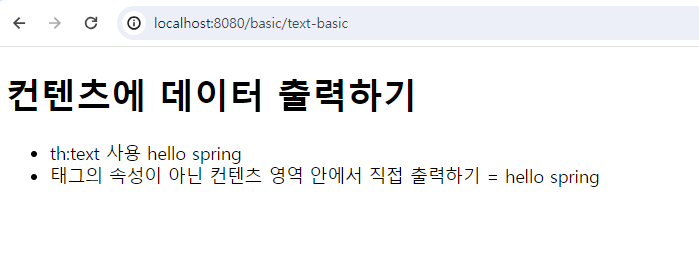
Escape
- HTML 문서는
<,>와 같은 특수 문자 기반으로 정의된다. 따라서 뷰 템플릿으로 HTML화면을 생성할 떄에는 출력하는 데이터에 이러한 특수문자가 있는 것을 주의해서 사용해야 한다. - 앞에서 만든 예제의 데이터를 다음과 같이 변경해서 실행해보자
--> 변경 전:"hello spring"
--> 변경 후:"hello <b>spring</b>"(<b>태그를 사용해서 spring이라는 단어가 진하게 나오도록 해보자)
  @GetMapping("/text-basic")
    public String textBasic(Model model){
        model.addAttribute("data", "hello <b>spring</b>");

        return "basic/text-basic";
    }
적용 후 실행해보면,

- 개발자가 의도한 것은
<b>가 있으면 강조하는 것이 목적이였지만, 태그 그대로 나온다. - 소스보기를 하면 < 부분이 < 로 변경된 것을 확인할 수 있다
HTML 엔티티
- 웹 브라우저는
<를 HTML 태그의 시작으로 인식한다. 따라서<를 태그의 시작이 아니라 문자로 표현할 수 있는 방법이 필요한데, 이것을 HTML 엔티티라고 한다.
그리고 이렇게 HTML에서 사용하는 특수 문자를 HTML 엔티티로 변경하는 것을 이스케이프라고 한다.
그리고 타임리프가 제공하는th:text,[[...]]는 기본적으로 이스케이스(escape)를 제공한다. ( 그래서 < 를 < 로 바꿔 버린 것. 이후 웹 브라우저는 < 를 보고 <(=less than)로 바꿔서 보여준다. )
Unescape
- 타임 리프는 두 기능을 제공한다.
th:text->th:utext
[[...]]->[(...)]
BasicController에 코드 추가
@GetMapping("/text-unescaped")
    public String textUnescaped(Model model){
        model.addAttribute("data", "hello <b>spring</b>");

        return "basic/text-unescaped";
    }
text-unescaped.html추가
<h1> text VS utext </h1>
<ul>
    <li>th:text=<span th:text="${data}"></span></li>
    <li>th:utext=<span th:utext="${data}"></span></li>
</ul>

<h1> <span th:inline = "none">[[...]]] VS [(...)]</span></h1>
<ul>
    <li><span th:inline="none">[[...]] = </span>[[${data}]]</li>
    <li><span th:inline="none">[[...]] = </span>[(${data})]</li>

</ul>
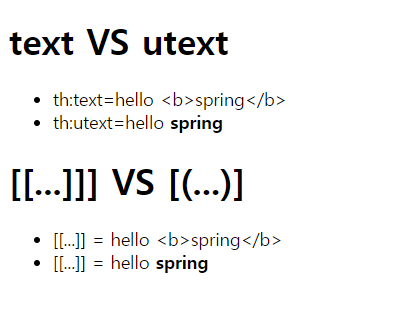
실행하면 이스케이프 처리가 되지 않고, 처리됨을 확인할 수 있다.
주의
실제 서비스를 개발하다 보면 escape를 사용하지 않아서 HTML이 정상 렌더링되지 않는 수 많은 문제가 발생한다. escape를 기본으로 하고, 꼭 필요한 때만 unescape를 사용하자.
참고
th:inline="none"
- 타임리프는
[[...]]를 해석하기 때문에, 화면에[[...]]글자를 그대로 보여줄 수 없다. 이 태그 안에서는 타임리프가 해석하지 말라는 옵션이다.
변수 - SpringEL
타임리프에서 변수를 사용할 때는 변수 표현식을 사용한다.
(Model에 담긴 데이터를 꺼내거나, 타임리프 내부에 선언된 변수를 사용할 때)
- 변수 표현식:
${...}
그리고 이 변수 표현식에는 스프링 EL이라는 스프링이 제공하는 표현식을 사용할 수 있다.
BasicCotroller 추가
 @GetMapping("/variable")
    public String variable(Model model){
        User userA = new User("userA", 10);
        User userB = new User("userB", 20);

        List<User> list = new ArrayList<>();
        list.add(userA);
        list.add(userB);

        Map<String, User> map = new HashMap<>();
        map.put("userA", userA);
        map.put("userB", userB);

        model.addAttribute("user", userA);
        model.addAttribute("users", list);
        model.addAttribute("userMap", map);

        return "basic/variable";
    }
variable.html
<h1>SpringEL 표현식</h1>
<ul>Object
    <li>${user.username} = <span th:text="${user.username}"></span></li>
    <li>${user['username']} = <span th:text="${user['username']}"></span></li>
    <li>${user.getUsername()} = <span th:text="${user.getUsername()}"></span></li>
</ul>

<ul>List
    <li>${users[0].username} = <span th:text="${users[0].username}"></span></li>
    <li>${users[0]['username']} = <span th:text="${users[0]['username']}"></span></li>
    <li>${users[0].getUsername()} = <span th:text="${users[0].getUsername()}"></span></li>
</ul>
<ul>Map
    <li>${userMap['userA'].username} = <span th:text="${userMap['userA'].username}"></span></li>
    <li>${userMap['userA']['username']} = <span th:text="${userMap['userA']['username']}"></span></li>
    <li>${userMap['userA'].getUsername()} = <span th:text="${userMap['userA'].getUsername()}"></span></li>
</ul>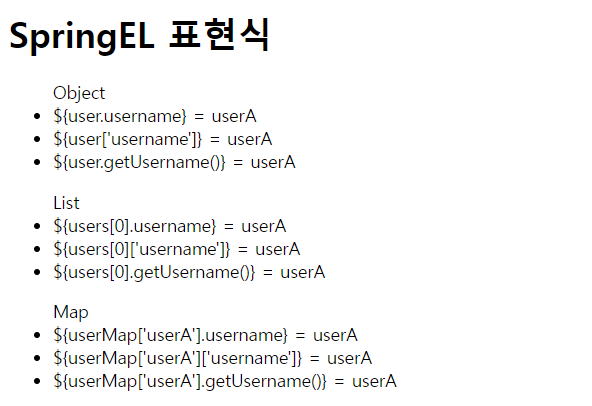
SpringEL의 다양한 표현식 사용
-
Object
user.username: user에 username을 프로퍼티 접근user['username']: 위와 같음user.getUsername(): user의 getUsername() 을 직접 호출
-
List
users[0].username: List에서 첫 번째(index 정보) 회원을 찾고 username 프로퍼티 접근 (-> list.get(0).getUsername() )users[0]['username']: 위와 같음users[0].getUsername(): List에서 첫 번째 회원을 찾고 메서드 직접 호출
-
Map
userMap['userA'].username: Map에서 userA(key 정보)를 찾고, username 프로퍼티 접근 (-> map.get("userA").getUsername() )userMap['userA']['username']: 위와 같음userMap['userA'].getUsername(): Map에서 userA를 찾고 메서드 직접 호출
지역변수 선언
th:with을 사용하면 지역 변수를 선언할 수 있다.
--> 지역 변수는 선언한 태그 안에서만 사용할 수 있다.
<h1>지역변수 - (th:with)</h1>
<div th:with="first=${users[0]}">
    <p>처음 만난 사람의 이름은 <span th:text="${first.username}"></span></p>
</div>
- first에
users[0]에는 userA에 해당하는 객체가 들억나다. - 지역변수는 선언한 태그 내에서만 사용이 가능하다. 해당 scope를 벗어난 다른 곳에서는 사용할 수 없다
기본 객체들
타임리프가 제공하는 기본 객체들에 대해서 알아보자
- ${#request} - 스프링 부트 3.0부터 제공하지 않는다.
- ${#response} - 스프링 부트 3.0부터 제공하지 않는다.
- ${#session} - 스프링 부트 3.0부터 제공하지 않는다.
- ${#servletContext} - 스프링 부트 3.0부터 제공하지 않는다.
- ${#locale}
주의! - 스프링 부트 3.0
스프링 부트 3.0 부터는 ${#request} , ${#response} , ${#session} , ${#servletContext} 를 지원하지 않는다.
스프링 부트 3.0이라면 직접 model 에 해당 객체를 추가해서 사용해야 한다. (3.0부터 사용할 수 있는 예시도 함께 알아보자.)
그런데 #request 는 HttpServletRequest 객체가 그대로 제공되기 때문에 데이터를 조회하려면 request.getParameter("data") 처럼 불편하게 접근해야 한다.
이런 점을 해결하기 위해 편의 객체도 제공한다.
- HTTP 요청 파라미터 접근: param
예) ${param.paramData} - HTTP 세션 접근: session
예) ${session.sessionData} - 스프링 빈 접근: @
예) ${@helloBean.hello('Spring!')}
basic-object.html
<h1>식 기본 객체 (Expression Basic Objects)</h1>
<ul>
    <li>request = <span th:text="${#request}"></span></li>
    <li>response = <span th:text="${#response}"></span></li>
    <li>session = <span th:text="${#session}"></span></li>
    <li>servletContext = <span th:text="${#servletContext}"></span></li>
    <li>local = <span th:text="${#locale}"></span></li>
</ul>

<h1>편의 객체</h1>
<ul>
    <li>Request Parameter = <span th:text="${param.paramData}"></span></li>
    <li>session = <span th:text="${session.sessionData}"></span></li>
    <li>spring bean = <span th:text="${@helloBean.hello('spring!')}"></span></li>
</ul>
유틸리티 객체와 날짜
타임리프는 문자, 숫자, 날짜, URI등을 편리하게 다루는 다양한 유틸리티 객체들을 제공한다.
(타임리프 매뉴얼에 예시가 잘 되어있어서 따로 구체적으로 보진 않는다. 필요할 때 찾아보자.)
타임리프 유틸리티 객체들
- #message : 메시지, 국제화 처리
- #uris : URI 이스케이프 지원
- #dates : java.util.Date 서식 지원
- #calendars : java.util.Calendar 서식 지원
- #temporals : 자바8 날짜 서식 지원
- #numbers : 숫자 서식 지원
- #strings : 문자 관련 편의 기능
- #objects : 객체 관련 기능 제공
- #bools : boolean 관련 기능 제공
- #arrays : 배열 관련 기능 제공
- #lists , #sets , #maps : 컬렉션 관련 기능 제공
- #ids : 아이디 처리 관련 기능 제공 (뒤에서 설명)
자바8 날짜
타임리프에서 자바 8 날짜인 LocalDate, LocalDateTime, Instant를 사용하려면, 추가 라이브러리가 필요하다.
date.html
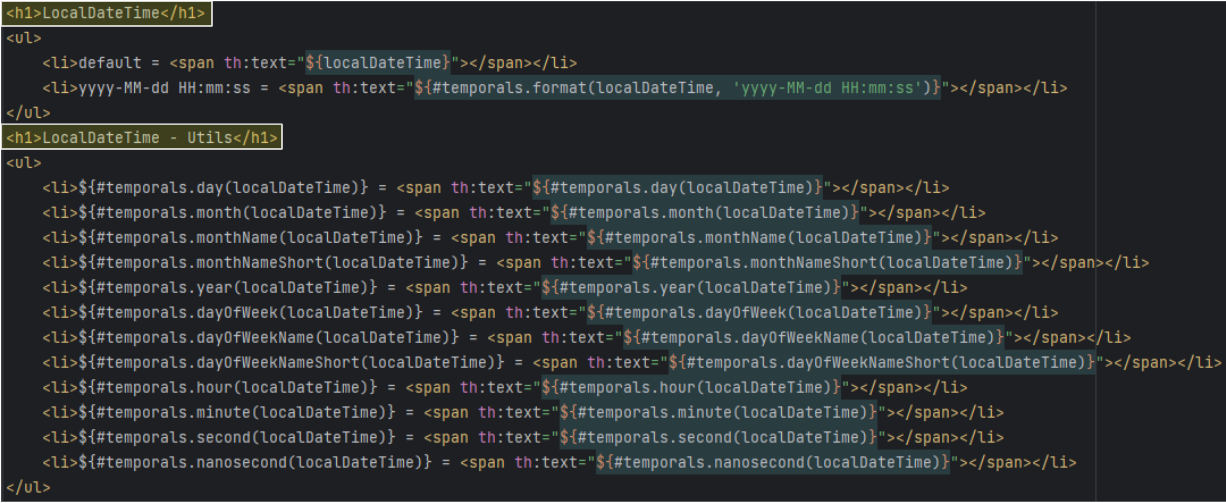
를 실행하면,
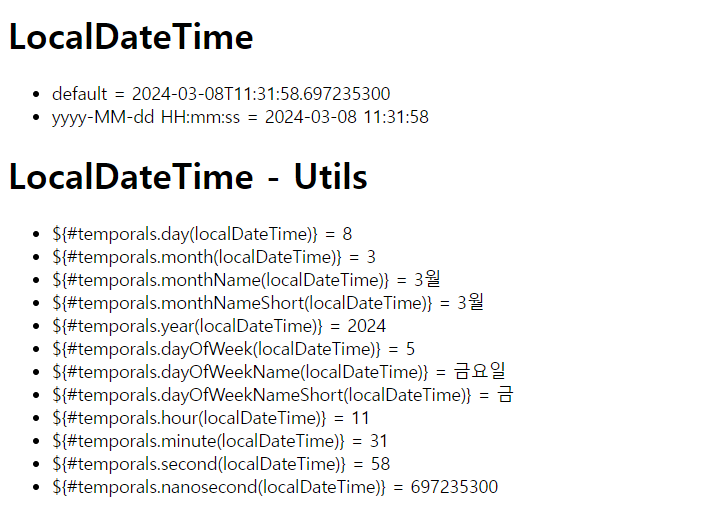
출력되는 것을 볼 수 있다.
URL 링크
타임리프에서ㅓ URL을 생성할 때에는 @{...}를 사용하면 된다.
BasicController
 @GetMapping("/link")
    public String link(Model model){
        model.addAttribute("param1", "data1");
        model.addAttribute("param2", "data2");

        return "basic/link";
    }
link.html
 <li><a th:href="@{/hello}">basic url</a></li>
    <li><a th:href="@{/hello(param1=${param1}, param2=${param2})}">hello query param</a></li>
    <li><a th:href="@{/hello/{param1}/{param2}(param1=${param1}, param2=${param2})}">path variable</a></li>
    <li><a th:href="@{/hello/{param1}(param1=${param1}, param2=${param2})}">path variable + query parameter</a></li>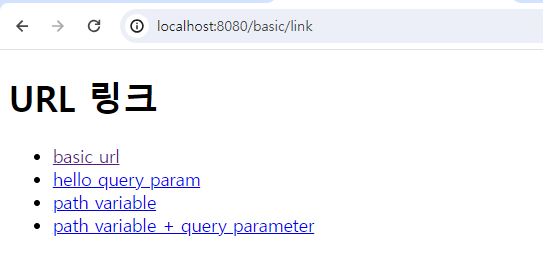
정상 출력되는 것을 볼 수 있다.
1) 단순한 URL 표현
@{/hello}--> /hello
2) 쿼리 파라미터 적용
@{/hello(param1=${param1},param2=$[param2})}
-->hello?param1=data1¶m2=data2- ()안에 있는 부분을 쿼리 파라미터로 처리한다.
3) 경로 변수 적용
@{/hello/{param1}/{param2}(param1=${param1}, param2=${param2})}
-> /hello/data1/data2- URL 경로 상에 변수가 있으면 () 부분은 경로 변수로 처리된다.
4 ) 경로 변수 + 쿼리 파라미터를 함께 적용
@{/hello/{param1}(param1=${param1}, param2=${param2})}
--> /hello/data1?param2=data2- 경로 변수와 쿼리 파라미터를 함께 사용할 수 있다(경로 변수에 매핑되지 않은 것은 쿼리 파라미터로 적용된다)
리터럴
리터럴은 소스 코드상에서 고정된 값을 말하는 용어이다.
String a = "Hello"
int a = 10 * 20
여기서 "Hello"는 문자 리터럴, 10, 20은 숫자 리터럴이다.
타임리프는 다음과 같은 리터럴이 있다
- 문자: 'hello'
- 숫자: 10
- 불린: true, false
- null: null
타임리프에서 문자 리터럴은 항상 ' 작은 따음표로 감싸야 한다
<span th:text="'hello'">- 문자를 항상
'으로 감싸는 것은 너무 귀찮은 일이다. 공백 없이 쭉 이어진다면 하나의 의미있는 토큰으로 인지해서 다음과 같이 작은 따음표를 생략할 수 있다.
--> ex)<span th:text="hello"> - 참고
<span th:text="hello world!"></span>
중간에 공백이 있어서 하나의 의미있는 토큰으로 인식되지 안는다
--><span th:text="'hello world'">과 같이'감싸면 정상 동작한다.
literal.html
<h1>리터럴</h1>
        <ul>
            <li>"hello world!" = <span th:text="'hello world!'"></span></li>
            <li>'hello' + ' world!' = <span th:text="'hello' + ' world!'"></span></li>
            <li>'hello world!' = <span th:text="'hello world!'"></span></li>
            <li>'hello ' + ${data} = <span th:text="'hello ' + ${data}"></span></li>
    <li>리터럴 대체 |hello ${data}| = <span th:text="|hello ${data}|"></span></li>
</ul>
실행해보면 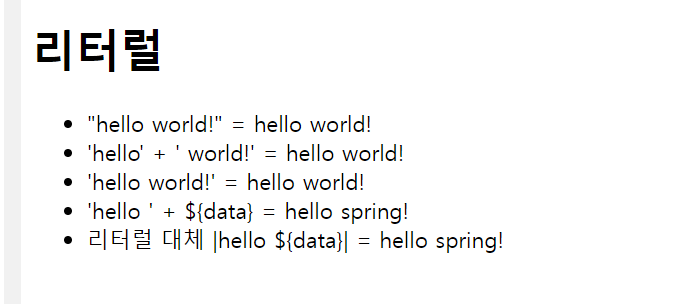
정상 출력되는 것을 확인할 수 있다.
- 문자 리터럴을 더해서(+) 사용할 수 있다.
- 중간에 띄어쓰기가 있을 떄에는
'를 감싸서 사용한다. - 변수를 더할 수 있다
- 리터럴 대체 문법을 사용할 수 있다
리터럴 대체 문법
<span th:text="|hello ${data}|">- 리터럴 대체 문법을 사용하면 마치 템플릿을 사용하는 것처럼 편리하다.
연산
타임리프 연산은 자바와 크게 다르지 않다.
operation.html
<ul>
<li>산술 연산
<ul>
<li>10 + 2 = <span th:text="10 + 2"></span></li>
<li>10 % 2 == 0 = <span th:text="10 % 2 == 0"></span></li>
</ul>
</li>
<li>비교 연산
<ul>
<li>1 > 10 = <span th:text="1 > 10"></span></li>
<li>1 gt 10 = <span th:text="1 gt 10"></span></li>
<li>1 >= 10 = <span th:text="1 >= 10"></span></li>
<li>1 ge 10 = <span th:text="1 ge 10"></span></li>
<li>1 == 10 = <span th:text="1 == 10"></span></li>
<li>1 != 10 = <span th:text="1 != 10"></span></li>
</ul>
</li>
<li>조건식
<ul>
<li>(10 % 2 == 0)? '짝수' : '홀수' = <span th:text="(10 % 2 == 0)? '짝수' : '홀수'">
</span></li>
</ul>
</li>
<li>Elvis 연산자
<ul>
<li>${data}?: '데이터가 없습니다.' = <span th:text="${data}?: '데이터가 없습니다.'"></span></li>
<li>${nullData}?: '데이터가 없습니다.' = <span th:text="${nullData}?: '데이터가 없습니다.'"></span></li>
</ul>
</li>
<li>No-Operation
<ul>
<li>${data}?: _ = <span th:text="${data}?: _">데이터가 없습니다.</span></li>
<li>${nullData}?: _ = <span th:text="${nullData}?: _">데이터가 없습니다.</span></li>
</ul>
</li>
</ul>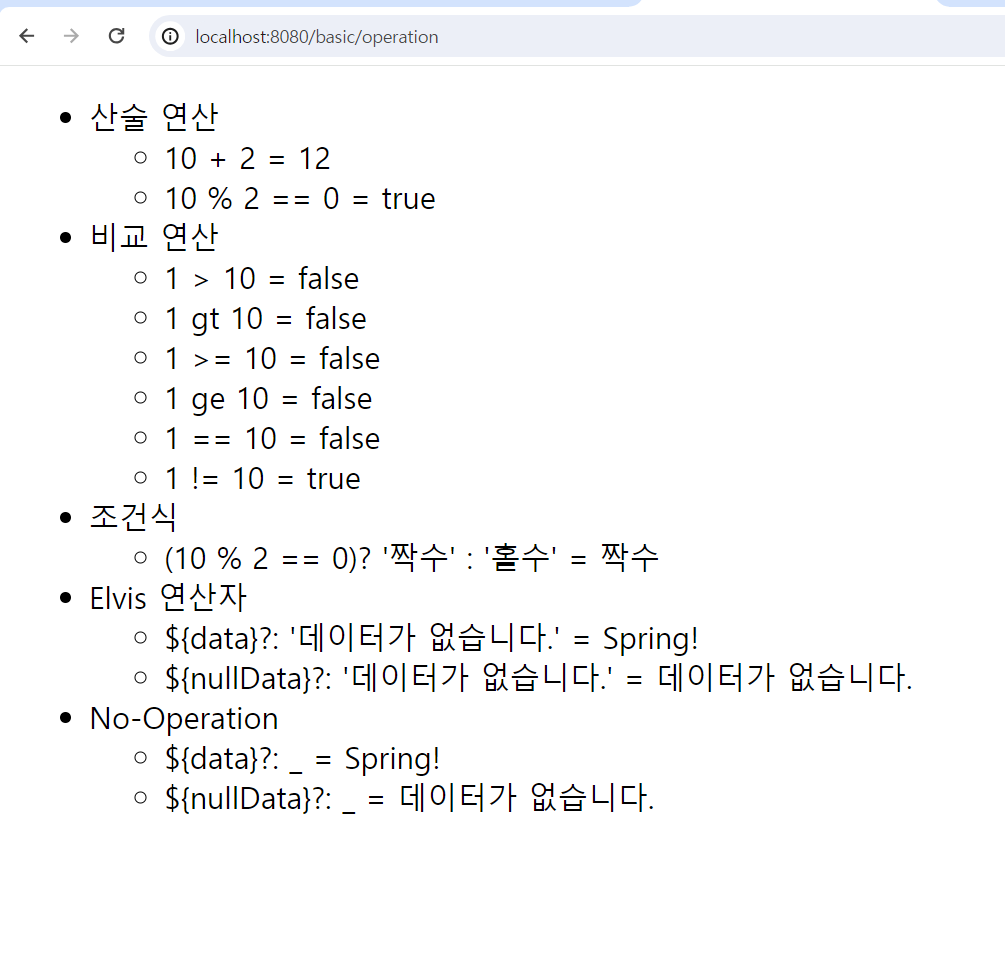
비교연산 : HTML 엔티티를 사용해야 한느 부분을 주의하자
>(gt),<(lt),>=(ge),<=(le),!(not),==(eq),!=(neq,ne)
조건식 : 자바의 조건식과 유사
Elvis 연산자 : 조건식의 편의버전 (?:)
No-Operation : _인 경우, 마치 타임리프가 실행되지 않는 것처럼 동작한다.
이것을 잘 사용하면, HTML의 내용 그대로를 활용할 수 있다.
${nullData}?: _ : 이 부분도 마찬가지로 nullData가 null이 아니면 ${nullData}의 값을 사용하고, null이면 우항의 _를 사용한다
--> nullData가 null이면 _에 해당하는 "데이터가 없습니다."가 표시된다.
속성 값 설정
타임리프 태그 속성(Attribute)
타임리프는 주로 HTML 태그에 th:* 속성을 지정하는 방식으로 동작한다
th:* 로 속성을 적용하면 기존 속성을 대체한다
attribute.html
<body>
<h1>속성 설정</h1>
<input type="text" name="mock" th:name="userA" />

<h1>속성 추가</h1>
- th:attrappend = <input type="text" class="text" th:attrappend="class='large'" /><br/>
- th:attrprepend = <input type="text" class="text" th:attrprepend="class='large'" /><br/>
- th:classappend = <input type="text" class="text" th:classappend="large" /><br/>

<h1>checked 처리</h1>
- checked o <input type="checkbox" name="active" th:checked="true" /><br/>
- checked x <input type="checkbox" name="active" th:checked="false" /><br/>
- checked=false <input type="checkbox" name="active" checked="false" /><br/>

</body>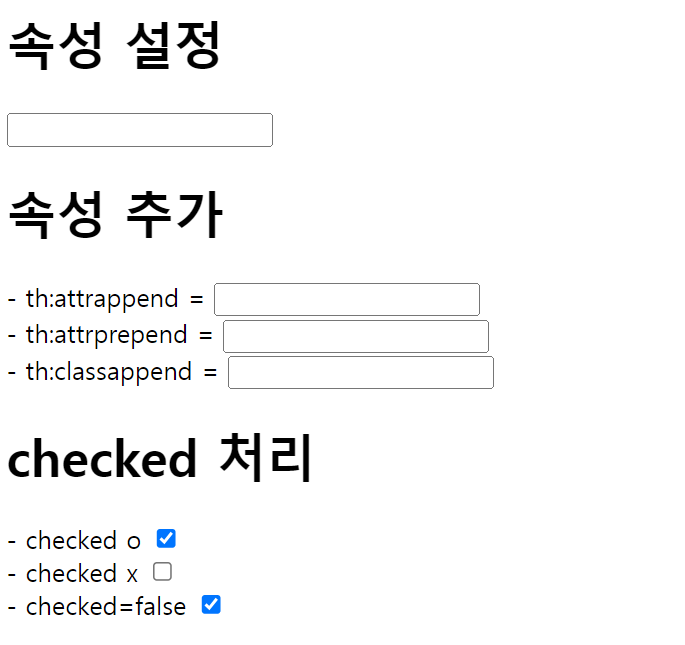
속성 설정
th:*: 속성을 지정하면 타임리프는 기존 속성을th:*로 지정한 속성으로 대체한다. 기존 속성이 없다면, 새로 만든다.<input type="text" name="mock" th:name="userA" />
--> 타임리프 렌더링 후 :<input type="text" name="userA" />
속성 추가
- th:attrappend : 속성 값의 뒤에 값을 추가한다.
- th:attrprepend : 속성 값의 앞에 값을 추가한다.
- th:classappend : class 속성에 자연스럽게 추가한다.
checked 처리
- HTML 에서는
<input type="checkbox" name="active" checked="false">
--> 이 경우에도 checked 속성이 있기 떄문에 checked 처리가 되어버린다.
(값이 false든 true든 checked 속성만 있어도 체크가 된다) - HTML에서 checked 속성은 checked 속성의 값과 상관없이 checked 라는 속성만 있어도 체크가 된다.
--> 타임리프의 th:checked 는 값이 false 인 경우 checked 속성 자체를 제거한다. <input type="checkedbox" name="active" th:checked="false"/>
--> 타임리프 렌더링 후:<input type="checkbox" name="active" />
반복
타임리프에서 반복은 th:each 를 사용한다.
each.html
<h1>기본 테이블</h1>
<table border="1">
    <tr>
        <th>username</th>
        <th>age</th>
    </tr>
    <tr th:each="user : ${users}">
        <td th:text="${user.username}">username</td>
        <td th:text="${user.age}">0</td>
    </tr>
</table>

<h1>반복 상태 유지</h1>
<table border ="1">
    <tr>
        <th>count</th>
        <th>username</th>
        <th>age</th>
        <th>etc</th>
    </tr>
    <tr th:each="user, userStat : ${users}">
        <td th:text="${userStat.count}">username</td>
        <td th:text="${user.username}">username</td>
        <td th:text="${user.age}">0</td>
        <td>
            index = <span th:text="${userStat.index}"></span>
            count = <span th:text="${userStat.count}"></span>
            size = <span th:text="${userStat.size}"></span>
            even? = <span th:text="${userStat.even}"></span>
            odd? = <span th:text="${userStat.odd}"></span>
            first? = <span th:text="${userStat.first}"></span>
            last? = <span th:text="${userStat.last}"></span>
            current = <span th:text="${userStat.current}"></span>
        </td>
    </tr>
</table>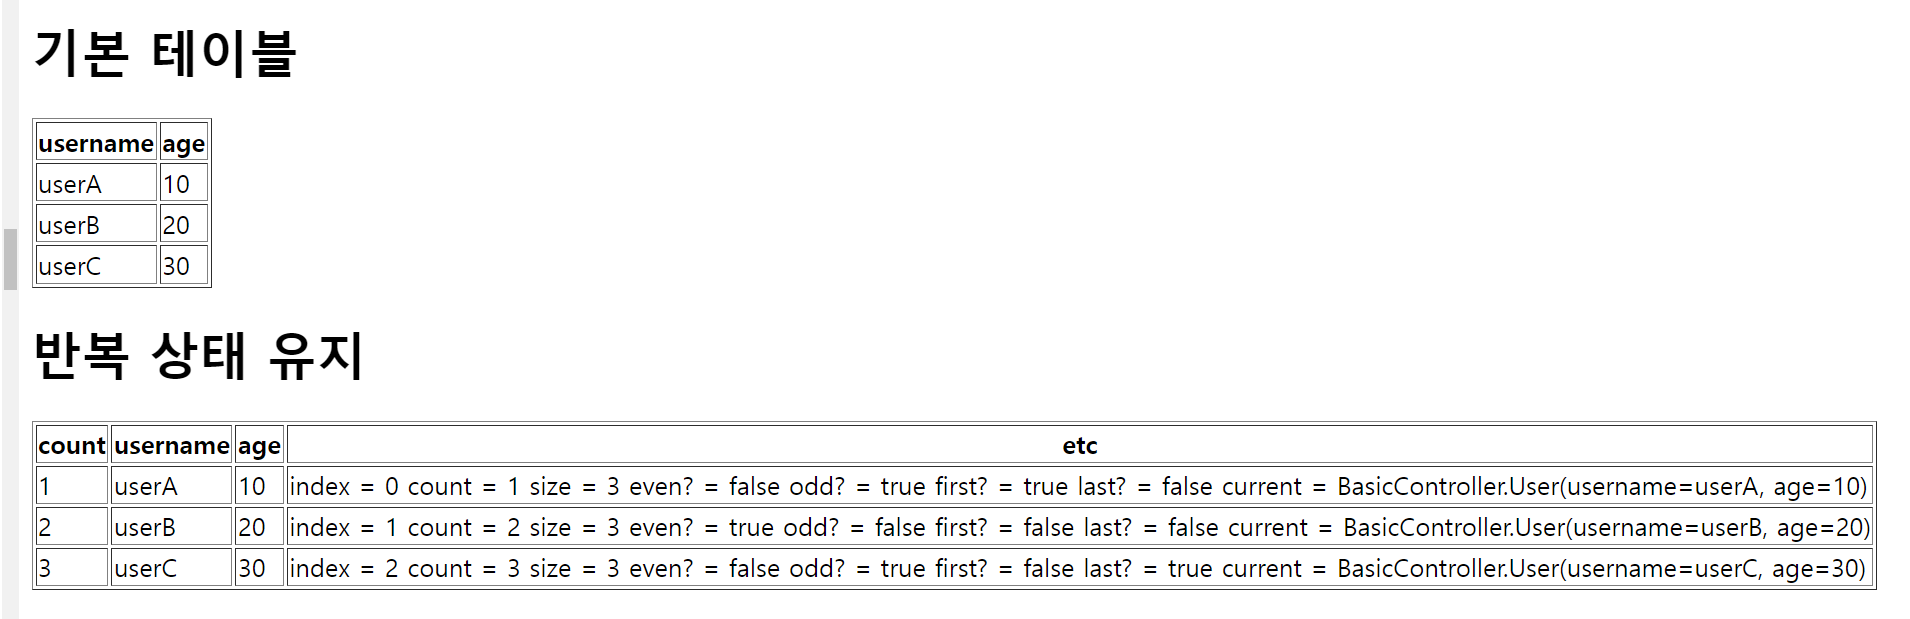
반복 기능
<tr th:each="user : ${users}">
반복 시 오른쪽 컬렉션 (${users})의 값을 하나씩 꺼내서 왼쪽 변수 (user)에 담아서 태그를 반복 실행한다.- th:each는 List 뿐만 아니라 배열, Map도 사용 가능
반복 상태 유지
<tr th:each="user, userStat : ${users}">- 반복의 두번째 파라미터를 설정해서 반복의 상태를 알 수 있다. (반복을 할 떄, 현재 반복이 어떻게 진행되고 있는지, 현재 loop에 대한 상태를 알려주는 기능을 제공한다)
- 두번째 파라미터는 생략이 가능한데, 생략하면 지정한 변수명(user) + Stat 가 됩니다. (여기서는 user + Stat = userStat 이므로 생략 가능합니다.)
반복 상태 유지 기능
- index : 0부터 시작하는 값
- count : 1부터 시작하는 값
- size : 전체 사이즈
- even , odd : 홀수, 짝수 여부 (boolean)
- first , last : 처음, 마지막 여부 (boolean)
- current : 현재 객체 (현재 객체를 받아볼 수도 있다. 그런데 위 예시로 보면 어차피 user에 담기니까, 이건 굳이 사용할일은 많지 않다.)
조건부 평가
타임리프의 조건식
- if
- unless(if의 반대)
condition.html
<h1>if, unless</h1>
<table border="1">
  <tr>
    <th>count</th>
    <th>username</th>
    <th>age</th>
  </tr>
  <tr th:each="user : ${users}">
    <td th:text="${userStat.count}">1</td>
    <td th:text="${user.username}">username</td>
    <td>
      <span th:text="${user.age}">0</span>
      <span th:text="'미성년자'" th:if="${user.age lt 20}"></span>
      <span th:text="'성인'" th:if="${user.age ge 20}"></span>
    </td>
  </tr>
</table>

<table border="1">
  <tr>
    <th>count</th>
    <th>username</th>
    <th>age</th>
  </tr>
  <tr th:each="user : ${users}">
    <td th:text="${userStat.count}">1</td>
    <td th:text="${user.username}">username</td>
    <td th:switch="${user.age}">
      <span th:case="10">10살</span>
      <span th:case="20">20살</span>
      <span th:case="*">기타</span>
    </td>
  </tr>
</table>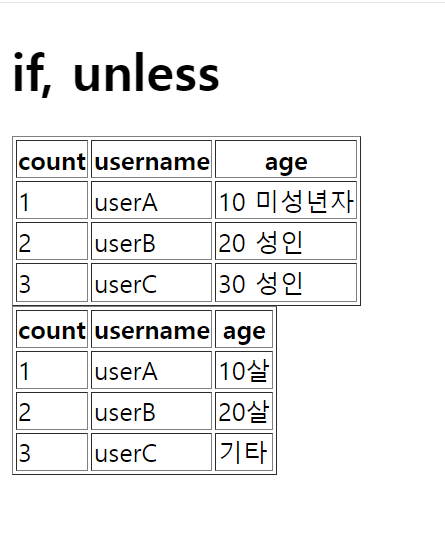
if, unless
- 타임리프는 해당 조건이 맞지 않으면 태그 자체를 렌더링하지 않는다. (태그 자체가 날라가는 것)
- 만약, 조건 자체가 false인 경우
<span>...<span>부분 자체가 렌더링 되고 사라진다
switch
*은 만족하는 조건이 없을 때 사용하는 디폴트 값이다.
주석
commemts.html
<h1>예시</h1>
<span th:text="${data}">html data</span>

<h1>1. 표준 HTML 주석</h1>
<!--
<span th:text="${data}">html data</span>
---->

<h1>2. 타임리프 파서 주석</h1>
<!--/* [[${data}]]  */-->

<!--/*-->
<span th:text="${data}">html data</span>
<!--*/-->

<h1>3. 타임리프 프로토타입 주석</h1>
<!--/*/
<span th:text="${data}">html data</span>
/*/-->
1) 표준 HTML 주석
- 자바 스크립트의 표준 HTML 주석은 타임리프가 렌더링하지 않고 그대로 남겨둔다
2) 타임리프 파서 주석
- 타임리프 파서 주석은 타임리프의 진짜 주석이다 --> 렌더링할 떄 주석 부분을 제거한다)
(타임리프 파서 자체가 주석으로 인정하기 때문에, 해당 부분은 렌더링할 때 아예 지워버린다.)
3) 타임리프 프로토타입 주석
- 타임리프 프로토타입은 약간 특이한데, HTML 주석에 약간의 구문(/*/)을 더했다.
- HTML 파일을 직접 웹 브라우저에서 그대로 열어보면, HTML 주석이기 때문에 이 부분은 웹 브라우저가 렌더링하지 않는다.
- 타임리프 렌더링을 거치면 이 부분이 정상 렌더링 된다. 쉽게 이야기해서 HTML 파일을 그대로 열어보면 주석처리가 되지만, 타임리프를 렌더링 한 경우에만 보이는 기능이다.
대부분 타임리프 파서 주석을 사용하는 편이다
블록
<th:block> 은 HTML 태그가 아닌 타임리프가 제공하는 유일한 타임리프의 자체 태그이다.
block.html
<th:block th:each="user : ${users}">
    <div>
        사용자 이름 <span th:text="${user.username}"></span>
        사용자 나이 <span th:text="${user.age}"></span>
    </div>

    <div>
        요약 <span th:text="${user.username} + '/' + ${user.age}"></span>
    </div>
</th:block>
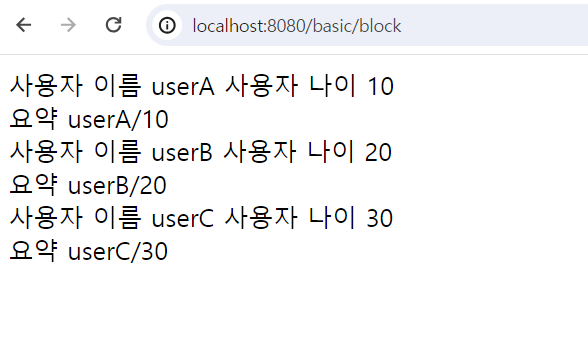
<th:block>은 특정 조건에 따라 렌더링을 제어하거나 특정 영역을 묶는 데 사용된다.- <th:block> 은 렌더링시 제거된다. (렌더링되고 나면 렌더링 결과에서는 사라진다.)
자바 스크립트 인라인
타임리프는 자바스크립트에서 타임리프를 편리하게 사용할 수 있는 자바스크립트 인라인 기능을 제공한다.
<script th:inline="javascript">
BasicController추가
 @GetMapping("/javascript")
    public String javascript(Model model){
        model.addAttribute("user", new User("userA", 10));
        addUser(model);

        return "basic/javascript";
    }
**javascript.html**
<body>
<!-- 자바스크립트 인라인 사용 전 -->
<script>
var username = [[${user.username}]];
var age = [[${user.age}]];
//자바스크립트 내추럴 템플릿
var username2 = /*[[${user.username}]]*/ "test username";
//객체
var user = [[${user}]];
</script>
<!-- 자바스크립트 인라인 사용 후 -->
<script th:inline="javascript">
var username = [[${user.username}]];
var age = [[${user.age}]];
//자바스크립트 내추럴 템플릿
var username2 = /*[[${user.username}]]*/ "test username";
//객체
var user = [[${user}]];
</script>
</body>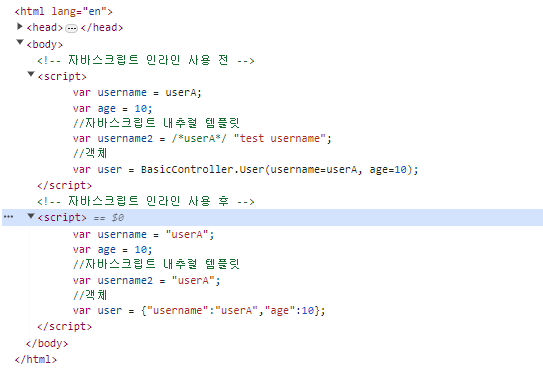
텍스트 렌더링
var username = [[${user.username}]]
인라인 사용 전 :var username = UserA
인라인 사용 후 :var username = "UserA"- 인라인 사용 전 렌더링 결과를 보면, UserA라는 변수 이름이 그대로 남아있다. 타임리프 입장에서는 정확하게 렌더링한 것 이지만, 개발자가 기대한 것은 "UserA" 문자 일 것이다.
- 결과적으로 UserA가 변수명으로 사용되어서 자바스크립트 오류가 발생한다. 다음으로 나오는 숫자 age의 경우에는 " 가 필요 없기 때문에 정상 렌더링 된다.
- 인라인 사용 후 렌더링 결과를 보면 문자 타입의 경우
"를 포함시켜 준다.
자바스크립트 내추럴 템플릿
- 타임리프는 HTML 파일을 직접 열어도 동작하는 내츄럴 템플릿 기능을 제공한다
- 자바스크립트 인라인 기능을 사용하면 주석을 활용해서 이 기능을 사용할 수 있다.
var username2 = /*[[${user.username}]]*/ "test username"
인라인 사용 전 : var username2 = /UserA/ "test username"; (타임리프로 렌더링 해도 주석으로 인해 "test username"으로 값이 할당 됨.)- 인라인 사용 후: var username2 = "UserA";
- 인라인 사용 전 결과를 보면 정말 그대로 해석한 것을 볼 수 있다.내츄럴 템플릿 기능이 동작하지 않고, 심지어 렌더링 내용이 주석처리 되어 버린다.
- 인라인 사용 후 결과를 보면 주석 부분이 제거되고, 기대한 "UserA"가 정확하게 적용된다. (렌더링시 "test username"을 제거하고, 주석안에
[[${user.username]]를 값으로 사용할 수 있도록 한다. - 이 덕분에 자바스크립트도 내츄럴 템플릿이 가능하게 된다. -> 파일을 직접 브라우저에서 열면 "test username"으로 값이 할당되고, 서버에서 렌더링이 되면 주석으로 처리되었던 값이 지정됨.)
객체
- 타임리프의 자바스크립트 인라인 기능을 사용하면, 객체를 JSON으로 자동변환해준다.
var user = [[${user}]]- 인라인 사용 전:
var user = BasicController.User(username=userA, age=10);--> 객체의 toString()으로 호출된 값 - 인라인 사용 후 :
var user = {"username":"userA","age":10};--> 객체를 JSON으로 변환해준다.
참고
- 자바스크립트 인라인 each : 자바스크립트 인라인은 each를 지원한다.
<script th:inline="javascript">
    [# th:each="user, stat : ${users}"]
    var user[[${stat.count}]] = [[${user}]];
    [/]
</script>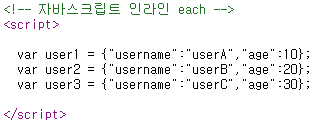
템플릿 조각
웹 페이지를 개발할 때에는 공동 영역이 많이 있다.
--> 이를 해결 하기 위해 템플릿 조각과 레이아웃 기능을 지원한다.
TemplateController
@Controller
@RequestMapping("/template")
public class TemplateController {

    @GetMapping("/fragment")
    public String template() {
        return "template/fragment/fragmentMain";
    }
}
footer.html
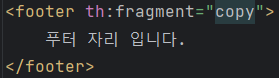
<footer th:fragment="copy">
    푸터 자리 입니다.
</footer>
<footer th:fragment="copyParam (param1, param2)">
    <p>파라미터 자리 입니다.</p>
    <p th:text="${param1}"></p>
    <p th:text="${param2}"></p>
</footer>th:fragment가 있는 태그는 다른 곳에 포함되는 코드 조각이라고 이해하면 된다.
fragmentMain.html
<body>
<h1>부분 포함</h1>
<h2>부분 포함 insert</h2>
<div th:insert="~{template/fragment/footer :: copy}"></div>

<h2>부분 포함 replace</h2>
<div th:replace="~{template/fragment/footer :: copy}"></div>

<h2>부분 포함 단순 표현식</h2>
<div th:replace="template/fragment/footer :: copy"></div>

<h1>파라미터 사용</h1>
<div th:replace="~{template/fragment/footer :: copyParam ('데이터1', '데이터2')}"></div>

</body>
* template/fragmemt/footer :: copy : template/fragment/footer.html 템플릿에 있는 th:fragment="copy" 라는 부분을 템플릿 조각으로 가져와서 사용한다는 의미이다.
실행결과
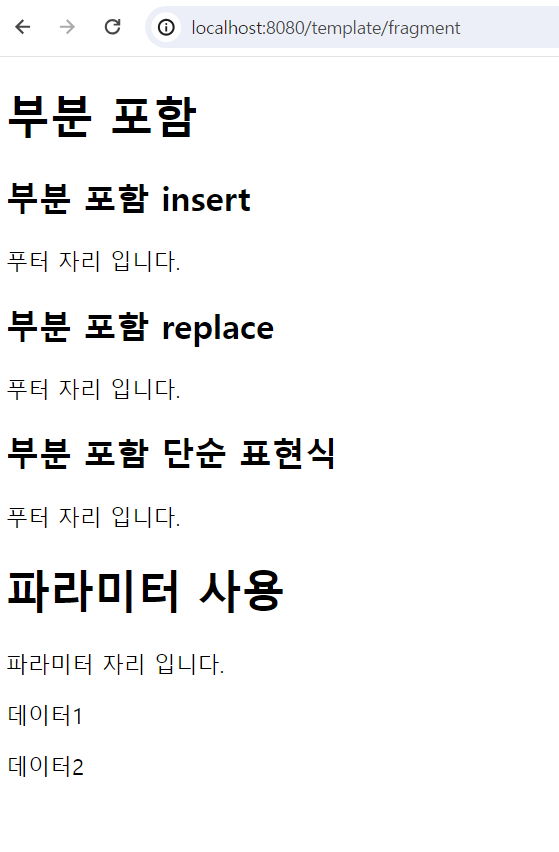
부분 포함 insert
<div th:insert="~{template/fragment/footer :: copy}"></div>
th:insert를 사용하면 현재 태그(div) 내부에 추가한다.
부분 포함 replace
<div th:replace="~{template/fragment/footer :: copy}">
th:replace를 사용하면 현재 태그를 대체한다.
부분 포함 단순 표현식
<div th:replace="template/fragment/footer :: copy">
~{...}를 사용하는 것이 원칙이지만 템플릿 조각을 사용하는 코드가 (경로나 이름정도 있는) 단순한 경우에는 이 부분을 생략할 수 있다.
파라미터 사용
- 다음과 같이 파라미터를 전달해서 동적으로 조각들을 렌더링할 수 있다.
<div th:replace="~{temlplate/fragment/footer :: copyParam('데이터1','데이터2')}"></div>
템플릿 레이아웃 1
템플릿 레이아웃
예) <head>에 공통으로 사용하는 css, javascript가 있다면, 이러한 공통 정보들을 한 곳에 모아두고, 공통으로 사용하되, 각 페이지마다 필요한 정보를 더 추가해서 사용하고 싶다면 다음과 같이 사용하면 된다.
TemplateController
 @GetMapping("/layout")
    public String layout(){
        return "template/layout/layoutMain";
    }
base.html
<head th:fragment="common_header(title,links)">

    <title th:replace="${title}">레이아웃 타이틀</title>

    <link rel="stylesheet" type="text/css" media="all" th:href="@{/css/awesomeapp.css}">
    <link rel="shortcut icon" th:href="@{/images/favicon.ico}">
    <script type="text/javascript" th:src="@{/sh/scripts/codebase.js}"></script>

    <th:block th:replace="${links}"/>
</head>- base.html : 전체 페이지에서 공통으로 적용될 head모양
- 공통 레이아웃이 있어도 각 사이트마다 조금씩 다르게 하고 싶은게 있을 것이다.
- 따라서 개별 페이지들 마다 다르게 적용되거나, 추가되는 부분들은 허용하도록 구성해 두었다.
① 여기에서는 title을 다르게 대체할 수 있도록 하였다.
② 그리고 공통 레이아웃에서는 사용하지 않는 여러 link를 추가할 수 있도록 하였다.
layoutMain.html
<head th:replace="template/layout/base :: common_header(~{::title},~{::link})">
    <title>메인 타이틀</title>
    <link rel="stylesheet" th:href="@{/css/bootstrap.min.css}">
    <link rel="stylesheet" th:href="@{/themes/smoothness/jquery-ui.css}">
</head>- layoutMain.html 우리가 개발 시 매번 생성할 페이지 중 하나
th:replace="template/layout/base :: common_header(~[::title],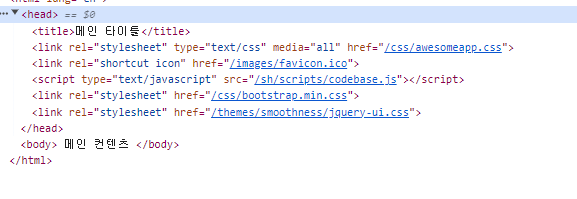
- base에 정의된 전체 head를 구성하는 레이아웃이 있고, 여기에 일부분은 개별 페이지에서 필요한 것으로 채울 수 있다.
- 위 예시에서는 1) 메인 타이틀이 전달한 부분으로 교체되었다.
- 공통 부분은 그대로 유지가 되고, 2)추가 부분에 전달한
<link>들이 포함된 것을 확인할 수 있다.
이 방식은 레이아웃 개념을 두고, 그 레이아웃에 필요한 코드 조각을 전달해서 완성하는 것으로 이해하면 된다.
템플릿 레이아웃 2
템플릿 레이아웃 확장
이번에는 전체 <html>에도 적용해보자
TemplateController
@GetMapping("/layoutExtend")
    public String layoutExtend(){
        return "template/layoutExtend/layoutExtendMain";
    }
layoutFile.html
<!DOCTYPE html>
<html th:fragment="layout(title,content)" xmlns:th="http://www.thymeleaf.org">
<head>
    <meta charset="UTF-8">
    <title th:replace="${title}">레이아웃 타이틀</title>
</head>
<body>
<h1>레이아웃 H1</h1>
<div th:replace="${content}">
<p>레이아웃 컨텐츠</p>
</div>

<footer>
    레이아웃 푸터
</footer>

</body>
</html>
layoutExtendMain.html
<!DOCTYPE html>
<html th:replace="~{template/layoutExtend/layoutFile :: layout(~{::title},~{::section})}"
      xmlns:th="http://www.thymeleaf.org">
<head>
    <meta charset="UTF-8">
    <title>메인 페이지 타이틀</title>
</head>
<body>
<section>
    <p>메인 페이지 컨텐츠</p>
    <div>메인 페이지 포함 내용</div>
</section>

</body>
</html>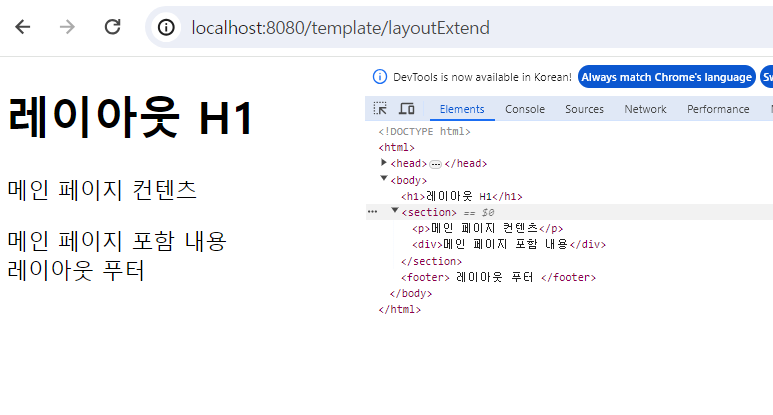
- layoutFile.html을 보면 기본 레이아웃을 가지고 있는데,
<html>에th:fragment속성이 정의되어 있다. - 이 레이아웃을 기본으로 하고, 여기에 필요한 내용을 전달해서 부분부분 변경하는 것으로 이해하면 된다.
layoutExtendMain.html는 현재 페이지인데,<html>자체를 th:replace 를 사용해서 변경하는 것을 확인할 수 있다- 결국 layoutFile.html 에 필요한 내용을 전달하면서 자체를 layoutFile.html 로 변경한다.