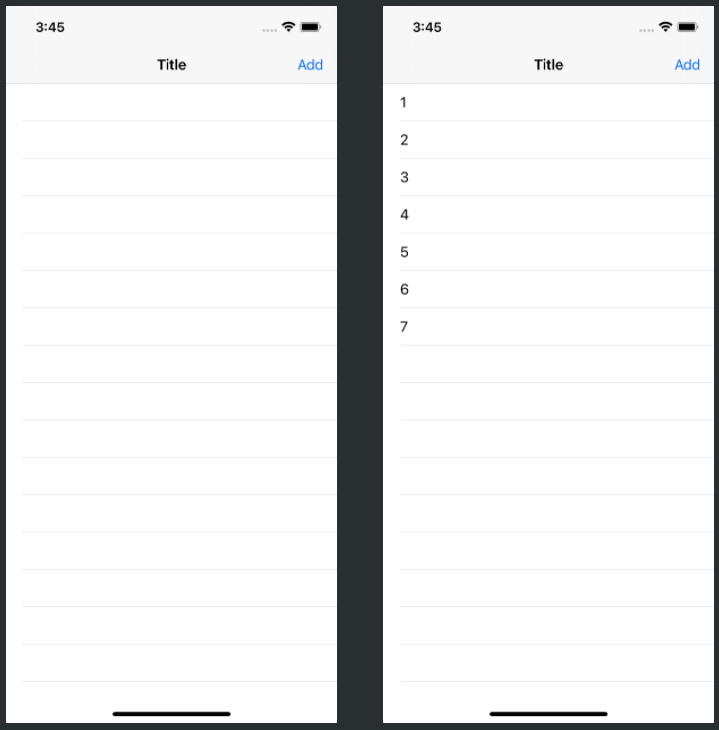
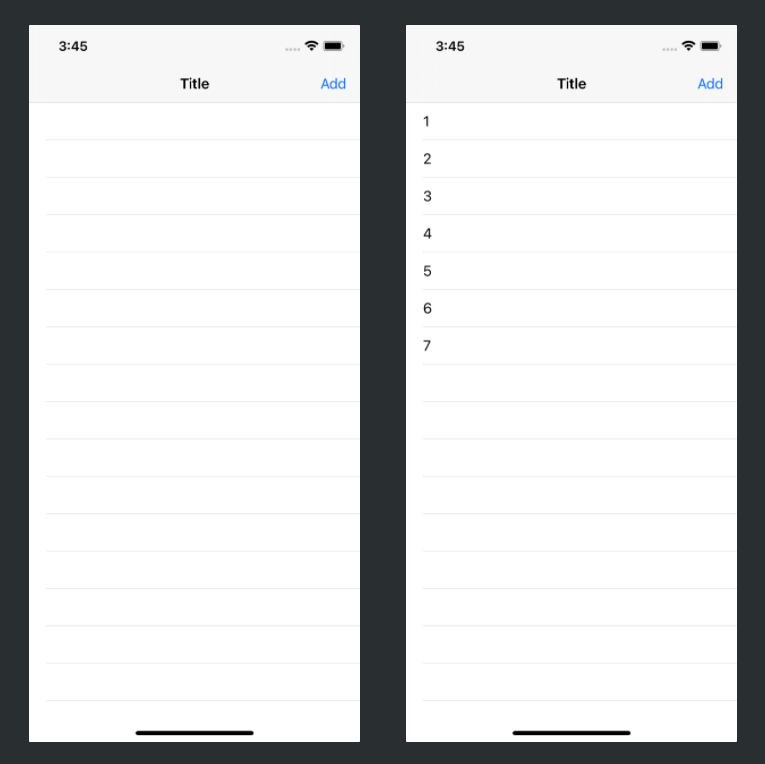
목표 화면
스토리보드를 쓰지 않고 아래의 화면을 만든다. Add버튼을 누르면 순서대로 셀이 생성되어야 한다.
스토리보드 파일 삭제
Main.storyboard과 SceneDelegate를 삭제한다. Info.plist에서 Main storyboard file base name과 Application Scene Manifest를 없앤다. AppDelegate는 앱의 라이프사이클을 관리하는데 SceneDelegate는 화면에 무엇을 보여줄 지를 관리한다. SceneDelegate를 삭제했으므로 AppDelegate에 window를 설정하고 네비게이션컨트롤러에 ViewController를 추가한 후 window의 rootView로 설정한다.
import UIKit

@main
class AppDelegate: UIResponder, UIApplicationDelegate {

    var window: UIWindow?

    func application(_ application: UIApplication, didFinishLaunchingWithOptions launchOptions: [UIApplication.LaunchOptionsKey: Any]?) -> Bool {

        window = UIWindow(frame: UIScreen.main.bounds)

        let navC = UINavigationController()
        navC.viewControllers = [ViewController()]
        window?.rootViewController = navC
        window?.makeKeyAndVisible()

        return true
    }

}
tableView 생성하기
화면색은 흰색으로 한다.
뷰 컨트롤러에 UITableViewDelegate와 UITableViewDataSource를 추가한다. UITableViewDelegate는 섹션을 관리하거나, 섹션의 헤더 또는 footer를 정하거나, 셀을 삭제 또는 재배열하는 등의 역할을 한다. UITableViewDataSource는 데이터를 관리하고 셀을 제공한다. 뷰 컨트롤러에 delegate와 dataSource를 연결한다.
import UIKit

class ViewController: UIViewController, UITableViewDelegate, UITableViewDataSource {

    var tableView = UITableView()

		var contentList: [String] = []

    override func viewDidLoad() {
        super.viewDidLoad()
        view.backgroundColor = .white

        tableView.delegate = self
        tableView.dataSource = self

    }

}
테이블뷰 추가하고 위치잡기
뷰 컨트롤러에 테이블뷰를 추가하고 위치를 잡는다.
class ViewController: UIViewController, UITableViewDelegate, UITableViewDataSource {

    var tableView = UITableView()

    var contentList: [String] = []

    override func viewDidLoad() {
        ...
        view.addSubview(tableView)

        tableView.translatesAutoresizingMaskIntoConstraints = false
        tableView.topAnchor.constraint(equalTo: view.safeAreaLayoutGuide.topAnchor).isActive = true
        tableView.leadingAnchor.constraint(equalTo: view.safeAreaLayoutGuide.leadingAnchor).isActive = true
        tableView.trailingAnchor.constraint(equalTo: view.safeAreaLayoutGuide.trailingAnchor).isActive = true
        tableView.bottomAnchor.constraint(equalTo: view.safeAreaLayoutGuide.bottomAnchor).isActive = true
    }

}
셀 생성하고 추가하기
섹션은 contentList의 갯수대로 생성한다. 셀의 텍스트는 contentList의 indexPath.row번째로 설정한다. 그리고 테이블뷰에 해당 셀을 등록한다.
class ViewController: UIViewController, UITableViewDelegate, UITableViewDataSource {

    var tableView = UITableView()

    var contentList: [String] = []

    override func viewDidLoad() {
        ...

        tableView.register(UITableViewCell.self, forCellReuseIdentifier: "DefaultCell")
    }

    func tableView(_ tableView: UITableView, numberOfRowsInSection section: Int) -> Int {
        return contentList.count
    }

    func tableView(_ tableView: UITableView, cellForRowAt indexPath: IndexPath) -> UITableViewCell {
        let cell = tableView.dequeueReusableCell(withIdentifier: "DefaultCell", for: indexPath)

        cell.textLabel?.text = contentList[indexPath.row]
        cell.selectionStyle = .none

        return cell
    }

}
네비게이션 바 만들기
네비게이션 바를 생성한다. 타이틀은 "Title"로 하고, 우측 Add 버튼을 생성한다. 이 버튼을 누르면 onClickAddButton 함수가 실행된다. 이 함수는 contentList에 contentList길이에 1을 추가한 텍스트를 넣는다. 테이블뷰의 데이터가 변화했으므로 reloadData() 메소드를 이용해 테이블뷰의 데이터를 리로드한다.
class ViewController: UIViewController, UITableViewDelegate, UITableViewDataSource {

    var tableView = UITableView()
    var navigationBar = UINavigationBar()
    var contentList: [String] = []

    override func viewDidLoad() {
        ...

        navigationItem.title = "Title"
        navigationItem.setRightBarButton(UIBarButtonItem(title: "Add", style: .plain, target: self, action: #selector(onClickAddButton(_:))), animated: false)
    }


    @objc
    private func onClickAddButton(_ sender: Any?) {
        contentList.append("\(contentList.count + 1)")
        tableView.reloadData()
    }
}