
날짜 세기 앱
세팅은 똑같이 프로젝트 초기화 한 후 진행한 것이다!
처음부터 끝까지 모두 정리하지 않고 몰랐던 내용이나 기억해야할 것들 위주로 정리해 본다.
Layout
✔️ SizedBox
Column을 SizedBox로 감싸주면 내부 Column의 크기를 강제시킬 수 있다. Column자체에 width를 지정해 줄 수 없기 때문이다.
child: SizedBox(
  Column(),
),
✔️ MediaQuery.of
child: SizedBox(
  width: MediaQuery.of(context).size.width,
  Column(),
),- MediaQuery.of(context) _ 실행하고 있는 앱 화면 정보를 가져올 수 있다.
- MediaQuery.of(context).size.width _ 화면의 width를 알 수 있다.
- MediaQuery.of(context).size.width / 2 _ 화면 width의 반만 차지하도록 할 수 있다.
✔️ 위젯 분리하기
Column안에 Expanded위젯으로 모두 작성해 놓으니 가독성이 떨어져 클래스를 만들어 분리했다.
child: Column(
  children: [
    _Top(),
    _Bottom()
  ],
)

.
.
.

class _Top extends StatelessWidget {
  const _Top({super.key});

  @override
  Widget build(BuildContext context) {
    return Expanded();
  }
}

class _Bottom extends StatelessWidget {
  const _Bottom({super.key});

  @override
  Widget build(BuildContext context) {
    return Expanded();
  }
}
➕ 클래스 이름 앞에 '_' 내부 파일에서만 사용하기 때문에 붙여주었다.
테마 설정하기
코드를 작성하다 보니 텍스트 스타일은 겹치는 코드가 너무 많아 가독성이 떨어지게 된다. 이럴 땐 적용되어 있던 TextStyle을 모두 지워주고 테마로 만들어 준다.
그리고 📄main.dart로 간다.
import 'package:flutter/material.dart';
import 'package:u_and_i/screen/home_screen.dart';

void main() {
  runApp(
    MaterialApp(
      theme: (),
      home: HomeScreen(),
    )
  );
}
그리고 theme()이라는 파라미터를 사용해 준다. theme이라는 파라미터 안에 ThemeData라는 클래스를 인스턴스화 하여 넣을 수 있다.
✔️ 텍스트 테마 지정하기
import 'package:flutter/material.dart';
import 'package:u_and_i/screen/home_screen.dart';

void main() {
  runApp(
    MaterialApp(
      theme: (
        textTheme: TextTheme(

        )
      ),
      home: HomeScreen(),
    )
  );
}
textTheme 를 추가해 텍스트의 테마를 지정해 줄 수 있다.
그리고 TextTheme() 위젯 정의로 들어가 보면 사용할 수 있는 값들을 확인할 수 있다.
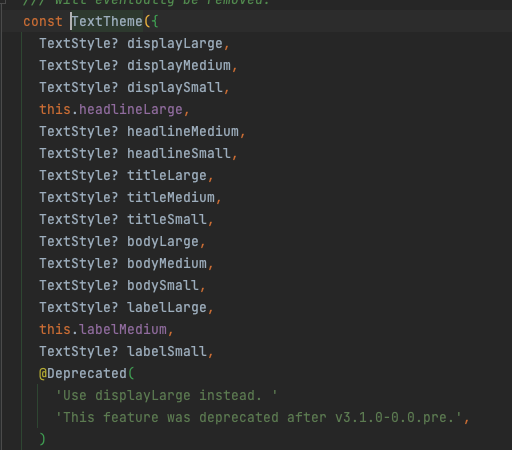
텍스트 테마를 지정해 보자
textTheme: TextTheme(
          displayLarge: TextStyle(
            color: Colors.white,
            fontSize: 80,
            fontFamily: 'parisienne'
          ),
          displayMedium: TextStyle(
            color: Colors.white,
            fontSize: 50,
            fontFamily: 'sunflower',
            fontWeight: FontWeight.w700,
          ),
          bodyLarge: TextStyle(
            color: Colors.white,
            fontSize: 30,
            fontFamily: 'sunflower'
          ),
          bodyMedium: TextStyle(
            color: Colors.white,
            fontSize: 20,
            fontFamily: 'sunflower'
          )
        )
근데 난 여기서 화이트 컬러도 겹쳐있는게 싫어서 챗 지피티한테 통일해 달라고 시켰다.
theme: ThemeData(
        fontFamily: 'sunflower',
        textTheme: TextTheme(
          displayLarge: TextStyle(
            fontSize: 80,
            fontFamily: 'parisienne'
          ),
          displayMedium: TextStyle(
            fontSize: 50,
            fontWeight: FontWeight.w700,
          ),
          bodyLarge: TextStyle(
            fontSize: 30,
          ),
          bodyMedium: TextStyle(
            fontSize: 20,
          )
        ).apply(
          bodyColor: Colors.white,
          displayColor: Colors.white,
        )
      ),
뭔지는 모르겠지만 아무튼 .apply()를 사용했더니 텍스트 컬러가 모두 화이트로 바뀌었다.
이렇게 테마를 지정해 준 후 Theme.of(context)로 적용해 준다.
Text(
  'U&I',
  style: Theme.of(context).textTheme.displayLarge,
),
Text(
  '2020-04-23',
  style: Theme.of(context).textTheme.displayMedium,
),
Text(
  'D+1',
  style: Theme.of(context).textTheme.displayMedium,
),
✔️ 코드 정리하기
그런데 위에 처럼 코드를 작성하면 Theme.of(context).textTheme가 중복이 되어있다. 이것도 중복을 없앨 수 있다. 중복된 부분을 변수로 생성해 변경해 코드를 정리할 수 있다.
@override
  Widget build(BuildContext context) {
    final textTheme = Theme.of(context).textTheme;

    return Expanded(
      child: Container(
        child: Column(
          children: [
            Text(
              'U&I',
              style: textTheme.displayLarge,
            ),
            Text(
              '처음 만난 날',
            ),
            Text(
              '2020-04-23',
              style: textTheme.displayMedium,
            ),
            Text(
              'D+1',
              style: textTheme.displayMedium,
            )
          ],
        ),
      ),
    );
  }
날짜 선택 기능 구현하기
✔️ IconButton()
화면에 아이콘 버튼도 추가해 놓았는데 이 아이콘 버튼을 누르면 날짜를 선택할 수 있는 창이 나올 수 있도록 해보자.
아이콘 버튼을 추가하는 걸 정리해 둔 줄 알았는데 없어서 간단하게 정리해 보면 아이콘으로 보이는 버튼을 추가해 준다.
IconButton(
  iconSize: 60,
  color: Colors.red,
  icon: Icon(Icons.favorite),
  onPressed: () {}
)- onPressed: onPressed _ 아이콘을 눌렀을 때 일어나는 일을 결정한다.
- icon: icon _ 아이콘의 모양을 결정해 준다.
onPressed에 함수를 추가해 아이콘을 눌렀을 때 창이 나타나도록 한다. 근데 어떤 창이냐면 날짜를 찍을 수 있는 창을 나타나도록 한다.
✔️ showCupertinoDialog() / CupertinoDatePicker()
Flutter에서 Dialog는 팝업창이라고 생각하면 된다. 사용자에게 경고, 확인, 입력 요청등의 팝업 창을 표시할 수 있다.
➕ 내가 사용할 Dialog위젯은 showCupertinoDialog()인데 앞에 붙은 Cupertino는 애플 본사가 있는 곳으로 아이폰 스타일의 위젯을 나타내 준다.
showCupertinoDialog(context: context, builder: builder)아이콘 버튼을 눌렀을 때 나타나도록 해야하기 때문에 onPress함수 내부에 작성해 준다.
CupertinoDatePicker()는 ios스타일의 날짜 및 시간 선택기를 제공하는 위젯이다. 이 위젯을 사용해 datepicker 기능을 구현한다.
IconButton(
  iconSize: 60,
  color: Colors.red,
  icon: Icon(Icons.favorite),
  onPressed: () {
    showCupertinoDialog(
      context: context,
      barrierDismissible: true,
      builder: (Builder context) {
        return Align(
          alignment: Alignment.center,
          child: Container(
            color: Colors.white,
            height: 300,
            child: CupertinoDatePicker(
              mode: CupertinoDatePickerMode.date,
              dateOrder: DatePickerDateOrder.ymd,
              onDateTimeChanged: (DateTime date) {
                print(date);
              }
            )
          );
        )
      }
    )
  }
)- barrierDismissible: true _ 팝업창이 띄워졌을 때 바깥 화면을 터치하면 팝업이 닫힐 수 있도록 해준다. 이 기능을 끄려면 false
- CupertinoDatePicker() _ 아이폰 스타일의 datepicker이다. 날짜를 선택할 수 있다.
CupertinoDatePicker()위젯의 속성을 살펴보면
- mode: CupertinoDatePickerMode.date 날짜만 선택할 수 있도록 해준다. 이 설정을 안 하면 시간 선택이 나온다.
- dateOrder: DatePickerDateOrder.ymd, _ 날짜 선택 순서를 년, 월, 일 순으로 바꿔준다.
- onDateTimeChanged _ CupertinoDatePicker 위젯에서 날짜나 시간이 변경될 때 호출되는 콜백 함수이다. 사용자가 날짜나 시간을 변경할 때마다 이 함수가 호출되어 선택된 날짜 및 시간 값이 전달된다.
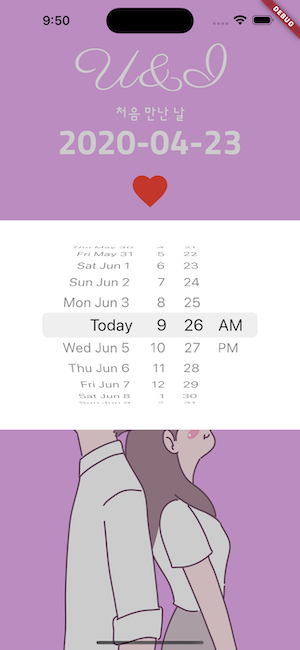
이렇게 datepicker 팝업 창을 구현해 줬다. 결과를 보자.
class _Top extends StatelessWidget {
  const _Top({super.key});

  @override
  Widget build(BuildContext context) {
    final textTheme = Theme.of(context).textTheme;
    return Expanded(
      child: Container(
        child: Column(
          children: [
          .
          .
          .
            IconButton(
              iconSize: 60,
              color: Colors.red,
              icon: Icon(Icons.favorite),
              onPressed: () {
                showCupertinoDialog(
                  context: context,
                  barrierDismissible: true,
                  builder: (BuildContext context) {
                    return Align(
                      alignment: Alignment.center,
                      child: Container(
                        color: Colors.white,
                        height: 300,
                        child: CupertinoDatePicker(
                          mode: CupertinoDatePickerMode.date,
                          dateOrder: DatePickerDateOrder.ymd,
                          onDateTimeChanged: (DateTime date) {
                            print(date);
                          },
                        ),
                      ),
                    );
                  },
                );
              },
            ),
          ],
        ),
      ),
    );
  }
}- 결과
데이터 연동하기
datepicker로 선택한 날짜를 화면에 표기하기 위해서는 Text위젯으로 작성되어 있던 날짜와 d-day에 데이터를 연동해 주어야 한다. 이 작업을 위해서는 먼저 StatelessWidget으로 작성된 _Top 클래스를 StatefulWidget으로 변경해 준다.
<변경 전>
class _Top extends StatelessWidget {
  const _Top({super.key});

  @override
  Widget build(BuildContext context) {
  .
  .
  .


<변경 후>
class _Top extends StatefulWidget {
  const _Top({super.key});

  @override
  State<_Top> createState() => _TopState();
}

class _TopState extends State<_Top> {
  @override
  Widget build(BuildContext context) {
그 다음 날짜를 넣어줄 거기 때문에 변수로 날짜를 생성해 준다. 일단 현재 시간으로 변수를 생성한다.
코드는 생략하고 설명 부분 코드만 작성했다.
class _TopState extends State<_Top> {
  //변수 생성
  DateTime selectedDate = DateTime.now();

  @override
  Widget build(BuildContext context) {
    //변수 생성
    final textTheme = Theme.of(context).textTheme;

    return Expanded(
      child: Container(
        child: Column(
          children: [
            .
            .
            Text(
              '${selectedDate.year}-${selectedDate.month}-${selectedDate.day}',
              style: textTheme.displayMedium,
            ),
            .
            .
          ]
        )
      )
    )
  }
}'${selectedDate.year}-${selectedDate.month}-${selectedDate.day}'변수를 화면에 나타나게 해준다. 이 글을 쓰고 있는 현재 기준으로 2024/6/4 이라서 이 날짜가 화면에 보이게 된다.
우리는 이 현재 날짜와 우리가 선택한 날짜의 차를 구해 화면에 d-day로 표기를 하는 것이 목표이다! 이걸 해보자.
class _TopState extends State<_Top> {
  //선택된 날짜
  DateTime selectedDate = DateTime.now();

  @override
  Widget build(BuildContext context) {
    //빌드 함수가 실행되는 순간 = 지금 현재 순간
    final now = DateTime.now();

    final textTheme = Theme.of(context).textTheme;

    return Expanded(
      child: Container(
        child: Column(
          children: [
            .
            .
            Text(
              '${selectedDate.year}-${selectedDate.month}-${selectedDate.day}',
              style: textTheme.displayMedium,
            ),
            Text(
              'D+${now.difference(selectedDate).inDays}',
              style: textTheme.displayMedium,
            ),
            .
            .
          ]
        )
      )
    )
  }
}-
now.difference(selectedDate).inDays + 1 _ 선택한 시간과 현재시간의 차이를 일 단위로 알 수 있다.
-
결과
지금은 selectedDate가 현재 날짜로 되어 있어 차이가 0으로 화면에 D+0으로 출력된다.
- datepicker로 선택한 날짜 slectedDate에 연동하기
child: CupertinoDatePicker(
  mode: CupertinoDatePickerMode.date,
  dateOrder: DatePickerDateOrder.ymd,
  onDateTimeChanged: (DateTime date) {
    setState(() {
      selectedDate = date;
    });
  },
),- setState로 빌드를 다시한다.
- 우리가 선택한 날짜를 selectedDate = date;로 selectedDate에 저장한다.
완성
상태 위로 올리기
상태관리 강의 어렵다고 대충 들어서 뭔진 모르겠지만 일단 킵고잉
_TopState 안에 있던 변수를 HomeScreen 클래스로 옮겨본다.
<변경 전>
class _HomeScreenState extends State<HomeScreen> {
}

class _TopState extends State<_Top> {
  DateTime selectedDate = DateTime.now();
}

<변경 후>
class _HomeScreenState extends State<HomeScreen> {
  DateTime selectedDate = DateTime.now();
}

class _TopState extends State<_Top> {
}
이렇게 변수만 옮기면 에러가 나서 수정을 더 해줘야 한다. HomeScreen위젯에 있는 selectedDate를 받기 위해서는 _Top에서 파라미터로 받아줘야 한다.
class _Top extends StatefulWidget {
  final DateTime selectedDate;

  const _Top({required this.selectedDate, super.key});

  @override
  State<_Top> createState() => _TopState();
}
그리고 날짜를 받아주었던 텍스트 코드도 변경해야 한다.
Text('${widget.selectedDate.year}-${widget.selectedDate.month}-${widget.selectedDate.day}')SelectedDate로 SetState할 수 없어서 아이콘 버튼 안에 onPresse함수에도 에러가 생겨 이 코드도 수정이 필요하다. 먼저 onPress 함수를 전체 복사하여 _Top의 파라미터로 정의해준다.
_Top(
  selectedDate: selectedDate,
  onPressed: () {
    showCupertinoDialog(
      context: context,
      barrierDismissible: true,
      builder: (BuildContext context) {
         return Align(
           alignment: Alignment.center,
           child: Container(
             color: Colors.white,
             height: 300,
             child: CupertinoDatePicker(
               mode: CupertinoDatePickerMode.date,
               dateOrder: DatePickerDateOrder.ymd,
               onDateTimeChanged: (DateTime date) {
                 setState(() {
                   selectedDate = date;
                 });
              },
            ),
          ),
        );
      },
    );
  },
),
✔️ voidCallback
onPress 타입 정의를 살펴보면 voidCallbakck?을 하면 null이 될 수 있다는 걸 알 수 있다.
voidCallback은 아무것도 반환하지 않는 void하 먼말인지 모르겠다.
내가 HomeScreen 위젯의 onPress함수를 넣어놨지만 아무것도 반환하고 있지 않은 상태이다.
코드를 작성해 보면
class _Top extends StatefulWidget {
  final DateTime selectedDate;
  final VoidCallback? onPressed;

  const _Top({
    required this.onPressed,
    required this.selectedDate,
    super.key
  });

  @override
  State<_Top> createState() => _TopState();
}
.
.
.
IconButton(
  iconSize: 60,
  color: Colors.red,
  icon: Icon(Icons.favorite),
  onPressed: widget.onPressed,
),
.
.
.
이렇게 작성하면 에러가 사라진다. SelectedDate를 HomeScreen에서 관리할 뿐이고 기능은 똑같이 동작한다.
✔️ 코드 정리하기
그런데 이렇게 작성했을 때 현재 HomeScreen _Top 위젯 안에 onPress함수 로직을 작성해 놨는데 이렇게 코드를 작성하는 것은 좋지 않다. 코드 가독성이 떨어지기 때문이다. _Top을 Column 위젯으로 감싸 놨는데 이 안에 함수 코드가 들어가서 Column안에 어떤 위젯들이 있는지 한 눈에 파악하기 힘들다.
먼저 _Top()위젯 안의 함수를 지워준다.
_Top(
  selectedDate: selectedDate,
  onPressed:
),
class _HomeScreenState extends State<HomeScreen> {
.
_Top(
selectedDate: selectedDate,
onPressed: onHeartPress(),
),
.
.
onHeartPress() {
showCupertinoDialog(
context: context,
barrierDismissible: true,
builder: (BuildContext context) {
return Align(
alignment: Alignment.center,
child: Container(
color: Colors.white,
height: 300,
child: CupertinoDatePicker(
mode: CupertinoDatePickerMode.date,
dateOrder: DatePickerDateOrder.ymd,
onDateTimeChanged: (DateTime date) {
setState(() {
selectedDate = date;
});
},
),
),
);
},
);
}
.
.
.
}그리고 _HomeScreenState 클래스 안에 함수를 따로 정의해 준다. 그리고 _Top 위젯의 파라미터로 넣어줬는데 에러가 난다.
_Top(
  selectedDate: selectedDate,
  onPressed: onHeartPress,
),
그럼 onHeartPress뒤에 파라미터를 받는 괄호를 제거하면 되는데 왜인지는 몰라
❗️ 우리가 코드를 읽을 때는 위에서부터 아래로 읽기 때문에 클래스와 관련 값들을 읽기 편하게 위에서 아래로 흐름이 흐르도록 작성하는 것이 중요하다. 가장 맨 위의 HomeScreen위젯에 어디에서 데이터를 정리하고 있는지 한눈에 알 수 있도록 작성하는 것이 좋다. 함수도 깔끔하기 onHeartPress가 보이도록 하였다.
추가 버그 개선
✔️ 선택 날짜 리셋됨
현재는 날짜를 선택하고 창을 닫고 다시 아이콘을 누르면 다시 오늘 날짜로 리셋된다. CupertinoDatePicker()의 기본값이 현재 시간이기 때문이다.
initialDateTime: selectedDate,initialDateTime을 선택 날짜로 설정해 주면 된다.
.
.
.
child: CupertinoDatePicker(
  mode: CupertinoDatePickerMode.date,
  initialDateTime: selectedDate,
  dateOrder: DatePickerDateOrder.ymd,
.
.
.
✔️ 미래 날짜 선택 가능
또 현재 날짜 이후로는 선택이 되면 안되는데 미래 날짜 선택이 가능하게 되어있다.
maximumDate: DateTime.now(),CupertinoDatePicker() 파라미터에 위 값을 넣어주면 오늘 날짜 이후로는 선택이 불가능하다.
