
브라우저 화면에서 이벤트가 발생하면 브라우저는 가장 먼저 이벤트 대상을 찾기 시작한다. 이벤트 대상을 찾아갈 때 가장 상위의 window 객체부터 document, body 순으로 DOM 트리를 따라 내려가는 캡처링 단계를 수행한다.
이때 이벤트 대상을 찾아가는 과정에서 브라우저는 중간에 만나는 모든 캡처링 이벤트 리스너를 실행시킨다. 그리고 이벤트 대상을 찾고 캡처링이 끝나면 다시 DOM 트리를 따라 올라가며 만나는 모든 버블링 이벤트 리스너를 실행하며 버블링 단계를 수행한다.
그리고 이러한 과정에서 이벤트 리스너가 차례로 실행되는것을 이벤트 전파(event propagation)라고 한다.
- 코드로 이해해보자
    <article class="parent">
        <button class="btn" type="button">버튼</button>
    </article>

    <script>
        const parent = document.querySelector('.parent');
        const btnFirst = document.querySelector('.btn');
        btnFirst.addEventListener('click', (event) => {
            console.log("btn capture!");
        }, true)

        window.addEventListener('click', () => {
            console.log("window capture!");
        }, true); // true : 캡처링 단계의 이벤트가 발생하도록 합니다.

        document.addEventListener('click', () => {
            console.log("document capture!");
        }, true);

        parent.addEventListener('click', () => {
            console.log("parent capture!");
        }, true);

        btnFirst.addEventListener('click', (event) => {
            console.log("btn bubble!");
        })

        parent.addEventListener('click', () => {
            console.log("parent bubble!");
        });

        document.addEventListener('click', () => {
            console.log("document bubble!");
        });

        window.addEventListener('click', () => {
            console.log("window bubble!");
        });
    </script>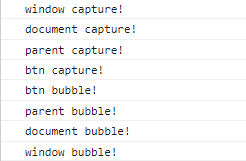
위와 같이 이벤트 전파가 되고 있다. 이벤트의 기본값은 버블링이고 ture 인자를 함께 전달하면 캡쳐링단계에서 실행된다.
이벤트 target, currentTarget
<article class="parent">
    <ol>
        <li><button class="btn-first" type="button">버튼1</button></li>
        <li><button type="button">버튼2</button></li>
        <li><button type="button">버튼3</button></li>
    </ol>
</article>

<script>
    const parent = document.querySelector('.parent');
    parent.addEventListener('click', function (event) {
        console.log(event.target);
        console.log(event.currentTarget);
    })
</script>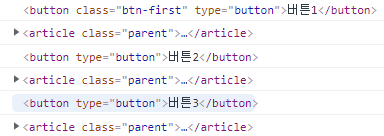
article에 이벤트를 달아주었다. 클릭이벤트가 발생한 진원지의 정보가 target에 담겨있다. 그래서 버튼1, 버튼2, 버튼3을 클릭한 경우 위와같이 출력된다. currentTarget 속성에는 이벤트 리스너가 연결된 요소가 참조되어 있다.
이벤트 전파과정을 겪는 이벤트의 특징 덕분에, 이벤트 리스너가 없는 요소인 target와 currenTarget을 사용하여 이벤트 진원지에 접근할 수 있다.
이벤트 위임
    <article class="parent">
        <ol>
            <li><button class="btn-first" type="button">버튼1</button></li>
            <li><button type="button">버튼2</button></li>
            <li><button type="button">버튼3</button></li>
        </ol>
    </article>

    <script>
        const parent = document.querySelector('.parent');
        parent.addEventListener('click', function (event) {
            console.log(event.target);
            if (event.target.nodeName === "BUTTON") {
                event.target.innerText = "버튼4";
            }
        })
    </script>
앞에서 우리는 이벤트의 흐름을 통해 이벤트 리스너가 없는 요소의 이벤트가 발생했을 때도 해당 요소에 접근 할 수 있다는 것을 알게 되었다. 이를 이용해 이벤트 리스너가 없어도 마치 리스너가 있는 것 처럼 사용 할 수 있다.
버튼 요소의 nodeName는 대문자로 나타난다. (BUTTON)
즉, 클릭한 것이 버튼이면 event.target.innerText = "버튼4"; 가 된다.
마무리 실습
<!DOCTYPE html>
<html lang="ko">

<head>
    <meta charset="UTF-8">
    <meta http-equiv="X-UA-Compatible" content="IE=edge">
    <meta name="viewport" content="width=device-width, initial-scale=1.0">
    <title>Document</title>
    <link rel="stylesheet" href="../html_css_basic/reset.css">
    <style>
        /* 직접 셀렉트 박스 만들기 */
        h2 {
            margin: 30px;
        }

        .cont-select {
            position: relative;
            width: 200px;
        }

        .btn-select {
            width: 100%;
            padding: 13px 14px;
            color: #000;
            font-size: 12px;
            line-height: 14px;
            text-align: left;
            border: 1px solid #C4C4C4;
            box-sizing: border-box;
            border-radius: 10px;
            cursor: pointer;
            background: url("images/icon-Triangle-down.png") right 13px center no-repeat;

            /* 말줄임 추가 */
            white-space: nowrap;
            text-overflow: ellipsis;
            overflow: hidden;
        }

        .btn-select:focus {
            outline: 3px solid #F8E4FF;
        }

        .list-member {
            display: none;
            width: 100%;
            overflow: hidden;
            position: absolute;
            left: 0;
            top: 51px;
            background: #FFF;
            border: 1px solid #C4C4C4;
            box-shadow: 4px 4px 14px rgba(0, 0, 0, 0.15);
            border-radius: 10px;
        }

        .btn-select.on {
            background: url("images/icon-Triangle-up.png") right 13px center no-repeat;

        }

        .btn-select.on+.list-member {
            display: block;
        }

        .list-member li {
            height: 40px;
            padding: 5px 18px;
        }

        .list-member li button {
            display: block;
            height: 30px;
            width: 100%;
            border: none;
            background-color: #fff;
            border-radius: 8px;
            cursor: pointer;

            /* 말줄임 추가 */
            white-space: nowrap;
            text-overflow: ellipsis;
            overflow: hidden;
        }

        .list-member li button:focus,
        .list-member li button:hover {
            background-color: #F8E4FF;
        }
    </style>
</head>

<body>

    <h2>셀렉트 박스 만들기</h2>
    <article class="cont-select">
        <button class="btn-select">나의 최애 프로그래밍 언어</button>
        <ul class="list-member">
            <!-- <li><button type="button">Python</button></li>
            <li><button type="button">Java</button></li>
            <li><button type="button">JavaScript</button></li>
            <li><button type="button">C#</button></li>
            <li><button type="button">C/C++</button></li> -->
        </ul>
    </article>
    <script>
        let flag = false;
        let lang = ['Python', 'Java', 'JavaScript', 'C#', 'C/C++']
        const select = document.querySelector('.btn-select');
        const list = document.querySelector('.list-member');
        for(let i = 0; i < lang.length; i++){
            list.insertAdjacentHTML('beforeend',`<li><button class="btn-li" type="button">${lang[i]}</button></li>`);
        }
        select.addEventListener('click', () => {
            flag === false ? list.style.display = 'block' : list.style.display = 'none';
            flag = !flag;
        });
        list.addEventListener('click', e => {
            if(e.target.tagName === 'BUTTON'){
                select.textContent = e.target.textContent;
                flag === false ? list.style.display = 'block' : list.style.display = 'none';
                flag = !flag;
            }
        });
    </script>
</body>

</html>
셀렉트 버튼을 만들었다. if(e.target.tagName === 'BUTTON') 부분이 없으면 ul부분의 가장자리를 눌렀을 경우 모든 값이 셀렉트박스에 텍스트로 들어가버린다. 이벤트 위임할때 엄격하게 처리해주는것이 좋겠다.
