학습 키워드
- 클래스와 객체
- JVM 메모리 영역
- 래퍼클래스
- static
- final
- 인터페이스
클래스와 객체
클래스란
- Java에서 클래스는 객체를 만들 때 필요한 설계도입니다.
- 클래스의 첫 글자는 대문자입니다.
객체란
- 주변에서 볼 수 있는 사물 및 어떤 개념이나 논리같은 덧셈, 뺄셈...등이 객체입니다.
- 클래스가 준비되어 있다면 클래스를 기준으로 여러 객체들을 만들어 낼 수 있습니다.
예제
- Person 클래스는 사람 객체를 만들기 위한 설계도입니다.
- 객체를 만들 때
new라는 키워드를 사용합니다. - 객체를 만드는 과정을 인스턴스화라고 합니다.
- 인스턴스화가 되면 Java 메모리 상에 객체가 만들어집니다.
public class Person(){
     ...
}
public class Main {

	public static void main(String[] args) {
    	Person personA = new Person(); // 첫 번째 객체 생성
        Person personB = new Person(); // 두 번째 객체 생성
    }
}
클래스 구조
- 클래스 구조는 속성, 생성자, 기능 부분으로 나누어집니다.
class 클래스{
	// ✅ 속성

    // ✅ 생성자

    // ✅ 기능
}
속성
- 객체는 속성(특징)을 작성하는 곳입니다.
- 객체를 생성해야 속성에 접근할 수 있습니다.
- 이 속성들은 변수로 표현합니다.
- 프로퍼티(property), 필드(field)라고도 합니다.
class Person {
	// ✅ 속성
    String name;
    int age;
    String address;
}
속성에 접근
-
객체를 통해 속성에 접근할 때
객체가 담긴 변수.속성으로 접근합니다. -
객체마다 속성 값이 다를 수 있습니다.
public class Main {
	public static void main(String[] args) {
		// ✅ 객체 생성
		Person personA = new Person();
		Person personB = new Person();

		// ✅ 객체를 통해 접근 personA 의 name
		System.out.println(personA.name);

		// ✅ 객체를 통해 접근 personB 의 name
		System.out.println(personB.name);
	}
}
생성자
- 객체를 만들 때 사용합니다.
- 객체를 어떻게 만들지 정의해 놓는 것입니다.
- 생성자가 없으면 클래스를 객체화 시킬 수 없습니다.
기본 생성자
- 클래스를 생성하면 기본 생성자는 자동으로 추가가 됩니다.
public class Person {

	Person() {} // ✅ 기본 생성자 자동추가, 보이지 않습니다.
}
생성자의 특징
- 반환 자료형이 없습니다.
- 클래스명과 이름이 똑같습니다.
- 여러 개가 존재할 수 있습니다.
생성자를 활용한 객체
- 생성자를 만들면 기본 생성자는 제거됩니다.
public class Person {
	String name;
	int age;
	String address;

	Person() {} // ❌ 기본생성자 제거됨

    Person(String name, int age) { // ✅ 새로운 생성자(조립설명서)
		this.name = name;
		this.age = age;
	}
}
public class Main {
	public static void main(String[] args) {
		Person personA = new Person("gygim", 10); // ✅ 조립설명서 준수
		Person personB = new Person("Steve", 5); // ✅ 조립설명서 준수
	}
}
this 키워드
this는 객체 자신을 가리키는 키워드입니다. 현제 실행 중인 객체를 의미합니다.
기능
- 기능은 메서드로 표현합니다.
- 성성하는 모든 기능을 구현할 수 있습니다.
- 클래스와 관련된 기능을 작성하는 것이 좋습니다.
- 메서드를 활용하는 것이 객체의 기능을 활용하는 것입니다.
class Person {
	...

    // ✅ 사람의 소개 기능
	void introduce() {
		System.out.println("안녕하세요.");
		System.out.println("나의 이름은 " + this.name + "입니다.");
		System.out.println("나이는 " + this.age + "입니다.");
	}

	// ✅ 사람의 더하기 기능
	int sum(int a, int b) {
		int result = a + b;
		return result;
	}
}
public class Main {
	public static void main(String[] args) {
		Person personA = new Person("gygim", 10);
		personA.introduce(); // ✅ personA 객체 introduce() 호출
		Person personB = new Person("Steve", 5);
	}
}
게터
- 게터란 클래스의 속성을 가져올 때 사용되는 기능을 의미합니다.
String getName() {
	return this.name;
}

int getAge() {
	return this.age;
}

String getAddress() {
	return this.address;
}
String name = person.getName();
int age = person.getAge();
String address = person.getAddress();
세터
- 세터란 객체의 속성을 외부에서 설정할 수 있게 해주는 기능입니다.
void getName(String name) {
	this.name = name;
}

void getAge(int age) {
	this.age = age;
}

void setAddress(String address) {
	this.address = address;
}
public class Main {

	public static void main(String[] args) {
		Person personA = new Person("gygim", 20);
		Person personB = new Person("Steve", 15);

		personA.setAddress("서울"); // ✅ personA 의 주소 설정
		personB.setAddress("미국"); // ✅ personA 의 주소 설정
	}
}
JVM 메모리 영역
JVM 메모리 구조
- Java의 메모리 구조는 크게 3가지로 나뉩니다.
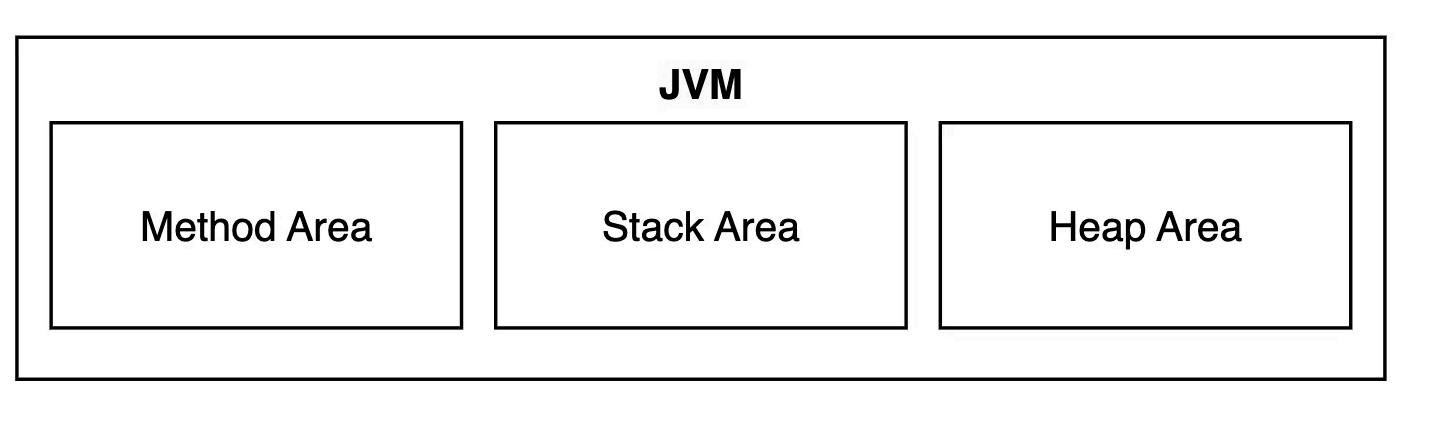
Method Area
- 프로그램 시작 시 정보가 저장됩니다.
- 클래스 정보(.class 파일)가 올라가는 곳입니다.
- 클래스의 메서드 정보, static 변수 등이 저장됩니다.
- 모든 객체가 공유하는 공용 공간입니다.
Stack Area
- 선입후출(LIFO)구조 입니다. 먼저 들어온 것이 가장 늦게 나간다는 뜻입니다.
- 메서드가 호출될 때마다 새로운 스택프레임이 쌓입니다.
- 가장 최근 호출된 메서드가 먼저 실행됩니다.
Heap Area
new키워드로 생성된 객체가 저장되는 곳입니다.- 객체의 실제 데이터가 저장되고 데이터의 주소는 stack 영역에 저장됩니다.
코드 흐름
public class Main {
 	static class Person {
 		// 1. 속성
 		String name;
 		int age;
 		String address;

     	// 2. 생성자
 		Person(String name, int age) {
 			this.name = name;
 			this.age = age;
 		}

 		// 3-1. 소개 기능(이름 나이 출력 기능)
 		void introduce() {
			 System.out.println("나의 이름은");
 			System.out.println(this.name + "입니다.");
 			System.out.println("나의 나이는");
 			System.out.println(this.age + "입니다.");
 		}

        // 3-2. 더하기 기능(소개를 하고 더하기 연산 수행)
		int sum(int value1, int value2) {
 			introduce();
 			int result = value1 + value2;
 			return result;
 		}
 	}

 public static void main(String[] args) {
 	String name = "Steve";
 	int age = 20;

 	Person personA = new Person(name, age);
 	personA.introduce();

    int value1 = 1;
 	int value2 = 2;

    int ret = personA.sum(value1, value2);
 	System.out.println(ret);
 }
}
Method 이해하기
- 프로그램이 실행되면 작성했던 모든 파일(.java)의 데이터가 Method영역에 저장됩니다.
- 프로그램 실행 시점에 한 번만 저장됩니다.
- Method 영역에 저장된 데이터는 프로그램 전체에서 공용으로 활용 가능합니다.
- static으로 선언된 변수와 메서드들이 이 공간에 위치하게 됩니다.
- 이 공간에 저장된 데이터는 공용으로 사용 가능합니다.
Heap 이해하기
new키워드로 생성된 객체는 Heap영역에 저장됩니다.- 객체를 담은 변수에는 실제 객체의 메모리 주소 값이 저장됩니다.
Stack 이해하기
- 메서드가 호출될 때마다 Stack영역에 메모리가 할당됩니다.
- 하나의 스택프레임에 각 메서드의 지역변수가 저장됩니다.
- LIFO구조입니다.
- 메서드가 시작되면 추가되고메서드가 종료되면 사라지는 구조입니다.
- 특정 메서드가 실행되면 해당 메서드의 정보와 변수가 Stack에 저장되고 메서드 실행이 끝나면 그 메모리는 자동으로 제거됩니다.
- 메서드 내에 선언된 지역변수들이 저장되는 공간입니다.
public class Main {

    public static void main(String[] args) {
 		String name = "Steve"; // 1
 		int age = 20;

 		Person personA = new Person(name, age); // personA = @100호
 		personA.introduce(); // 2
 	}
}
래퍼클래스
래퍼클래스란
- 기본자료형을 객체로 감싸는 클래스입니다.
| 기본 자료형 (Primitive Type) | 래퍼 클래스 (Wrapper Class) |
|---|---|
| byte | Byte |
| short | Short |
| int | Integer |
| long | Long |
| float | Float |
| double | Double |
| char | Character |
| boolean | Boolean |
참조형
- 변수에 객체가 담기면 해당 변수를 참조형변수라고 합니다.
- 참조형 변수는 데이터가 저장된 메모리 주소를 가리킵니다.
- 객체, 배열등이 참조형에 속합니다.
Person personA = new Person("Steve"); // ✅ 객체가 담긴 personA 는 참조형 변수입
Syetem.out.println(personA.name);
System.out.println(personA); // ✅ 출력하면 @123 메모리의 주소값이 출력됩니다.
int[] arr = {1, 2, 3, 4}; // ✅ 배열이 담긴 arr 는 참조형 변수입니다.
System.out.println(arr); // ✅ 출력하면 @123 메모리의 주소값이 출력됩니다.
래퍼클래스&객체
- 래퍼클래스에 담겨 있는 변수도 참조형 변수입니다.
- 하지만 출력 시 메모리 주소값이 나오지 않습니다.
Integer num = 100;
System.out.println(num); // ✅ 출력 100
- 내부적으로
toString()이 오버라이딩 되어 있기 때문입니다.
래퍼클래스 사용 이유
- 기본형은 객체처럼 속성, 기능을 가질 수 없으나, 객체는 기능을 제공할 수 있습니다.
- 기본형을 감싼 객체를 만들어 기능을 제공하면 편리하게 데이터처리를 할 수 있습니다.
Integer num = 123; // 래퍼클래스
String str = num.toString(); // ✅ 편리한 기능

int a = 100; // 그냥 데이터 100
String str = a.toString(); // ❌ 변환 불가
커스텀 래퍼클래스
class CustomInteger {

	// ✅ 속성
 	int value;

 	// ✅ 생성자
 	CustomInteger(int value) {
 		this.value = value;
 	}

    // ✅ 기능
 	// ✅ 값을 가져오는 메서드
 	int getValue() {
 		return value;
 	}

    // ✅ 값을 설정하는 메서드
 	void setValue(int value) {
 		this.value = value;
 	}

 	// ✅ toString() 오버라이딩 (값을 출력할 수 있도록)
 	@Override
 	public String toString() {
 		return String.valueOf(value);
 	}
}
public class Main {

 public static void main(String[] args) {

	CustomInteger num1 = new CustomInteger(100);

    System.out.println(num1); // ✅ 100
 	System.out.println(num1.getValue()); // ✅ 100

    num1.setValue(200);
 	System.out.println(num1); // ✅ 200
 }
}
오토 박싱&언박싱
- 래퍼클래스 ↔ 기본형으로 형변환은 굉장히 자주 일어납니다.
- Java에서는 이 형변환 과정을 자동으로 지원해줍니다.
Integer num3 = 10; // ✅ 오토박싱 (기본형을 자동으로 래퍼 클래스 객체로 변환)
int num = num3; // ✅ 오토 언박싱(참조형을 자동으로 기본형으로 변환)
오토박싱
- 기본형 → 래퍼형으로 변환하는 과정입니다.
Integer는 참조형(객체)이지만 기본형int값을 직접 대입할 수 있습니다.- 내부적으로 컴파일러가 자동으로
Integer.valueOf(10)을 호출하여 객체를 생성하기 때문입니다.
Integer num3 = 10; // ✅ 오토박싱
// ✅ 내부적 자동 처리(래퍼형 <- 기본형)
Integer num = Integer.valueOf(10);
오토 언박싱
- 래퍼형 → 기본형으로 변환하는 과정입니다.
num은Integer객체(참조형변수)지만 기본형int변수에 대입할 수있습니다.- 내부적으로 컴파일러가 자동으로
num.intValue()를 호출하여 기본형으로 변환하기 때문입니다.
Integer num3 = 10;
int num = num3; // ✅ 오토 언박싱
// ✅ 내부적 자동처리(기본형 <- 래퍼형)
int a = num.intValue();
기본형과 래퍼형 성능 비교
- 래퍼형은 내부적으로 데이터를 감싸고 있기 때문에 연산 시 불리합니다.
- 객체에서 기본형 값을 꺼내서 연산하는 추가작업이 발생하기 때문입니다.
- 빠른 작업이 필요한 경우 기본형을 직접 활용하는 것이 좋은 선택입니다.
static
static이란
- 모든 객체가 함께 사용하는 변수나 메서드를 만들 때 사용됩니다.
- 객체(인스턴스)를 만들지 않아도 클래스 이름만으로 바로 사용할 수 있습니다.
- 모든 객체가 같은 값을 공유합니다.
- static변수와 메서드는 한 번만 생성되고 Method영역에 저장됩니다.
static 활용
- 변수, 메서드에 붙일 수 있습니다.
- static키워드로 선언도니 변수와 메서드는 Method영역에 저장됩니다.
- 각 객체는 클래스영역에 저장된 데이터를 활용할 수 있습니다.
class Person {
	// ✅ static 변수
	static int population = 0;

	// ✅ static 메서드
	static void printPopulation() {
		System.out.println("현재 인구 수: " + population);
	}
}
System.out.println("static 변수: " + Person.population);
System.out.println("static 메서드: " + Person.printPopulation);
인스턴스 멤버
- 객체를 만들 때 마다 생성되는 변수와 메서드입니다.
- 객체를 생성한 후 사용할 수 있습니다.
- 각 객체가 개별적으로 값을 가집니다.
- 객체는 Heap영역에 위치합니다.
인스턴스 변수
- 객체가 생성될 때마다 따로 만들어지는 변수입니다.
- 객체를 생성한 후 접근할 수 있습니다.
name변수는 각 객체마다 별도로 저장됩니다.
class Person {
	String name; // ✅ 인스턴스 변수
}
public class Main {

	public static void main(String[] args) {

 		Person p1 = new Person(); // p1 객체 생성
 		p1.name = "gygim"; // ✅ p1 객체의 데이터에 접근

 		Person p2 = new Person(); // p2 객체 생성
 		p2.name = "Steve"; // ✅ p2 객체의 데이터에 접근
 	}
}
인스턴스 메서드
- 객체의 속성을 활용하는 메서드입니다.
- 객체가 생성된 후 사용할 수 있습니다.
class Person {
	String name;

	void printName() { // ✅ 인스턴스 메서드
	System.out.println("나의 이름은 " + this.name + "입니다.");
	}
}
public class Main {

	public static void main(String[] args) {

 		Person p1 = new Person();
 		p1.name = "gygim";
 		p1.printName(); // ✅ p1 객체의 메서드 실행

		 Person p2 = new Person();
 		p2.name = "Steve";
 		p2.printName(); // ✅ p2 객체의 메서드 실행
 	}
}
클래스 멤버
- 클래스 자체에 속하는 변수와 메서드를 의미합니다.
- static 키워드를 사용해서 선언합니다.
- 해당 클래스로 만들어진 객체가 공유해서 사용할 수 있습니다.
- 클래스가 로드될 때 Method영역에 적재됩니다.
- 객체 생성 없이 사용 가능합니다.
클래스 변수
- 클래스가 로드될 때 한 번만 생성됩니다.
- 모든 객체가 공유하는 변수입니다.
- Method영역에 저장됩니다.
- 객체를 만들지 않아도
클래스명.변수명으로 접근 가능합니다.
class Person {
	static int population = 0; // ✅ 클래스 변수
}
public class Main {

 	public static void main(String[] args) {

		// ✅ 객체 생성 전에도 클래스 레벨에서 직접 접근가능
 		System.out.println("현재 인구 수: " + Person.population);

 		Person p1 = new Person();
 		Person p2 = new Person();

 		// ✅ 모든 객체가 하나의 값을 공유
 		System.out.println("현재 인구 수: " + Person.population);
 	}
}
클래스 메서드
- 클래스에 속하는 메서드입니다.
- 객체 없이 사용할 수 있습니다.
- 클래스 변수만 사용할 수 있고 객체 변수는 사용할 수 없습니다.
class Person {
	static int population = 0;

    public Person(String name) {
		this.name = name;
		population++; // 생성자 호출시 populataion 1 증가
	}

	static void printPopulation() {
		System.out.println("현재 인구 수: " + population); // ✅ 클래스 메서
	}
}
public class Main {

	public static void main(String[] args) {

 		// ✅ 객체생성 여부에 상관없이 사용 가능
 		Person.printPopulation(); // 현재 인구 수: 0

        Person p1 = new Person("gygim"); // 생성시마다 population 1 증가
 		Person p2 = new Person("Steve"); // 생성시마다 population 1 증가

        Person.printPopulation(); // 현재 인구 수: 2
 	}
}
static 변수와 메모리는 프로그램이 종료될 때까지 메모리에 유지됩니다.
필요할 때만 사용해야 합니다.
final
final의 용도
- 변수의 변경이 불가능하게 만듭니다.
final int a = 100;
a = 200; // ❌ 오류 발생!
- 클래스는 상속할 수 없게 만듭니다.
final class Animal {
 	void sound() {
 		System.out.println("Animal sound!");
 	}
}

// class Dog extends Animal {} // ❌ 오류! final 클래스는 상속할 수 없습니다.- 메서드는 수정할 수 없게 만듭니다.
class Parent {
	 final void show() {
 		System.out.println("Hello from Parent");
 	}
}

class Child extends Parent {

        @Override
 	void show() { // ❌ 오류! final 메서드를 재정의할 수 없음
 		System.out.println("Hello from Child");
 	}
}
상수
- 변하지 않고 항상 일정한 값을 갖는 수 잆니다.
- Java에서 상수는 대문자로 표현하는 것이 관례입니다.
- 프로그램 실행 중에 절대 변경되어서는 안되기 때문에 static final 키워드를 사용해 선언합니다.
- static으로 선언된 변수는 프로그램 시작 시 한 번만 초기화되고 모든 인스턴스에서 같은 값을 공유합니다.
public class Circle {
 	final static double PI = 3.14159; // ✅ 상수 선언
}
System.out.println("상수활용: " + Circle.PI);
static으로 선언하는 이유
- 보통 상수는 여러 곳에서 값을 공유해 쓰일 목적으로 활용됩니다.
- 참조형 변수를 static 없이 선언할 경우 객체마다 값이 중복 저장됩니다.
불변객체
- 내부 상태를 변경할 수 없는 객체입니다.
final을 속성(property, field)에 활용합니다.- 세터없이 설계합니다.
- 변경이 필요할 경우 새로운 객체를 만들어야 합니다.
public final class Circle {

 	final static double PI = 3.14159;
 	final double radius; // ✅ final 로 선언해서 값이 변경되지 않도록 합니다.

    Circle(double radius) {
 		this.radius = radius;
 	}
}
public final class Circle { // ✅ 클래스에 final 선언 (상속 방지)

 	private static final double PI = 3.14159; // ✅ 상수는 private static final로
 	private final double radius; // ✅ 필드를 private final로 선언하여 완전한 불변

    public Circle(double radius) { // ✅ 생성자는 public으로 유지
 		this.radius = radius;
 	}

 	public double getRadius() { // ✅ public 메서드로 변경
 		return radius;
 	}

 	public double getArea() { // ✅ public 메서드로 변경
 		return PI * radius * radius;
 	}

 	public double getPerimeter() { // ✅ public 메서드로 변경
 		return 2 * PI * radius;
 	}
}
불변 객체의 값 변경이 필요한 경우
public final class Circle {

    public static final double PI = 3.14159;
 	private final double radius;

 	public Circle(double radius) {
 		this.radius = radius;
 	}

 	// ✅ 반지름이 다른 새로운 Circle 생성 (불변 객체 유지)
 	public Circle changeRadius(double newRadius) {
 		return new Circle(newRadius); // 생성자 호출: 기존 객체 변경 X, 새 객체 생성
 	}
}
인터페이스
인터페이스란
- 설계 표준입니다.
- 클래스가 따라야할 최소한의 공통 규칙을 정의하는 역할을 합니다.
인터페이스의 사용 이유
- 모든 설계에 표준이 있는 이유와 똑같습니다.
- 개발자마다 서로 다른 방식으로 메서드를 만든다면 일관성이 깨질 수 있습니다.
- 인터페이스를 활용해서 최소한의 규격을 정의합니다.
- 세부 구현은 각 클래스에 맡깁니다.
- 일관성을 유지하면서 클래스가 고유한 특색을 확장할 수 있도록 돕습니다.
인터페이스 활용
- 클래스에서
implements키워드로 인터페이스를 활용할 수 있습니다. - 인터페이스를 구현한 클래스를 구현체라고 합니다.
interface Car {
 	void drive();
 	void stop();
}
class LuxuryCar implements Car {
@Override
void drive() { // ✅ 인터페이스 규칙 준수
System.out.println("멋지게 이동합니다."); // 구현 내용은 자유롭습니다.
}
@Override
void stop() { // ✅ 인터페이스 규칙 준수
System.out.println("멋지게 정지합니다."); // 구현 내용은 자유롭습니다.
}
void charge() { // 🎉 CarA 만의 기능을 확장 가능합니다.
System.out.println("차량을 충전합니다");
}
}
class SpeedCar implements Car {

		@Override
 	void drive() { // ✅ 인터페이스 규칙 준수
 		System.out.println("빠르게 이동합니다."); // 구현 내용은 자유롭습니다.
 	}

 		@Override
 	void stop() { // ✅ 인터페이스 규칙 준수
 		System.out.println("빠르게 정지합니다."); // 구현 내용은 자유롭습니다.
 	}

 	void autoParking() { // 🎉 CarB 만의 기능을 확장 가능합니다.
 		System.out.println("자동 주차 기능을 실행합니다.");
 	}
}
public class Main {

 	public static void main(String[] args) {
 		LuxuryCar car1 = new LuxuryCar();
 		SpeedCar car2 = new SpeedCar();

		// ✅ 각 차량의 공통 기능
 		car1.drive();
 		car1.stop();
 		car2.drive();
 		car2.stop();

        // ✅각 차량의 고유 기능
 		car1.charge();
        car2.autoParking();
 	}
}
인터페이스 다중 구현
implements키워드로 다수의 인터페이스를 구현할 수 있습니다.- 한 개의 클래스가 여러 인터 페이스를 구현한 경우 다중구현이라고 합니다.
// 🚀 "동물의 기본 기능" 인터페이스
interface Animal {
 	void eat();
}

// ✈ "나는 기능" 인터페이스
interface Flyable {
	void fly();
}

// ✅ 다중 구현
class Bird implements Animal, Flyable {

 	public void eat() {
		System.out.println("새가 먹이를 먹습니다.");
 	}

 	public void fly() {
 		System.out.println("새가 하늘을 납니다.");
 	}

 	// 추가적으로 land() 메서드도 가능하지만 필수는 아님
 	public void land() {
 		System.out.println("새가 착륙합니다.");
 	}
}
// 실행 코드
public class Main {

	public static void main(String[] args) {
 		Bird bird = new Bird();

        bird.eat(); // "새가 먹이를 먹습니다."
 		bird.fly(); // "새가 하늘을 납니다."
 		bird.land(); // "새가 착륙합니다."
 	}
}
인터페이스 다중상속
extends키워드로 상속을 구현할 수 있습니다.
// 1. 기본 인터페이스: 동물의 기본 기능
interface Animal {
	void eat();
}

// 2. 추가 인터페이스: 나는 기능
interface Flyable {
 	void fly();
}

// 3. ✅ 다중 상속새로운 인터페이스: 동물 + 나는 기능
interface FlyableAnimal extends Animal, Flyable {
 	void land(); // 추가 기능
}

// 4. 새 클래스 (FlyableAnimal을 구현)
class Bird implements FlyableAnimal {

    public void eat() {
 		System.out.println("새가 먹이를 먹습니다.");
 	}

 	public void fly() {
 		System.out.println("새가 하늘을 납니다.");
 	}

 	public void land() {
 		System.out.println("새가 착륙합니다.");
 	}
}

// 5. 실행 코드
public class Main {
 	public static void main(String[] args) {
 		Bird bird = new Bird();

    	bird.eat(); // "새가 먹이를 먹습니다."
 		bird.fly(); // "새가 하늘을 납니다."
 		bird.land(); // "새가 착륙합니다."
 	}
}
인터페이스에 변수를 선언하는 경우
- 변수 선언 시 형식에 관계 없이 자동으로 상수로 선언됩니다.
public static final로 선언됩니다.static으로 선언되기 때문에 구현체 없이도 활용 가능합니다.- 인터페이스는 표준의 역할이므로 변수선언은 최소화하는 것이 좋습니다.
public interface Config {
 	int POPULATION = 100; // public static final 로 선언됩니다.
}
public class Main {
   	public static void main(String[] args) {
 		System.out.println(Config.POPULATION);
    }
}
반갑습니다!