학습 키워드
- 자바개념확장
- 코드실습
- 트러블슈터
객체지향
제네릭
- 클래스, 메서드 등에 사용되는
<T>타입 매개변수를 의미합니다. - 타입을 미리 지정하지 않고 사용 시 유연하게 결정할 수 있는 문법입니다.
- 코드 재사용성과 타입 안정성을 보장받을 수 있습니다.
public class GenericBox<T> { // ✅ 제네릭 클래스
    private T item;

    public GenericBox(T item) {
        this.item = item;
    }

    public T getItem() {
        return this.item;
    }
}
타입소거
- 컴파일 시점에 제네릭 타입 정보를 제거하는 과정입니다.
Object로 대체됩니다.- 필요한 경우 컴파일러가 자동으로 강제 다운 캐스팅 코드를 삽입하여 타입 안전성을 보장합니다.
public class Main {
    public static void main(String[] args) {

        // 1. ✅ 재사용 가능(컴파일시 타입소거: T -> Object)
        GenericBox<String> strGBox = new GenericBox<>("ABC");
        GenericBox<Integer> intGBox = new GenericBox<>(100);
        GenericBox<Double> doubleGBox = new GenericBox<>(0.1);

        // 2. ✅ 타입 안정성 보장(컴파일시 타입소거: 자동으로 다운캐스팅)
        String strGBoxItem = strGBox.getItem();
        Integer intGBoxItem = intGBox.getItem();
        Double doubleGBoxItem = doubleGBox.getItem();
        System.out.println("strGBoxItem = " + strGBoxItem);
        System.out.println("intGBoxItem = " + intGBoxItem);
        System.out.println("doubleGBoxItem = " + doubleGBoxItem);
    }
}
제네릭 매서드
- 메서드 내부에서 사용할 타입을 유연하게 지정하는 기능입니다.
- 클래스 제네릭 타입과 별개로 독립적인 타입 매개변수를 가집니다.
public class GenericBox<T> {

    // 속성
    private T item;

    // 생성자
    public GenericBox(T item) {
        this.item = item;
    }

    // 기능
    public T getItem() {
        return this.item;
    }

		// ⚠️ 일반 메서드 T item 는 클래스의 <T> 를 따라갑니다.
    public void printItem(T item) {
        System.out.println(item);
    }

    // ✅ 제네릭 메서드 <S> 는 <T> 와 별개로 독립적이다.
    public <S> void printBoxItem(S item) {
        System.out.println(item);
    }
}
public class Main {
public static void main(String[] args) {
GenericBox<String> strGBox = new GenericBox<>("ABC");
GenericBox<Integer> intGBox = new GenericBox<>(100);
// ⚠️ 일반메서드: 클래스 타입 매개변수를 따라갑니다.
// String 데이터 타입 기반으로 타입소거가 발생.
// String 타입의 다운캐스팅 코드 삽입!
strGBox.printItem("ABC"); // ✅ String 만 사용가능
strGBox.printItem(100); // ❌ 에러 발생
// ✅ 제네릭 메서드: 독립적인 타입 매개변수를 가집니다.
// String 타입 정보가 제네릭 메서드에 아무런 영향을 주지 못함.
// 다운캐스팅 코드 삽입되지 않음.
strGBox.printBoxItem("ABC"); //✅ 모든 데이터 타입 활용 가능
strGBox.printBoxItem(100); //✅ 모든 데이터 타입 활용 가능
strGBox.printBoxItem(0.1); //✅ 모든 데이터 타입 활용 가능
}
}
람다
- 익명 클래스를 더 간결하게 표현하는 문법입니다.
- 함수형 인터페이스를 통해서 구현하는 것을 권장합니다.
// 람다 표현식
Calculator calculator1 = (a, b) -> a + b;

// 익명클래스
Calculator calculator1 = new Calculator() {
		@Override
		public int sum(int a, int b) {
				return a + b;
		}
};
@FunctionalInterface // ✅ 함수형 인터페이스 선언
public interface Calculator {
int sum(int a, int b); // ✅ 오직 하나의 추상 메서드만 선언해야합니다.
}public class Main {
public static void main(String[] args) {
...
// ✅ 람다식 활용
Calculator calculator2 = (a, b) -> a + b;
int ret2 = calculator2.sum(2, 2);
System.out.println("ret2 = " + ret2);
}
}함수형 인터페이스
- 단 하나의 추상 메서드만 가지도록 강제하는 어노테이션입니다.
- 인터페이스에 두 개 이상의 추상 메서드가 존재하면 컴파일러가 어떤 메서드를 구현하는지 모호해져 람다식에서 활용합니다.
- 오버로딩 기능을 통해 같은 이름의 메서드를 여러 형태로 정의하면 모호성이 발생할 수 있습니다.
public interface Calculator {
    int sum(int a, int b);        // ✅ 선언 가능
    int sum(int a, int b, int c); // ⚠️ 오버로딩으로 선언 가능 모호성 발생!
}
@FunctionalInterface // ✅ 함수형 인터페이스 선언
public interface Calculator {
int sum(int a, int b); // ✅ 오직 하나의 추상 메서드만 선언해야합니다.
int sum(int a, int b, int c); // ❌ 선언 불가 에러발생!
}매개변수로 전달
- 익명 클래스를 변수에 담아 전달
public class Main {
    public static int calculate(int a, int b, Calculator calculator) {
        return calculator.sum(a, b);
    }

    public static void main(String[] args) {

        Calculator cal1 = new Calculator() {
            @Override
            public int sum(int a, int b) {
                return a + b;
            }
        };

        // ✅ 익명 클래스를 변수에 담아 전달
        int ret3 = calculate(3, 3, cal1);
        System.out.println("ret3 = " + ret3); // 출력: ret3 = 6
    }
}
- 람다식을 변수에 담아 전달
public class Main {

    public static int calculate(int a, int b, Calculator calculator) {
        return calculator.sum(a, b);
    }

    public static void main(String[] args) {
        Calculator cal2 = (a, b) -> a + b;

        // ✅ 람다식을 변수에 담아 전달
        int ret4 = calculate(4, 4, cal2);
        System.out.println("ret4 = " + ret4); // 출력: ret4 = 8
    }
}
- 람다식을 직접 전달
public class Main {

    public static int calculate(int a, int b, Calculator calculator) {
        return calculator.sum(a, b);
    }

    public static void main(String[] args) {
        // ✅ 람다식을 직접 매개변수로 전달
        int ret5 = calculate(5, 5, (a, b) -> a + b);
        System.out.println("ret5 = " + ret5); // 출력: ret5 = 10
    }
}
스트림
- 데이터를 효율적으로 처리할 수 있는 흐름입니다.
- 선언형 스타일로 가독성이 굉장히 뛰어납니다.
- 데이터 준비 → 중간 연산 → 최종 연산 순으로 처리됩니다.
- 컬렉션과 함께 자주 활용됩니다.
public class Main {

    public static void main(String[] args) {

        // ArrayList 선언
        List<Integer> arrayList = new ArrayList<>(List.of(1, 2, 3, 4, 5));

        // ✅ 스트림 선언적 스타일: 각 요소 * 10 처리
        List<Integer> ret2 = arrayList.stream().map(num -> num * 10).collect(Collectors.toList());
        System.out.println("ret2 = " + ret2);
    }
}
스트림 처리단계
| 단계 | 설명 | 주요 API |
|---|---|---|
| 데이터 준비 | 컬렉션을 스트림으로 변환 | stream() |
| 중간 연산 등록 | 데이터 변환 및 필터링 | map() |
| 최종 연산 | 최종 처리 및 데이터 변환 | collect() |
// 1. 데이터 준비: 스트림 생성
Stream<Integer> stream = arrayList.stream();

// 2. 중간 연산 등록: 각 요소를 10배로 변환 로직 등록
Stream<Integer> mappedStream = stream.map(num -> num * 10);

// 3. 최종 연산: 최종 결과 리스트로 변환
List<Integer> ret2 = mappedStream.collect(Collectors.toList());
// ✅ 한 줄로 표현 가능
List<Integer> ret2 = arrayList.stream() // 1. 데이터 준비
    .map(num -> num * 10)               // 2. 중간 연산 등록
    .collect(Collectors.toList());  // 3. 최종 연산
람다식과 활용
public class Main {

    public static void main(String[] args) {

        // ArrayList 선언
        List<Integer> arrayList = new ArrayList<>(List.of(1, 2, 3, 4, 5));

        // 스트림 없이: 각 요소 * 10 처리
        ArrayList<Integer> ret1 = new ArrayList<>();
        for (Integer num : arrayList) {
            int multipliedNum = num * 10;
            ret1.add(multipliedNum);
        }
        System.out.println("ret1 = " + ret1);

        // 스트림 활용: 각 요소 * 10 처리
        List<Integer> ret2 = arrayList.stream().map(num -> num * 10).collect(Collectors.toList());
        System.out.println("ret2 = " + ret2);

        // 직접 map() 활용해보기
        // 1. 익명클래스를 변수에 담아 전달
        Function<Integer, Integer> function = new Function<>() {

            @Override
            public Integer apply(Integer integer) {
                return integer * 10;
            }
        };
        List<Integer> ret3 = arrayList.stream()
                .map(function)
                .collect(Collectors.toList());
        System.out.println("ret3 = " + ret3);

        // 2. 람다식을 변수에 담아 전달
        Function<Integer, Integer> functionLambda = (num -> num * 10);
        List<Integer> ret4 = arrayList.stream()
                .map(functionLambda)
                .collect(Collectors.toList());
        System.out.println("ret4 = " + ret4);

				// 람다식 직접 활용
        List<Integer> ret5 = arrayList.stream()
                .map(num -> num * 10)
                .collect(Collectors.toList());
        System.out.println("ret5 = " + ret5);
    }
}
중간연산
List<Integer> arrayList = new ArrayList<>(List.of(1, 2, 3, 4, 5));

// ✅ filter() + map() 사용 예제
List<Integer> ret6 = arrayList.stream() // 1. 데이터 준비: 스트림 생성
        .filter(num -> num % 2 == 0)    // 2. 중간 연산: 짝수만 필터링
        .map(num -> num * 10)           // 3. 중간 연산: 10배로 변환
        .collect(Collectors.toList()); // 4. 최종 연산: 리스트로 변환

System.out.println(ret6); // 출력: [20, 40]
코드실습
예외처리
package com.example.trycatchtest;

import java.util.Scanner;

public class Trycatchtest {
    public static void main(String[] args) {
        Scanner sc = new Scanner(System.in);

        while(true){
            try{
                System.out.println("사용자 아이디를 입력하세요.");
                String username = sc.nextLine();
                System.out.println("사용자 패스워드를 입력하세요.");
                String password = sc.nextLine();

                login(username,password);
                System.out.println("로그인 성공.");
                break;
            } catch(Exception e) {
                System.out.println(e.getMessage());
            }

        }
    }

    // 메서드 사용지로 예외를 전달.
    public static void login(String username, String password) throws Exception{
        if(!username.equals("admin") || !password.equals("1234")) {
            throw new Exception("로그인 실패. 아이디 또는 패스워드가 잘못되었습니다.");
        }
    }
}
예외가 발생할 코드를 try{} 로 감싸고 catch 로 해결합니다.
위의 코드의 경우 입력된 값을 확인하여 예외가 발생할 경우 계속하여 재시도 하도록 설계되어 있습니다.
Optional
package com.example.optional;

public class Student {
    private String name;

    public Student(String name) {
        this.name = name;
    }

    public String getName() {
        return name;
    }
}
package com.example.optional;
import java.util.Optional;
public class CampService {
private static Student[] students = {
new Student("Spartan"),
new Student("Steve"),
new Student("John")
};
public Optional<Student> getStudent(String name) {
for (Student student : students) {
if (student.getName().equals(name)) {
return Optional.of(student);
}
}
return Optional.ofNullable(null);
}
}package com.example.optional;
import java.util.Optional;
import java.util.Scanner;
public class Main {
public static void main(String[] args) {
Scanner sc = new Scanner(System.in);
CampService camp = new CampService();
System.out.println("찾는 학생의 이름을 입력하세요,");
String name = sc.nextLine();
Optional<Student> optional = camp.getStudent(name);
boolean flag = optional.isPresent();
if (flag) {
Student student = optional.get();
String studentName = student.getName();
System.out.println(studentName);
} else {
System.out.println("학생이 데이터가 없습니다.");
}
}
}getStudent(); 매서드의 이해가 조금은 힘들었지만, 매서드의 이해를 이해하고 나니 굉장히 즐거웠습니다.
컬렉션
package com.example.collectiontest;

public class Product {
   private String name;
   private int price;

   public Product(String name, int price) {
       this.name = name;
       this.price = price;
   }

   public String getName() {
       return name;
   }

   public int getPrice() {
       return price;
   }
}
package com.example.collectiontest;
import java.util.ArrayList;
import java.util.List;
public class Cart {
private List<Product> cart = new ArrayList<>();
public void addProduct(Product product) {
cart.add(product);
System.out.println(product.getName() + "가 장바구니에 추가되었습니다");
}
public void removeProduct(String productName) {
boolean removed = false;
for (Product product : cart) {
if (product.getName().equals(productName)) {
cart.remove(product);
removed = true;
System.out.println(product.getName() + "가 장바구니에서 제거 되었습니다.");
break;
}
}
if (!removed) {
System.out.println("해당 상품이 장바구니에 없습니다.");
}
}
public void printCart() {
if (cart.isEmpty()) {
System.out.println("장바구니가 비어 있습니다.");
} else {
for (Product product : cart) {
System.out.println(product.getName() + ": " + product.getPrice());
}
}
}
public void calculateTotalPrice() {
int total = 0;
for (Product product : cart) {
total += product.getPrice();
}
System.out.println("총 금액은: " + total);
}
}package com.example.collectiontest;
import java.util.ArrayList;
import java.util.Scanner;
public class Main {
public static void main(String[] args) {
Cart cart = new Cart();
Product arr1 = new Product("양파", 100);
Product arr2 = new Product("사과", 200);
Product arr3 = new Product("생선", 300);
Product arr4 = new Product("두부", 400);
System.out.println("장바구니 상품 추가: ");
cart.addProduct(arr1);
cart.addProduct(arr2);
cart.addProduct(arr3);
cart.addProduct(arr4);
System.out.println();
System.out.println("장바구니 상품 조회: ");
cart.printCart();
System.out.println();
System.out.println("장바구니 총 금액 조회: ");
cart.calculateTotalPrice();
System.out.println();
System.out.println("장바구니에서 사과 제거: ");
cart.removeProduct("사과");
System.out.println();
}
}컬렉션 또한 배열의 비유연성을 대체할 프레임워크라는 개념만을 습득했을 뿐, 코드진행에 대한 이해가 부족합니다.
트러블슈팅
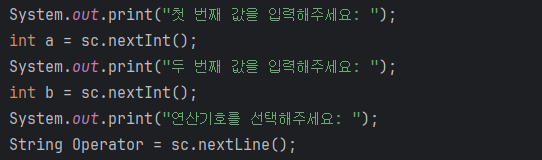
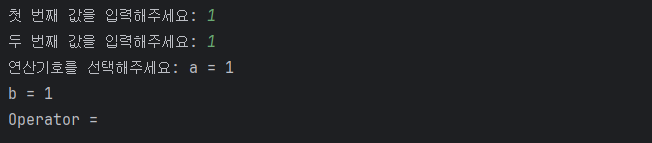
연산기호를 입력하지도 않았는데 a = 1이라는 문라자 자동으로 입력되고 다음 줄에도 의도하지 않은 코드가 입력되었다.
그 이유는 내가 연산기호 입력에 nextLine(); 을 사용했기 때문이다. 터미널에서는 a와 b의 값이 그저 1로만 보이지만 사실 입력을 하고 엔터를 누른 순간 그 뒤에는 케리지 리턴이 함께 포함되어 입력이된다. nextInt(); 케리지 리턴을 무시하고 입력을 받지만 nextLine(); 은 한 줄 단위로 입력을 받기 때문에 이런 일이 생긴 것이다. 나는 Operator 값을 넣지 않았다고 생각했지만 사실은 내가 입력하기 전, 케리지 리턴 값이 먼저 들어가 버린 것이다. 이를 해결하기 위해 케리지 리턴을 무시하는 next();로 메서드를 변경하였다.

반갑습니다!