[학습 목표]
- 프로세스와 쓰레드의 차이점에 대해서 이해합니다.
- 싱글 쓰레드와 멀티 쓰레드의 차이점에 대해서 이해합니다.
- Java에서 쓰레드를 생성하는 방법에 대해 배웁니다.
- 쓰레드 우선순위 및 그룹에 대해서 사용법을 배웁니다.
- 데몬 쓰레드와 사용자 쓰레드의 차이점을 이해하고 사용법을 배웁니다.
- 쓰레드의 상태와 제어하는 방법에 대해 배웁니다.
- 쓰레드의 동시성 문제를 해결하기 위해 동기화 하는 방법을 알아봅니다.
- 자바 8에서 있었던 큰 변화와 그 근간을 알아봅니다.
- 함수형 프로그래밍의 아주 간략한 아이디어를 배웁니다.
- 함수형 인터페이스와 람다를 이해합니다.
- Java Stream 을 알아봅니다.
- Null 이 왜 나쁜지 예시 코드와 함께 알아보고 개선합니다.
- 5번의 아이디어를 발전시킨 Optional 객체를 알아봅니다.
1.프로세스와 쓰레드
1)프로세스와 쓰레드
프로세스와 쓰레드 의 차이
- 프로세스 : 운영체제로부터 자원을 할당받는 작업의 단위
- 쓰레드 : 프로세스가 할당받은 자원을 이용하는 실행의 단위
프로세스
실행 중인 프로그램
- Java 프로그램을 실행시키면 이프로그램은 프로세스라는 이름으로 운영체제 위에서 실행됩니다.
- 즉, OS 위에서 실행되는 모든 프로그램은 OS가 만들어준 프로세스에서 실행됩니다.
- OS가 프로그램 실행을 위한 프로세스를 할당해줄때 프로세스안에 프로그램 Code와 Data 그리고 메모리 영역(Stack, Heap)을 함께 할당해줍니다.
- Code 는 Java main 메소드와 같은 코드를 말합니다.
- Data 는 프로그램이 실행중 저장 할 수 있는 저장공간을 의미합니다.
- 전역변수, 정적변수(static), 배열등 초기화된 데이터를 저장하는 공간
- Memory (메모리 영역)
- Stack : 지역변수, 매개변수 리턴 변수를 저장하는 공간
- Heap : 프로그램이 동적으로 필요한 변수를 저장하는 공간 (new(), mallock())
쓰레드
프로세스내에서 일하는 일꾼(코드실행의 흐름)
- 프로그램에서 실행요청이 들어오면 생성됨
- 프로세스 안에는 여러 쓰레드(일꾼)들이 있고, 쓰레드들은 실행을 위한 프로세스 내 주소공간이나 메모리공간(Heap)을 공유받습니다.
- 쓰레드(일꾼)들은 각각 명령처리를 위한 자신만의 메모리공간(Stack)도 할당받습니다.
[Java Thread]
JVM 프로세스 안에서 실행되는 쓰레드
생성과 함께 Java Main 쓰레드부터 실행!!
2)멀티 쓰레드
Java는 메인 쓰레드가 main() 메서드를 실행시키면서 시작이 됩니다.
- 메인 쓰레드는 필요에 따라서 작업 쓰레드들을 생성해서 병렬로 코드를 실행 시킬 수 있습니다.
- 즉, Java는 멀티 쓰레드를 지원합니다.
싱글 쓰레드
프로세스 안에 하나의 쓰레드만 실행
Java=> main()메서드만 실행시킴->싱글 스레드
메인 쓰레드 종료되면 JVM 같이 종료
멀티 쓰레드
프로세스 안에서 여러 개의 쓰레드가 실행되는 것!
Java프로그램은 메인쓰레드외에 다른 작업 쓰레드를 생성(메인 쓰레드 안에서)
- 장점
- 여러개 작업 동시에 -> 성능 좋아짐
- 스택 제외 모든 영역 (프로세스 내) 메모리 공유-> 자원 효율적 사용
- 응답 쓰레드와 작업 쓰레드 분리해 ->비동기 처리(??) ->빠른 응답
- 단점
- 동기화 문제 발생 : 싱크 안맞, 자원 충돌!
- 교착 상태(데드락) : 서로 자원 원하는 상태 -> 서로 점유하는 리소스를 내놓지 않아서(종료되야) 서로 기다리는 상태가 무한
=> 안정적으로 컨트롤가능한 기법 사용해서 문제없이 효율적인 병렬,동시 처리 가능
3)Thread와 Runnable
(실제로 Java에서 어떻게 구현??)
1.Thread 클래스 상속받아서 run() 오버라이딩-> main에서 start()
//1. Thread 클래스 이용(상속)
public class TestThread extends Thread{
    @Override
    public void run() {
        //실제 우리가 쓰레드에서 수행할 작업!
        for(int i=0;i<100;i++){
            System.out.print("*");
        }
    }
}
public class Main {
    //메인 스레드 구동
    public static void main(String[] args) {
        TestThread testThread = new TestThread();
        testThread.start();
    }
}- Runnable interface 이용(더 많이 쓰임)
public class TestRunnable implements Runnable{
    @Override
    public void run() {
        //쓰레드에서 수행할 작업 정의!
        for(int i=0;i<100;i++){
            System.out.print("$");
        }
    }
}
public class Main {
//메인 스레드 구동
public static void main(String[] args) {
Runnable run= new TestRunnable();
Thread thread=new Thread(run);
thread.start();
}
}- 람다식 이용(모던 자바에서 설명)
public class Main {
    public static void main(String[] args) {
        //람다식 (익명 합수) -> run에 적었던 내용 {} 안에 적어준다!
        Runnable task = () -> {
            int sum = 0;
            for (int i = 0; i < 50; i++) {
                sum += i;
                System.out.println(sum);
            }
            System.out.println(Thread.currentThread().getName() + " 최종 합 : " + sum);
        };

        Thread thread1 = new Thread(task);//runnabale 객체
        thread1.setName("thread1");//쓰레드의 이름 정의
        Thread thread2 = new Thread(task);
        thread2.setName("thread2");

        //병렬적으로 실행 thread 1 구동중에 thread2가 참여!
        thread1.start();
        thread2.start();
    }
}
실습!
public class Main {
    public static void main(String[] args) {
        //첫번쨰
        Runnable task = () -> {
            for (int i = 0; i < 100; i++) {
                System.out.print("$");
            }
        };
        //두번째
        Runnable task2 = () -> {
            for (int i = 0; i < 100; i++) {
                System.out.print("*");
            }
        };


        Thread thread1 = new Thread(task);
        thread1.setName("thread1");
        Thread thread2 = new Thread(task2);
        thread2.setName("thread2");

        thread1.start();
        thread2.start();

        //출력 시 ***$$$$***$$$$ 이런식으로됨
        //순서 보장X 할때마다 다른 결과
        //걸리는 시간이나 동작 예측 할 수 없다!(안정적X)
    }
}
4)데몬 쓰레드와 사용자 쓰레드
데몬 쓰레드
보이지않는 곳(background)에서 실행되는 낮은 우선순위 가진 쓰레드!
보조적인 역할 담당
대표적인 데몬 쓰레드 : 가비지 컬렉터(CG) - 메모리 영역 정리
- 우선순위가 낮다! -> 상대적으로 다른 쓰레드에 비해 리소스 적게 할당 받음
- JVM은 사용자 쓰레드 작업 끝나면 데몬 쓰레드 강제종료!(부가적인 작업이라고 생각해서)
public class Main {
    public static void main(String[] args) {

        Runnable demon = () -> {
            for (int i = 0; i < 1000000; i++) {
                System.out.println(i+"번째 demon");
            }
        };

        Thread thread = new Thread(demon);
        /*중요 : 우선순위가 낮다! -> 상대적으로 다른 쓰레드에 비해 리소스 적게 할당 받음-> 느림*/
        thread.setDaemon(true); // true로 설정시 데몬스레드로 실행됨
        thread.start();
        // 100만번 출력 안되고 중간에 끊김 !

        for (int i = 0; i < 100; i++) {
            System.out.println(i+"번째 task");
        }
        //main 쓰레드라 100번 출력다됨
    }
}
사용자 쓰레드
명시적으로(보이는 곳에서,foreground) 쓰레드를 만들어 실행시킴!
높은 우선순위를 가진 쓰레드!
기존에 만들었던 쓰레드!
5)쓰레드 우선순위와 쓰레드 그룹
쓰레드 우선순위
멀티 쓰레드-> 쓰레드 마다 작업 중요도에 따라 우선순위 지정 -> 작업시간 많이 부여(리소스 많이 할당) ->빠르게 처리
- 최대 우선순위 (MAX_PRIORITY) = 10
- 최소 우선순위 (MIN_PRIORITY) = 1
- 보통 우선순위 (NROM_PRIORITY) = 5
- 기본 값이 보통 우선순위입니다.
- 1~10 사이의 숫자로 지정
- 이 우선순위의 범위는 OS가 아니라 JVM에서 설정한 우선순위입니다.
- 스레드 우선순위는
setPriority(숫자)메서드로 설정
getPriority()로 우선순위를 반환
public class Main {
    public static void main(String[] args) {
        Runnable task1 = () -> {
            for (int i = 0; i < 100; i++) {
                System.out.print("$");
            }
        };

        Runnable task2 = () -> {
            for (int i = 0; i < 100; i++) {
                System.out.print("*");
            }
        };

        Thread thread1 = new Thread(task1);
        thread1.setPriority(8);//우선 순위 할당
        int threadPriority = thread1.getPriority();//get으로 반환
        System.out.println("threadPriority = " + threadPriority);

        Thread thread2 = new Thread(task2);
        thread2.setPriority(2);//우선 순위 할당

        //thread1 -> thread2
        // 더 빨리 끝날 가능 성이 높다 (완벽하게 보장X)
        // 차이 별로 안남(가벼운 작업들이라)-> 무거운 작업 시에 빛을 발함.
        thread1.start();
        thread2.start();
    }
}
쓰레드 그룹
쓰레드를 특성마다 묶어서 관리(한꺼번에 종료, 멈춤 등)
- 모든 쓰레드는 반드시 하나의 그룹에 포함되어야한다!!
- 지정안해도 자동으로 main 그룹에 포함
- 별도로 그룹 지정하면 그 그룹에 속하게됨
public class Main {
    public static void main(String[] args) {

        //
        Runnable task = () -> {
            // thead.interrupt(); 시행 전까지
            while (!Thread.currentThread().isInterrupted()) {
                try {
                    Thread.sleep(1000);
                    System.out.println(Thread.currentThread().getName());
                } catch (InterruptedException e) {
                    break;
                }
            }
            System.out.println(Thread.currentThread().getName() + " Interrupted");
        };

        // ThreadGroup 클래스로 객체를 만듭니다.
        ThreadGroup group1 = new ThreadGroup("Group1");

        // Thread 객체 생성시 첫번째 매개변수로 넣어줍니다.
        // Thread(ThreadGroup group, Runnable target, String name)
        // THrad 셍성자가 여러개라 구현 가능
        Thread thread1 = new Thread(group1, task, "Thread 1");
        Thread thread2 = new Thread(group1, task, "Thread 2");

        // Thread에 ThreadGroup 이 할당된것을 확인할 수 있습니다.
        System.out.println("Group of thread1 : " + thread1.getThreadGroup().getName());
        System.out.println("Group of thread2 : " + thread2.getThreadGroup().getName());

        thread1.start();
        thread2.start();

        try {
            // 현재 쓰레드를 지정된 시간(5초)동안 멈추게 합니다.
            Thread.sleep(5000);
        } catch (InterruptedException e) {
            e.printStackTrace();
        }

        // interrupt()는 일시정지 상태인 쓰레드를 실행대기 상태로 만듭니다.
        group1.interrupt();
        //한 꺼번에 일시정지
    }
}
6)쓰레드 상태와 제어
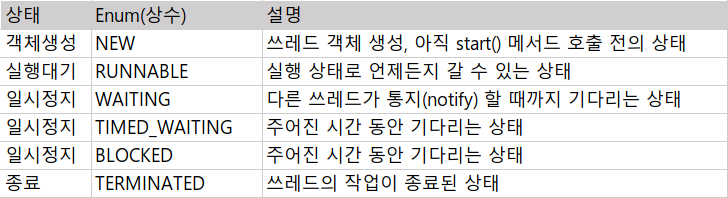
쓰레드 상태
Thread.sleep();
Thread.interrupt();
일시정지, 종료 => 상태 존재 ,제어가능
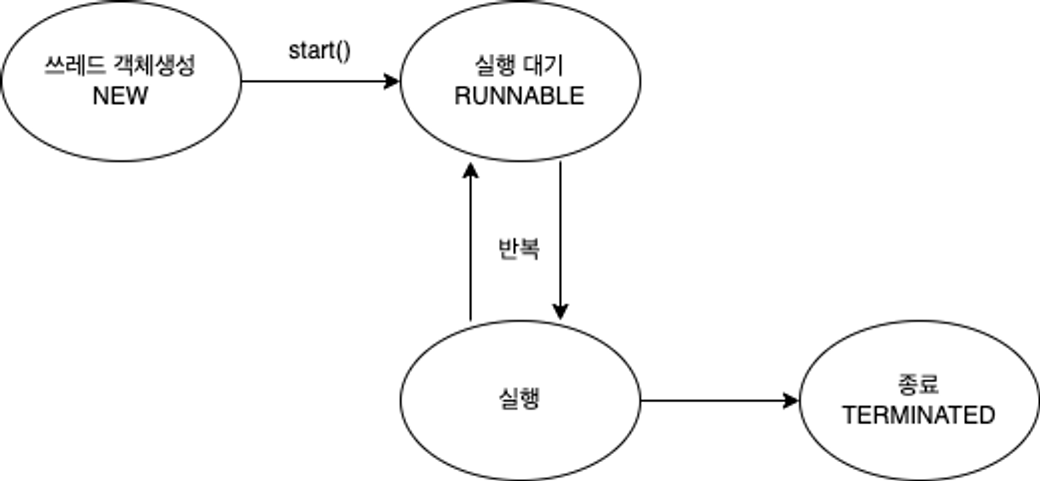
- 실행 대기와 실행 반복!

쓰레드의 상태
쓰레드 제어
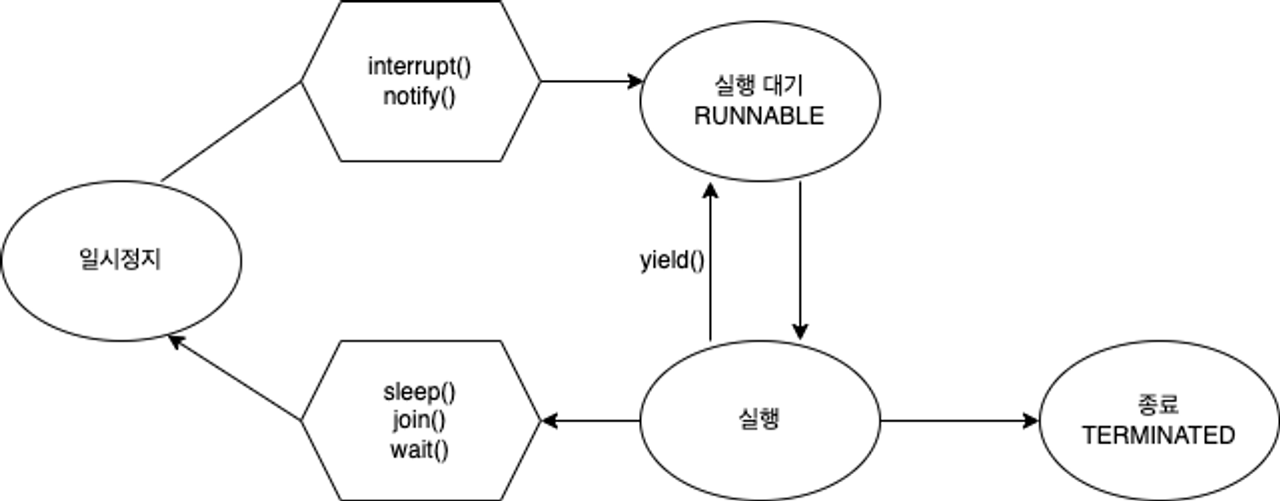
-
실행중 -> 일시정지
-
sleep(1000): 현재 쓰레드를 지정된 시간동안 멈추게 함(TIMED WAITING)
- 1000msc = 1sec
- 예외처리 필수 (try - catch)
- static 메소드 이므로 Thread.sleep()으로 사용!(객체 지정 불가)public class Main { public static void main(String[] args) { Runnable task = () -> { // (1)예외처리 필수 // sleep 중에 interrupt()호출 -> (실행 대기 상태) // sleep이 깨지면 InterruptedException 발생할 수 있음 try { //(2) 특정 쓰레드 지정 불가 (static 메서드) Thread.sleep(2000);// TIMED_WAITING(주어진 시간동안만 기다리는 상태) } catch (InterruptedException e) { e.printStackTrace(); } System.out.println("task : " + Thread.currentThread().getName());// 2초후 Thread 출력 }; Thread thread = new Thread(task, "Thread"); thread.start(); try { // thread.sleep(1000);//객체로 만든 것 잠재움 // 특정 쓰레드 지정 불가 (static) Thread.sleep(1000);//메인 쓰레드가 잠잔다! System.out.println("sleep(1000) : " + Thread.currentThread().getName());//1초 후 main 출력 } catch (InterruptedException e) { e.printStackTrace(); } } <출력!> 1초 : sleep(1000) : main 2초 : Thread }
-
- 일시정지 -> 실행대기
interrupt(): 일시정지 상태인 쓰레드를 실행대기 상태로 보내다!
public class Main {
    public static void main(String[] args) {
        Runnable task = () -> {
            // interrupt() 호출 시  while문 통과 X -> catch문안거침
            while (!Thread.currentThread().isInterrupted()) {
                try {
                    Thread.sleep(1000);
                    System.out.println(Thread.currentThread().getName());
                } catch (InterruptedException e) {
                    break;
                }
            }


            System.out.println("task : " + Thread.currentThread().getName());
        };

        Thread thread = new Thread(task, "Thread");
        thread.start();

        thread.interrupt();

        //thread.isInterrupted()) 일시 정지 상태인지 확인
        System.out.println("thread.isInterrupted() = " + thread.isInterrupted());

    }
출력: sleep 안하고 바로 출력
task : Thread
thread.isInterrupted() = true
- 실행 중 ->(기다렸다가) 대기
join (): 정해진 시간동안 지정한 쓰레드가 작업하는 것을 기다림!
->시간 지정 안하면 지정한 쓰레드의 작업이 끝날 때까지 기다림
main은 thread1이 끝날 때 까지 기다려 주지 않음!
public class Main {
    public static void main(String[] args) {
        Runnable task = () -> {
            try {
                Thread.sleep(5000); // 5초
            } catch (InterruptedException e) {
                e.printStackTrace();
            }
        };

        Thread thread = new Thread(task, "thread");

        thread.start();

        long start = System.currentTimeMillis();// 0초

        try {
            thread.join();//끝날때 까지 기다림!

        } catch (InterruptedException e) {
            e.printStackTrace();
        }

        // thread 의 소요시간인 5000ms 동안 main 쓰레드가 기다렸기 때문에 5000이상이 출력됩니다.
        System.out.println("소요시간 = " + (System.currentTimeMillis() - start));//5011
    }
}yield():
남은 시간을 다음 쓰레드에게 양보하고 쓰레드 자신은 실행대기 상태가 됩니다.
public class Main {
    public static void main(String[] args) {
        Runnable task = () -> {
            try {
                for (int i = 0; i < 10; i++) {
                    Thread.sleep(1000);
                    System.out.println(Thread.currentThread().getName());
                }
            } catch (InterruptedException e) {
                Thread.yield();//남은 시간 양보한다.
            }
        };

        Thread thread1 = new Thread(task, "thread1");//10초간 이름 출력
        Thread thread2 = new Thread(task, "thread2");//10초간 이름 출력

        thread1.start();//new->Runnable
        thread2.start();//new->Runnbale

        try {
            Thread.sleep(5000);//5초
        } catch (InterruptedException e) {
            e.printStackTrace();
        }

        thread1.interrupt();//thread1 실행대기

        //출력
        //thread1
        //thread2-1초
        //thread1
        //thread2-2초
        //thread1
        //thread2-3초
        //thread1
        //thread2-4초
        //thread2-5
        //thread2-6
        //thread2-7
        //thread2-8
        //thread2-9
        //thread2-10초
    }
}*synchronized: 한 쓰레드가 진행중인 작업을 다른 쓰레드가 침범하지 못하게 막는것 Lock
- 원인 :멀티 쓰레드->자원 공유->충돌,버그 발생,교착상태
- 임계 영역 : 다른 쓰레드의 침범을 막하야하는 코드! Lock을 가진 단 하나의 쓰레드만 출입가능!
메서드 or 코드 묶음(참조변수) 앞에 synchronized 붙여 임계 영역 지정
public class Main {
    public static void main(String[] args) {
        AppleStore appleStore = new AppleStore();

        Runnable task = () -> {
            while (appleStore.getStoredApple() > 0) {
                appleStore.eatApple();
                System.out.println(Thread.currentThread().getName()+" 남은 사과의 수 = " + appleStore.getStoredApple());
            }

        };

        for (int i = 0; i < 3; i++) {
            new Thread(task,"Thread"+i).start();
        }
    }
}

class AppleStore {
    private int storedApple = 10;

    public int getStoredApple() {
        return storedApple;
    }

    public void eatApple() {
    	/****이영역의 유무가 중요~***/
        synchronized (this) {
            if (storedApple > 0) {
                try {
                    Thread.sleep(1000);
                } catch (InterruptedException e) {
                    e.printStackTrace();
                }
                storedApple -= 1;
            }
        }
    }
}
synchronized 없을 때
Thread0 남은 사과의 수 = 8
Thread2 남은 사과의 수 = 8
Thread1 남은 사과의 수 = 8
Thread2 남은 사과의 수 = 7
Thread0 남은 사과의 수 = 6
Thread1 남은 사과의 수 = 5
Thread2 남은 사과의 수 = 4
Thread0 남은 사과의 수 = 3
Thread1 남은 사과의 수 = 2
Thread0 남은 사과의 수 = 0
Thread2 남은 사과의 수 = 0
Thread1 남은 사과의 수 = -1 -> 0보다 작은값 수행됨
synchronized 있을 때
Thread0 남은 사과의 수 = 9
Thread2 남은 사과의 수 = 8
Thread1 남은 사과의 수 = 7
Thread2 남은 사과의 수 = 6
Thread0 남은 사과의 수 = 5
Thread2 남은 사과의 수 = 4
Thread1 남은 사과의 수 = 3
Thread2 남은 사과의 수 = 2
Thread0 남은 사과의 수 = 1
Thread2 남은 사과의 수 = 0
Thread1 남은 사과의 수 = 0
Thread0 남은 사과의 수 = 0
침범을 막은 코드(임계영역)를 수행하다보면 작업을 더이상 진행할 상황이 아니면,
wait()호출하여 쓰레드가 Lock반납하고 기다리게 할 수 있음.
다른 쓰레드가 Lock을 얻어 해당 객체에 대한 작업 수행,
추후에 작업 진행 할 수 있는 상황이 되면 notify() 호출해
작업 중단했던 쓰레드가 다시 Lock을 얻어 진행!
wait(): 실행 중이던 쓰레드 해당 객체의 대기실(waiting pool)에서 기다림notify(): 객체의 대기실에 있는 모든 쓰레드 중에서 임의의 쓰레드만 통지를 받음->랜덤으로!
import java.util.ArrayList;
import java.util.List;

//1명 점원이 재고 상품(각각 재고 5개)판매
//2명 손님이 구매
public class Main {
    public static String[] itemList = {
            "MacBook", "IPhone", "AirPods", "iMac", "Mac mini"
    };
    public static AppleStore appleStore = new AppleStore();
    public static final int MAX_ITEM = 5;

    public static void main(String[] args) {

        // 가게 점원
        Runnable StoreClerk = () -> {
            while (true) {
                int randomItem = (int) (Math.random() * MAX_ITEM);
                appleStore.restock(itemList[randomItem]);
                try {
                    Thread.sleep(50);
                } catch (InterruptedException ignored) {
                }
            }
        };

        // 고객
        Runnable Customer = () -> {
            while (true) {
                try {
                    Thread.sleep(77);
                } catch (InterruptedException ignored) {
                }

                int randomItem = (int) (Math.random() * MAX_ITEM);//5개 중 랜덤으로 고른다
                appleStore.sale(itemList[randomItem]);//랜덤으로 상품 쌓는다
                System.out.println(Thread.currentThread().getName() + " Purchase Item " + itemList[randomItem]);
            }
        };

        new Thread(Customer, "Customer1").start();
        new Thread(Customer, "Customer2").start();
        new Thread(StoreClerk, "StoreClerk").start();


    }
}

class AppleStore {
    private List<String> inventory = new ArrayList<>();//인벤토리

    public void restock(String item) {
        synchronized (this) {
            while (inventory.size() >= Main.MAX_ITEM) {//재고 꽉참
                System.out.println("인벤토리 꽉참 " + Thread.currentThread().getName() + " Waiting!");
                try {
                    wait(); // 재고가 꽉 차있음!! -> 점원 쓰레드 waitin pool로 감 -> 재고가 하나라도 사라지면 notify
                    Thread.sleep(333);
                } catch (InterruptedException e) {
                    e.printStackTrace();
                }
            }
            // 재입고
            inventory.add(item);
            System.out.println(item+" 입고 완료");
            notify(); // 재입고 되었음을 고객에게 알려주기!!
            System.out.println("Inventory 현황: " + inventory.toString());//전체 상품 알려줌
        }
    }

    //고객 쓰레드 임계 영역
    public synchronized void sale(String itemName) {
        while (inventory.size() == 0) {//재고 없음
            System.out.println("상품 없음 " +Thread.currentThread().getName() + " Waiting!");
            try {
                wait(); //1) 아무 재품가 없음 -> 기다림 -> 점원이 재고 넣었을 때 생길때 notify
                Thread.sleep(333);
            } catch (InterruptedException e) {
                e.printStackTrace();
            }
        }

        while (true) {
            // 고객이 주문한 제품이 있는지 확인
            for (int i = 0; i < inventory.size(); i++) {
                if (itemName.equals(inventory.get(i))) {
                    inventory.remove(itemName);//구매->재고에서 삭제
                    notify(); // 제품 샀으니깐 제품 입고하라고 알려줌
                    return; // 메서드 종료
                }
            }

            // 고객이 찾는 제품이 없을 경우
            try {
                System.out.println(Thread.currentThread().getName()+" : " +itemName+ "없음 Waiting!");
                wait();//2) 찾는 제품 없으면 기다림 -> 점원이 재입고 할 때 까지
                Thread.sleep(333);
            } catch (InterruptedException e) {
                e.printStackTrace();
            }
        }

    }
출력
MacBook 입고 완료
Inventory 현황: [MacBook]
Mac mini 입고 완료
Inventory 현황: [MacBook, Mac mini]
Customer2 : iMac없음 Waiting!
Customer1 Purchase Item MacBook
AirPods 입고 완료
Inventory 현황: [Mac mini, AirPods]
Customer2 : iMac없음 Waiting!
Customer1 Purchase Item Mac mini
IPhone 입고 완료
Inventory 현황: [AirPods, IPhone]
Customer2 : iMac없음 Waiting!
Customer1 : iMac없음 Waiting!
AirPods 입고 완료
Inventory 현황: [AirPods, IPhone, AirPods]
Customer2 : iMac없음 Waiting!
Mac mini 입고 완료
Inventory 현황: [AirPods, IPhone, AirPods, Mac mini]
Customer1 : iMac없음 Waiting!
AirPods 입고 완료
Inventory 현황: [AirPods, IPhone, AirPods, Mac mini, AirPods]
Customer2 : iMac없음 Waiting!-> iMac재고 채워질때까지 기다림
인벤토리 꽉참 StoreClerk Waiting!->하나라도 팔릴 때까지
점원과 고객이 서로 기다리는 병목현상 발생!!!
->notify,wait 주의점
->누구인지 명시를 해줘야한다 보완필요!!
<Lock 클래스>
-
synchronized(같은 메서드 내에서만 Lock을 걸 수 있다) 제약 해결
-
Lock interface를 구현한 클래스!
1) ReentrantLock : 가장 일반적인 Lock, 상호 베타적, 재진입이 가능한 Lock, 특정 조건에서 Lock을 풀고, 나중에 다시 Lock을 얻어 임계 영역으로 진입 가능=> Condition에서 활용
public class MyClass {
    private Object lock1 = new Object();
    private Object lock2 = new Object();

    public void methodA() {
        synchronized (lock1) {
            methodB();//lock1을 가진 상탱에서 lock2에 접근
        }
    }

    public void methodB() {
        synchronized (lock2) {
            // do something
            methodA();// lock2를 가진 상태에서 lock1에 접근!
        }
    }
}- methodB에서 methodA를 호출하고 있으므로, methodB에서 lock2를 가진 상태에서 methodA를 호출하면 lock1을 가지려고 할 것입니다.
- 그러나 이때, methodA에서 이미 lock1을 가지고 있으므로 lock2를 기다리는 상태가 되어 데드락이 발생할 가능성이 있습니다.
이 때 ReentrantLock 사용하면 이미 가지고 있더라도 락을 유지하면서 계속 실행
->데드락 발생 안함!
코드의 유연성 높임!
2) ReentrantReadWriteLock : 읽기를 위한 Lock과 쓰기를 위한 Lock 별도로 제공
- 읽기에는 공유적이고, 쓰기에는 베타적인 Lock!
- read-only lock : 읽기 Lock걸려있으면 다른 쓰레드들도 읽기 Lock중복으로 걸 수있음!
- 읽기 Lock걸려있는 상태에서 쓰기 Lock 거는 것 허용안됨(데이터 변경 방지!)
3) StampedLock
ReentrantReadWriteLock + 낙관적인 Lock기능 추가
낙관적인 Lock: 데이터를 변경하기 전에 Lock을 걸지 않음! => 데이터를 변경할 때만 Lock 건다!
- 작업은 빠르지만, 여러쓰레드 동시에 변경하려고 할때는 적합하지 않음
< Condition 인터페이스 >
wait() & notify()의 문제점!=> waiting pool에 있는 쓰레드 notify()할 때 쓰레드 구분못함!(특정 조건으로 깨우지 못한다!)
=>JDK 5 에서 제공한 Condition interface으로 해결
- wating pool에 있는 쓰레드를 특정 조건으로 분리해서 만족될 때만 깨우도록함!
- ReentrantLock 클래스와 함께 사용
wait() & notify() -> await() & signal() 사용
(예시로 실행까지 안해서 완벽하게 이해하지 못함!)
private ReentrantLock lock = new ReentrantLock();

// lock으로 condition 생성
private Condition condition1 = lock.newCondition();
private Condition condition2 = lock.newCondition();

private ArrayList<String> tasks = new ArrayList<>();

// 작업 메서드
public void addMethod(String task) {
		lock.lock(); // 임계영역 시작

		try {
			while(tasks.size() >= MAX_TASK) {
					String name = Thread.currentThread().getName();
					System.out.println(name+" is waiting.");
					try {
						condition1.await(); // wait(); condition1 쓰레드를 기다리게 합니다.
						Thread.sleep(500);
					} catch(InterruptedException e) {}
			}

			tasks.add(task);
			condition2.signal(); // notify();  기다리고 있는 condition2를 깨워줍니다.
			System.out.println("Tasks:" + tasks.toString());
		} finally {
			lock.unlock(); // 임계영역 끝
		}
	}
2.Java 8(모던 자바)
1.모던자바
Java의 진화!
(데이터량 증가->효율적인 알고리즘으로 처리)
프로그래머가 해결해야하는 문제가 계속 변화-> 요구 기능도 변화(니즈)
최초에는 C, C++ 같은 언어가 지배적->난이도 높고 보안이슈 ->C#,Java 탄생
- 프로그래밍 언어는 시장에 상황에 따라 대안 등장하고 적응하지 못하면 도태된다!
- Java의 대격변 Java8
java 장점: jvm만 설치되면 어디서든 실행가능, 객체지향프로그래밍 대표주자, 캡슐화!->인기 많았다
새로운 요구사항(빅데이터 AI)->맞춤형으로 진화
1)병렬처리
2)함수형 프로그래밍->람다식
프로그래밍의 패러다임
- 객체지향프로그래밍의 핵심 아이디어(1)코드의 재사용성 2)유지보수 확장 3)코드 신뢰성)
- 함수형프로그래밍의 핵심 아이디어
: 수학에서 함수처럼 특정 데이터에 의존하지 않음! (순수함수)
순수함수 - 어떤 값을 넣던지 결과 항상 동일!(예측가능), 외부 간섭X
순수X함수 - 결과 예측 불가, 외부 상황에 따라 바뀜 or 외부에 영향력 행사
-> 순수함수의 모음으로 프로그램 바라보고 구현
-> 검증 쉬움, 성능 최적화 쉬움(재사용, 캐싱),동시성 문제 해결(다른값변경X)
** Java 성장 큰 시스템에서의 핵심 -> 새로운 생태계가 열리면서 진화하거나 도태되는 시점 도달 -> 모던 자바로 커버
<Java 8에 추가된 개념>
함수형 프로그래밍 기능 추가
- 함수를 일급 값으로 바라본다!(함수를 객체 or 변수처럼 쓰겠다!)
- 변수,객체 : 함수의 인자(파라미터)로 넘기고, 함수의 결과로 반환, 값 수정, 값 대입, 연산 가능
- 기존의 메서드는 지원 안함(이급 값)->일급 값
- 람다(익명 함수) 추가
- 일급 객체
- Stream
- map, filter 등 메소드 사용
- 데이터 처리를 지연하도록 소스에서 추출된 연속된 요소
- 컬렉션의 반복을 멋있게 처리하는 기능
2.람다와 스트림
함수를 변수로 쓸 때 타입을 어떻게???->(함수형) 인터페이스
인터페이스는 타입 역할 가능!(멀티 리모컨 예제)
- 함수형 인터페이스 특징 : 추상메소드 딱 1개만 가지고 있음
- 두 메소드를 하나로! : 내부 주요 로직을 함수로 전달받아 처리
<람다>
- 예제
class Main{
	public staic void main(String []){
    	....
        parkingLot.addAll(parkingCarWithTicket(carsWantToPark));//벤츠 아우디
       //일정 돈 이상 있는 차만 주차가능
        parkingLot.addAll(parkingCarWithMoney(carsWantToPark));//현대

 		//parkingCarWithTicket, parkingCarWithMoney 함수를
        // parkCars라는 하나의 함수로 재정의
        // 파라미터에 함수가 들어간다!
        // 함수를 인터페이스로 구현

     	parkingLot.addAll(parkCars(carsWantToPark, Car::hasTicket));
        parkingLot.addAll(parkCars(carsWantToPark, Car::noTicketButMoney));

        //더 간단하게 람다함수 사용!!
          weekenparkinLot.addAll(parkCars(carsWantToPark,
          (Car car) -> car.hasParkingTicket() && car.getParkingMoney() > 1000));

        }


        public static List<Car> parkCars(List<Car> carsWantToPark, Predicate<Car> function) {
        ArrayList<Car> cars = new ArrayList<>();
        for (Car car : carsWantToPark) {
            //전달된 함수를 사용하여 구현!
            if (function.test(car)) {
                cars.add(car);
            }
        }


}
class Car{
 	....
     public static boolean noTicketButMoney(Car car) {
        return !car.hasParkingTicket && car.getParkingMoney() > 1000;
    }

    public static boolean hasTicketAndMoney(Car car) {
        return car.hasParkingTicket && car.getParkingMoney() > 1000;
    }

}

interface Predicate<T> {
    boolean test(T t);//티켓 잇는지 없는지 돈 있는지 없는지
}
(파라미터 값, ...) -> { 함수 몸체 }- 아래의 함수 두개는 같은 함수입니다.
- 이름 반환타입, return문 여부에 따라 {}까지도 생략이 가능합니다.
return문이 1줄이면 생략!
public int toLambdaMethod(int x, int y) {
	return x + y;
}

(x, y) -> {
 	return x + y;
}
//위와 동일
(x, y) -> x + y
// 이런 함수도 가능하겠죠?
public int toLambdaMethod2() {
	return 100;
}
//input 없음!
() ->{
	return 100;
}
//위와 동일
() -> 100

// 모든 유형의 함수에 가능합니다.
public void toLambdaMethod3() {
	System.out.println("Hello World");
}

() -> System.out.println("Hello World")
Stream
-
자료구조(리스트,맵,셋 등)들의 흐름을 객체로서 제공
-
사용할 수 있는 메소드를 API 로 제공
-
원본 데이터 변경하지 않음!->새롭게 추출(map,fiter,foreach)
-
일회용(한번 사용한 스트림은 어디에도 남지 않는다!)
-컬랙션에 정의 컬래션을 상속하는 구현체들은 스트림 반환 가능!
List<Car> benzParkingLot =
            carsWantToPark.stream()
            .filter((Car car) -> car.getCompany().equals("Benz"))
            .toList();

// 1carsWantToPark의 스트림값을 받아와서

// 거기 구현되어 있는 filter()메서드를 사용합니다.
// filter메서드는 함수를 파라미터로 전달받습니다.
// 여기서 함수는 제조사가 벤츠면 true를 반환하는 함수네요.
// 필터 메서드는 이름처럼 false를 반환한 스트림의 원소들을 제거합니다.

// 이 결과도 반환을 받아서 다시 리스트로 묶어줍니다.
위와 동일한 역할을 하는 코드
ArrayList<Car> benzParkingLotWithoutStream = new ArrayList<>();

for (Car car : carsWantToPark) {
    if (car.getCompany().equals("Benz")) {
        benzParkingLotWithoutStream.add(car);
    }
}
1.스트림 받아오기 (.stream())
2.스트림 가공하기(.filter() & .map())
3.스트림 결과 만들기(.toList())
스트림 API
- .filter() : 조건에 맞는 것만 반환 예) 2의 배수만, 벤츠만
- .map() : 모든 요소 가공해서 반환 예) 모든 요소 *2, 대문자로 변경
carNames.stream() .map(name -> name.toUpperCase()).toList(); // 결과 // ["SERIES 6", "A9", "IONIC 6"] - .forEach(): 내부에서 로직 수행!
List<String> carNames = Arrays.asList("Series 6", "A9", "Ionic 6");
carNames.stream()
    .forEach(System.out::println);
  //모든 요소 출력
3.Optional
null이 1조원(10억달러) 짜리 실수다
- 만든 사람 Tony Hoare이 말함
->nullpointException
->여러가지 문제점 발생
public class NullIsDanger {
    public static void main(String[] args) {

        SomeDBClient myDB = new SomeDBClient();

        String userId = myDB.findUserIdByUsername("HelloWorldMan");
		//1)데이터 있는경우 : data
        //2)데이터 없는 경우 : null -> print할 떄 null 참조한다는 문제 발생!->runtime에서 nullpointException 발생

        //System.out.println("HelloWorldMan's user Id is : " + userId);

        //-> 개선1
        if(userId != null){
			System.out.println("HelloWorldMan's user Id is : " + userId);
        }
    }
}

class SomeDBClient {

    public String findUserIdByUsername(String username) {
        // ... db에서 찾아오는 로직
				String data = "DB Connection Result";

        if (data != null) {
            return data;
        } else {
            return null;
        }
    }

}
이코드의 문제점 : null이 반환될 여지가 있음에도 null이 반환 될 수 있음을 명시하지않았다.
->개선 1 : 조건문으로 null 아닐때만 출력하게함
개선1의 문제점 : 수동이라서 약속을 지키는 사람만하고 안하는 사람은 안함...
->개선2 : 결과값 객체를 감싸서 반환
// 개선 2: 결과값을 감싼 객체를 만듭니다.
class SomeObjectForNullableReturn {
    private final String returnValue;
    private final Boolean isSuccess;

    SomeObjectForNullableReturn(String returnValue, Boolean isSuccess) {
        this.returnValue = returnValue;
        this.isSuccess = isSuccess;
    }

    public String getReturnValue() {
        return returnValue;
    }

    public Boolean isSuccess() {
        return isSuccess;
    }
}

public class NullIsDanger {
    public static void main(String[] args) {

        SomeDBClient myDB = new SomeDBClient();

        // 개선 2 : 이제 해당 메서드를 사용하는 유저는, 객체를 리턴받기 때문에 더 자연스럽게 성공여부를 체크하게 됩니다.
        SomeObjectForNullableReturn getData = myDB.findUserIdByUsername("HelloWorldMan");

        if (getData.isSuccess()) {
            System.out.println("HelloWorldMan's user Id is : " + getData.getReturnValue());
        }
    }
}

class SomeDBClient {
    // 개선 2 : 결과값을 감싼 객체를 리턴합니다.
    public SomeObjectForNullableReturn findUserIdByUsername(String username) {
        // ... db에서 찾아오는 로직
        String data = "DB Connection Result";

        if (data != null) {
            return new SomeObjectForNullableReturn(data, true);
        } else {
            return new SomeObjectForNullableReturn(null, false);
        }
    }

}
개선3) 발전시키기 제네릭 사용
class SomeObjectForNullableReturn<T> {
    private final T returnValue;
    private final Boolean isSuccess;


    SomeObjectForNullableReturn(T returnValue, Boolean isSuccess) {
        this.returnValue = returnValue;
        this.isSuccess = isSuccess;
    }

    public T getReturnValue() {
        return returnValue;
    }

    public Boolean isSuccess() {
        return isSuccess;
    }

}
모든 메서드에 적용가능!
개선3의 아이디어 발전시킨 것이 java.util.Optional 객체!
Optional
-우리가 데이터를 감쌌더 로직 + a
Optional
1.값이 null 인 Optional 생성
Optional<Car> emptyOptional = Optional.empty();
2.값이 있는 Optional 생성
Optional<Car> hasDataOptional = Optional.of(new Car());
3.값이 있을 수도 있는 Optional생성
Optional<Car> hasDataOptional = Optional.ofNullable(getCarFromDB());
예제)
Optional<String> carName = getCarNameFromDB();

String realCarName= carName.ofElse("NoCar");
//OfElse 값을 받아오는 메서드 , 파라미터에 값이 Null인 경우 반환할 값!


//위 두줄을 한줄로
String carName= getCarNameFromDB().ofElse("NoCar");


Car car = getCarNameFromDB().orElseGet(Car::new);
//파라미터에 메서드를 사용해 값 받기
//null일 경우 함수 실행

//값이 없으면 예외 발생 시킴!
//파라미터로 람다(익명함수) 사용
Car car = getCarNameFromDB()
		.orElseThrow(() -> new CarNotFoundException("No Car!));
