
타입스크립트 인터페이스
-
타입스크립트에서는 자바스크립트(ES6)에서 지원하지 않던 인터페이스를 지원한다.
-
인터페이스를 이용하여 추상화를 할 수 있다.
스프링의 DI와 NestJS의 DI
스프링의 DI
- 자바 스프링 프레임워크에서는 추상화된 인터페이스를 의존하여도 스프링 컨테이너가 "런타임"시점에 스프링 빈에 등록된 구현체를 주입하여 준다.
public interface BackEndFramework {
	String crud();
}

@Component
public class SpringBoot implements BackEndFramework {

    @Override
    public String crud() {
    	return this.getClass().getSimpleName();
    }
}

@Component
@RequiredArgsConstructor
public class Developer {

    private final BackEndFramework backEndFramework;

    public String develop() {
        return backEndFramework.crud();
    }
}-
BackEndFramework라는 인터페이스를 생성 후 구현체인 SpringBoot를 스프링 빈으로 등록한다.
-
Developer클래스에서는 추상화된 인터페이스인 BackEndFramework를 의존하고 있다.
-
테스트 해보자
@SpringBootTest
class DeveloperTest {

    @Autowired
    Developer developer;

    @Test
    void DI() {
		assertThat(developer.develop()).isEqualTo("SpringBoot");
    }
}
결과
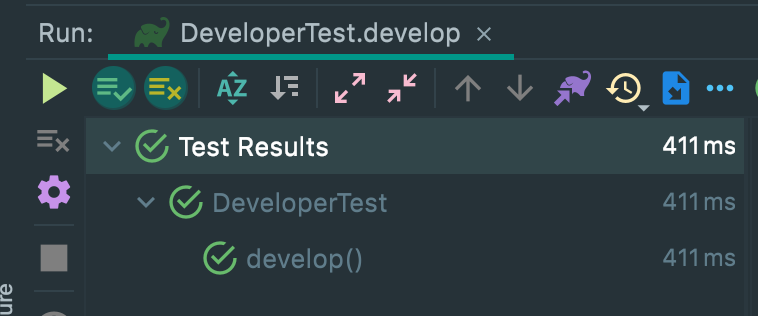
- Developer는 BackEndFramework만 의존하고 있지만 테스트를 실행해보니 구현체인 SpringBoot를 실행(의존)하고 있다.
- 이유는 스프링 컨테이너는 추상화된 인터페이스를 의존하고 있을 경우 스프링 빈에서 해당 인터페이스의 구현체를 찾아 주입해 주기 때문이다.
- 이로인해 개발자는 쉽게 OCP DIP원칙을 지키면서 변경에 유연한 개발을 할 수 있다.
NestJS의 DI
- TypeScript는 컴파일 시점에만 인터페이스가 존재하고 "런타임" 시점에는 인터페이스가 사라지게 된다.
export interface BackEndFramework {
  crud();
}

@Injectable()
export class NestJS implements BackEndFramework {

  crud() {
    return NestJS.name;
  }
}

@Injectable()
export class Developer {

  constructor(
    private readonly backEndFramework: BackEndFramework,
  ) {
  }

  develop() {
    return this.backEndFramework.crud();
  }
}

@Module({
  imports: [],
  providers: [Developer, NestJS],
})
export class AppModule {}-
스프링때와 마찬가지로 BackEndFramework라는 인터페이스의 구현체인 NestJS를 프로바이더로 등록한다.
-
Developer클래스에서는 추상화된 인터페이스인 BackEndFramework를 의존하고 있다.
-
테스트 해보자
describe('DI Test', () => {
  let sut: Developer;

  beforeEach(async () => {
    const app: TestingModule = await Test.createTestingModule({
      imports: [AppModule],
    }).compile();

    sut = app.get<Developer>(Developer);
  });

  it('DI', async () => {
    expect(sut.develop()).toBe('NestJS');
  });
});
결과

- NestJS가 Developer의 의존성을 해결할 수 없다는 Error를 뱉는다.
이유
- DI는 의존성을 "런타임"시점에 주입시켜주는 기술이다.
- 위에서 말했듯이 TypeScript의 인터페이스는 런타임 시점에 사라지게 된다.
- NestJS에서는 인터페이스가 런타임 시점에 사라지기 때문에 DI컨테이너가 런타임 시점에
의존성을 주입시켜주지 못하는 것이다.
해결법
- 프로바이더를 모듈에 등록할때 사용자 지정 프로바이더 문자열 토큰 주입 방식으로 해결할 수 있다.
@Module({
  imports: [],
  providers: [Developer, {
    provide: 'impl',  useClass: NestJS,
  }],
})
export class AppModule {}

@Injectable()
export class Developer {

  constructor(
    @Inject('impl') // Inject 데코레이터 사용
    private readonly backEndFramework: BackEndFramework,
  ) {
  }

  develop() {
    return this.backEndFramework.crud();
  }
}-
일반적으로 프로바이더를 주입 할때, 생성자 주입 패턴을 사용하여 프로바이더를 주입하게된다.
-
하지만 이 패턴을 사용하려면 클래스를 의존하고 있어야 하며, 인터페이스를 의존하고 있으면 생성자 주입 패턴을 사용할 수 없다.
-
이럴 경우 위와 같이 문자열 토큰방식으로 프로바이더를 등록 후 의존하고 있는 인터페이스에@Inject('provide') 데코레이터를 달아주면 useClass에 명시한 구현체가 주입된다.
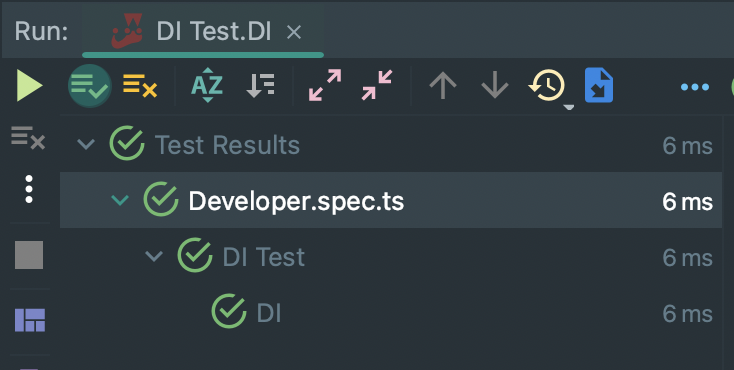
결과
-
위와 같이 성공적인 결과가 나온다.
-
위와 같은 방법으로 NestJS에서도 클라이언트 코드의 수정없이 유연하게 구현체를 변경할 수 있게 된다.
끝

개발자ㅋ.ㅋ