IOC(Inversion of Control)란?
제어의 역전이라는 뜻으로, 기존의 프로그래밍에서는 개발자가 코드 내에서 객체의 생성과 관리를 직접 구현하였습니다. 하지만 IOC는 이와 달리 객체의 생성과 관리를 개발자가 아닌프레임워크에 위임하며, 이를 통해 객체 간의 결합도를 낮추고 유연하고 확장 가능한 애플리케이션을 만들 수 있습니다.
DI(Dependency Injection)이란?
- IOC의 개념은
DI(Dependency Injection)와 밀접한 관련이 있습니다. DI는의존성 주입이라는 뜻으로, 객체 간의 의존 관계를 코드 내에서 직접 구현하는 것이 아니라, 외부에서 객체를 생성하고 의존 관계를 설정하여 필요한 객체를 주입하는 방식을 말합니다. 이를 통해 객체 간의 결합도를 낮출 수 있으며, 유연하고 확장 가능한 애플리케이션을 만들 수 있습니다.
스프링 프레임워크에서의 IOC/DI 개념과 컨테이너
IOC와 DI는 스프링 프레임워크에서 매우 중요한 개념으로 활용되고 있으며, 스프링 프레임워크에서는 객체의 생성과 관리를 담당하는
컨테이너가 제공됩니다. 이 컨테이너는 개발자가 설정한 정보를 바탕으로 객체를 생성하고 의존 관계를 설정하여 필요한 객체를 주입합니다. 이를 통해 개발자는 객체의 생성과 관리를 직접 구현하지 않고, 객체 간의 의존 관계를 구성하여 애플리케이션을 구현할 수 있습니다.
@Component 어노테이션
@Component 어노테이션은 스프링 프레임워크에서 매우 중요한 역할을 합니다. 이 어노테이션을 이용하면 스프링 애플리케이션을 실행하는 도중 @Component 어노테이션이 붙은 클래스들을 스캔하여 객체를 생성하고 빈으로 등록합니다. 이를 통해 개발자는 직접 객체를 생성하거나 빈으로 등록할 필요 없이, 스프링 컨테이너에서 관리되는 빈을 사용할 수 있습니다.
@Component 어노테이션의 특징
- 객체 생성 및 빈 등록
@Component어노테이션이 붙은 클래스는 스프링 컨테이너 객체를 생성하고 빈으로 등록- 빈 등록 시, 클래스 이름의 첫 글자를 소문자로 변환한 이름으로 등록됨
- 스캔 대상 지정
@Component어노테이션은 클래스에 직접 부여할 수 있으며, 클래스를 스캔 대상으로 지정하는 다른 어노테이션들도 있음@Controller,@Service,@Repository등의 어노테이션들은@Component어노테이션을 기반으로 하며, 스프링 컨테이너에서 빈으로 등록됨
- 의존성 주입(Dependency Injection)
@Component어노테이션을 이용하여 빈으로 등록된 객체는 다른 빈과 의존 관계를 맺을 수 있음Autowired어노테이션을 이용하여 의존 관계를 자동으로 설정할 수 있음
- 스코프 지정
@Scope어노테이션을 이용하여 빈의 스코프를 지정할 수 있음- 기본 스코프는 싱글톤(Singleton)이며, 다른 스코프들도 사용 가능함
빈(Bean)은 또 무엇인가?
- 스프링 프레임워크에서 관리되는 객체를 의미하며 스프링에서 객체를 생성하면, 해당 객체는 스프링 컨테이너에 등록됨, 이렇게 등록된 객체를 빈이라 부르며, 스프링 컨테이너가 관리함
빈(Bean) 의 특징
- 객체 생성 및 소멸 관리
- 빈은 스프링 컨테이너에서 객체를 생성하고, 라이프사이클을 관리
- 빈이 더 이상 필요하지 않을 때, 스프링 컨테이너에서 객체를 소멸시킴
- 의존성 관리
- 다른 빈과 의존 관계를 맺을 수 있음
- 이를 통해 빈 간의 의존 관계를 쉽게 관리할 수 있음
- 스코프 지정
- 스코프를 지정하여, 객체의 생성과 소멸 시점, 사용 범위 등을 설정할 수 있음
- 기본 스코프는 싱클톤(Singleton)임
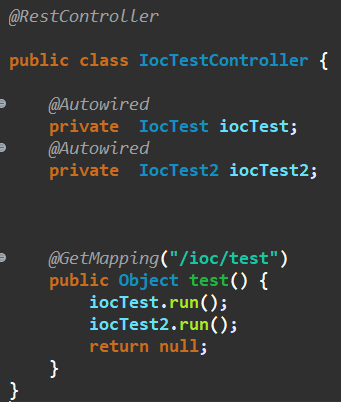
@Autowired 사용안했을 때
@Autowired 사용했을 때
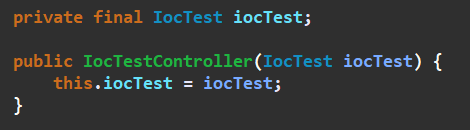
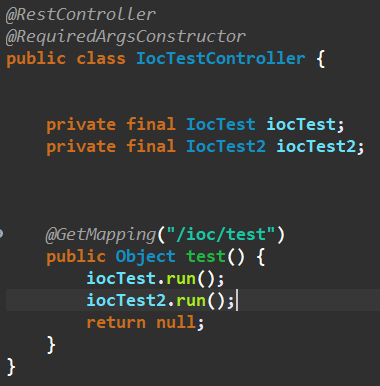
@RequiredArgsConstructor 사용할 때
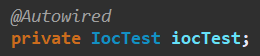
@Autowired 사용할 때
수강신청 웹페이지 만들기
-
학생정보
- id, name, birth_date
-
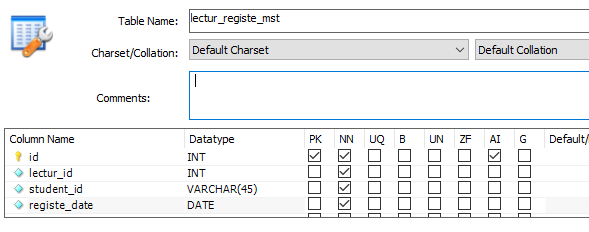
수강정보
- id, lecture_id(강의), student_id(학생), register_data(등록일)
-
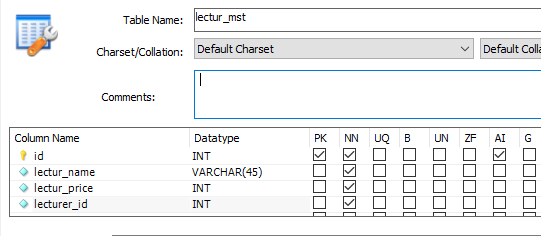
강의정보
- id, lecture_name(강의명), price(가격)
-
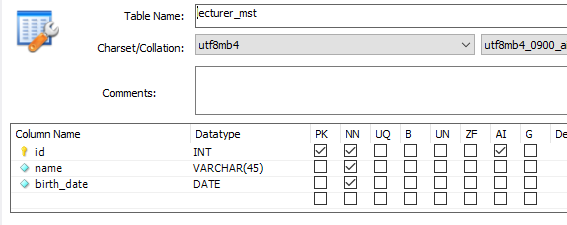
강사정보
- id, name, birth_date
MySQL 연결하기
new SCHEMAS > lecture 생성
table 추가
student_mst

lecturer_mst
lectur_mst
lectur_registe_mst
마이바티스(MyBatis)
Version 2.2.2 클릭 dependency 추가

MySQL Connector Java
최신 버전 dependency 추가

<dependency>
  <groupId>org.mybatis.spring.boot</groupId>
  <artifactId>mybatis-spring-boot-starter</artifactId>
  <version>2.2.2</version>
</dependency>
		<!-- https://mvnrepository.com/artifact/mysql/mysql-connector-java -->
<dependency>
  <groupId>mysql</groupId>
  <artifactId>mysql-connector-java</artifactId>
</dependency>
src/main/resources
application.properties
spring.datasource.driver-class-name= com.mysql.cj.jdbc.Driver
spring.datasource.url=jdbc:mysql://localhost:3306/lecture
spring.datasource.username:root
spring.datasource.password:root
application.yml (계층형으로 수정) - F2눌러서 확장자 변경
src/main/resources > mappers folder 생성
domain.entity
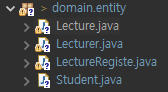
Lecture
package com.web.study.domain.entity;

public class Lecture {
	private int id;
	private String lecture_name;
	private int lecture_price;
	private int lecturer_id;
}
Lecturer
package com.web.study.domain.entity;

import java.time.LocalDate;

public class Lecturer {

	private int id;
	private String name;
	private LocalDate birth_data;

}
LectureRegiste
package com.web.study.domain.entity;

import java.time.LocalDate;

public class LectureRegiste {
	private int id;
	private int lecture_id;
	private int student_id;
	private LocalDate registe_date;
}
Student
package com.web.study.domain.entity;

import java.time.LocalDate;

public class Student {
	private int id;
	private String name;
	private LocalDate birth_data;
}
postman 등록

- Varialbe : localhost
- Type : default
- Initial value : http://localhost:8080
Mybatis 홈페이지 > 시작하기
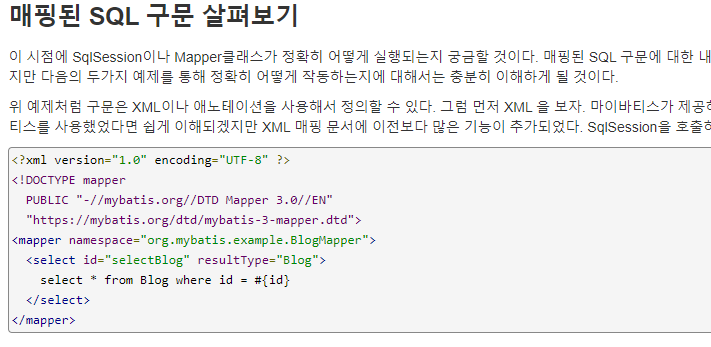
LectureServiceImple

Mappers > lecture.xml에 붙여넣기
<?xml version="1.0" encoding="UTF-8"?>
<!DOCTYPE mapper
  PUBLIC "-//mybatis.org//DTD Mapper 3.0//EN"
  "https://mybatis.org/dtd/mybatis-3-mapper.dtd">
<mapper namespace="com.web.study.repository.LectureRepository">

  <insert id="registe" parameterType="com.web.study.domain.entity.Lecture">
  	insert into lecture_mst
  	values (0, #{lecture_name}, #{lecture_price},  #{lecturer_id})
  </insert>
</mapper>
LectureServiceImpl
package com.web.study.service;

import org.springframework.stereotype.Service;

import com.web.study.domain.entity.Lecture;
import com.web.study.dto.request.lecture.LectureReqDto;
import com.web.study.repository.LectureRepository;

import lombok.RequiredArgsConstructor;

@Service
@RequiredArgsConstructor
public class LectureServiceImpl implements LectureService {


	private final LectureRepository lectureRepository;

	@Override
	public void registeLecture(LectureReqDto lectureReqDto) {

		// DTO -> ENTITY 변환 (LectureReqDto 참고)
		Lecture lecture = lectureReqDto.toEntity();
		System.out.println("변환: " + lecture);
		lectureRepository.registe(lecture);

	}
}
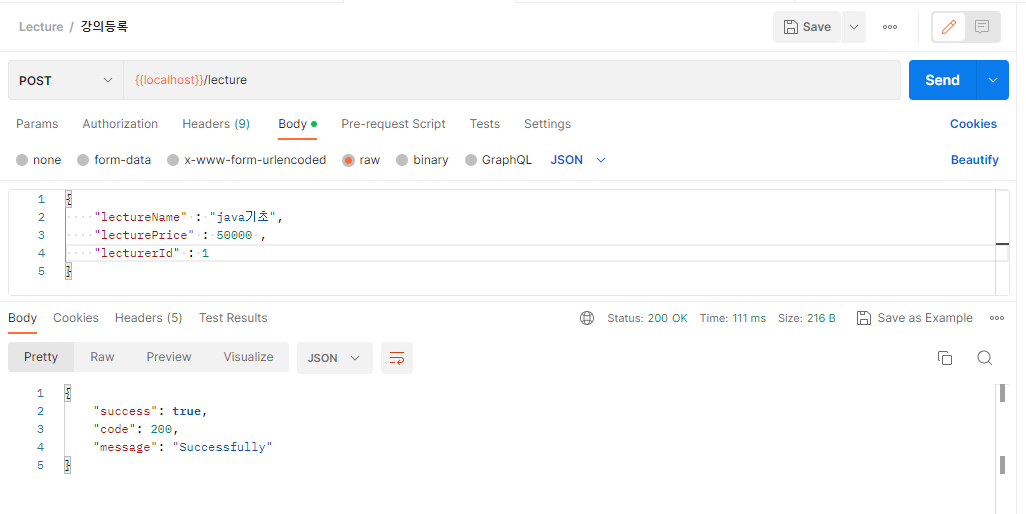
POSTMAN SEND
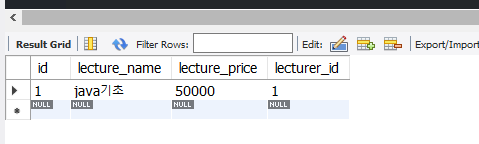
MySQL 연동 화면
MySQL 파일 저장