Application 생성하기
코드 구성요소를 다운로드하고 관리형 인스턴스 그룹을 만들고 관리형 인스턴스 그룹에 대한 자동 확장을 구성해야 한다.
Cloud Storage 에 스크립트 파일 업로드
Autoscaling out 시에 인스턴스 그룹은 새 compute engine 인스턴스를 만들어야 하는데 그럴 때 인스턴스 템플릿을 기반으로 인스턴스를 생성한다.
각 인스턴스는 start 스크립트가 필요한데 템플릿은 시작 스크립트를 참조하는 방법이 필요하다. Compute Engine 은 시작 스크립트의 소스로 Cloud Storage 버킷 사용을 지원한다.
이 실습에서는 자동으로 생성된 기존 인스턴스 템플릿 및 그룹이 있음
나중에 이 그룹을 검사하여 사용자 지정 메트릭 스크립트에서 생성된 사용자 지정 메트릭 값의 변형에 의해 조정이 제어되는 방식을 확인한다.
Create a bucket

Cloud storage 에 버킷을 생성 한 후 다음 명령어로 시작 스크립트 파일을 복사한다.
gsutil cp -r gs://spls/gsp087/* gs://<YOUR BUCKET>복사된 스크립트 목록

startup.sh (https://storage.cloud.google.com/autoscale_bk/startup.sh)스크립트 내용
#
# Copyright 2017 Google LLC
#
# Licensed under the Apache License, Version 2.0 (the "License");
# you may not use this file except in compliance with the License.
# You may obtain a copy of the License at
#
#      http:#www.apache.org/licenses/LICENSE-2.0
#
# Unless required by applicable law or agreed to in writing, software
# distributed under the License is distributed on an "AS IS" BASIS,
# WITHOUT WARRANTIES OR CONDITIONS OF ANY KIND, either express or implied.
# See the License for the specific language governing permissions and
# limitations under the License.
#
set -v

# Talk to the metadata server to get the project id
PROJECTID=$(curl -s "http://metadata.google.internal/computeMetadata/v1/project/project-id" -H "Metadata-Flavor: Google")
INSTANCEID=$(curl -s "http://metadata.google.internal/computeMetadata/v1/instance/id" -H "Metadata-Flavor:Google")
ZONEID=$(curl -s "http://metadata.google.internal/computeMetadata/v1/instance/zone" -H "Metadata-Flavor:Google")
GCS_BUCKET_NAME=$(curl -s "http://metadata.google.internal/computeMetadata/v1/instance/attributes/gcs-bucket" -H "Metadata-Flavor:Google")

# Install logging monitor. The monitor will automatically pick up logs sent to syslog.
curl -s "https://storage.googleapis.com/signals-agents/logging/google-fluentd-install.sh" | bash
service google-fluentd restart &

# Install dependencies from apt
apt-get update
apt-get install -yq ca-certificates git nodejs build-essential supervisor

# Install nodejs
apt-get install nodejs npm -y

# Setup the script directories
mkdir /opt/app
mkdir /opt/app/autoscale_metric
cd /opt/app/autoscale_metric

# Copy the script files from your bucket to the VM
gsutil cp $GCS_BUCKET_NAME/writeToCustomMetric.js /opt/app/autoscale_metric/writeToCustomMetric.js
gsutil cp $GCS_BUCKET_NAME/writeToCustomMetric.sh /opt/app/autoscale_metric/writeToCustomMetric.sh
gsutil cp $GCS_BUCKET_NAME/config.json /opt/app/autoscale_metric/config.json
gsutil cp $GCS_BUCKET_NAME/package.json /opt/app/autoscale_metric/package.json
npm install

# Set exec permissions
chmod 755 /opt/app/autoscale_metric/writeToCustomMetric.sh

# Create a nodeapp user. The application will run as this user.
useradd -m -d /home/nodeapp nodeapp
chown -R nodeapp:nodeapp /opt/app

# establish the high cycle start offset time based on the first node startup time, defaults to now to handle first run case.
# gcloud logging read --limit=1 nodeapp --order=asc > log.txt
OFFSET=$(perl -e 'open (FH, "log.txt"); while (<FH>) { $x .= $_ }; if ($x =~ /receiveTimestamp.*\d\dT\d\d:(\d\d)/) {print "$1\n"} else {@time=localtime(time);print "$time[1]\n"}')
echo $PROJECTID $INSTANCEID $ZONEID $OFFSET

# Configure supervisor to run the node app.
cat >/etc/supervisor/conf.d/node-app.conf << EOF
[program:nodeapp]
directory=/opt/app/autoscale_metric
command=bash /opt/app/autoscale_metric/writeToCustomMetric.sh $PROJECTID $INSTANCEID $ZONEID $OFFSET
autostart=true
autorestart=true
user=nodeapp
environment=HOME="/home/nodeapp",USER="nodeapp",NODE_ENV="production"
stdout_logfile=syslog
stderr_logfile=syslog
EOF

supervisorctl reread
supervisorctl update

# Application should now be running under supervisor
supervisorctl status all
Creating an instance template
인스턴스 그룹에 생성된 인스턴스에 대한 템플릿을 생성.
템플릿의 일부로 인스턴스가 시작될 때 실행되어야 하는 시작 스크립트의 위치를 지정한다.
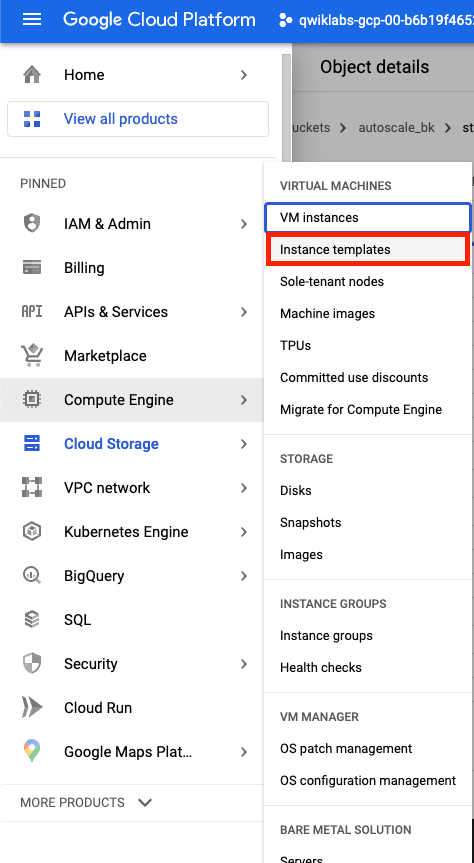
템플릿 생성을 누르고 아래로 스크롤하여 네트워킹, 디스크, 보안, 관리, 단독 임대를 클릭하여 입력 옵션을 확장합니다.
관리탭의 메타데이터 섹션에서 + Add item 을 통해 메타데이터 key, values 를 입력한다.
create 를 눌러 생성
