
11강 / 객체지향4. ES6방식으로 안쉽게 구현하는 상속기능 (class)
Class 라는 문법이 있다.
constructor, prototype 을 이용한 상속기능을 만들 수 있게 도와주는 문법이다.
기존 function부터 시작하던 문법과 기능상 차이는 크게 없고 약간 더 보기쉽게 표현해줄 뿐이다.
어떻게 하는지 자세히 알아보자!
ES6 Class 키워드로 구현하는 constructor 기계만들기
constructor 라는건 저번시간에 했기 때문에 알고있는 부분이다.
obejct 뽑는 기계였다.
ES6 Class라는 신문법으로 constructor를 만드려면 이렇게 따라치면 된다.
class Parent {
  constructor(){
    this.name = 'Kim'
  }
}

let child = new Parent();
예전 function Parent(){} 이렇게 기계를 만드는 문법과 똑같은 문법이다.
이제 new 키워드를 이용해서 방금 만든 Parent라는 기계에서 object를 새로 생성할 수 있는 것이다.
constructor()라고 쓴 부분에 예전처럼 this.name = ? 하면 새로 생성되는 object들에 값을 부여할 수 있다.
상속가능한 함수를 추가하려면 어떻게 해야할까?
예전에 sayHi() 이런거 하면서 배웠던 두가지 방법이 있다.
- 함수를
this.sayHi이렇게constructor안에 추가하는 방법
- 함수를
class Parent {
  constructor(){
    this.name = 'Kim';
    this.sayHi = function(){ console.log('hello') }
  }
}

let child = new Parent();
그럼 새로생성되는 child은 sayHi() 함수를 직접 가지게 되며 자유롭게 쓸 수 있다.
- 기계의
prototype에 추가하는 방법
- 기계의
▼ 2번처럼 prototype에 추가하려면
class Parent {
  constructor(){
    this.name = 'Kim';
  }
  sayHi(){
    console.log('hello')
  }
}

let child = new Parent();
이런 식으로 하면 된다.
object에 함수추가하듯 하면 된다.
그럼 child은 sayHi()라고 썼을 때 Parent의 prototype에 있던 sayHi() 함수를 쓸 수 있다.
(혹은 그냥 Parent.prototype.sayHi = function(){} 이렇게 해도 된다.)
참고로 알아두는 Object.getPrototypeOf()
Object.getPrototypeOf() 함수 안에 object를 넣으면 부모 prototype을 출력해준다.
이 object가 대체 누구로부터 prototype을 상속받고 있는지를 알려주는 함수다.
__proto__라는 키워드와 비슷한 역할을 한다고 보면 된다.
Q. 여기에는 부모 prototype이 뭘까?
class Parent {
  constructor(){
    this.name = 'Kim';
  }
  sayHi(){
    console.log('hello')
  }
}

let child = new Parent();
console.log(Object.getPrototypeOf(child));
위 코드에서 child의 부모 prototype이 뭔지 알기 위해 Object.getPrototypeOf()를 사용해 보았다.
Parent {
  sayHi: ƒ
}
콘솔은 위와 같이 나타내주고 있다. 그렇기 때문에 부모 prototype은 Parent인 것을 알 수 있다.
constructor안에 파라미터 추가하기
ES6 방식으로 constructor 만들 때 파라미터를 추가하려면 이렇게 하면 된다.
class Parent {
  constructor(personName, personAge){
    this.name = personName;
    this.age = personAge;
  }
}

let child = new Parent('Park', 30);
이런 식으로 하면 파라미터를 넣어서 constructor를 만들 수 있다.
prototype 내에 함수 여러개 추가하기
class Parent {
  constructor(personName, personAge){
    this.name = personName;
    this.age = personAge;
  }
  sayHi(){
    console.log('안녕');
  }
  sayHello(){
    console.log('안녕하세요');
  }
}

let child = new Parent('Park');
이렇게 쭉 써주면 prototype에 sayHi, sayHello 등 여러개 함수를 동시에 넣을 수 있다.
12강 / 객체지향5. class를 복사하는 extends / super
Class를 상속한 Class를 만들고 싶을 때 쓰는 extends
Grandpa Class를 하나 만들었다고 예시를 들어보자
Grandpa Class는 lastName과 name이라는 속성을 가지고 있다.
class Grandpa{
  constructor(personName){
    this.lastName = 'Kim';
    this.name = personName;
  }
}
그럼 이제 new Grandpa() 뭐 이런식으로 하면 새로운 object를 쉽게 생성할 수 있다.
그런데 이 Class가 너무나도 유용한 나머지 이것과 유사한 Class를 하나 더 만들고 싶다.
그러면 직접 Class를 하나 더 만들어서 내용을 복붙하는 방법도 있다.
하지만 Class안에 복사할 내용이 너무나도 많으면 코드가 너무나도 길어진다.
그래서 고대의 개발자들이 extends라는 문법을 만들었는데
이걸 이용해서 Class를 만들면 기존에 있던 Class의 내용을 그대로 복붙해서 만들어낼 수 있다.
다른말로 "다른 Class를 상속해서 만들 수 있게 도와주는 문법"이다.
그래서 Grandpa Class를 상속하는 Father Class를 만들어보자.
class Grandpa{
  constructor(personName){
    this.lastName = 'Kim';
    this.name = personName;
  }
}

class Father extends Grandpa{

}extends는 이렇게 쓰면 된다.
그럼 이제 Grandpa는 Class를 그대로 복붙한 Father라는 Class가 생성된다.
진짜 Class가 생겼는지 확인해보기 위해 new Father(); 이렇게 테스트 해보자.

위 사진처럼 Grandpa의 속성이 Father에도 있는 것을 볼 수 있다.
new Father('만수'); 이렇게 하면 lastName과 name을 가진 object 자료가 하나 생성된다.
class Grandpa {
  constructor(personName) {
    this.lastName = "Kim";
    this.name = personName;
  }
}

class Father extends Grandpa {}

let father = new Father("만수");

console.log(father);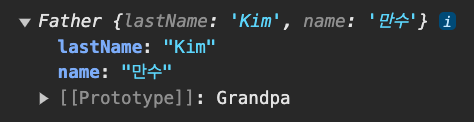
근데 Father라는 class에는 새로운 속성을 추가하고 싶으면
당연히 Father constructor안에 내용을 추가하면 된다.
class Grandpa {
  constructor(personName) {
    this.lastName = "Kim";
    this.name = personName;
  }
}

class Father extends Grandpa{
  constructor(){
    this.age = 50;
  }
}
이렇게 하면 new Father() 했을 때 생성된 object들은 {lastName, name, age} 속성들을 가지고 있을 것 같다.
하지만 이러면 에러가 난다.
super를 써야된다고 에러가 난다.

그럼 super를 써주면 된다.
class Grandpa {
  constructor(personName) {
    this.lastName = "Kim";
    this.name = personName;
  }
}

class Father extends Grandpa{
  constructor(){
    super()
    this.age = 50;
  }
}super()라는 함수는
"extends로 상속중인 부모 class의 constructor()"를 의미한다. (암기사항)
쉽게 말하면 Grandpa class의 constructor() 이거랑 똑같다는 소리이다. (암기해야됨)
그래야 이제 에러없이 this.age 이런걸 추가할 수 있다.
근데 Grandpa class의 constructor()에는 personName 파라미터를 입력할 수 있었다.
그것도 똑같이 따라서 명시해주어야 Grandpa가 가진 모든 속성들을 정확히 상속받을 수 있다.
class Grandpa {
  constructor(personName) {
    this.lastName = "Kim";
    this.name = personName;
  }
}

class Father extends Grandpa{
  constructor(personName){
    super(personName)
    this.age = 50;
  }
}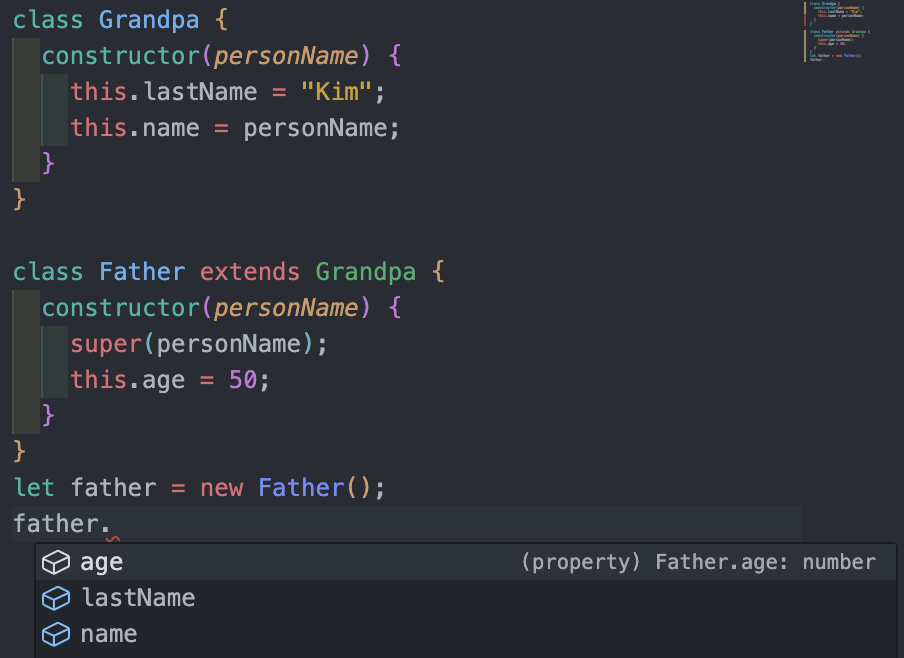
이제 에러 없이 3개의 속성을 모두 사용할 수 있는 것을 볼 수 있다.
Grandpa constructor()에 personName이라는 파라미터가 있던걸 그대로 Father constructor()에도 따라했다.
(파라미터 작명은 자유롭게 가능합니다)
이제 그럼 new Father(); 할 때 파라미터를 입력하면 this.name 속성에 들어가게 된다.
Q. 위 코드 하단에
let father = new Father('만수'); 이렇게 적으면 father라는 변수는 어떤 내용을 가지고 있을까?
father라는 변수는Father라는class로부터 새로 생성된object이다.
- 그래서
Grandpa가 가지고 있던lastName,name그리고Father가 가지고 있던age를 전부 물려받았다.
- 그리고
this.name자리에는'만수'를 넣어 실행했다.
그래서 { lastName : 'Kim', name : '만수', age : 50 } 이라는object가 된다.

Grandpa에 메소드(함수)를 추가한다면
Grandpa class 안에 함수를 추가한다면 Father class의 자식들도 물려받아 쓸 수 있을까?
실험해보자!
class Grandpa {
  constructor(personName) {
    this.lastName = "Kim";
    this.name = personName;
  }
  sayHi(){
    console.log('안녕 나는 할아버지')
  }
}

class Father extends Grandpa{
  constructor(personName){
    super(personName)
    this.age = 50;
  }
}

let father = new Father('만수')
그럼 이제 father라는 object는 sayHi()라는 함수를 쓸 수 있을까?
- 쓸 수 있다!
father라는 object가 father.sayHi() 이렇게 사용한다면
- 1.
father라는object에sayHi가 있는지 물어보고 - 2. 없으면
Fahter.prototype에sayHi가 있는지 물어보고 - 3. 없으면
Grandpa.prototype에sayHi가 있는지 물어보고
이런 식으로 sayHi를 실행하기 위해 부모님을 뒤져본다.
근데 sayHi()라는건 Grandpa.prototype에 추가된 함수이기 때문에
father라는 object는 sayHi() 함수를 실행할 수 있다.
근데 class간에 함수를 상속하고 싶으면 어떻게 해요?
Father라는 class에 함수를 만들고 싶다.
근데 Grandpa class에 있던 sayHi()라는 함수가 너무나도 유용한 나머지
이걸 그대로 Father class에 가져와서 활용하고 싶은 것이다.
그럴 때 어떻게 해야할까?
이 때도 super를 쓰면 된다.
class Grandpa {
  constructor(personName) {
    this.lastName = "Kim";
    this.name = personName;
  }
  sayHi(){
    console.log('안녕 나는 할아버지')
  }
}

class Father extends Grandpa{
  constructor(personName){
    super(personName)
    this.age = 50;
  }
   sayHi2(){
    console.log('안녕 나는 아버지');
    super.sayHi();
  }
}

let father = new Father('만수')super라는걸 저렇게 prototype 함수 안에서 쓰면 아까의 super와 약간 다른 의미가 된다.
여기서의 super는 부모 class의 prototype을 의미한다.
super는 뜻이 두개이다.
-
1.
constructor안에서 쓰면부모 class의constructor -
2.
prototype함수 안에서 쓰면부모 class의prototype
Q. 그럼 위의 예제 코드에서 father.sayHi2()를 실행하면 무엇이 콘솔창에 출력될까?
father.sayHi2()를 사용한다면Father.prototype에 있던sayHi2함수가 동작한다.
그 함수는 일단console.log('안녕 나는 아버지')를 실행하고
둘째 줄에서super.sayHi()를 실행한다. 이건 다른말로Grandpa.prototype.sayHi()와 똑같기 때문에
console.log('안녕 나는 할아버지')를 실행할 것이다.
그래서 콘솔창에"안녕 나는 아버지" "안녕 나는 할아버지"가 출력된다.