📌 LiveData란?
데이터를 저장하고 변화를 관찰(observe) 할 수 있는 객체
🔑 특징
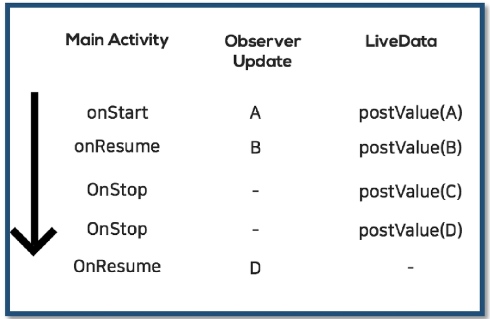
애플리케이션의 lifecycle을 인식
- activity, Fragment, Service, Component의 생명주기를 따름
- 이 activity 등의 lifecycle owner가 started 혹은 resume 상태인 경우만 observer를 active 상태로 간주
- 기본적으로 viewmodel에서 사용하도록 설계됨 따라서 액티비티나 프래그먼트가 재실행되도 뷰모델이 살아있어 livedata가 소멸되지 않게 할 수 있음.
📌 MutableLiveData
LiveData는 기본적으로 immutable 하다.
값을 바꾸고 싶다면 MutableLiveData를 통해 데이터를 쓸 수 있다.
MutableLiveData:
value 변수에 값을 담아서 lifecycle 까지 저장/ 관리한다. livedata를 상속받아 setValue(), postValue()와 같은 메소드를 제공해 값을 수정할 수 있게 한 객체이다.
    override fun onCreate(savedInstanceState: Bundle?) {
        super.onCreate(savedInstanceState)
        setContentView(R.layout.activity_main)
        val text = findViewById<TextView>(R.id.text)
        //백그라운드 스레드에서 호출
        liveString.postValue("postValue Write")

        //반드시 메인 스레드에서만 호출
        liveString.value = "setValue Write"

        liveString.observe(this){ liveString ->
            Log.d(TAG, "value : $liveString")
            text.text = liveString
        }

        //결과
//        D/MainActivity_싸피: value : setValue Write
//        D/MainActivity_싸피: value : postValue Write
    }
postValue는 백그라운드, setValue는 메인스레드에서 실행하며, 따라서 위를 실행하면 메인스레드 작업이 기본적으로 더 빨리 끝나므로 화면 내용은 postValue Write일 것이다.
📌 LiveData를 상속받아 만들기
라이브 데이터가 값을 post 하는 작업 등을 미리 정의한 liveData 클래스를 만들 수 있다.
class TimerLiveData : LiveData<Long>() {

    private val initialTime: Long = SystemClock.elapsedRealtime()
    private var timer: Timer? = null

    override fun onActive() {
        Log.d(TAG, "onActive: ")
        timer = Timer()
//         scheduleAtFixedRate(task, start, peroid) : start시간부터 period 간격으로 task를  수행
        timer?.scheduleAtFixedRate(object : TimerTask() {
            override fun run() {
                val newValue = (SystemClock.elapsedRealtime() - initialTime) / 1000
                postValue(newValue)
            }
        }, ONE_SECOND, ONE_SECOND)
    }

    override fun onInactive() {
        Log.d(TAG, "onInactive: ")
        timer?.cancel()
    }

    companion object {
        private const val ONE_SECOND = 1000.toLong()
    }
}
LiveData는 onActivte(), onInactive() 두가지를 적절히 오버라이딩 하면 되는데,
onActive는 활성 상태의 관찰자(observer)가 있을 때 호출,
onInactive는 활성 상태의 관찰자(observer)가 없을 때 호출된다.
그리고 onActive안의 run 문을 관찰자가 있을 때 실행한다.
이를 관찰하는 액티비티도 있어야 할 것이다.
timerLiveData = TimerLiveData()
        timerLiveData.observe(this){
            binding.timerTextview.text = it.toString()
        }
액티비티가 소멸되지 않는 이상 initialTime은 계속 액티비티의 시작지점일 것이므로, 앱이 백그라운드로 가더라도 다시 화면에 돌아왔을 때 시간이 계속 간 것처럼 보여질 것이다.
🔑 lifecycle과 관계없이 observer가 데이터를 받기 - observeForever
timerLiveData.observeForever(observer)
timerLiveData.removeObserver(observer)
observeForever을 쓰면 라이프사이클에 관계없이 라이브데이터를 관찰하므로 화면 회전등에 영향을 받지 않는다.
📌 ViewModel + LiveData
ViewModel.kt
class MainViewModel : ViewModel() {
    private val _elapsedTime = TimerLiveData()
    fun getElapsedTime() = _elapsedTime
}
액티비티가 아닌 뷰모델에서 라이브데이터를 사용하는 것이 일반적이다.
MainActivity.kt
viewModel.getElapsedTime().observe(this) { time ->
            binding.timerTextview.text = time.toString()
        }
메인에서 이 뷰모델의 라이브데이터를 getter로 가져온다.
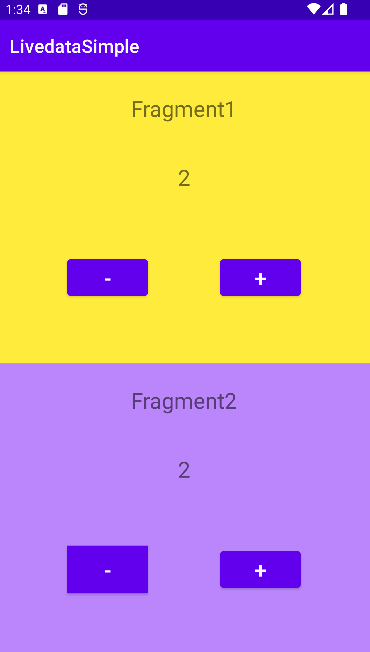
🔑 ViewModel을 통해 fragment 에서 같은 livedata observe
viewModel
class NewActivityViewModel : ViewModel() {
    //사용자의 클릭 수를 세는 변수
    private val _count = MutableLiveData<Int>().apply {
        value = 0
    }
    val count: LiveData<Int>
        get() = _count

    //사용자가 클릭 했을 때 클릭수 를 증가시키는 메소드
    fun increaseCount() {
        _count.value = (count.value ?: 0) + 1
    }

    fun decreaseCount() {
        _count.value = (count.value ?: 0) - 1
    }


}
Fragment1
class BlankFragment1 : Fragment() {

    private val activityWithFragmentViewModel: NewActivityViewModel by activityViewModels()

    private var _binding: FragmentBlank1Binding? = null
    private val binding get() = _binding!!
    override fun onCreateView(
        inflater: LayoutInflater, container: ViewGroup?,
        savedInstanceState: Bundle?
    ): View {
        _binding = FragmentBlank1Binding.inflate(inflater, container, false)
        return binding.root
    }


    override fun onViewCreated(view: View, savedInstanceState: Bundle?) {
        super.onViewCreated(view, savedInstanceState)

        printCount()

        binding.buttonPlus.setOnClickListener {
            activityWithFragmentViewModel.increaseCount()
        }
        binding.buttonMinus.setOnClickListener {
            activityWithFragmentViewModel.decreaseCount()
        }
    }

    fun printCount() {
        //viewLifeCycleOwner = 나를 뷰로 가지는 오너 : 즉 여기서는 액티비티
        activityWithFragmentViewModel.count.observe(viewLifecycleOwner) {
            binding.textResult.text = it.toString()
        }
    }

    override fun onDestroyView() {
        super.onDestroyView()
        _binding = null
    }

}
fragment의 printCount로 부모 액티비티와 연결된 뷰모델의 count를 관찰하여 데이터가 바뀔 때마다 ui를 수정해준다. 다른 프래그먼트에서도 동일한 코드를 작성하여 같은 데이터를 옵저빙 할 수 있다.
📌 livedata를 받아 변형한 livedata 만들기 - Transformation
val times = Transformations.map(count){
       "$it * 2 = ${it*2}"
   }
times라는 val은 livedata인 count를 받아 값을 변형해준 변수인데, 일반 string으로 하면 값이 변화할 때마다 옵저빙 하기 어렵다. 그렇다면 livedata형으로 만들어줘야 한다.
이를 해주는 것이 Transformations 이다.
📌 LiveData + ViewModel + HTTP(Retrofit)
Gradle
    //dependency 추가
    implementation 'androidx.lifecycle:lifecycle-viewmodel-ktx:2.4.1'

    //framework ktx dependency 추가
    implementation "androidx.fragment:fragment-ktx:1.4.1"

    //coroutine
    implementation 'org.jetbrains.kotlinx:kotlinx-coroutines-core:1.5.2'
    implementation 'org.jetbrains.kotlinx:kotlinx-coroutines-android:1.5.2'

    // 레트로핏
    // https://github.com/square/retrofit
    implementation 'com.squareup.retrofit2:retrofit:2.9.0'

    // https://github.com/square/retrofit/tree/master/retrofit-converters/gson
    implementation 'com.squareup.retrofit2:converter-gson:2.9.0'

    // https://github.com/square/okhttp
    implementation("com.squareup.okhttp3:okhttp:4.9.0")
    // https://github.com/square/okhttp/tree/master/okhttp-logging-interceptor
    implementation("com.squareup.okhttp3:logging-interceptor:4.9.0")
및 인터넷 허용
<uses-permission android:name="android.permission.INTERNET" />https://jsonplaceholder.typicode.com/
에서 제공하는 API를 사용하여 실습해볼수 있다.
🔑 viewModel에서 http 통신 코드 작성
api를 작성해주고
    @GET("posts")
suspend fun getPosts(): List<Post>
viewModel
class ActivityViewModel : ViewModel() {

    private val _postList = MutableLiveData<List<Post>>()
    val postList: LiveData<List<Post>>
        get() = _postList

    fun getPostList() {
        val postService = ApplicationClass.wRetrofit.create(PostService::class.java)

        CoroutineScope(Dispatchers.Main).launch {
            try {
                _postList.value = postService.getPosts()
            } catch (e: Exception) {
                _postList.value = ArrayList()
            }
        }
    }
}
뷰모델에서 http 로직을 작성해준다.
🔑 viewmodelScope
viewModelScope.launch {
            try {
                _postList.value = postService.getPosts()
            } catch (e: Exception) {
                _postList.value = ArrayList()
            }
        }
CoroutineScope 이 아닌 viewModelScope를 주어 뷰 모델의 생명주기에 맞추어 코루틴이 실행되도록 할 수 있어 위 방식이
참고로 http 통신 로그를 확인하고 싶다면
okhttp interceptor을 사용하면 된다. 아래 코드를 확인하자
ApplicationClass
class ApplicationClass : Application() {

    val SERVICE_URL = "https://jsonplaceholder.typicode.com/"

    override fun onCreate() {
        super.onCreate()

        val client: OkHttpClient = OkHttpClient.Builder()
            .readTimeout(5000, TimeUnit.MILLISECONDS)
            .connectTimeout(5000, TimeUnit.MILLISECONDS)
            // 로그캣에 okhttp.OkHttpClient로 검색하면 http 통신 내용을 보여줍니다.
            .addInterceptor(HttpLoggingInterceptor().setLevel(HttpLoggingInterceptor.Level.BODY))
            .build()

        // 앱이 처음 생성되는 순간, retrofit 인스턴스를 생성
        wRetrofit = Retrofit.Builder()
                .baseUrl(SERVICE_URL)
                .client(client)
                .addConverterFactory(GsonConverterFactory.create())
                .build()
    }

    companion object {
        // 전역변수 문법을 통해 Retrofit 인스턴스를 앱 실행 시 1번만 생성하여 사용 (싱글톤 객체)
        lateinit var wRetrofit : Retrofit

    }
}