AutoLayout
코드로 Constraints 짜보기!!
코드로 Constraints를 짜는 방법에는 크게 세 가지 방법이 있다고 한다.
- Visual Format Language
- NSLayoutConstraint class
- Layout Anchors
But,
Visual Format Language 로 Constraints를 짜는 것은 어렵고 효율적이지 않다고 하니
오늘은 NSLayoutConstraint class 와 Layout Anchors 를 활용해서 공부해보자!!
Layout Anchors
가장 효율적이고 좋은 방법이라고 한다. Anchor는 영어로 닻 이라는 뜻인데, 쉽게 View에 닻을 내려서 고정시킨다고 생각하면 좋을 것 같다

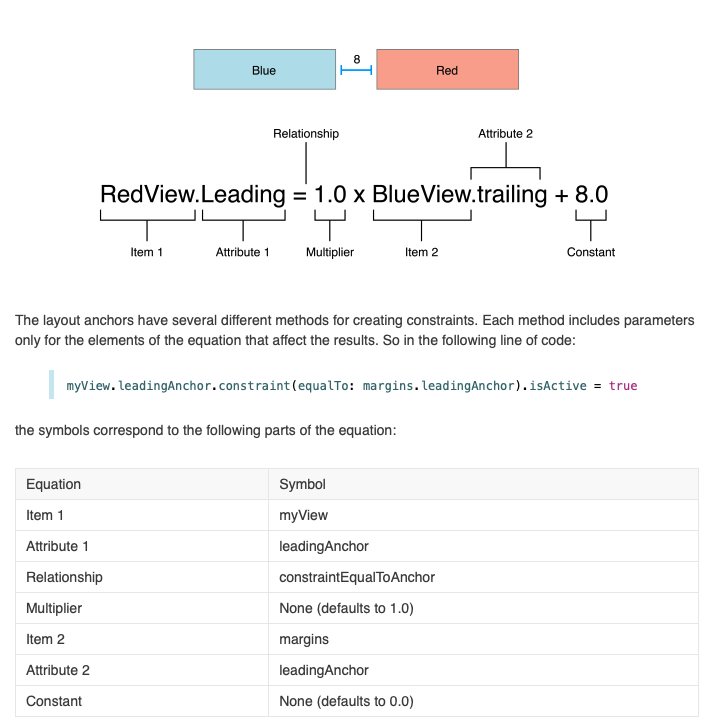
AutoLayout 기본개념(1) 에서 본 그림이다
굉장히 중요하다고 그 때 코멘트를 남겼는데, 위 식을 그대로 코드로 옮길 수 있기 때문이다
위 그림의 RedView와 BlueView 를 코드로 나타내면
RedView.leadingAnchor.constraint(equalTo: BuleView.trailingAnchor, constant: 8).isActive = true
와 같다
Layout Anchor 을 활용해서 AutoLayout Constraint를 줄 때 아주 큰 장점이 있는데
컴파일러가 바로 에러를 잡는다는 것이다
button.bottomAnchor.constraint(equal.To: safeArea.leadingAnchor)
//에러 발생
해당 구문을 잘 보면 button의 vertical 속성과 horizontal을 뒤섞어 constraint를 만들려고 하였는데,
이럴 경우 컴파일러가 바로 눈치 채고 에러를 일으켜 준다
NSLayoutConstraint
이번에는 그럼 NSLayoutConstraint 객체를 활용해서 AutoLayout Constraint를 구현해보자!!
이건 Anchor 보다 더 간단한데,
let button = UIButton()
button.setTitle("Button", for: .normal)
button.setTitleColor(.white, for: .normal)
button.backgroundColor = .systemPink
view.addSubview(button)

button.translatesAutoresizingMaskIntoConstraints = false

let safeArea = view.safeAreaLayoutGuide
let leading = NSLayoutConstraint(item: button,
	attribute: .leading,
   	relatedBy: .equal,
   	toItem: safeArea,
   	attribute: .leading,
   	multiplier: 1,
   	constant: 16)
let trailing = NSLayoutConstraint(item: button,
	attribute: .trailing,
   	relatedBy: .equal,
   	toItem: safeArea,
   	attribute: .trailing,
   	multiplier: 1,
   	constant: -16)
let bottomSafeArea = NSLayoutConstraint(item: button,
	attribute: .bottom,
   	relatedBy: .equal,
   	toItem: safeArea,
   	attribute: .bottom,
   	multiplier: 1,
   	constant: -16)
let bottomView = NSLayoutConstraint(item: button,
	attribute: .bottom,
   	relatedBy: .lessThanOrEqual,
   	toItem: view,
   	attribute: .bottom,
   	multiplier: 1,
   	constant: -20)

NSLayoutConstraint.activate([leading, trailing, bottomSafeArea, bottomView])
와 같이 활용할 수 있다! 중요한 점은 마지막에 꼭 activate 메서드를 활용해서 Cosntraint를 활성화시켜야 한다는 것이다!!
근데 NSLayoutConstraint의 아주 큰 단점이 있는데,
이 객체는 잘못된 Constraint를 지정하여도 컴파일러의 오류가 검출되지 않는다는 것이다!!
그러니 될 수 있으면 Layout Anchor 개념을 활용하는 것이 좋아보인다
