Ⅰ. Virtual 환경에서 하드디스크 추가
- VMware 시작 윈도우에서 Edit virtual machine settings 클릭
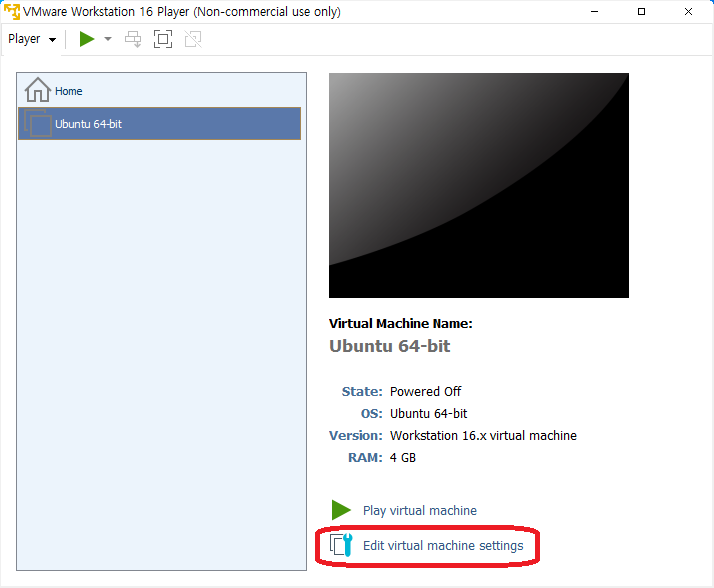
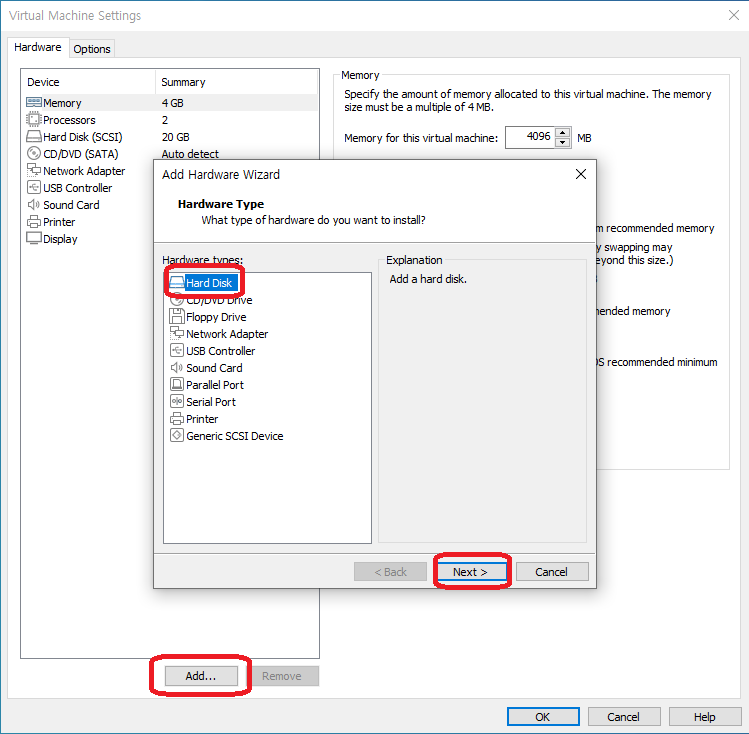
- Add.. 클릭 -> Hard Disk 선택 -> Next 클릭
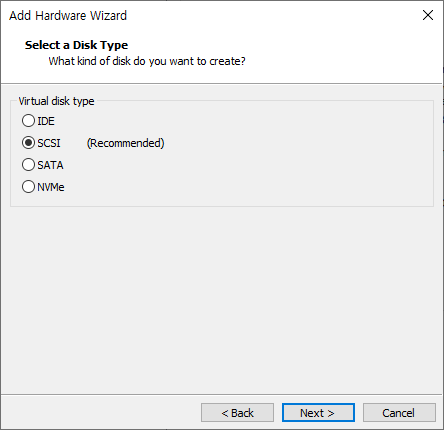
- SCSI 선택 후 Next
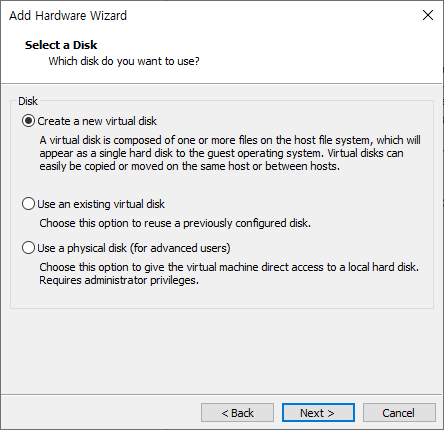
- Create a new virtual disk 선택 후 Next
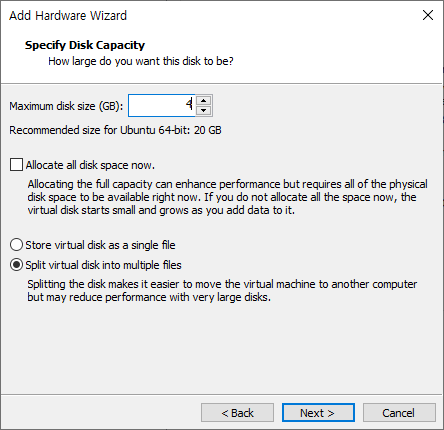
- 용량 지정 후 Next
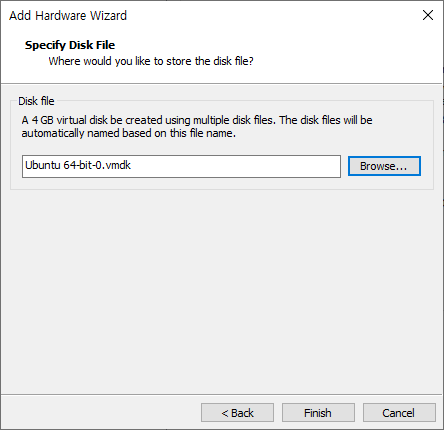
- Finish를 눌러 완료
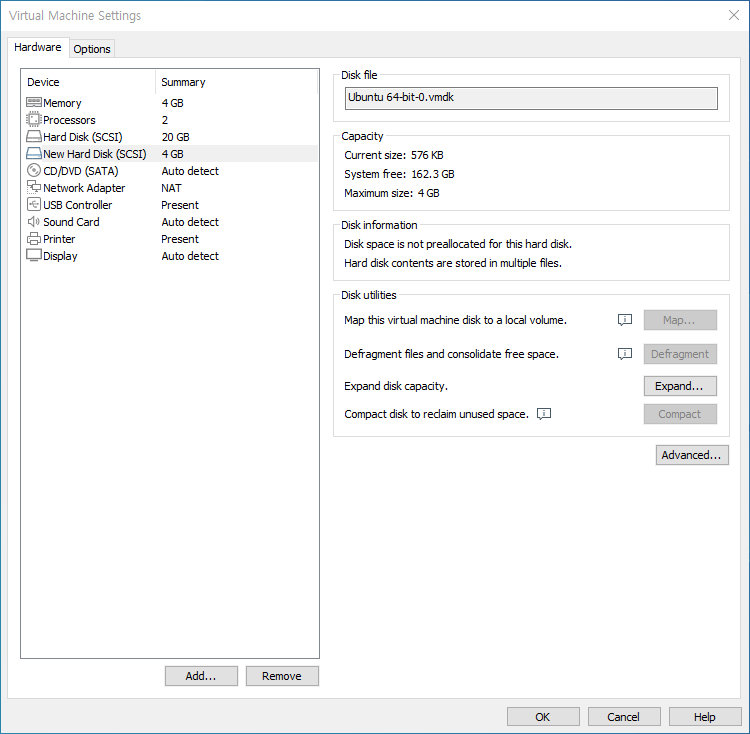
- New Hard Disk 가 생겼으면 성공
Ⅱ. Partitioning
-
Physical / Logical 로 나뉨 : 작은 시스템에는 Physical partition으로 충분
-
Physical partioning은 label타입에 따라 DOS방식, GTP 방식이로 나뉨
- DOS : 최대 2T, fdisk 사용
- GPT : 용량 제한 없음, parted 사용
1. DOS labeled disk
- 최대 4 개의 primary partition을 만들 수 있음
- 그 이상을 쓰고 싶을 경우 하나의 primary partition을 extened partition로 대체 할 수 있음
- extended partition을 여러 개의 logical drive로 나눌 수 있음
a. 디스크 목록
# fdisk -lor# lsblk
root@jsg-ubuntu:~# fdisk -l
Disk /dev/sda: 20 GiB, 21474836480 bytes, 41943040 sectors
Units: sectors of 1 * 512 = 512 bytes
Sector size (logical/physical): 512 bytes / 512 bytes
I/O size (minimum/optimal): 512 bytes / 512 bytes
Disklabel type: dos
Disk identifier: 0x2658b87a

Device     Boot    Start      End  Sectors  Size Id Type
/dev/sda1  *        2048 39942143 39940096   19G 83 Linux
/dev/sda2       39944190 41940991  1996802  975M  5 Extended
/dev/sda5       39944192 41940991  1996800  975M 82 Linux swap / Solaris

Disk /dev/sdb: 4 GiB, 4294967296 bytes, 8388608 sectors
Units: sectors of 1 * 512 = 512 bytes
Sector size (logical/physical): 512 bytes / 512 bytes
I/O size (minimum/optimal): 512 bytes / 512 bytes
- /dev/sd[abcd..:몇 번째 디스크인지][123...:몇 번째 파티션인지]
b. 특정 디스크 조작
# fdisk /dev/...- m 을 입력하면 가능한 커맨드를 볼 수 있음
root@jsg-ubuntu:~# fdisk /dev/sdb

Welcome to fdisk (util-linux 2.27.1).
Changes will remain in memory only, until you decide to write them.
Be careful before using the write command.

Device does not contain a recognized partition table.
Created a new DOS disklabel with disk identifier 0x059ba759.

Command (m for help): m

Help:
  ...

  Generic
   d   delete a partition				# 파티션 삭제
   F   list free unpartitioned space
   l   list known partition types			# 파티션 타입 목록
   n   add a new partition				# 새로운 파티션 생성
   p   print the partition table			# 현재 파티션 상태 출력
   t   change a partition type				# 파티션 타입 변경
   v   verify the partition table
   i   print information about a partition

   ...

  Save & Exit
   w   write table to disk and exit			# 변경된 사항 저장하고 종료
   q   quit without saving changes			# 변경된 사항 저장하지 않고 종료

   ...
- 새로운 파티션 생성 : n
Command (m for help): n
Partition type
   p   primary (0 primary, 0 extended, 4 free)
   e   extended (container for logical partitions)
Select (default p): p				# primary partion으로 생성
Partition number (1-4, default 1): 1		# 1번 파티션 (/dev/sdb1)
First sector (2048-8388607, default 2048): 	# 시작점
Last sector, +size{K,M,G,T,P} (2048-8388607, default 8388607): +2G   # 끝점(+크기)

Created a new partition 1 of type 'Linux' and of size 2 GiB.

Command (m for help): p
Disk /dev/sdb: 4 GiB, 4294967296 bytes, 8388608 sectors
Units: sectors of 1 * 512 = 512 bytes
Sector size (logical/physical): 512 bytes / 512 bytes
I/O size (minimum/optimal): 512 bytes / 512 bytes
Disklabel type: dos
Disk identifier: 0x059ba759

Device     Boot Start     End Sectors Size Id Type
/dev/sdb1        2048 4196351 4194304   2G 83 Linux
- 파티션 삭제 : d
Command (m for help): d
Selected partition 1
Partition 1 has been deleted.
Ⅲ. make file system
- 포맷이라고도 함
1. File System 종류
- ext4 : 리눅스 고유 파일 시스템, 작은 기기에 유리
- xfs : RHEL계열(7 이후부터) 기본 시스템, 고성능 기기에 유리
- zfs : CoW가 지원되어 좋지만 아직 실험적인 단계인 파일 시스템
- ntfs : 윈도우NT 계열 파일 시스템
- fat32/exfat : 카메라에서 많이 쓰이는 파일 시스템
2. mkfs
- file system 생성
# mkfs -t fs_type device or # mkfs.fs_type device
root@jsg-ubuntu:~# mkfs.ext4 /dev/sdb1
mke2fs 1.42.13 (17-May-2015)
Creating filesystem with 524288 4k blocks and 131072 inodes
Filesystem UUID: 2dcf43d4-819c-40b2-9bd3-bf3c415c4a35
Superblock backups stored on blocks:
	32768, 98304, 163840, 229376, 294912

Allocating group tables: done
Writing inode tables: done
Creating journal (16384 blocks): done
Writing superblocks and filesystem accounting information: done
3. fsck
-
file system의 무결성을 확인
-
offline(unmount) 상태에서하는게 안전함
-
# fsck -t fs_type deviceor# fsck.file_type device
root@jsg-ubuntu:~# fsck.ext4 /dev/sdb1
e2fsck 1.42.13 (17-May-2015)
/dev/sdb1: clean, 11/131072 files, 25388/524288 blocks
root@jsg-ubuntu:~# echo $?
0					# 0이면 정상
4. mkswap
-
메모리 부족할 때 디스크의 도움 받을 수 있음
-
# mkswap -L label_name device: 스왑 공간 생성
root@jsg-ubuntu:~# mkswap -L swapfs2 /dev/sdb2
mkswap: /dev/sdb2: warning: don't erase bootbits sectors
        (dos partition table detected). Use -f to force.
Setting up swapspace version 1, size = 1024 MiB (1073737728 bytes)
LABEL=swapfs2, UUID=c44f5b14-9bcc-4eca-89f9-13dff591f124
-
# swapon device: 스왑 활성화 -
# swapoff device: 스왑 비활성화 -
# cat /proc/swaps: 스왑 공간 확인
root@jsg-ubuntu:~# cat /proc/swaps
Filename				Type		Size	Used	Priority
/dev/sda5                               partition	998396	0	-2
/dev/sdb2                               partition	1048572	0	-3
Ⅳ. mount
1. mount table 보기
# findmnt
root@jsg-ubuntu:~# findmnt
TARGET                                SOURCE     FSTYPE  OPTIONS
/                                     /dev/sda1  ext4    rw,relatime,errors=remo
├─/sys                                sysfs      sysfs   rw,nosuid,nodev,noexec,
│ ├─/sys/kernel/security              securityfs securit rw,nosuid,nodev,noexec,
│ ├─/sys/fs/cgroup                    tmpfs      tmpfs   ro,nosuid,nodev,noexec,
│ │ ├─/sys/fs/cgroup/systemd          cgroup     cgroup  rw,nosuid,nodev,noexec,
│ │ ├─/sys/fs/cgroup/memory           cgroup     cgroup  rw,nosuid,nodev,noexec,
│ │ ├─/sys/fs/cgroup/freezer          cgroup     cgroup
...
...
  └─/run/user/1000                    tmpfs      tmpfs   rw,nosuid,nodev,relatim
    └─/run/user/1000/gvfs             gvfsd-fuse fuse.gv rw,nosuid,nodev,relatim
2. mount 하기
# mount -t fs_type [-o option] device directory
root@jsg-ubuntu:~# mkdir /media/backup
root@jsg-ubuntu:~# mount -t ext4 /dev/sdb1 /media/backup
root@jsg-ubuntu:~# lsblk
NAME   MAJ:MIN RM  SIZE RO TYPE MOUNTPOINT
sdb      8:16   0    4G  0 disk
├─sdb2   8:18   0    1G  0 part [SWAP]
└─sdb1   8:17   0    2G  0 part /media/backup	# mount 됨 확인
sr0     11:0    1 1024M  0 rom
sda      8:0    0   20G  0 disk
├─sda2   8:2    0    1K  0 part
├─sda5   8:5    0  975M  0 part [SWAP]
└─sda1   8:1    0   19G  0 part /
- 기존 mount할 directory에 있던 파일들은 보이지 않게 됨. unmount하면 다시 보임!
3. unmount 하기
# umount deviceor# umount directory
root@jsg-ubuntu:~# umount /media/backup
root@jsg-ubuntu:~# lsblk
NAME   MAJ:MIN RM  SIZE RO TYPE MOUNTPOINT
sdb      8:16   0    4G  0 disk
├─sdb2   8:18   0    1G  0 part [SWAP]
└─sdb1   8:17   0    2G  0 part
sr0     11:0    1 1024M  0 rom
sda      8:0    0   20G  0 disk
├─sda2   8:2    0    1K  0 part
├─sda5   8:5    0  975M  0 part [SWAP]
└─sda1   8:1    0   19G  0 part /
- "target is busy"가 뜨는 경우
fuser -c[k] dir로 PID 찾은후 kill 명령
root@jsg-ubuntu:/media/backup# umount /media/backup
umount: /media/backup: target is busy
        (In some cases useful info about processes that
         use the device is found by lsof(8) or fuser(1).)
root@jsg-ubuntu:/media/backup# fuser -c /media/backup
/media/backup:        2657c
4. remount
-
mount된 파티션의 옵션을 변경할 때
-
# mount -o remount,option device
root@jsg-ubuntu:~# mount -o remount,ro /dev/sdb1
root@jsg-ubuntu:~# findmnt
TARGET                                SOURCE     FSTYPE  OPTIONS
/                                     /dev/sda1  ext4    rw,relatime,errors=remo
├─/sys                                sysfs      sysfs   rw,nosuid,nodev,noexec,
│ ├─/sys/kernel/security              securityfs securit rw,nosuid,nodev,noexec,
...
└─/media/backup                       /dev/sdb1  ext4    ro,relatime,data=ordere
5. bind
# mount --bind old_dir new_dir: 하나의 디렉토리를 다른 디렉토리에 연결시킴
Ⅴ. fstab
-
부팅시 파일 시스템을 자동 마운트하기 위한 정보
- device : 아래 중 하나
- /dev/sd... : 실제 디바이스로 설정하는 방식
- Label=name : 레이블 이름으로 검색해서 설정하는 방식
- UUID=uuid : UUID 값으로 검색해서 설정하는 가장 최신 방식
- mount point : mount 할 directory
- fstype : file type
- options :
- defaults : 기본값, 부팅시 자동으로 마운트
- noauto : 부팅시 자동으로 마운트 X
- rw : 읽기/ 쓰기 가능
- ro : 읽기만 가능
- user : 일반 유저도 마운트 가능
- nouser : 루트 유저만 마운트 가능
- noexec : 실행파일의 사용 금지
- dump: 백업 가능(0) / 불가능 (1)
- fsck: fsck 우선순위, 안함(0), 루트와 같은 우선 순위(1), 후순위(2)
- device : 아래 중 하나
| device | mount point | fstype | options | dump | fsck |
|---|---|---|---|---|---|
| UUID=e65ee1... | / | ext4 | errors=remount-ro | 0 | 1 |
| UUID=84970b... | none | swap | sw | 0 | 0 |
1. Label, UUID 값 생성
a. 레이블 생성
e2label device [new-label]
root@jsg-ubuntu:~# blkid /dev/sdb1
/dev/sdb1: LABEL="Study" UUID="2dcf43d4-819c-40b2-9bd3-bf3c415c4a35"
TYPE="ext4" PARTUUID="059ba759-01"
b. UUID 생성
tune2fs -U <clear|random|time|uuid_value> device
- -L 을 옵션으로 주면 Label도 설정 가능
- uuid 입력 방법:
- clear : 값 클리어
- random : 랜덤으로 지정
- time : 시간을 토대로 지정
- uuid_value : uuid_value를 직접 입력해 지정 (uuidgen을 많이 사용)
root@jsg-ubuntu:~# tune2fs -U $(uuidgen) /dev/sdb1
tune2fs 1.42.13 (17-May-2015)
root@jsg-ubuntu:~# blkid /dev/sdb1
/dev/sdb1: LABEL="Study" UUID="9c4daae1-21b2-4619-8d02-db881a6fd4b3"
TYPE="ext4" PARTUUID="059ba759-01"
c. 레이블, UUID 로 디바이스 검색
findfs LABEL=label or findfs UUID=uuid
root@jsg-ubuntu:~# findfs LABEL=Study
/dev/sdb1
root@jsg-ubuntu:~# findfs UUID=9c4daae1-21b2-4619-8d02-db881a6fd4b3
/dev/sdb1
d. 레이블/UUID 등 디바이스 정보 보기
# blkid [device]
root@jsg-ubuntu:~# blkid /dev/sdb1
/dev/sdb1: LABEL="Study" UUID="9c4daae1-21b2-4619-8d02-db881a6fd4b3"
TYPE="ext4" PARTUUID="059ba759-01"
2. /etc/fstab 수정
root@jsg-ubuntu:~# cat /etc/fstab
# /etc/fstab: static file system information.
#
# Use 'blkid' to print the universally unique identifier for a
# device; this may be used with UUID= as a more robust way to name devices
# that works even if disks are added and removed. See fstab(5).
#
# file_system    mount_point   type    options       dump    pass

UUID=e65ee146-aea7-418b-8946-8993e297d5a6  /   ext4   errors=remount-ro 0 1
UUID=84970be2-9cd1-49c0-9f99-eec452cfccaa none     swap    sw   0 0
UUID=9c4daae1-21b2-4619-8d02-db881a6fd4b3 /media/backup	  ext4   defaults 0 1

root@jsg-ubuntu:~# lsblk			# 컴퓨터 재실행시 자동 마운트 됨
NAME   MAJ:MIN RM  SIZE RO TYPE MOUNTPOINT
sdb      8:16   0    4G  0 disk
├─sdb2   8:18   0    1G  0 part
└─sdb1   8:17   0    2G  0 part /media/backup
sr0     11:0    1 1024M  0 rom
sda      8:0    0   20G  0 disk
├─sda2   8:2    0    1K  0 part
├─sda5   8:5    0  975M  0 part [SWAP]
└─sda1   8:1    0   19G  0 part /
Ⅵ. udisksctl
-
수동 mount 대신 자주 쓰임
-
일반 유저로 명령을 실행해야하고, 디렉토리를 자동 생성/삭제 해줌
-
$ udisksctl mount -b device: 마운트 -
$ udisksctl unmount -b device: 언마운트 -
$ udisksctl loop-setup --file XXX.iso: 파일을 디바이스처럼 마운트 -
$ udisksctl status: 장착된 장치 정보 -
$ udisksctl dumpor$ udisksctl info -d device: 개별 장치 정보
