Ⅰ. 이론
-
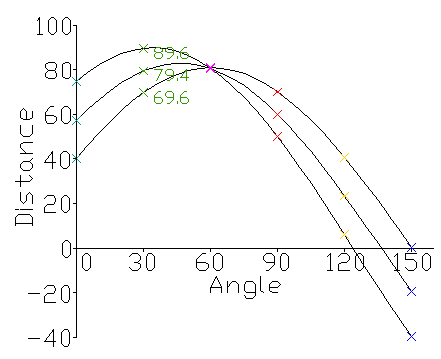
각 점에 대해서 점을 지나는 직선을 r = 𝑥 cos 𝜃 + 𝑦 sin 𝜃 꼴로 표현 할 수 있음
-
모든 경우의 수를 (r,𝜃) 평면상에 표시 할 수 있음

- 이 곡선들이 겹치는 점이 직선일 확률이 높다
Ⅱ. HoughLines
-
lines = cv.HoughLines(image, rho, theta, threshold, srn=0, stn=0, min_theta=0, max_theta=cv.PI)-
lines : 찾아난 직선들
[ρ,θ]의 어레이 ρ는 (0,0) 좌표와의 거리, θ 는 x축과의 각도(rad) -
image : 8-bit, single-channel binary source image.
-
rho, theta : ρ, θ의 해상도
-
threshold : 해상도 안의 겹치는 수가 몇개 이상이여야 직선으로 인정할 것인지
-
srn, stn : multi-scale Hough transform 으로 더욱 정확한 직선을 검출하고 싶을시 지정. 해상도가 rho/srn, theta/stn 이 되는 것과 비슷한 효과를 준다. 0 이면 classical Hough transform 사용
-
min_theta, max_theta : 검출할 직선의 각도 제한 (0 ~ pi)
-
Ⅲ. HoughLinesP
-
HoughLines를 개선한 방식으로 모든 점을 사용하지 않기 때문에 더 빠름. threshold값을 더 낮춰야 함. 직선의 시작과 끝을 알 수 있음.
-
lines = cv.HoughLinesP(image, rho, theta, threshold, minLineLength=0, maxLineGap=0)-
lines : 찾아낸 선분
[x1,y1,x2,y2]의 어레이 -
image : 8-bit, single-channel binary source image
-
rho, theta : ρ, θ의 해상도
-
threshold : 해상도 안의 겹치는 수가 몇개 이상이여야 직선으로 인정할 것인지
-
minLineLength : 선분으로 인정할 최소의 길이
-
maxLineGap : 동일 직선상의 선분들이 얼마 이하 떨어져이면 연결할것인지
-
Ⅳ. 코드 예시
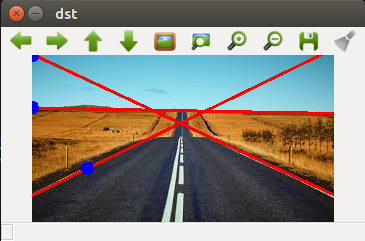
- HoughLines
import numpy as np
import cv2

src = cv2.imread("src/ex_codes/road.jpeg")
dst = src.copy()
gray = cv2.cvtColor(src, cv2.COLOR_BGR2GRAY)
canny = cv2.Canny(gray, 5000, 1500, apertureSize = 5, L2gradient = True)
lines = cv2.HoughLines(canny, 1, np.pi/180, 100)
print(lines)
for i in lines:
    rho, theta = i[0][0], i[0][1]
    a, b = np.cos(theta), np.sin(theta)
    x0, y0 = a*rho, b*rho

    scale = src.shape[0] + src.shape[1]

    x1 = int(x0 + scale * -b)
    y1 = int(y0 + scale * a)
    x2 = int(x0 - scale * -b)
    y2 = int(y0 - scale * a)

    cv2.line(dst, (x1, y1), (x2, y2), (0, 0, 255), 2)
    cv2.circle(dst, (x0, y0), 3, (255, 0, 0), 5, cv2.FILLED)

cv2.imshow("dst", dst)
cv2.waitKey(0)
cv2.destroyAllWindows()

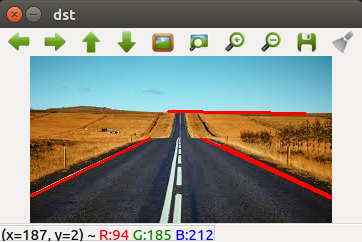
- HoughLinesP
import numpy as np
import cv2

src = cv2.imread("src/ex_codes/road.jpeg")
dst = src.copy()
gray = cv2.cvtColor(src, cv2.COLOR_BGR2GRAY)
canny = cv2.Canny(gray, 5000, 1500, apertureSize = 5, L2gradient = True)
lines = cv2.HoughLinesP(canny, 0.8, np.pi / 180, 80, minLineLength = 10, maxLineGap = 10)

for i in lines:
    cv2.line(dst, (i[0][0], i[0][1]), (i[0][2], i[0][3]), (0, 0, 255), 2)

cv2.imshow("dst", dst)
cv2.waitKey(0)
cv2.destroyAllWindows()

