this 키워드
-
this 는 자신이 속한 객체 또는 자신이 생성할 인스턴스를 가리키는 자기 참조 변수입니다.
-
this 를 통해서 자신이 속한 객체 또는 자신이 생성할 인스턴스의 프로퍼티나 메서드를 참조할 수 있습니다.
-
함수를 호출하면 this 가 암묵적으로 함수 내부에 전달됩니다.
-
this 가 가리키는 값, 즉 this 바인딩은 함수 호출 방식에 의해 동적으로 결정됩니다.
함수 호출 방식과 this 바인딩
1. 일반 함수 호출
- 기본적으로 전역 객체가 바인딩됩니다.
- 콜백 함수가 일반 함수로 호출되면 콜백 함수 내부의 this 에도 전역 객체가 바인딩됩니다.
- 어떤 함수라도 일반 함수로 호출되면 this 에 전역 객체가 바인딩됩니다.
- 웹 브라우저에서 사용되는 자바스크립트의 전역 객체는 window 입니다. 자바스크립트를 사용하는 서버인 Node.js 에서는 global 이라는 이름의 전역 객체가 있습니다.
2. 메서드 호출
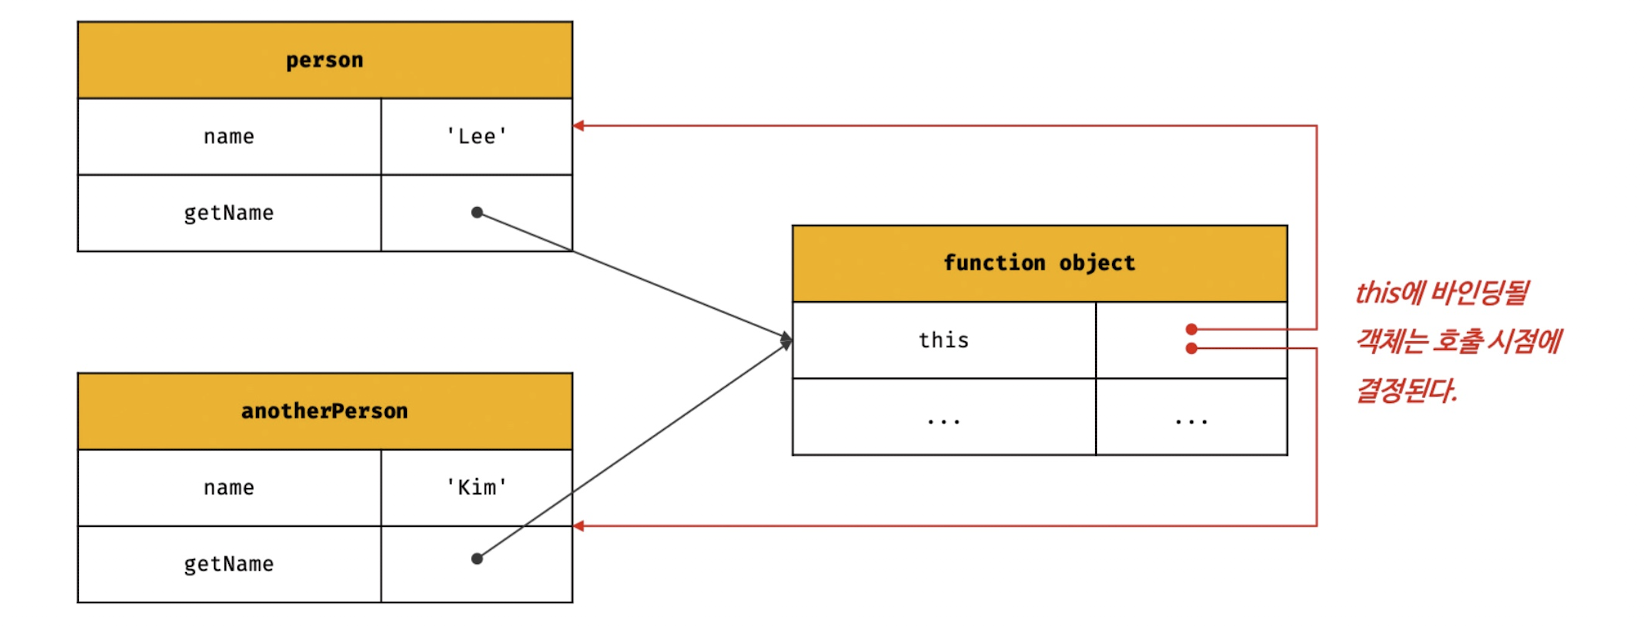
- 메서드 내부의 this 에는 메서드를 호출한 객체가 바인딩됩니다.
- 주의할 것은 this 메서드를 소유한 객체가 아닌 메서드를 호출한 객체에 바인딩된다는 것입니다.
const person = {
 name: 'Lee',
  getName() {
  	return this.name;
  }
};

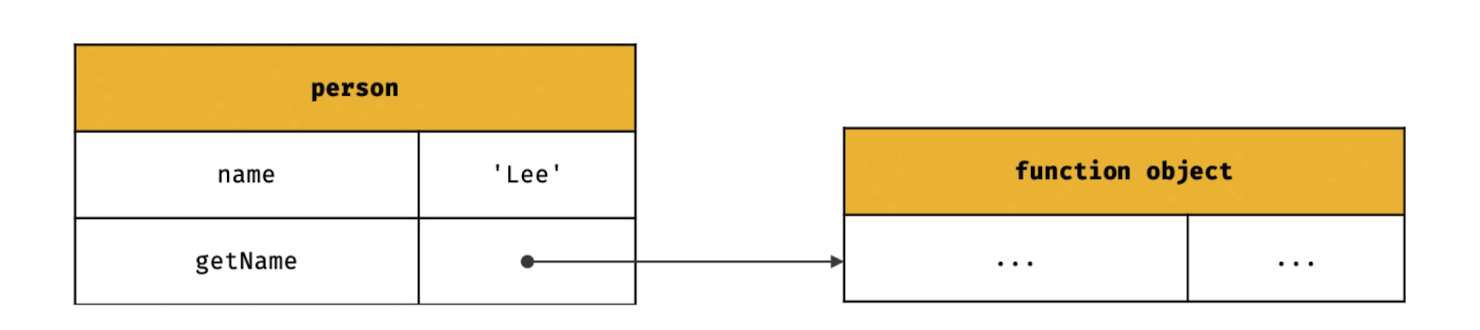
console.log(person.getName()); // Lee- person 객체의 getName 프로퍼티가 가리키는 함수 객체는 person 객체에 포함된 것이 아니라 독립적으로 존재하는 별도의 객체입니다. getName 프로퍼티가 함수 객체를 가리키고 있을 뿐입니다.
const anotherPerson = {
 name: 'Kim'
};

// getName 메서드를 anotherPerson 객체의 메서드로 할당
anotherPerson.getName = person.getName;

console.log(anotherPerson.getName()); // Kim- 따라서 메서드 내부의 this 는 프로퍼티로 메서드를 가리키고 있는 객체와 관계 없고, 메서드를 호출한 객체에 바인딩됩니다.
3. 생성자 함수 호출
- 생성자 함수 내부의 this 에는 생성자 함수가 생성할 인스턴스가 바인딩됩니다.
- new 연산자와 함께 생성자 함수를 호출하지 않으면 일반 함수로 동작합니다.
4. Function.prototype.apply/call/bind 메서드에 의한 간접 호출
- apply, call, bind 메서드는 Function.prototype 의 메서드입니다. 모든 함수가 상속받아 사용할 수 있습니다.
- apply 와 call 메서드의 기능은 함수를 호출하는 것입니다. apply 와 call 메서드는 함수를 호출하면 첫 번째 인수로 전달한 특정 객체를 호출한 함수의 this 에 바인딩합니다.
- bind 메서드는 함수를 호출하지 않고, 첫 번째 인수로 전달한 값으로 this 바인딩이 교체된 함수를 새롭게 생성해 반환합니다.
자바스크립트 이벤트 핸들러에서의 this 이해하기
자바스크립트에서 이벤트 핸들러 내부의 this 키워드가 가리키는 대상은 함수가 어떻게 정의되고 호출되느냐에 따라 다릅니다. 이 글에서는 다양한 방식으로 이벤트 핸들러를 정의했을 때 this가 어떻게 동작하는지 설명합니다.
1. 이벤트 핸들러 어트리뷰트 방식
HTML 어트리뷰트로 이벤트 핸들러를 설정할 때, 함수 내부의 this는 전역 객체(window)를 가리킵니다.
<!DOCTYPE html>
<html>
<body>
    <button onclick="handleClick()">Click me</button>
    <script>
        function handleClick() {
            console.log(this); // window
        }
    </script>
</body>
</html>
위 예제에서 handleClick 함수는 이벤트 핸들러로 호출되지만, this는 전역 객체 window를 가리킵니다. 이는 이벤트 핸들러가 일반 함수로 호출되기 때문입니다.
2. 이벤트 핸들러에 this 전달
이벤트 핸들러에 this를 전달하여 이벤트를 바인딩한 DOM 요소를 가리키도록 할 수 있습니다.
<!DOCTYPE html>
<html>
<body>
    <button onclick="handleClick(this)">Click me</button>
    <script>
        function handleClick(button) {
            console.log(button); // 이벤트를 바인딩한 button 요소
            console.log(this); // window
        }
    </script>
</body>
</html>
위 예제에서 handleClick 함수에 this를 전달하여 button 요소를 가리키게 했습니다. 하지만 함수 내부에서 this는 여전히 전역 객체 window를 가리킵니다.
3. 이벤트 핸들러 프로퍼티 방식과 addEventListener 메서드 방식
이 두 방식 모두 이벤트 핸들러 내부의 this는 이벤트를 바인딩한 DOM 요소를 가리킵니다.
<!DOCTYPE html>
<html>
<body>
    <button class="btn1">0</button>
    <button class="btn2">0</button>
    <script>
        const $button1 = document.querySelector('.btn1');
        const $button2 = document.querySelector('.btn2');

        // 이벤트 핸들러 프로퍼티 방식
        $button1.onclick = function (e) {
            console.log(this); // $button1
            console.log(e.currentTarget); // $button1
            console.log(this === e.currentTarget); // true
            ++this.textContent;
        };

        // addEventListener 메서드 방식
        $button2.addEventListener('click', function (e) {
            console.log(this); // $button2
            console.log(e.currentTarget); // $button2
            console.log(this === e.currentTarget); // true
            ++this.textContent;
        });
    </script>
</body>
</html>
이벤트 핸들러 프로퍼티 방식과 addEventListener 메서드 방식을 사용하면 this는 이벤트를 바인딩한 DOM 요소를 가리킵니다.
4. 화살표 함수 사용 시 주의
화살표 함수로 정의한 이벤트 핸들러 내부의 this는 상위 스코프의 this를 가리킵니다. 따라서 이벤트를 바인딩한 DOM 요소를 가리키지 않습니다.
<!DOCTYPE html>
<html>
<body>
    <button class="btn1">0</button>
    <button class="btn2">0</button>
    <script>
        const $button1 = document.querySelector('.btn1');
        const $button2 = document.querySelector('.btn2');

        // 이벤트 핸들러 프로퍼티 방식
        $button1.onclick = e => {
            console.log(this); // window
            console.log(e.currentTarget); // $button1
            console.log(this === e.currentTarget); // false
            ++this.textContent;
        };

        // addEventListener 메서드 방식
        $button2.addEventListener('click', e => {
            console.log(this); // window
            console.log(e.currentTarget); // $button2
            console.log(this === e.currentTarget); // false
            ++this.textContent;
        });
    </script>
</body>
</html>
화살표 함수는 자신만의 this 바인딩을 가지지 않고 상위 스코프의 this를 가리키기 때문에, 위 예제에서 화살표 함수 내부의 this는 window 객체를 가리킵니다.
5. 클래스의 메서드에서의 this
클래스에서 이벤트 핸들러를 바인딩할 때는 this에 주의해야 합니다. 이벤트 핸들러 내부의 this가 클래스 인스턴스를 가리키도록 하려면 bind 메서드를 사용해 바인딩해야 합니다.
<!DOCTYPE html>
<html>
<body>
    <button class="btn">0</button>
    <script>
        class App {
            constructor() {
                this.$button = document.querySelector('.btn');
                this.count = 0;

                // increase 메서드를 이벤트 핸들러로 등록
                this.$button.onclick = this.increase.bind(this);
            }

            increase() {
                this.$button.textContent = ++this.count;
            }
        }

        new App();
    </script>
</body>
</html>
위 예제에서 increase 메서드는 클래스 인스턴스를 가리키도록 bind 메서드를 사용해 바인딩합니다. 이를 통해 클래스 인스턴스의 this가 이벤트 핸들러 내부에서도 유지됩니다.
이처럼 자바스크립트에서 이벤트 핸들러 내부의 this는 함수가 정의되고 호출되는 방식에 따라 달라집니다. 이를 올바르게 이해하고 사용함으로써 예측 가능한 코드를 작성할 수 있습니다.