Simple TODO with Swift
Table View, Core Data, User Notification을 활용한 TODO 앱을 만들어보고 기록한 글입니다. 🙌
Mission
- Table View
- Core Data
- User Notification
Table View
Table View Cell Style
Table View Cell Style을 Subtitle로 설정해서 Title에는 task name이, Subtitle에는 due date 값이 보이도록 했습니다.

extension ViewController: UITableViewDelegate, UITableViewDataSource {

    func tableView(_ tableView: UITableView, cellForRowAt indexPath: IndexPath) -> UITableViewCell {
        let cell = tableView.dequeueReusableCell(withIdentifier: "cell", for: indexPath)
        let task = taskData[indexPath.row]

        cell.textLabel?.text = task.name
        cell.detailTextLabel?.text = Self.dateFormatter.string(from: task.dueDate!)
        cell.selectionStyle = .none

        return cell
    }

    // ...
DateFormatter
Date 타입인 due date는 DateFormatter를 사용해서 표시해줬습니다.
.dateStyle이 medium이면 year, month, day만 표시합니다.
    // date dateFormatter
    static let dateFormatter: DateFormatter = {
        let dateFormatter = DateFormatter()
        dateFormatter.dateStyle = .medium
        return dateFormatter
    }()
Header View for Table View
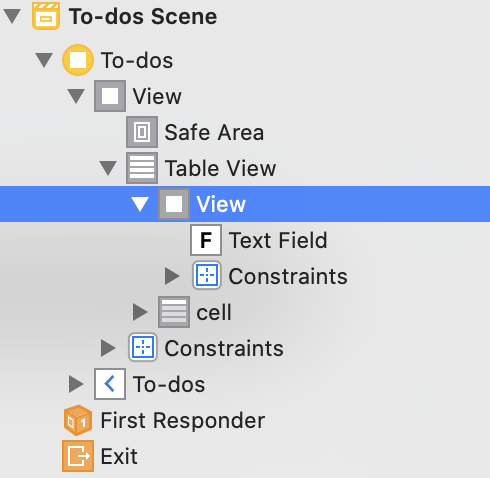
TableView의 하위 hierarchy에 빈 view를 생성하고, 뷰에 textField를 올려 autolayout을 설정해서 테이블 뷰의 헤더뷰처럼 나타낼 수 있습니다.

didSelectRowAt
cell을 선택했을 때, 해당하는 task의 view controller로 이동합니다. 현재 vc가 navigation controller 기반이므로 pushViewController()로 push 합니다.
func tableView(_ tableView: UITableView, didSelectRowAt indexPath: IndexPath) {
    tableView.deselectRow(at: indexPath, animated: true)
    guard let taskVC = storyboard?.instantiateViewController(identifier: "task") as? TaskViewController else { return }
    taskVC.configure(model: taskData[indexPath.row])
    taskVC.completionHandler = { [weak self] in self?.fetchTasks() }
    navigationController?.pushViewController(taskVC, animated: true)
}
Editing Style
cell에 delete 기능도 다음과 같이 추가합니다.

    // tableView editingStyle

    func tableView(_ tableView: UITableView, editingStyleForRowAt indexPath: IndexPath) -> UITableViewCell.EditingStyle {
        return .delete
    }

    func tableView(_ tableView: UITableView, commit editingStyle: UITableViewCell.EditingStyle, forRowAt indexPath: IndexPath) {
        if editingStyle == .delete {
            // delete cell
            tableView.beginUpdates()

            // delete data
            CoreDataManager.shared.deleteTask(object: taskData[indexPath.row], completion: nil)

            taskData.remove(at: indexPath.row) // 배열에서 제거하지 않으면 오류
            tableView.deleteRows(at: [indexPath], with: .fade)
            tableView.endUpdates()
        }
    }
💡 NOTICE
delete 했을 때, cell의 row 개수와 맞지 않으면 다음과 같은 오류가 발생합니다:
reason: 'Invalid update: invalid number of rows in section 0. The number of rows contained in an existing section after the update (16) must be equal to the number of rows contained in that section before the update (16), plus or minus the number of rows inserted or deleted from that section (0 inserted, 1 deleted) and plus or minus the number of rows moved
Core Data
Core Data를 적용해서 data를 저장, 조회, 수정, 삭제할 수 있게 구현했습니다.
다음은 데이터 수정을 위한 메서드입니다.
id로 String 타입(해당 task 객체의 taskName)을 전달받고, taskName으로 변경할 task name을 전달받습니다. id에 해당하는 model를 찾기 위해서 NSPredicate를 사용합니다.
@discardableResult
func updatetask(id: String, taskName: String, dueDate: Date, completion: (() -> Void)?) -> Bool {
    let fetchRequest: NSFetchRequest<NSFetchRequestResult>
        = NSFetchRequest<NSFetchRequestResult>(entityName: "Task")
    fetchRequest.predicate = NSPredicate(format: "name = %@", NSString(string: id)) // id에 해당하는 객체 찾기
    print("updating: \(fetchRequest)")

    do {
        let fetchData = try context.fetch(fetchRequest)
        let task = fetchData[0] as! NSManagedObject
        task.setValue(taskName, forKey: "name") // 데이터 업데이트
        task.setValue(dueDate, forKey: "dueDate")
        do {
            try context.save()
            completion?()
        } catch {
            print(error.localizedDescription)
            return false
        }
    } catch {
        print(error.localizedDescription)
        return false
    }
    return true
}
@discardableResult attribute는 함수의 결과를 사용하지 않을 때의 warning을 무시합니다.
User Notification
    @objc func didTapSaveButton() {
        guard let taskName = taskTextField.text, !taskName.isEmpty else {
            return
        }

        CoreDataManager.shared.insertTask(taskName: taskName, dueDate: dueDate.date, completion: completionHandler)

        // UserNotification
        UNUserNotificationCenter.current().requestAuthorization(options: [.alert, .badge, .sound]) { [weak self] (success, error) in
            guard let strongSelf = self else {
                return
            }
            if success {
                print("auth success!")
                DispatchQueue.main.async {
                    // setting, triger, request user notification
                    strongSelf.scheduleTest(taskName: taskName, dueDate: strongSelf.dueDate.date)
                }
            }
        }

        navigationController?.popViewController(animated: true)
    }

    func scheduleTest(taskName: String, dueDate: Date) {
        let content = UNMutableNotificationContent()
        content.title = taskName
        content.sound = .default
        content.badge = 1
        content.body = "It's almost close to deadline!"

        let targetDate = Date().addingTimeInterval(10)
        let trigger = UNCalendarNotificationTrigger(dateMatching: Calendar.current.dateComponents([.year, .month, .day, .hour, .minute, .second],
                                                                                                  from: targetDate),
                                                    repeats: false)

        let request = UNNotificationRequest(identifier: "some_long_id", content: content, trigger: trigger)

        UNUserNotificationCenter.current().add(request, withCompletionHandler: { error in
            if error != nil {
                print("something went wrong")
            }
        })
}Code Review
- Task VC와 Entry VC를 하나로 합쳐보기
- CoreDataManger 하위에 TaskDataManager 레이어 하나 더 두고, 프로토콜을 이용해 확장해보기
- enum을 활용해서 raw value 사용해보기
- 관심사 분리 - delegate 프로토콜 채택 시, 적극적으로 extension 하기
- viewDidLoad 함수 안에 직접 구현 코드를 작성하는 것은 지양할 것 (메서드로 따로 빼기)