.png)
python 가상환경 설정

별다른 반응이 있진 않음!
다시 터미널 켰을 때

이렇게 뜨면 가상환경이 활성화된 것!!
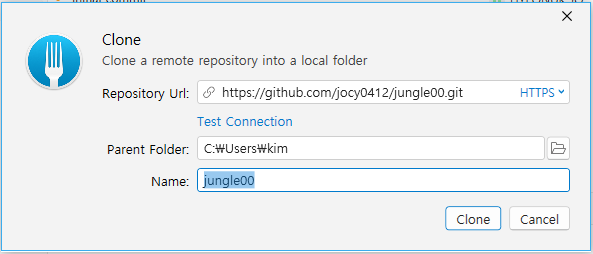
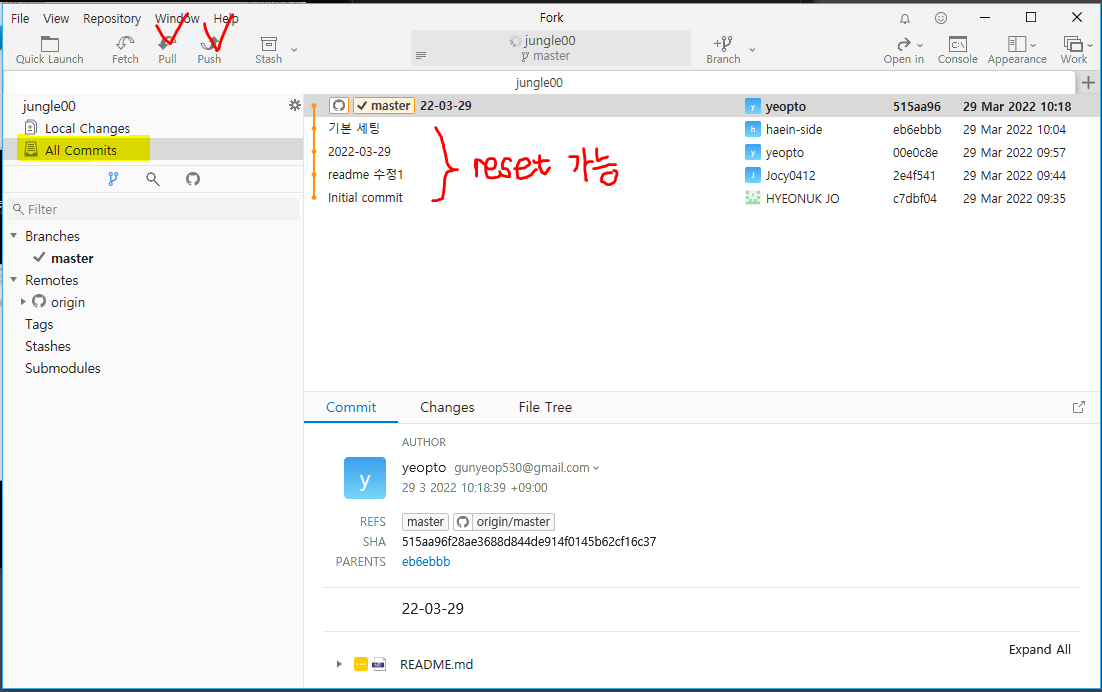
git-fork 쓰는 법
-
개인이 repo 만들고 collaborator 아이디로 초대해주기 & 메일로 발송된 invitation 수락해야!
-
file - clone 눌러서 모두 다운 받게 하기
-
내 로컬에 있는 파일 -> staged area에 올리기

-
All commits에서 reset, pull, push 가능
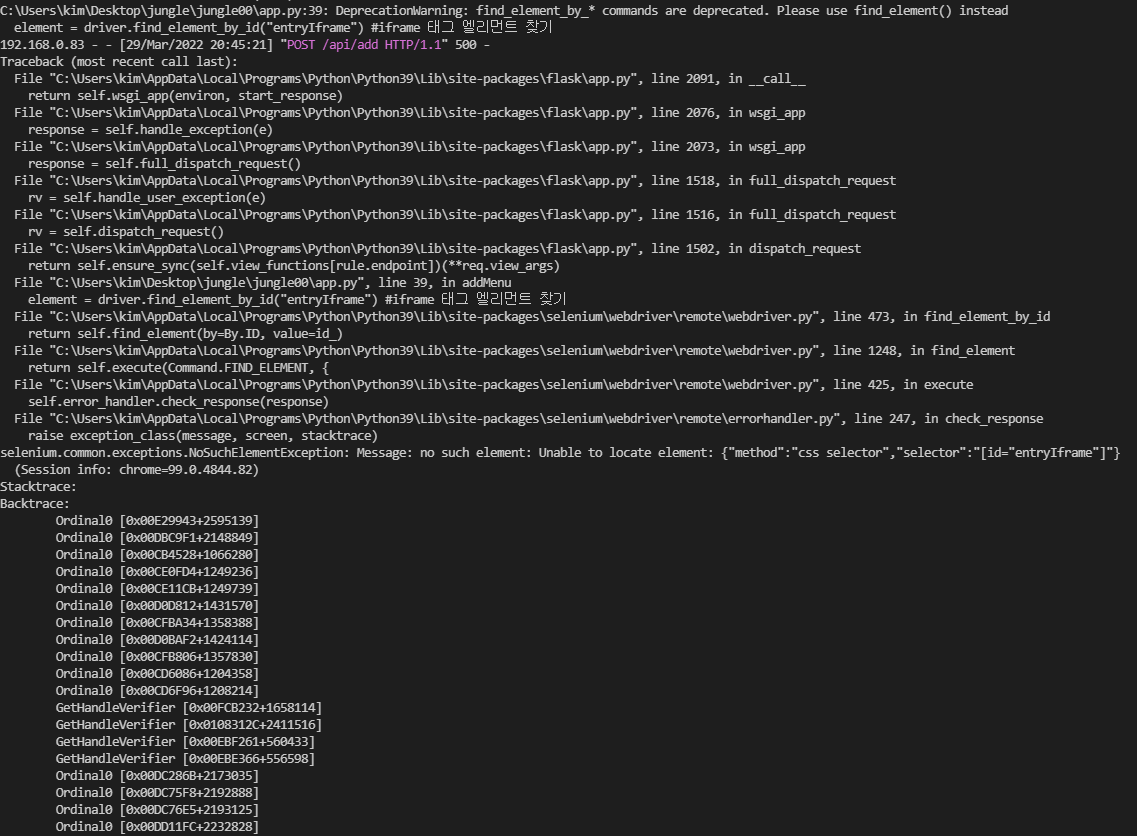
sellenium과의 전쟁..
네이버 지도를 크롤링하려고 했으나 iframe으로 원하는 부분이 되어 있어 좌절하고 말았다.
알고보니 그렇게 되어있는 부분은 BeautifulSoup로 크롤링이 안되고 Sellenium을 써서 크롤링해줘야 했다.
몇 시간동안 구현을 시도했으나 되지 않았다ㅜㅜ
피땀눈물이 담긴 나의 코드
from flask import Flask, render_template, jsonify, request
from pymongo import MongoClient
from bs4 import BeautifulSoup
from selenium import webdriver
from selenium.webdriver.common.keys import Keys
# import simplejson as json
# from bson import ObjectId
# from bson.objectid import ObjectId
# from bson.json_util import dumps
import requests

app = Flask(__name__)

client = MongoClient('mongodb://test:test@54.180.139.22', 27017)  # mongoDB는 27017 포트로 돌아갑니다.
db = client.dbmuckji  # 'dbmuckji'라는 이름의 db를 만들거나 사용합니다.

@app.route('/')
def home():
    return render_template('index.html')

@app.route('/api/addpage')
def addPage():
   return render_template('add.html')

@app.route('/api/add', methods=['POST'])
def addMenu():
    # 1. 클라이언트로부터 데이터를 받기
    food_receive = request.form['food_give']
    category_receive = request.form['category_give']
    url_receive = request.form['url_give']

    # 2. shop_name, shop_address, shop_img 크롤링해오기
    headers = {
        'User-Agent': 'Mozilla/5.0 (Windows NT 10.0; Win64; x64)AppleWebKit/537.36 (KHTML, like Gecko) Chrome/73.0.3683.86 Safari/537.36'}
    # data = requests.get(url_receive, headers=headers)

    driver = webdriver.Chrome("C:/Users/kim/Desktop/dev/chromedriver.exe")
    driver.get(url_receive)
    element = driver.find_element_by_id("entryIframe") #iframe 태그 엘리먼트 찾기
    driver.switch_to.frame(element) #프레임 이동

    data = driver.page_source
    print(data)
    soup = BeautifulSoup(data, 'html.parser')
    print(soup)
    # soup = BeautifulSoup(data.content.decode('utf-8','replace'), 'html.parser')

    shop_name = soup.select_one('div._3uUKd _2z4r0').text
    shop_address = soup.select_one('div._1h3B_ > span._2yqUQ').text
    shop_img = soup.select_one('div._1ZDCY> a > div.cb7hz _div')['style'] # 문자열 수정해줘야


    # shop_name = soup.select_one('#entryIframe > #app-root')

    print(shop_name)

    # 3. dbmuckji DB로 보낼 데이터 정리
    food = {
            'food_name': food_receive,
            'food_category': category_receive,
            'shop_name': shop_name,
            'shop_address': shop_address,
            'shop_img': shop_img,
            'shop_url':url_receive,
            'like':0,    # like를 0으로 세팅
            'hate':0,    # hate를 0으로 세팅
            'food_code':0 # food_code를 0으로 세팅
            }

    # 3. mongoDB에 데이터 넣기
    # db의 shop 콜렉션을 만들고 데이터 넣기
    db.shop.insert_one(food)

    return jsonify({'result': 'success'})


if __name__ == '__main__':
   app.run('0.0.0.0',port=5000,debug=True)
그게, 할 수 있다고 믿어야 해