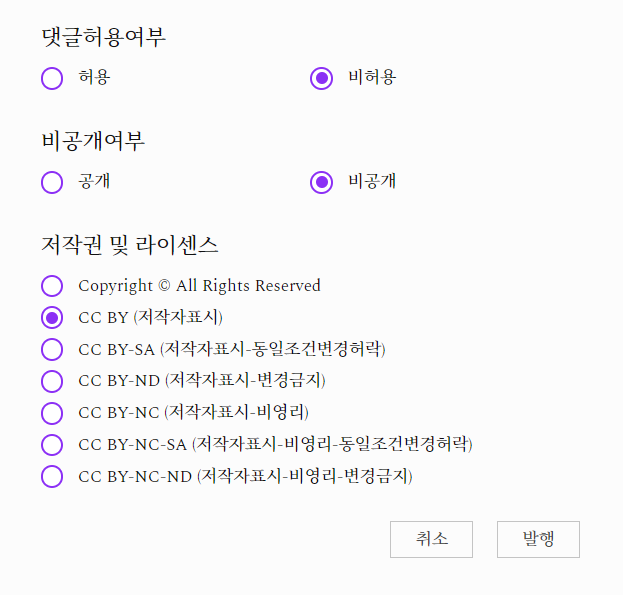
프로젝트 내에서 중복적으로 사용되고 있는 라디오버튼 요소가 있었다. 라이브러리를 이용해 쉽게 다루는 방법도 있지만, 커스텀 훅 연습을 위해 라디오버튼 커스텀 훅을 직접 만들어보기로 했다.

먼저 공통으로 요구되는 props는 다음과 같았다.
- 라디오버튼 속성으로 사용될 목록 리스트
- 같은 속성을 가진 라디오버튼 그룹 name
- 초기값 설정
문제는 초기값 설정에 있었다. 회원가입과 같은 일반적인 폼에서는 제출 후 초기값이 리셋되기 때문에 따로 기억할 필요가 없이 한번만 설정해주면 된다. 하지만 우리 사이트에서는 사용자가 글 작성 시 각각 글 공개 여부, 댓글 공개 여부, 라이센스 정보 값을 선택하고 제출 한 뒤에, 글을 수정할 때 다시 그 선택했던 값을 불러와야 했기 때문에 애를 먹었다.
아래는 첫번째로 시도했던 방법이다.
import { useState } from 'react';
import { CustomMultiRadioBtnBox } from './styles';

type useRadioButtonPropsType = [renderChecks: () => JSX.Element];

export function useRadioButtons(
  radioBtnList: string[],
  labelName: string
): useRadioButtonPropsType {
  const getDefaultRadiobuttons = () =>
    radioBtnList.map((radioBtn: string) => ({
      name: radioBtn,
      checked: false,
    }));

  const [radioButtons, setRadioButtons] = useState(getDefaultRadiobuttons());

  function setRadiobutton(
    e: React.ChangeEvent<HTMLInputElement>,
    index: number,
    checked: boolean
  ) {
    const newRadiobuttons = [...radioButtons];
    newRadiobuttons[index].checked = checked;
    setRadioButtons(newRadiobuttons);
  }

  const renderChecks = () => (
    <CustomMultiRadioBtnBox>
      {radioButtons.map((radioBtn, index) => (
        <label key={index} htmlFor={radioBtn.name}>
          <li key={index}>
            <input
              type="radio"
              name={labelName}
              id={radioBtn.name}
              value={radioBtn.name}
              checked={radioBtn.checked}
              onChange={e => setRadiobutton(index, e.target.checked)}
            />
            <span></span>
            {radioBtn.name}
          </li>
        </label>
      ))}
    </CustomMultiRadioBtnBox>
  );

  return [renderChecks];
}
이 방법에서는 e.target.checked 속성을 이용하려고 했는데 라디오 버튼 속성 목록을 받아와 map으로 돌렸을 때 defaultChecked를 설정할 수가 없었다.
Warning: InfoPost contains an input of type radio with both checked and defaultChecked props. Input elements must be either controlled or uncontrolled (specify either the checked prop, or the defaultChecked prop, but not both). Decide between using a controlled or uncontrolled input element and remove one of these props.
... 입력 요소는 제어되거나 제어되지 않아야 합니다(checked prop 또는 defaultChecked prop 중 하나를 지정하되 둘 다 지정해서는 안 됨)...
defaultChecked를 따로 지정할 수 있을 줄 알았던 착각 속에 범한 오류...😵
결국 체크는 되는데 초기값을 지정할 방법이 떠오르지 않아 두번째 방법으로 코드를 수정했다.
useRadioButton.tsx
import { useState } from 'react';
import { CustomMultiRadioBtnBox } from '../components/Input/styles';

type useRadioBtnPropsType = [checkRadioValue: string, renderChecks: () => JSX.Element];

export function useRadioButton(
  radiobuttonsList: string[], // 라디오버튼 목록
  labelName: string, // 라디오버튼그룹 name
  initialCheck: string // 초기값
): useRadioBtnPropsType {
  const getDefaultRadiobuttons = () =>
    radiobuttonsList.map((radioBtn: string) => ({
      name: radioBtn,
      checked: false,
    }));

  const radioButtons = getDefaultRadiobuttons();

  const [checkRadioValue, setCheckRadioValue] = useState(initialCheck);
  const handleChange = (e: React.ChangeEvent<HTMLInputElement>) => {
    const { value } = e.target;
    const selected = radioButtons.find(check => check.name === value);
    if (selected) {
      setCheckRadioValue(selected.name);
    }
  };

  const renderChecks = () => (
    <CustomMultiRadioBtnBox>
      {radioButtons.map((radioBtn, index) => (
        <label key={index} htmlFor={radioBtn.name}>
          <li key={index}>
            <input
              type="radio"
              name={labelName}
              id={radioBtn.name}
              value={radioBtn.name}
              checked={radioBtn.name === checkRadioValue}
              onChange={handleChange}
            />
            <span></span>
            {radioBtn.name}
          </li>
        </label>
      ))}
    </CustomMultiRadioBtnBox>
  );

  return [checkRadioValue, renderChecks];
}
handelChange 함수는 이벤트 객체를 받아 각 라디오 버튼 input 요소가 선택될 때 value값을 가져온다. 그리고 이 값이 받아온 라디오버튼 목록에서 특정 항목의 name과 일치할 때, useState를 이용해 checkRadioValue(현재 선택된 라디오버튼의 name)의 상태를 변경해준다. 또한 받아온 initialCheck를 이용해 초기 value값을 지정할 수 있다.
renderCheck 함수는 화면에 라디오 버튼을 그리고, 체크 여부를 표시한다.
useRadioButton 커스텀 훅 사용 예제
// 포스트공개여부: 공개(1), 비공개(0)
  const publicLabel = ['공개', '비공개'];
  const [isPublic, setIsPublic] = useState(tempPost.data?.isPublic === 0 ? '비공개' : '공개');
  const [publicValue, renderPublicChecks] = useRadioButton(
    publicLabel,
    'isPublic',
    isPublic
  );
  useEffect(() => { // checkRadioValue state 변경
    setIsPublic(publicValue === '공개' ? '공개' : '비공개');
  }, [isPublic, publicValue]);
이제 라디오 버튼이 필요한 곳에서 이렇게 커스텀 훅을 불러와 이렇게 사용해주면 된다.
사실 커스텀 훅으로 만들지 않았다면 더 빨리 만들 수는 있었겠지만 중복 로직 작성을 최대한 피하고 로직 자체를 재사용 가능하게 만들고 싶었다.
커스텀 훅의 장점은 컴포넌트 로직을 재사용 가능하게 만듬으로써 코드의 중복을 제거하고, 필요한 곳에서 재사용할 수 있으며, 관심사를 분리하여 관리가 용이해진다는 점에 있다. useInput, useRadioButton과 같이 일관성 있게 명명된 커스텀 훅을 바라보면 어쩐지 배가 부른 기분이다. 어떤 로직을 수행하는 코드인지 쉽게 알아차릴 수 있기 때문에 다른 개발자들과 협업에도 이점을 가져다 주는 것을 알 수 있다.
기능 구현에만 급급하던 전보다 나름 좋은 코드를 고민하며 작성하는 날들이 늘어가는 것 같기도 하고...🏃♀️🏃♀️
