Retrofit2?
안드로이드에서 api 서버와 통신하기 위한 라이브러리
예제는 간단하게 "text"로 보내, "result"로 받아보겠습니다.
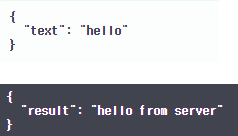
위: request 아래: response
설정
라이브러리 추가
- Gradle Scripts.build.gradle (Module:{프로잭트 이름})
implementation 'com.squareup.retrofit2:retrofit:2.6.4'
implementation 'com.squareup.retrofit2:converter-gson:2.6.4'
인터넷 권한
- app.manifests.AndroidManifest.xml
<?xml version="1.0" encoding="utf-8"?>
<manifest xmlns:android="http://schemas.android.com/apk/res/android"
    package="com.example.hello">

    <uses-permission android:name="android.permission.INTERNET"/> // 권한 추가

    <application
        ...생략
        android:usesCleartextTraffic="true">
        ...생략
UI
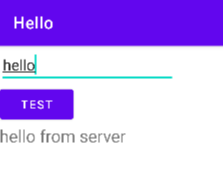
UI는 간단하게 client에서 "hello"를 보내면 server에서 보낸 "hello from server"를 TextView에 띄어줍니다.
코드
DTO Data.java
package com.example.hello;

import com.google.gson.annotations.Expose;
import com.google.gson.annotations.SerializedName;

public class Data {
    @Expose
    @SerializedName("text") private String text;
    @SerializedName("result") private String result;

    public String getText() {
        return text;
    }
    public void setText(String text) {
        this.text = text;
    }

    public String getResult(){
        return result;
    }
}
위: request 아래: response
json 데이터를 보내고 받는 class 입니다.
@SerialzedName : JSON으로 바꿀 때, 매칭되는 이름을 명시 ex) {"text" : text값}
- 보낼 때, 키값이 "text"이고 받을 때는 키값이 result이기 때문에
@SerializedName(어노테이션)을 "text", "result"에 각각 붙여줘야합니다.
@Expose : object 안에 해당 값이 null일 경우, json으로 만들 필드를 자동으로 생략
Interface ApiInterface.java
package com.example.hello;

import retrofit2.Call;
import retrofit2.http.Body;
import retrofit2.http.POST;

public interface ApiInterface {
    @POST("api/auth/test")
    Call<Data> postData(@Body Data data);
}
retrofit interface에는 각 api에 대한 명세를 적습니다.
@POST: body로 데이터를 전송하기 때문에 POST메서드로 보냅니다. (GET, POST, PUT, DELETE) 괄호 안에는 baseURL을 제외한 uri를 적어주면 됩니다.
Call postData(@Body Data data): Call 객체로 HTTP POST요청을 웹서버에 보내고 반환 타입을 형식으로 받습니다. @Body는 body에 있는 데이터를 Data클래스에 있는 @SerialzedName({KEY}) KEY와 매칭 시킵니다.
Retrofit Client RetrofitClient.java
package com.example.hello;

import retrofit2.Retrofit;
import retrofit2.converter.gson.GsonConverterFactory;

public class RetrofitClient {
    private static Retrofit retrofit;

    public static Retrofit getRetrofit(){
        if(retrofit==null){
            Retrofit.Builder builder = new Retrofit.Builder();
            builder.baseUrl("{baseURL}/");
            builder.addConverterFactory(GsonConverterFactory.create());

            retrofit = builder.build();
        }
        return retrofit;
    }

}
getRetrofit()은 여러 가지 설정 후 retrofit객체를 반환해 줍니다. {baseURL}에 웹서버의 baseURL을 넣어주고 끝은 /로 끝내야 오류가 나지 않습니다.
MainActivity.java
package com.example.hello;

import android.os.Bundle;
import android.view.View;
import android.widget.Button;
import android.widget.EditText;
import android.widget.TextView;

import androidx.appcompat.app.AppCompatActivity;

import retrofit2.Call;
import retrofit2.Response;
import retrofit2.Callback;

public class MainActivity extends AppCompatActivity{

    ApiInterface api;
    Button btn;
    TextView txt;
    EditText editText;

    @Override
    protected void onCreate(Bundle savedInstanceState) {
        super.onCreate(savedInstanceState);
        setContentView(R.layout.activity_main);

        api = RetrofitClient.getRetrofit().create(ApiInterface.class);
        txt = (TextView) findViewById(R.id.txt);
        editText = (EditText) findViewById(R.id.editText);
        btn = (Button) findViewById(R.id.btn);
        btn.setOnClickListener(new View.OnClickListener() {
            @Override
            public void onClick(View view) {
                Data data = new Data();
                data.setText(editText.getText().toString());
                api.postData(data).enqueue(new Callback<Data>() {
                    @Override
                    public void onResponse(Call<Data> call, Response<Data> response) {
                        if(response.isSuccessful()){
                            txt.setText(response.body().getResult());
                        }
                    }

                    @Override
                    public void onFailure(Call<Data> call, Throwable t) {

                    }
                });
            }
        });

    }
}
http 메서드는 추후에 추가하겠습니다.
공부하면서 적은 거라 틀린 부분이 있을 수 있습니다.ㅎㅎ