오늘 학습 진행 내용
게임 개발자를 위한 C++ 문법
챕터 3-2: Unreal Engine 기본개념
언리얼 엔진 프로젝트에서 C++ 기반 프로젝트 생성
권장사항 : 프로젝트 에디터 내 라이브 코딩 활성화 해지
Visual Studio와 충돌해서 에러 발생시키는 경우 존재
C++ 액터 간단한 예제
369 게임 규칙으로 로그 출력하는 예시
#include "PracticeACtor.h"

//369 게임 함수
void APracticeACtor::Game369() {
int Start = 1; //출력할 숫자의 시작 값
int End = 30; //출력할 숫자의 끝 값
for (int i = Start; i <= End; i++) {
	FString Number = FString::FromInt(i); //숫자를 문자열(FString)로 변환
	bool bIsClap = false; //"짝"을 출력할지 여부를 나타내는 변수
	//변환된 문자열을 한 글자씩 검사
	for (TCHAR Char : Number) {
		if (Char == '3' || Char == '6' || Char == '9') {
			bIsClap = true;
			break;
		}

	}
	if (bIsClap) {
		UE_LOG(LogTemp, Warning, TEXT("Clap"));
	}
	else {
		UE_LOG(LogTemp, Warning, TEXT("%d"), i);
	}
}
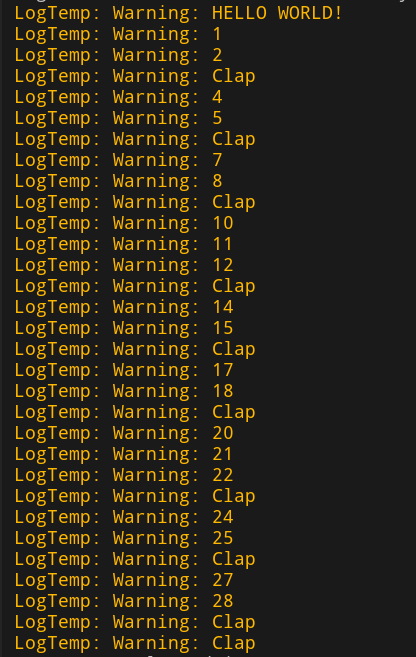
실행 결과
로그 콘솔창에 다음과 같이 출력
랜덤으로 생성된 3개의 숫자 합을 로그로 출력하는 예시
//랜덤으로 생성된 3개의 숫자 합을 출력하는 함수
void APracticeACtor::RandomSum() {
	//랜덤 숫자 범위 설정
	int MinValue = 1;
	int MaxValue = 100;

	//랜덤 숫자 3개 생성
	int RandomNumber1 = FMath::RandRange(MinValue, MaxValue);
	int RandomNumber2 = FMath::RandRange(MinValue, MaxValue);
	int RandomNumber3 = FMath::RandRange(MinValue, MaxValue);

	int Sum = RandomNumber1 + RandomNumber2 + RandomNumber3;

	UE_LOG(LogTemp, Warning, TEXT("Random Numbers: %d, %d, %d"), RandomNumber1, RandomNumber2, RandomNumber3);
	UE_LOG(LogTemp, Warning, TEXT("Sum: %d"), Sum);
}
실행 결과

로그 출력 종류 예시
UE_LOG는 3가지로 구성
1. 카테고리
로그의 카테고리 태그 역할(LogTemp를 많이 씀)
2. 심각성
중요도에 따라 심각성 분류할 수 있고, 각 로그는 색이 다르게 출력
3. 실제 출력 메세지
//UE_LOG 다양한 예시 출력 함수
void APracticeACtor::ExamplesLog() {
	//1. 일반 로그 - 개발자가 디버깅을 위해 사용하는 기본 메세지
	UE_LOG(LogTemp, Log, TEXT("Game has started. Player has joined the game."));
	//2. 중요 정보(Display) - 항상 표시되는 정보 메세지
	FString PlayerName = TEXT("Player1");
	UE_LOG(LogTemp, Display, TEXT("Welcome, %s! Enjoy the  game."), *PlayerName);

	//3. 경고(Warning) - 잠재적 문제가 있을 때 경고를 출력
	int PlayerHealth = 20;
	if (PlayerHealth < 30) {
		UE_LOG(LogTemp, Warning, TEXT("Player health is below maximum: %d"), PlayerHealth);
	}
	//4. 오류(Error) - 실행에 영향을 줄 수 있는 문제
	int AmmoCount = 0;
	if (AmmoCount == 0) {
		UE_LOG(LogTemp, Error, TEXT("No ammo left! Player cannot shoot."));
	}
	//5. 치명적인 오류(Fatal) - 프로그램이 더 이상 실행될 수 없는 경우 종료
	//해당 로그 출력 시 프로그램 즉시 크래시 처리
	//bool bCriticalFailure = true; //
	//if (bCriticalFailure) {
	//	UE_LOG(LogTemp, Fatal, TEXT("A critial failure occurred. Shutting down..."));
	//}
	//6. 문자열 결합 - 다양한 데이터를 한 메세지로 출력
	int Score = 150;
	int TimeLeft = 120;
	UE_LOG(LogTemp, Log, TEXT("Score: %d, Time Left: %d sceonds."), Score, TimeLeft);

	//7. 부동 소수점(Floating Point) 값 출력
	float PlayerSpeed = 325.5f;
	UE_LOG(LogTemp, Display, TEXT("Player Speed : %.2f units/sec"), PlayerSpeed);
	//8. 여러 심각도 사용 - 게임 상태에 따라 로그를 구분
	bool bIsPaused = true;
	if (bIsPaused) {
		UE_LOG(LogTemp, Warning, TEXT("Game is currently paused."));
	}
	else {
		UE_LOG(LogTemp, Log, TEXT("Game is running normally."));
	}
	//9. 디버깅용 메시지(Developer Note)
	UE_LOG(LogTemp, Display, TEXT("This message is for developrs to debug state."));
}
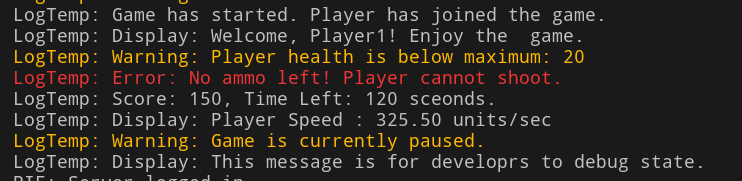
실행 결과
로그 콘솔창에 다음과 같이 출력
Unreal Engine 기본 개념 실습
UE_LOG를 활용한 로또번호생성기 구현
-
숙제 설명
💡 `Actor`가 생성되는 시점(`BeginPlay`)에 로또 번호 (각 숫자는 1~45범위이고 중복되지 않는 숫자 6개)를 콘솔에 출력하는 코드를 구현하세요. 📌요구사항- 언리얼 엔진의
FMath::RandRange()를 사용해서 1~45사이의 랜덤 숫자를
생성합니다. - 배열에 값이 이미 존재하는지 확인하기 위해
TArray::Contains를 사용할 수 있습니다. 해당 함수를 사용하는 예시는 아래로 참조하세요.
- 언리얼 엔진의
[출력 예시]
//[LogTemp]는 실제 출력하는게 아니고 카테고리입니다.
[LogTemp] Lotto Numbers: 3, 15, 22, 30, 35, 44
실습 구현 코드
//UE_LOG를 활용한 로또번호생성기 구현
void APracticeACtor::LottoGame() {
	TArray<int32> Numbers;
	int count = 0;

	while (count != 6) {
		int LottoNum = FMath::RandRange(1, 45);
		if(!Numbers.Contains(LottoNum)) {
				Numbers.Add(LottoNum);
				count += 1;
		}
	}

	// 숫자 배열을 문자열로 변환
	FString LottoNumbersStr;
	for (int32 Number : Numbers)
	{
		LottoNumbersStr += FString::FromInt(Number) + TEXT(", ");
	}
	LottoNumbersStr.RemoveFromEnd(TEXT(", "));

	for (auto& Num : Numbers) {
		if (GEngine) {
			UE_LOG(LogTemp, Display, TEXT("Lotto Number: %d"), Num);
			GEngine->AddOnScreenDebugMessage(-1, 5.f, FColor::Yellow, FString::Printf(TEXT("Lotto Number : %d"), Num));
		}
	}
	if (GEngine) {
		GEngine->AddOnScreenDebugMessage(-1, 5.f, FColor::Yellow, FString::Printf(TEXT("Lotto Numbers : %s"), *LottoNumbersStr));
	}
}
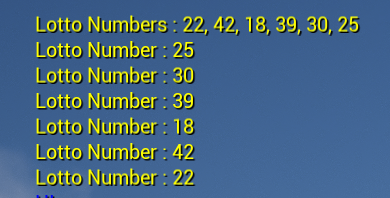
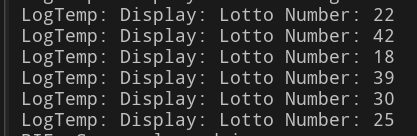
실행 결과
챕터 3-3. 3주차 숙제
배송 추적 시스템
배송 추적 시스템은 배송 상태가 변경될 때, 고객에게 자동으로 알림을 보내는 시스템 입니다. 옵저버 패턴을 활용해서 배송회사와 다양한 유형의 고객 간의 알림 시스템을 구현 해보세요 세부 요구사항은 아래와 같습니다.
배송 회사(Delivery Service)
- 고객들을 관리하며 배송 상태가 변경되면 모든 고객에게 알림을 보냅니다.
- 고객 등록, 고객 제거, 배송 상태 업데이트 기능을 제공해야 합니다.
고객(Customer)
- 고객은 배송 상태가 변경될 때 알림을 받습니다.
- 고객 유형은 다음 세 가지로 구분 됩니다.
- 일반 고객(RegularCustomer)
- VIP 고객(VIPCustomer)
- 기업 고객(BisunessCustomer)
코드의 전체적은 구조는 아래와 같습니다.
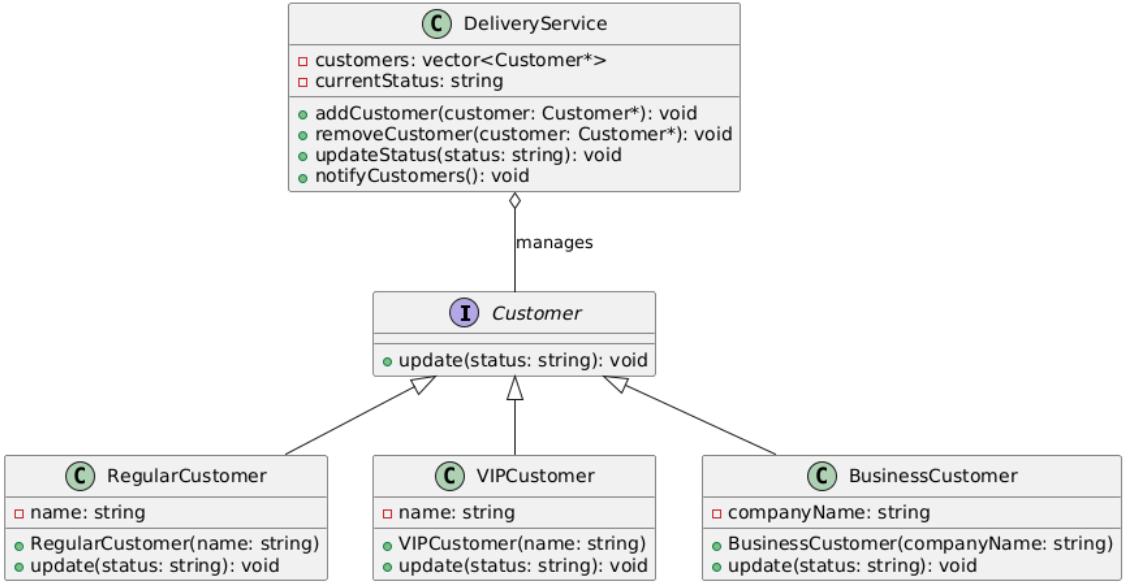
코드 실행시 출력값은 아래와 같습니다.
Updating status: 배송 준비 중
Regular customer Alice received update: 배송 준비 중
VIP customer Bob received VIP update: 배송 준비 중
Business customer CompanyX received business update: 배송 준비 중

Updating status: 배송 완료
Regular customer Alice received update: 배송 완료
VIP customer Bob received VIP update: 배송 완료
Business customer CompanyX received business update: 배송 완료
기본 뼈대 코드를 활용해 코드를 작성해 보세요
#include <iostream>
#include <vector>
#include <string>
using namespace std;

// 고객 인터페이스 (Observer 역할)
class Customer {
public:
    virtual void update(const string& status) = 0; // 순수 가상 함수
};

// 일반 고객 클래스
class RegularCustomer : public Customer {
private:
    string name;
public:
    RegularCustomer(const string& name) : name(name) {}

    void update(const string& status) {
        cout << "Regular customer " << name << " received update: " << status << endl;
    }
};

// TODO: VIP 고객 클래스 (Customer를 상속받아 구현)
// 요구 사항:
// - 고객 이름을 저장하는 멤버 변수 `name`을 추가하세요.
// - 생성자에서 이름을 초기화하세요.
// - `update` 메서드를 구현하여 "VIP customer [이름] received VIP update: [배송 상태]" 형식으로 출력되도록 하세요.


// TODO: 배송 회사 클래스 (DeliveryService)
// 요구 사항:
// - `customers`라는 고객 리스트를 저장하는 멤버 변수를 추가하세요.
// - `currentStatus`라는 현재 배송 상태를 저장하는 멤버 변수를 추가하세요.
// - 고객을 추가하는 `addCustomer` 메서드를 구현하세요.
// - 고객을 제거하는 `removeCustomer` 메서드를 구현하세요.
// - 배송 상태를 업데이트하고 모든 고객에게 알리는 `updateStatus` 메서드를 구현하세요.
// - 등록된 모든 고객에게 상태를 전달하는 `notifyCustomers` 메서드를 구현하세요.

// Main 함수
int main() {
    DeliveryService service;

    // 고객 객체 생성
    RegularCustomer* customer1 = new RegularCustomer("Alice");
    VIPCustomer* customer2 = new VIPCustomer("Bob");
    BusinessCustomer* customer3 = new BusinessCustomer("CompanyX");

    // 고객 등록
    service.addCustomer(customer1);
    service.addCustomer(customer2);
    service.addCustomer(customer3);

    // 배송 상태 업데이트 및 알림
    cout << "Updating status: 배송 준비 중" << endl;
    service.updateStatus("배송 준비 중");

    cout << "\nUpdating status: 배송 완료" << endl;
    service.updateStatus("배송 완료");

    // 메모리 해제
    delete customer1;
    delete customer2;
    delete customer3;

    return 0;
}
작성 코드
#include <iostream>
#include <vector>
#include <string>
#include <algorithm>
using namespace std;

// 고객 인터페이스 (Observer 역할)
class Customer {
public:
    virtual void update(const string& status) = 0; // 순수 가상 함수
};

// 일반 고객 클래스
class RegularCustomer : public Customer {
private:
    string name;
public:
    RegularCustomer(const string& name) : name(name) {}

    void update(const string& status) {
        cout << "Regular customer " << name << " received update: " << status << endl;
    }
};

// TODO: VIP 고객 클래스 (Customer를 상속받아 구현)
// 요구 사항:
// - 고객 이름을 저장하는 멤버 변수 `name`을 추가하세요.
// - 생성자에서 이름을 초기화하세요.
// - `update` 메서드를 구현하여 "VIP customer [이름] received VIP update: [배송 상태]" 형식으로 출력되도록 하세요.
class VIPCustomer : public Customer{
    private:
        string name;
    public:
        VIPCustomer(const string& name) :name(name){};
        void update(const string& status){
            cout<<"VIP customer "<<name<<" received VIP update: "<<status<<endl;
        }
};

class BusinessCustomer : public Customer{
    private:
        string companyName;
    public:
        BusinessCustomer(string companyName) : companyName(companyName){};
        void update(const string& status){
            cout<<"Business customer "<<companyName<<" received update: "<<status<<endl;
        };
};

// TODO: 배송 회사 클래스 (DeliveryService)
// 요구 사항:
// - `customers`라는 고객 리스트를 저장하는 멤버 변수를 추가하세요.
// - `currentStatus`라는 현재 배송 상태를 저장하는 멤버 변수를 추가하세요.
// - 고객을 추가하는 `addCustomer` 메서드를 구현하세요.
// - 고객을 제거하는 `removeCustomer` 메서드를 구현하세요.
// - 배송 상태를 업데이트하고 모든 고객에게 알리는 `updateStatus` 메서드를 구현하세요.
// - 등록된 모든 고객에게 상태를 전달하는 `notifyCustomers` 메서드를 구현하세요.
class DeliveryService {
private:
    vector<Customer*> customers;
    string currentStatus;

public:
    void addCustomer(Customer* customer) {
        customers.push_back(customer);
    }

    void removeCustomer(Customer* customer) {
        //찾은 값 하나만 삭제
        // auto it = find(customers.begin(), customers.end(), customer);
        // if (it != customers.end()) {
        //     customers.erase(it);
        // }

        //찾은 값 전부 삭제 처리
        customers.erase(remove(customers.begin(), customers.end(), customer), customers.end());


    }

    void updateStatus(const string& status) {
        currentStatus = status;
        for (auto& customer : customers) {
            customer->update(status);
        }
    }

    void notifyCustomers() {
        for (auto& customer : customers) {
                 customer->update(currentStatus);
        }
    }
};

// Main 함수
int main() {
    DeliveryService service;

    // 고객 객체 생성
    RegularCustomer* customer1 = new RegularCustomer("Alice");
    VIPCustomer* customer2 = new VIPCustomer("Bob");
    BusinessCustomer* customer3 = new BusinessCustomer("CompanyX");

    // 고객 등록
    service.addCustomer(customer1);
    service.addCustomer(customer2);
    service.addCustomer(customer3);

    // 배송 상태 업데이트 및 알림
    cout << "Updating status: 배송 준비 중" << endl;
    service.updateStatus("배송 준비 중");

    cout << "\nUpdating status: 배송 완료" << endl;
    service.updateStatus("배송 완료");

    // 메모리 해제
    delete customer1;
    delete customer2;
    delete customer3;

    return 0;
}

개발합시다!