1. Reflection이란 무엇인가?
1.1 Reflection의 정의
Reflection은 런타임에 클래스의 구조를 분석하고 조작할 수 있게 해주는 Java API다.
2. Reflection의 동작 원리
2.1 JVM 클래스 로딩 메커니즘
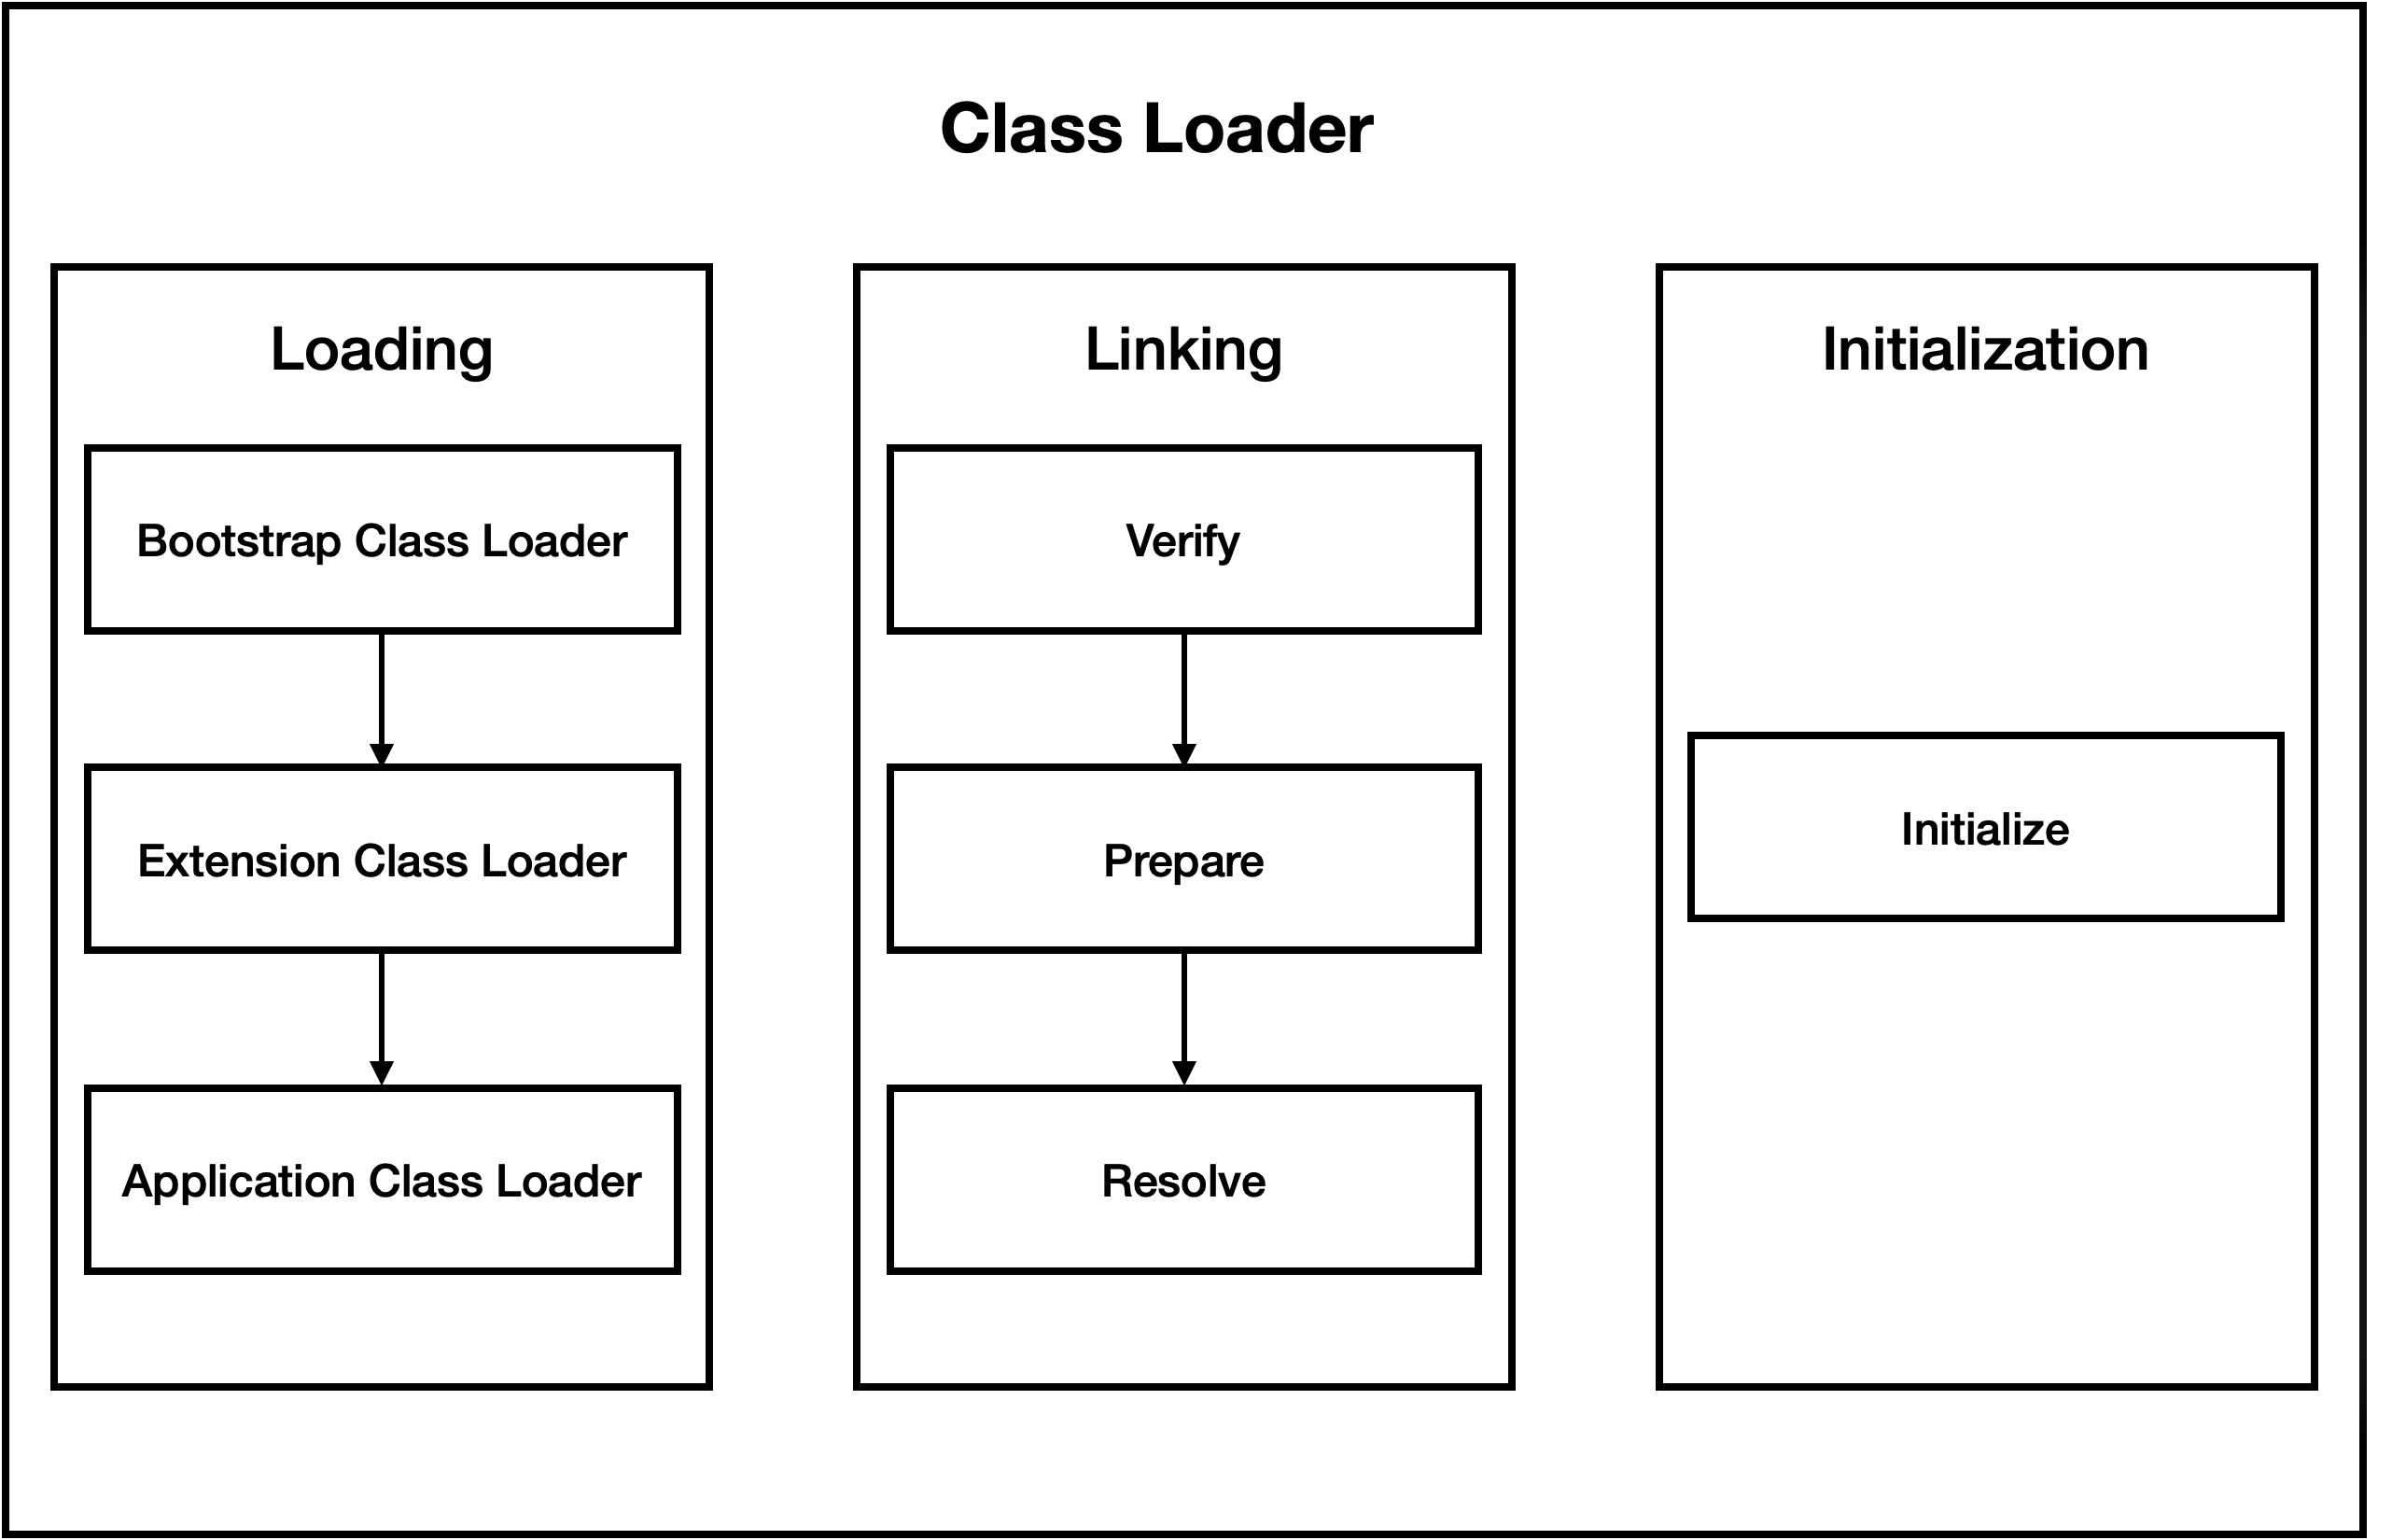
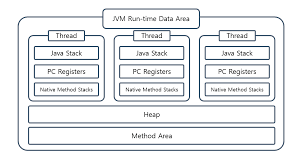
위 사진은 JVM Class Loader와 Runtime Data Area 사진이다.
Class의 Metadata를 저장하는 곳은 Method Area라는 곳에 저장이 되고,
저장하는 것을 하는 주체는 ClassLoader이다.
즉, ClassLoader가 Method Area에 Class마다 Metadata를 저장하게 된다.
2.2 정적 바인딩 vs 동적 바인딩
바인딩이란?
바인딩(Binding)은 프로그램 구성 요소의 실제 값이나 메서드가 결정되는 시점을 의미한다. 언제 결정되느냐에 따라 정적 바인딩과 동적 바인딩으로 나뉜다.
정적 바인딩
컴파일 타임에 호출할 메서드가 결정된다.
public class Calculator {
    // Overloading - 정적 바인딩
    public int add(int a, int b) {
        return a + b;
    }
ㅤ
    public double add(double a, double b) {
        return a + b;
    }
}
ㅤ
Calculator calc = new Calculator();
calc.add(1, 2);        // 컴파일 시 int 버전 결정
calc.add(1.0, 2.0);    // 컴파일 시 double 버전 결정
컴파일러가 타입을 보고 어떤 메서드를 호출할지 미리 결정한다.
잘못 사용하면 컴파일 에러가 발생한다.
동적 바인딩
런타임에 호출할 메서드가 결정된다.
ㅤclass Animal { public void sound() { System.out.println("동물 소리"); } } ㅤ class Dog extends Animal { @Override public void sound() { System.out.println("멍멍"); } } ㅤ Animal animal = new Dog(); // 컴파일 타임: Animal 타입 animal.sound(); // 런타임: Dog의 sound() 호출 → "멍멍"컴파일러는 Animal 타입만 알지만,
실행 시에는 실제 객체(Dog)의 메서드가 호출된다.
이것이 다형성의 핵심이다.
Reflection은 극단적 동적 바인딩
일반 동적 바인딩은 컴파일 타임에 타입을 알고 있다.
하지만 Reflection은 문자열만으로 모든 것을 런타임에 결정한다.
2.3 Reflection이 가능한 이유
Reflection이 가능한 이유는 앞서 말했던 Method Area와
Class 때문인데, Heap에 생성되는 Class 객체는 Method Area의 클래스 메타데이터를 참조한다.
이를 통해 런타임에 클래스의 모든 구조 정보에 접근할 수 있다.
3. Reflection API 핵심 사용법
3.1 Class 객체 획득하기 (3가지 방법)
2.3에서 말했듯이 Class객체를 통해 Method Area의 클래스 메타데이터를 참조할 수 있다.
그렇다면, Class객체는 어떻게 가져오는 것일까?
여기에는 3가지 방법이 있다.1. 클래스 리터럴
컴파일 타임에 클래스를 알고 있을 때 사용한다.
Class<User> clazz = User.class;2. 인스턴스의 getClass()
이미 객체가 있고, 그 실제 타입을 알고 싶을 때 사용한다.
User user = new User();
Class<?> clazz = user.getClass();
3. Class.forName(String)
클래스 이름을 문자열로만 알고 있을 때 사용한다.
String className = "com.example.User";
Class<?> clazz = Class.forName(className);
3.2 조작법
Reflection으로 Constructor, Field, Method에 접근하고 조작할 수 있다.
ㅤ
Reflection API는 3가지 정도만 알면 된다.
1. 접근: get[Declared]XXX()
2. 권한 설정: setAccessible(true) // private 접근 시
3. 조작: newInstance() / get() / set() / invoke()
ㅤ
Constructor, Field, Method를 조작하는 코드를 보며 이야기해보자.
ㅤConstructor - 객체 생성
// 기본 생성자
Constructor<?> ctor = clazz.getDeclaredConstructor();
Object instance = ctor.newInstance();
ㅤ
// 파라미터 있는 생성자
Constructor<?> ctor = clazz.getConstructor(String.class, int.class);
Object instance = ctor.newInstance("리안", 19);
ㅤ
// private 생성자
Constructor<?> ctor = clazz.getDeclaredConstructor();
ctor.setAccessible(true);
Object instance = ctor.newInstance();
위와 같이 get[Declared]Constructor로 생성자를 주입 받을 수 있으며,
newInstance(인자값) 메서드로 객체 생성이 가능하다.
하지만, 이때 private 생성자라면, 생성을 하지 못하는데,
setAccessible(true)라고 설정하면 생성할 수 있게 된다.
ㅤField - 필드 접근 및 수정
// 필드 조회
Field field = clazz.getDeclaredField("name");
ㅤ
// 값 읽기
Object value = field.get(instance);
ㅤ
// 값 쓰기
field.set(instance, "리안");
ㅤ
// private 필드
Field field = clazz.getDeclaredField("privateField");
field.setAccessible(true);
field.set(instance, "value");
위와 같이 get[Declared]Field로 필드값을 주입받을 수 있으며,
get(객체) 메서드로 필드 값을 주입받을 수 있고,
set(객체, 값) 메서드로 필드 값에 값을 주입받을 수 있다.
하지만, 이때 private 필드라면, get, set을 할 수 없게 되는데,
setAccessible(true)라고 설정하면 생성할 수 있게 된다.
ㅤMethod - 메서드 호출
// 메서드 찾기
Method method = clazz.getMethod("getName");
ㅤ
// 메서드 호출
Object result = method.invoke(instance);
ㅤ
// 파라미터 있는 메서드
Method method = clazz.getMethod("setName", String.class);
method.invoke(instance, "리안");
ㅤ
// private 메서드
Method method = clazz.getDeclaredMethod("privateMethod");
method.setAccessible(true);
Object result = method.invoke(instance);
위와 같이 get[Declared]Method로 메서드를 주입받을 수 있으며,
invoke(객체)로 실행시킬 수 있다.
하지만, 이때 private 필드라면, invoke를 할 수 없게 되는데,
setAccessible(true)라고 설정하면 생성할 수 있게 된다.
4. SpringBoot에서 Reflection이 사용되는 곳
4.1 DI (Dependency Injection)의 동작 원리
UserRepository의 의존성이 필요한 UserService 코드
@Service
class UserRepository {
    public void save() {
        System.out.println("DB 저장");
    }
}
ㅤ
@Service
class UserService {
	// Field
    @Autowired
    private UserRepository userRepository;
ㅤ
    public UserService() {}
}
ㅤ
@Service
class UserService {
	private final UserRepository userRepository;
	ㅤ
	// Constructor
    public UserService(UserRepository userRepository) {
        this.userRepository = userRepository;
    }ㅤ
}
ㅤ
@Service
class UserService {ㅤ
	private UserRepository userRepository;
    ㅤ
    // Setter
    @Autowired
    public void setUserRepository(UserRepository userRepository) {
        this.userRepository = userRepository;
    }
ㅤ
    public UserService() {}
}
SimpleDIContainer 코드
ComponentScan단계에서 @Service 어노테이션이 있는 클래스들 Bean으로 등록public class SimpleDIContainer { private Map<Class<?>, Object> beans = new HashMap<>(); ㅤ public void scan(String packageName) throws Exception { // 패키지에서 클래스 찾기 (ClassLoader 사용) List<Class<?>> classes = findClasses(packageName); ㅤ // @Service 있는 클래스만 Bean 등록 for (Class<?> clazz : classes) { if (clazz.isAnnotationPresent(Service.class)) { beans.put(clazz, null); } } ㅤ // 등록된 Bean 생성 // Bean MapKeySet으로 조회하면서 실제 객체 주입 createBeans(); } ㅤㅤ private List<Class<?>> findClasses(String packageName) { // ClassLoader로 패키지 스캔해서 .class 파일 찾기 // 실제로는 복잡한 로직이지만, 여기서는 UserService, UserRepository만 반환 // UserRepository.class, UserService.class return Arrays.asList(UserRepository.class, UserService.class); } ㅤ // 실제로는 get메서드를 사용했을 때, 찾을 수 없다면 RuntimeException 띄움 public <T> T getBean(Class<T> clazz) { return (T) beans.get(clazz); } }
4.1.1 Constructor Injection
private Object createBeanByConstructor(Class<?> clazz) throws Exception {
    // 1. 생성자 찾기
    Constructor<?> constructor = clazz.getDeclaredConstructors()[0];
ㅤ
    // 2. 생성자 파라미터 타입 확인
    Class<?>[] paramTypes = constructor.getParameterTypes();
ㅤ
    if (paramTypes.length == 0) {
        // 의존성 없으면 바로 생성
        return constructor.newInstance();
    }
ㅤ
    // 3. 각 파라미터 타입에 맞는 Bean 조회
    Object[] dependencies = new Object[paramTypes.length];
    for (int i = 0; i < paramTypes.length; i++) {
        dependencies[i] = getBean(paramTypes[i]);
    }
ㅤ
    // 4. 생성자 호출 → 생성과 동시에 의존성 주입 완료
    return constructor.newInstance(dependencies);
}
생성자를 찾은 후 해당 생성자의 Parameter Class(Dependencies)들을 Bean으로 들고온 후,
Dependencies를 넣어서 Bean 객체 생성
4.1.2 Field Injection
private Object createBeanByField(Class<?> clazz) throws Exception {
    // 1. 기본 생성자로 객체 생성 (이 시점에 필드는 null)
    Constructor<?> constructor = clazz.getDeclaredConstructor();
    Object bean = constructor.newInstance();
ㅤ
    // 2. 클래스의 모든 필드 조회
    Field[] fields = clazz.getDeclaredFields();
ㅤ
    for (Field field : fields) {
        // 3. @Autowired가 붙은 필드만 처리
        if (field.isAnnotationPresent(Autowired.class)) {
ㅤ
            // 4. private 필드 접근 허용
            field.setAccessible(true);
ㅤ
            // 5. 필드 타입에 맞는 Bean 조회
            Class<?> fieldType = field.getType();
            Object dependency = getBean(fieldType);
ㅤ
            // 6. 필드에 값 주입
            field.set(bean, dependency);
        }
    }
ㅤ
    return bean;
}
해당 클래스내의 Field들을 모두 들고온 후 @Autowired 어노테이션이 붙어 있는 것들만 getBean을 통해 의존성 주입
이때, 보통 필드가 private 접근 생성자이므로 setAccessible(true)로 설정함
또한, final을 붙이지 못함.
final은 생성자가 끝나면 더 이상 불변해야하기 때문임.
4.1.3 Setter Injection
private Object createBean_Setter(Class<?> clazz) throws Exception {
    // 1. 기본 생성자로 객체 생성 (이 시점에 필드는 null)
    Constructor<?> constructor = clazz.getDeclaredConstructor();
    Object bean = constructor.newInstance();
ㅤ
    // 2. 클래스의 모든 메서드 조회
    Method[] methods = clazz.getDeclaredMethods();
ㅤ
    for (Method method : methods) {
        // 3. @Autowired가 붙은 메서드만 처리
        if (method.isAnnotationPresent(Autowired.class)) {
ㅤ
            // 4. 메서드 파라미터 타입 확인
            Class<?>[] paramTypes = method.getParameterTypes();
ㅤ
            // 5. 각 파라미터 타입에 맞는 Bean 조회
            Object[] dependencies = new Object[paramTypes.length];
            for (int i = 0; i < paramTypes.length; i++) {
                dependencies[i] = getBean(paramTypes[i]);
            }
ㅤ
            // 6. Setter 메서드 호출
            method.invoke(bean, dependencies);
        }
    }
ㅤ
    return bean;
}
이것도 Field Injection과 코드 형식이 비슷하다.
DeclaredMethods()로 이 클래스 안에 있는 메서드들을 모두 들고 온다.
여기서 @Autowired가 들어가 있는 메서드들만 Parameter Type(Dependencies)를 조사해서 주입하고, 해당 메서드를 invoke시킨다.
또한, 여기서도 final 키워드를 넣을 수 없다.
생성자가 끝난 시점에서 Field값이 null이기 때문이다.
이는 불변한다.
4.2 JPA Entity와 기본 생성자
JPA Entity는 Reflection을 통해, 객체를 생성한다.
@Entity
public class User {
    @Id
    private Long id;
    private String name;
ㅤ
    // 파라미터 있는 생성자만 존재
    public User(String name) {
        this.name = name;
    }
}
위 코드는 User 엔티티 코드이다.
// JPA/Hibernate 내부 동작 (의사 코드)
public User createEntity(ResultSet rs) throws Exception {
    // 1. 기본 생성자로 빈 객체 생성
    Constructor<?> constructor = User.class.getDeclaredConstructor();
    User user = (User) constructor.newInstance();
ㅤ
    // 2. ResultSet에서 값 꺼내기
    Long id = rs.getLong("id");
    String name = rs.getString("name");
ㅤ
    // 3. Reflection으로 필드에 값 주입
    Field idField = User.class.getDeclaredField("id");
    idField.setAccessible(true);
    idField.set(user, id);
ㅤ
    Field nameField = User.class.getDeclaredField("name");
    nameField.setAccessible(true);
    nameField.set(user, name);
ㅤ
    return user;
}
보통의 엔티티 클래스는 필드값이 private 접근제어자인 경우가 많다.
그래서, JPA/Hibernate는 이를 Reflection을 활용해 private Field를 주입하고 있다.
5. Reflection의 단점과 성능 이슈
5.1 성능 오버헤드의 진실
Reflection은 느리다고 알려져 있다.
실제로도 과연 그럴까?
100만 번 메서드 호출 테스트 결과:
일반 호출: 3ms
Reflection (캐싱 없음): 2847ms → 949배 느림
Reflection (캐싱 있음): 47ms → 15배 느림
Reflection (최적화): 38ms → 12배 느림
느린 이유는 무엇일까?
5.1.1 메서드 찾기 비용
일반 호출: 컴파일 시점에 이미 결정
Reflection: 런타임에 클래스의 모든 메서드를 순회하며 이름 비교
5.1.2 타입 체크
일반 호출: 컴파일러가 타입 체크 완료
Reflection: 런타임에 매번 타입 확인 + 캐스팅 필요
5.1.3 접근 제어 체크
Reflection은 매번 접근 권한 확인
5.2 캡슐화(Encapsulation) 위반
또한, Reflection은 private에 접근할 수 있다.
이는 객체지향의 캡슐화를 무너뜨린다
5.3 컴파일 타임 타입 체크 불가
마지막으로,
Reflection은 문자열로 찾기 때문에 컴파일러가 오류를 잡아줄 수 없다.
JavaScript도 이러한 문제 때문에 TypeScript를 많이 사용하니,
꽤나 심각한 문제라고 생각된다.
6. Java 9+ module-info.java
Requires
역할: 다른 모듈에 대한 의존성을 선언한다
module my.app {
    requires java.sql;        // java.sql 모듈이 필요함
    requires spring.boot;     // spring.boot 모듈이 필요함
}
requires transitive - 이 모듈을 사용하는 다른 모듈도 자동으로 의존성 포함
Exports
역할: 특정 패키지를 다른 모듈에 공개한다
module my.library {
    exports com.library.api;  // 이 패키지를 외부에 공개
}
public 접근 제어자만 접근 가능.
exports를 하지 않은 패키지는 외부에 공개되지 않음.
Opens
역할: 특정 패키지를 리플렉션 접근에 허용한다.
module my.app {
    opens com.example.entity;  // 리플렉션으로 private 필드/메서드 접근 가능
}
private도 리플렉션 접근 가능
opens com.example.entity to hibernate.core, jackson.databind;특정 프레임워크에만 허용할 수도 있음
Open
역할: 모듈 전체를 리플렉션에 개방한다
open module my.app {
    requires spring.boot;
    // 모든 패키지가 자동으로 리플렉션에 열림
}
open module my.app { // ... } ㅤ // 위는 아래와 동일 module my.app { opens com.example.myapp; opens com.example.myapp.controller; opens com.example.myapp.service; opens com.example.myapp.repository; opens com.example.myapp.entity; opens com.example.myapp.dto; opens com.example.myapp.config; // ... 모든 패키지에 opens가 자동 적용 }opens 여러개를 open하나로 대체할 수 있음
마지막 표로 보며 정리해보자
키워드 일반 접근
(컴파일 타임)Reflection 접근
(런타임)private 접근 주요 사용처 requires ❌ ❌ ❌ 모듈 의존성 선언
(접근 제어와 무관)exports ✅
(public만)❌
(public만)❌ API 공개용
라이브러리 인터페이스opens ❌ ✅
(모든 접근자)✅ 프레임워크용
(JPA Entity, DI)open ❌ ✅
(모든 패키지, 모든 접근자)✅ 프레임워크 전용 모듈
(완전 개방)