저번 글에서는 webRTC의 개념과 기본적인 네트워크 배경지식에 대해 소개하였습니다.
이번 글에서는 간단히 webRTC 1:1 코드의 구현 및 동작에 대해 설명하겠습니다. 1:1 코드의 구현은 매우 간단하며 여러 측면에서 효용이 없지만 webRTC 서비스를 구현하기 위해서 반드시 이해하고 넘어가야 합니다.
webRTC는 결국 두 피어를 peer-to-peer(p2p) 형식으로 서로의 미디어 스펙을 확인하고 데이터를 UDP 형태로 스트리밍하는 API 입니다. 이 과정에선 그 어떤 플러그인의 도움도 필요 없습니다. 따라서 서비스의 구현방식은 개발자(1:1, 1:n, n:m)가 설계하기 나름입니다. 또한 서비스의 구현방식에 따라 서버의 구현방식도 선택하여야 합니다.
앞선 글에서의 언급처럼 두 개 이상의 피어를 서로 연결해주기 위해서는 Signaling, STUN, TURN 총 3개의 서버가 필요합니다. 하지만 개발자가 n:m 형태의 많은 엔드유저의 서비스를 계획하고 있다면 수 많은 트래픽을 감당하기 위해 추가로 Media 서버도 요구됩니다.
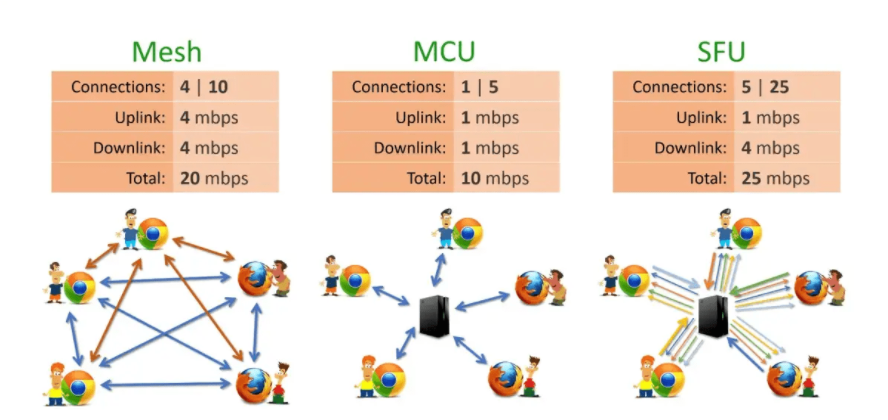 그림 1. 서버의 형태
시그널링 서버의 구현 프레임워크 또한 개발자가 정하기 나름입니다. 저는 nodeJS의 express 서버와 socket.io(v4)를 사용하겠습니다.
const express = require('express');
const http = require('http');
const { createSocketServer } = require('./socketServer');
const port = 4545;

function createApp() {
    const app = express();
    app.use(express.static("public"));
    app.use(express.json());

    // Set EJS as the view engine
    app.set('view engine', 'ejs');
    app.get('/', (req, res) => {
        res.render('index');
    });

    return app;
}

const app = createApp();
const server = http.createServer(app);
server.listen(port, () => {
    console.log(`Server listening at http://localhost:${port}`)
});

createSocketServer(server);
index.js
express 서버의 시작을 담당하는 index.js 입니다.
웹 페이지를 보여주기 위해서 View Engine을 사용하였으며 베이스 주소('/')에 접속하였을 때 index 페이지를 띄워주는 것 외에 특별한 코드는 없습니다. 다만 HTTP 통신만으로 서버-클라이언트 시그널 교환을 유기적으로 처리하기엔 귀찮은 부분이 있습니다. 따라서 서버가 클라이언트에게 요청을 보낼 수 있는 socket.io 특징을 이용해서 소켓 서버를 만듭니다. 이 소켓 서버가 시그널링의 실질적인 부분을 담당할 것 입니다. 가장 아랫 줄의 createSocketserver(server); 는 다음과 같습니다.
const { Server } = require('socket.io');

function createSocketServer(server) {
    const io = new Server(server, {path:'/webRTC_V0'});
    io.on('connection', socket => {
        console.log('Socket Client connected');
        webRTCHandler(socket);
        socket.on('disconnect', () => console.log('Client disconnected'));
    });
}

function webRTCHandler(socket) {
    socket.on('webrtc:signaling', (signalMessage) => {
        socket.broadcast.emit('webrtc:signaling', signalMessage);
    });
}

exports.createSocketServer = createSocketServer;
socketServer.js
소켓 서버의 생성을 담당하는 socketServer.js 입니다. Socket.io 서버의 생성과 관련해서는 Socket.io 공식 문서(링크 필요) 에서 자세하게 설명해주고 있습니다. 해당 소켓서버가 실질적인 시그널링 서버가 되지만 보다시피 코드가 매우 간단합니다. 다시 말해 Mesh 형태에서 시그널링 서버는 시그널링 메시지의 전달만 담당하기 때문에 부하가 거의 없습니다.
<!DOCTYPE html>
<html lang="en">
<head>
    <meta charset="UTF-8">
    <meta name="viewport" content="width=device-width, initial-scale=1.0">
    <title>Document</title>
    <script type="importmap">
        {
          "imports": {
            "socket.io-client": "https://cdn.socket.io/4.4.1/socket.io.esm.min.js"
         }
        }
    </script>
</head>
<body>
    <script src="https://webrtc.github.io/adapter/adapter-latest.js"></script>
    <script type="module" src="/js/webrtc.js"></script>
    Index page

    <br />
    <video id="localVideo" style="border: 3px solid black;" autoplay playsinline></video>
    <video id="remoteVideo" style="border: 3px solid black;" autoplay playsinline></video>

    <br />
    <button id="startBtn">Start</button>

</body>
</html>
index.ejs
프론트 페이지(index.ejs) 입니다.
head 태그 안에 socket.io-client를 cdn 형식으로, webrtc를 수행하기 위한 만든 코드인 webrtc.js를 import 하였습니다. 참고로 클라이언트에서 socket.io를 사용하기 위해서는 반드시 socket.io-client 모듈이 있어야 합니다. 나의 비디오와 상대방의 비디오를 표시하기 위해서 두개의 비디오를 만들고, 각각 'localVideo', 'remoteVideo'라는 아이디를 부여했습니다. 마지막으로 시작 버튼을 생성하여 스트리밍 연결을 시작할 트리거 역할을 할 것 입니다.
import { io } from "socket.io-client";

const VERSION = "webRTC_V0" // 소켓 서버의 path와 일치시켜야 함
const config =
{
    iceServers: [
        {
          urls: "turn:x.xx.xxx.xxx",
          username: "username",
          credential: "password",
        }, // turn 서버 설정
        {
          urls: "stun:stun.l.google.com:19302",
        }, // stun 서버 설정
      ],
    };
const constraints = { audio: false, video: true }; // 비디오만 사용
const stream = await navigator.mediaDevices.getUserMedia(constraints); // 비디오 스트림 생성
document.getElementById("localVideo").srcObject = stream; // localVideo에 스트림 추가

// 아래는 peer connection 생성과 signaling을 위한 변수들
let pc = undefined;
let makingOffer = false;
let ignoreOffer = false;
let polite = false;

let socket = io("/", { transports: ["websocket"], path: `/${VERSION}` }); // socket 서버에 연결

socket.on("connect", () => {
    console.log("Connected to server");
}); // 연결되면 로그 출력

socket.on("disconnect", () => {
    console.log("Disconnected from server");
}); // 연결이 끊기면 로그 출력

socket.on("webrtc:signaling", async (signalMessage) => { // 소켓서버로 부터 webrtc:signaling 이벤트를 받을 때
    console.log("Signal received: ", signalMessage); // 로그 출력
    try {
        if (signalMessage.type === 'offer' || signalMessage.type === 'answer') { // 받은 메세지가 offer 혹은 answer를 라면
            if (!pc && signalMessage.type === 'offer') pc = await createPeerConnection(); // pc가 없고 offer를 받았다면 pc를 생성

            const description = signalMessage.data;
            const offerCollision =
                description.type === "offer" &&
                (makingOffer || pc.signalingState !== "stable");
            // offer를 받았는데 makingOffer가 true거나 pc의 signalingState가 stable이 아니라면
            // offerCollision을 true로 설정 (오퍼 충돌이 일어났다는 뜻)

            ignoreOffer = !polite && offerCollision;
            if (ignoreOffer) {
                return;
            } // polite가 false이고 offerCollision이 true라면 ignoreOffer를 true로 설정.
              // 즉 polite는 어느 피어가 offer를 보낼지 결정하는 변수

            await pc.setRemoteDescription(description);
            if (description.type === "offer") {

                await pc.setLocalDescription();
                let signalMessage = {
                    type: pc.localDescription.type,
                    data: pc.localDescription
                }
                socket.emit("webrtc:signaling", signalMessage);
            }
        } else if (signalMessage.type === 'candidate') {
            const candidate = new RTCIceCandidate(signalMessage.data);
            try {
                await pc.addIceCandidate(candidate);
            } catch (err) {
                if (!ignoreOffer) {
                    throw err;
                }
            }
        }
    } catch (err) {
        console.error(err);
    }
});

const createPeerConnection = async () => { // peer connection 생성

    const pc = new RTCPeerConnection(config); // config에 따른 peer connection 생성

    for (const track of stream.getTracks()) {
        pc.addTrack(track, stream);
    } // stream의 track들을 peer connection에 추가. 근데 이 경우 stream은 하나의 track만 가지고 있음

    // 아래는 모두 peer connection의 이벤트 핸들러들을 등록하는 과정
    pc.onnegotiationneeded = async () => { // negotiation이 필요할 때 (offer 보내야 할 때)
        try {
            makingOffer = true;
            await pc.setLocalDescription(); // local description 설정
            let signalMessage = {
                type: pc.localDescription.type,
                data: pc.localDescription
            } // local description을 signalMessage로 만들어서
            socket.emit("webrtc:signaling", signalMessage); // 소켓서버로 보냄
        } catch (err) {
            console.error(err);
        } finally {
            makingOffer = false;
        }
    };

    pc.onicecandidate = ({ candidate }) => { // ice candidate가 생성되면
        if (candidate) {
            let signalMessage = {
                type: 'candidate',
                data: candidate
            } // candidate를 signalMessage로 만들어서
            socket.emit("webrtc:signaling", signalMessage); // 소켓서버로 보냄
        }
    };

    pc.ontrack = (event) => { // 다른 피어로 부터 track이 도착하면
        document.getElementById("remoteVideo").srcObject = event.streams[0]; // remoteVideo에 track을 추가
    };

    return pc;
}

document.getElementById("startBtn").addEventListener("click", async () => {
    pc = await createPeerConnection();
    polite = true;
}); // start 버튼을 누르면 peer connection 생성, polite를 true로 설정
webrtc.js
주석에 대부분의 설명이 적혀있습니다. 아래의 변수들과 함수는 mdn에서 설명하는 정석적인 방법을 따를 때 필요하고, webRTC의 전체적인 흐름을 제어할때 필수적이므로 자세히 설명하겠습니다.
let pc = undefined;
let makingOffer = false;
let ignoreOffer = false;
let polite = false;
const createPeerConnection = async () => { // peer connection 생성
const pc = new RTCPeerConnection(config); // config에 따른 peer connection 생성
for (const track of stream.getTracks()) {
pc.addTrack(track, stream);
} // stream의 track들을 peer connection에 추가. 근데 이 경우 stream은 하나의 track만 가지고 있음
// 아래는 모두 peer connection의 이벤트 핸들러들을 등록하는 과정
    pc.onnegotiationneeded = async () => { // negotiation이 필요할 때 (offer 보내야 할 때)
        try {
            makingOffer = true;
            await pc.setLocalDescription(); // local description 설정
            let signalMessage = {
                type: pc.localDescription.type,
                data: pc.localDescription
            } // local description을 signalMessage로 만들어서
            socket.emit("webrtc:signaling", signalMessage); // 소켓서버로 보냄
        } catch (err) {
            console.error(err);
        } finally {
            makingOffer = false;
        }
    };
pc.onicecandidate = ({ candidate }) => { // ice candidate가 생성되면
if (candidate) {
let signalMessage = {
type: 'candidate',
data: candidate
} // candidate를 signalMessage로 만들어서
socket.emit("webrtc:signaling", signalMessage); // 소켓서버로 보냄
}
};
pc.ontrack = (event) => { // 다른 피어로 부터 track이 도착하면
document.getElementById("remoteVideo").srcObject = event.streams[0]; // remoteVideo에 track을 추가
};
return pc;
}pc는 new peerConnection()으로 생성된 객체를 담을 변수입니다. 그리고 바로 위 함수 function createPeerConnection()을 통해 할당할 수 있도록 하였습니다. makingOffer, ignoreOffer, polite는 두 피어가 시그널링을 할 때 두 피어가 동시에 offer를 생성해 교환하는 경우를 방지하기 위해서 필요합니다. offer를 보낼 피어(클라이언트)가 확정되어 있는 서비스라면 굳이 필요 없을 수 있습니다.
webRTC를 이용해서 서비스를 구축할 때, 필연적으로 포함되는 엔드유저의 유형은 '발신자'와 '수신자'입니다. 그러나 offer와 answer는 근본적으로 sdp를 주고받는 동일한 레벨의 행위입니다. 경우에 따라 다르겠지만, 일반적으로는 발신자의 코드와 수신자의 코드가 크게 다르지 않을 수록 좋습니다. 이번 코드에서는 수신자와 발신자가 동일한 js 파일(webrtc.js)을 import하여 사용하기 때문에 더더욱 그렇습니다. 이러한 요구를 적용하며 코드를 작성하는 것을 mdn에서는 'perfect negotiation pattern'이라고 하며 다음과 같이 설명합니다.
Perfect negotiation makes it possible to seamlessly and completely separate the negotiation process from the rest of your application's logic. Negotiation is an inherently asymmetric operation: one side needs to serve as the "caller" while the other peer is the "callee." The perfect negotiation pattern smooths this difference away by separating that difference out into independent negotiation logic, so that your application doesn't need to care which end of the connection it is. As far as your application is concerned, it makes no difference whether you're calling out or receiving a call.
The best thing about perfect negotiation is that the same code is used for both the caller and the callee, so there's no repetition or otherwise added levels of negotiation code to write.
pc.onnegotiationneeded = async () => { // negotiation이 필요할 때 (offer 보내야 할 때)
try {
makingOffer = true;
await pc.setLocalDescription(); // local description 설정
let signalMessage = {
type: pc.localDescription.type,
data: pc.localDescription
} // local description을 signalMessage로 만들어서
socket.emit("webrtc:signaling", signalMessage); // 소켓서버로 보냄
} catch (err) {
console.error(err);
} finally {
makingOffer = false;
}
};발신자와 수신자의 코드를 동일하게 유지하고 싶을 때 가장 많이 사용하는 이벤트 리스너가 'onnegotiationneeded' 입니다. 해당 코드는 offer의 발신(negotiation)이 필요하다고 판단되는 경우에 실행되는 콜백입니다. negotiation이 필요한 상황은 pc에 미디어 트랙이 등록된 경우(pc.addTrack), 와이파이가 끊겼다가 재연결 된 경우 등 다양한 트리거 기준이 있습니다. (자세한 보충 설명 필요) 해당 코드에서는 pc 객체에 미디어 트랙이 등록되는 경우에 해당 콜백이 실행됩니다.
우리는 이제 양 측의 피어가 동등한 입장임을 가정하고 코드를 썻기에 어떤 피어가 'offer'를 받아들일 것인지 정해야 합니다. 다음의 시나리오를 가정하고 생각하면 이해가 쉽습니다.
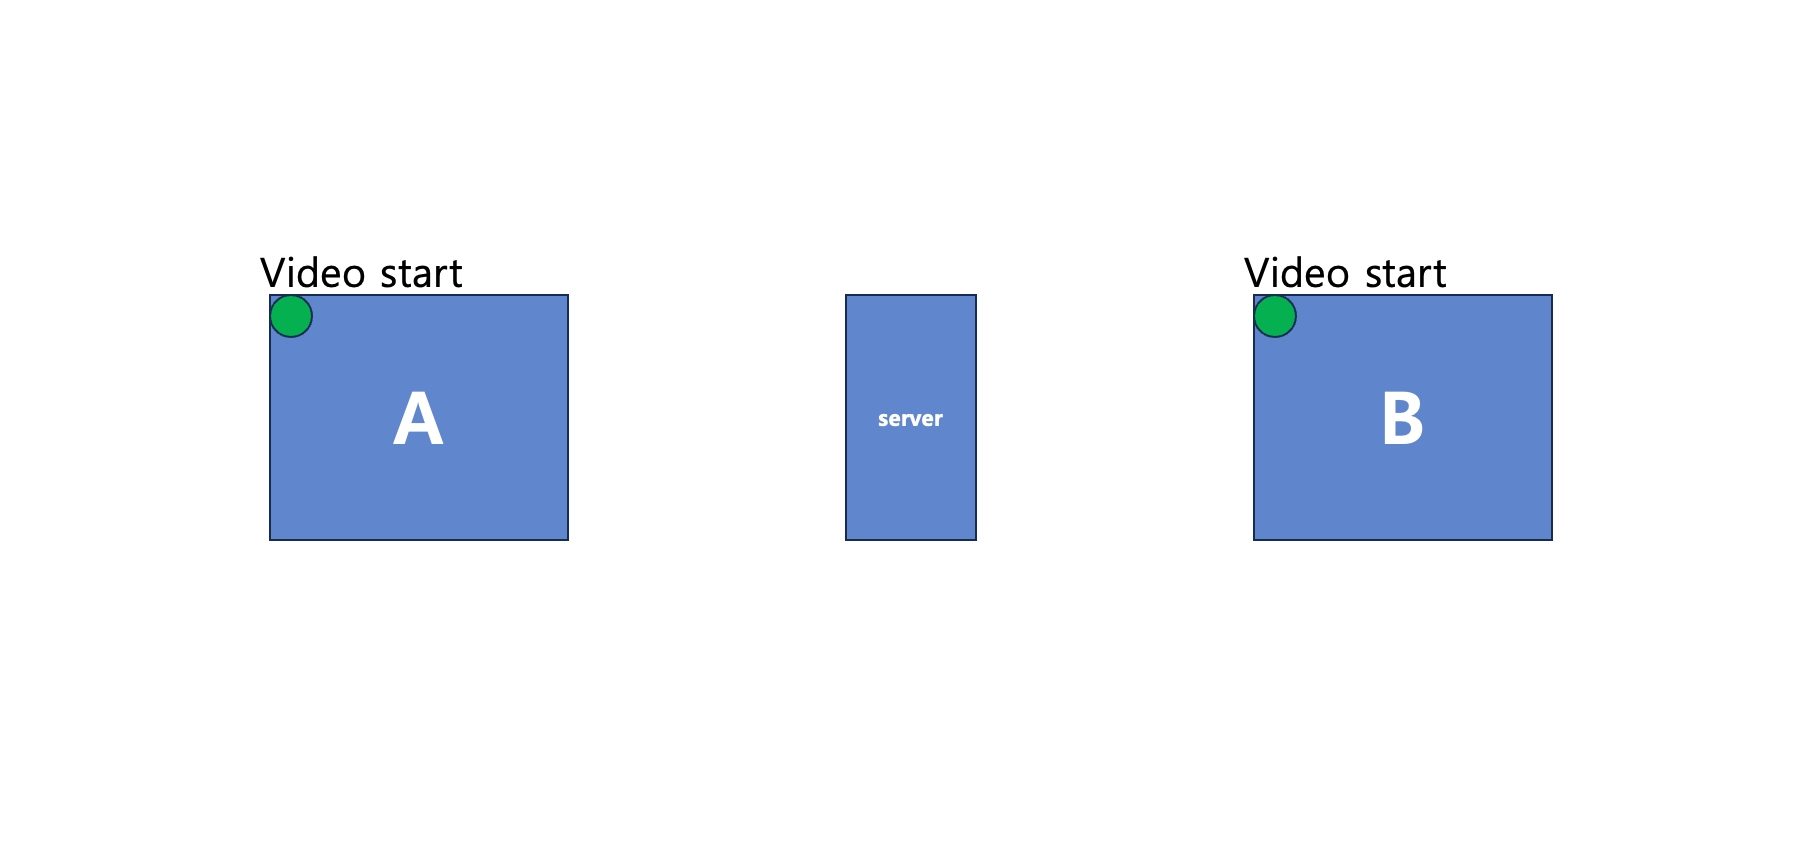 웹 페이지 접속 시 바로 비디오(local)이 실행됨
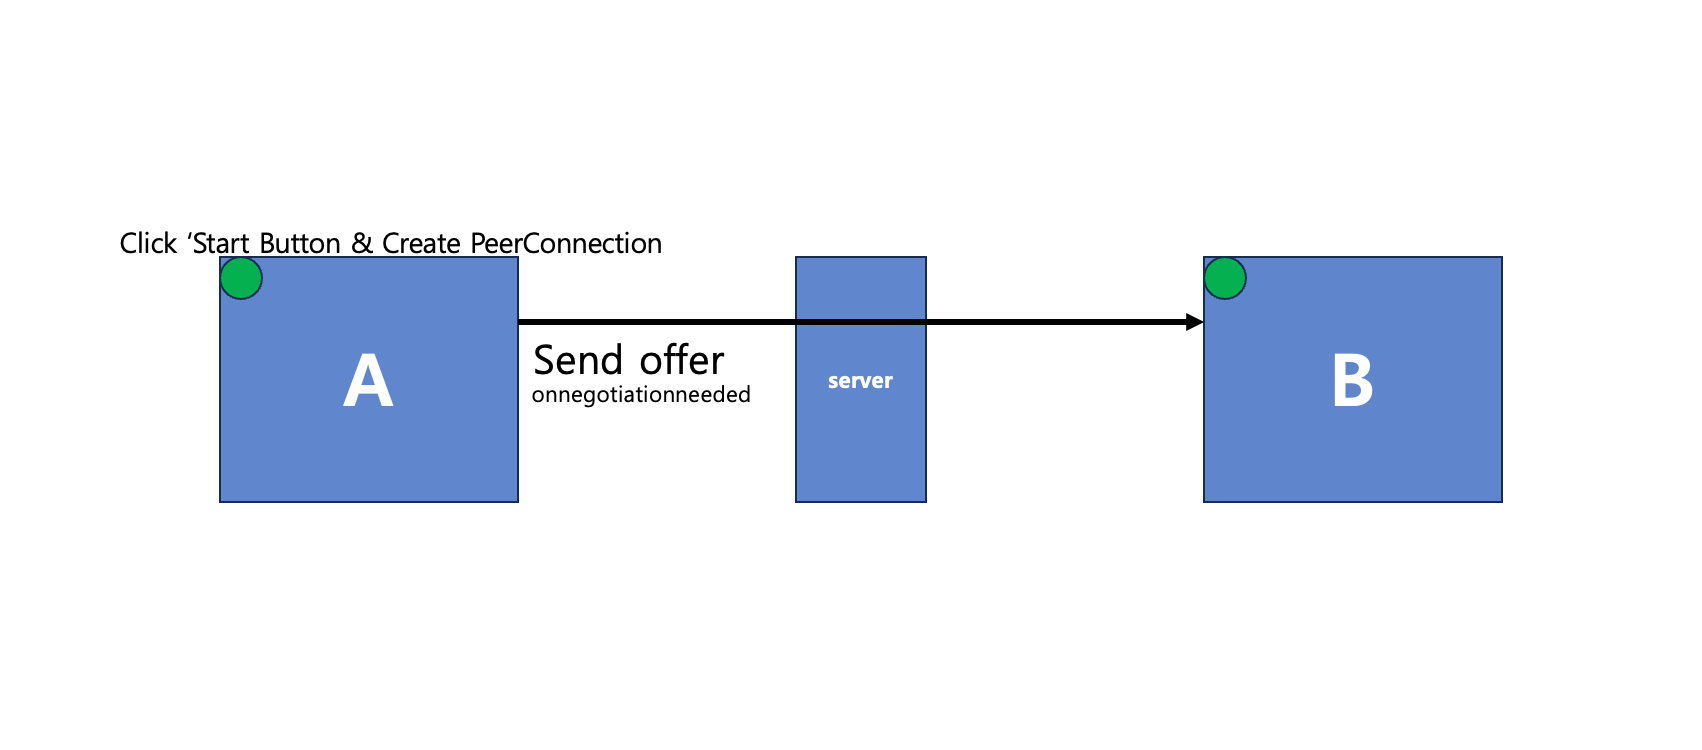 A가 Start Button을 클릭
연결을 위해 A는 Start 버튼을 누릅니다. Start 버튼을 누르는 경우 function createPeerConnection()가 실행되어 pc 객체가 할당되고, pc.addtrack() 으로 인해 pc에 트랙이 추가되므로 이 순간 onnegotiation 콜백이 동작하여 B에게 offer를 보내게 됩니다.
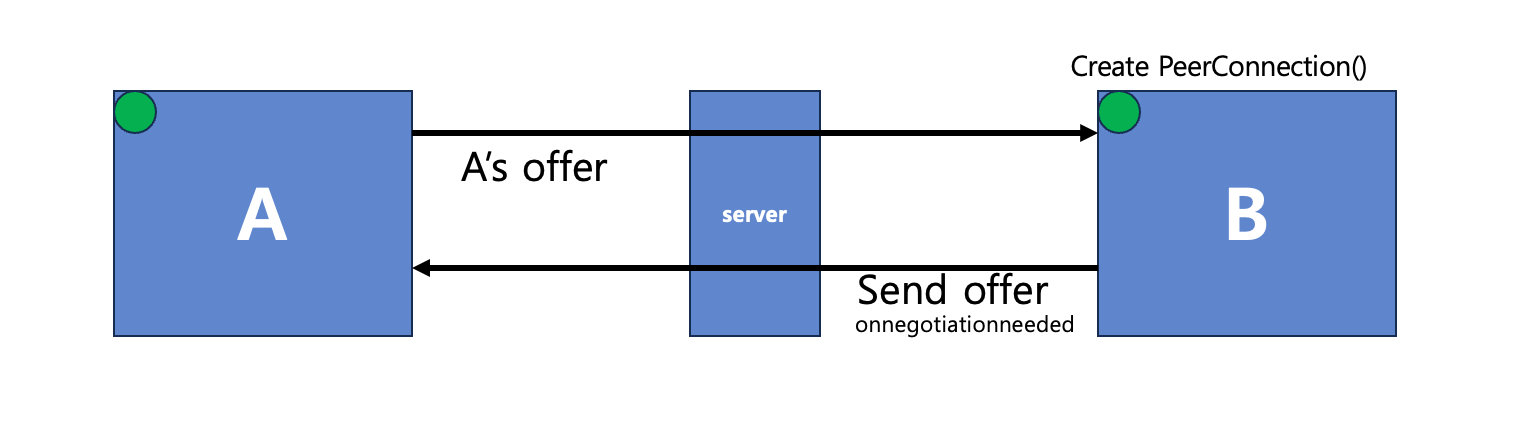 B 또한 onnegotiationneeded 콜백에 의해 offer를 보냄
B는 A의 offer를 받은 순간 위의 로직에 의해 function createPeerConnection() 이 진행되어 pc 객체를 할당됩니다. 앞선 언급처럼 function createPeerConnection()이 실행되는 순간 track이 등록되므로 onnogotiation 콜백이 동작하여 A에게 자신의 offer를 보냅니다.
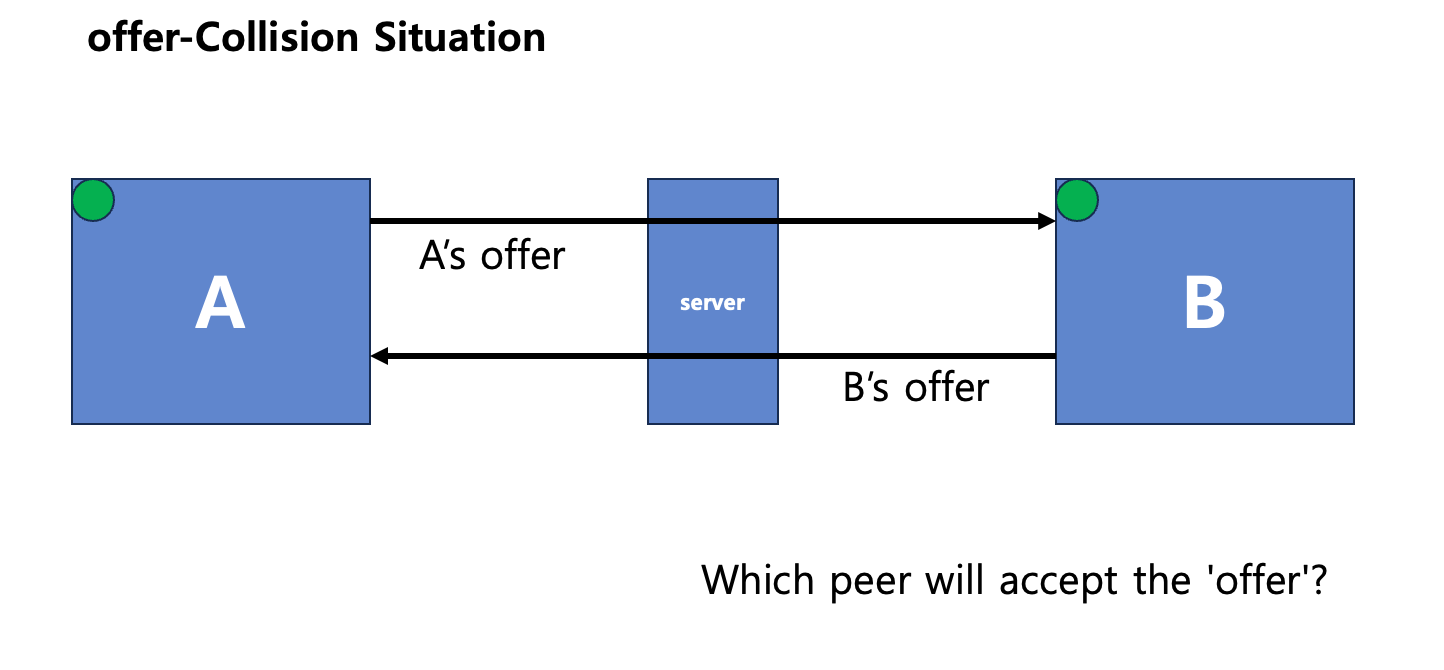 offer collision이 발생
이처럼 두 개의 offer가 서로에게 보내지게 됩니다. webRTC 규약에 따르면 두 피어 사이에서는 한 피어가 offer를 보내면 다른 피어는 answer로 응답하여 시그널링을 이룹니다. 즉 A, B중 하나의 피어만이 offer를 받아들인 뒤 answer 답장을 해야합니다. 이 순간에 우리는 어떤 피어가 offer를 줘야할지 정해야 합니다. 그래서 mdn에서는 'polite'라는 개념을 설명합니다.
A polite peer, which uses ICE rollback to prevent collisions with incoming offers. A polite peer, essentially, is one which may send out offers, but then responds if an offer arrives from the other peer with "Okay, never mind, drop my offer and I'll consider yours instead."
An impolite peer, which always ignores incoming offers that collide with its own offers. It never apologizes or gives up anything to the polite peer. Any time a collision occurs, the impolite peer wins.This way, both peers know exactly what should happen if there are collisions between offers that have been sent. Responses to error conditions become far more predictable.
How you determine which peer is polite and which is impolite is generally up to you. It could be as simple as assigning the polite role to the first peer to connect to the signaling server, or you could do something more elaborate like having the peers exchange random numbers and assigning the polite role to the winner. However you make the determination, once these roles are assigned to the two peers, they can then work together to manage signaling in a way that doesn't deadlock and doesn't require a lot of extra code to manage.
(start 버튼 코드 추가)
저는 Start 버튼을 누르는 피어가 Polite한 피어인 것으로 설정합니다. 다시 말해 Start 버튼을 누른 A는 Polite한 Peer가 되며 자신의 offer를 상대가 받아들이고, 상대의 offer는 무시해야 합니다.
            const offerCollision =
                description.type === "offer" &&
                (makingOffer || pc.signalingState !== "stable");
            // offer를 받았는데 makingOffer가 true거나 pc의 signalingState가 stable이 아니라면
            // offerCollision을 true로 설정 (오퍼 충돌이 일어났다는 뜻)

            ignoreOffer = !polite && offerCollision;
            if (ignoreOffer) {
                return;
            } // polite가 false이고 offerCollision이 true라면 ignoreOffer를 true로 설정.
              // 즉 polite는 어느 피어가 offer를 보낼지 결정하는 변수
offerCollision을 해결하는 로직
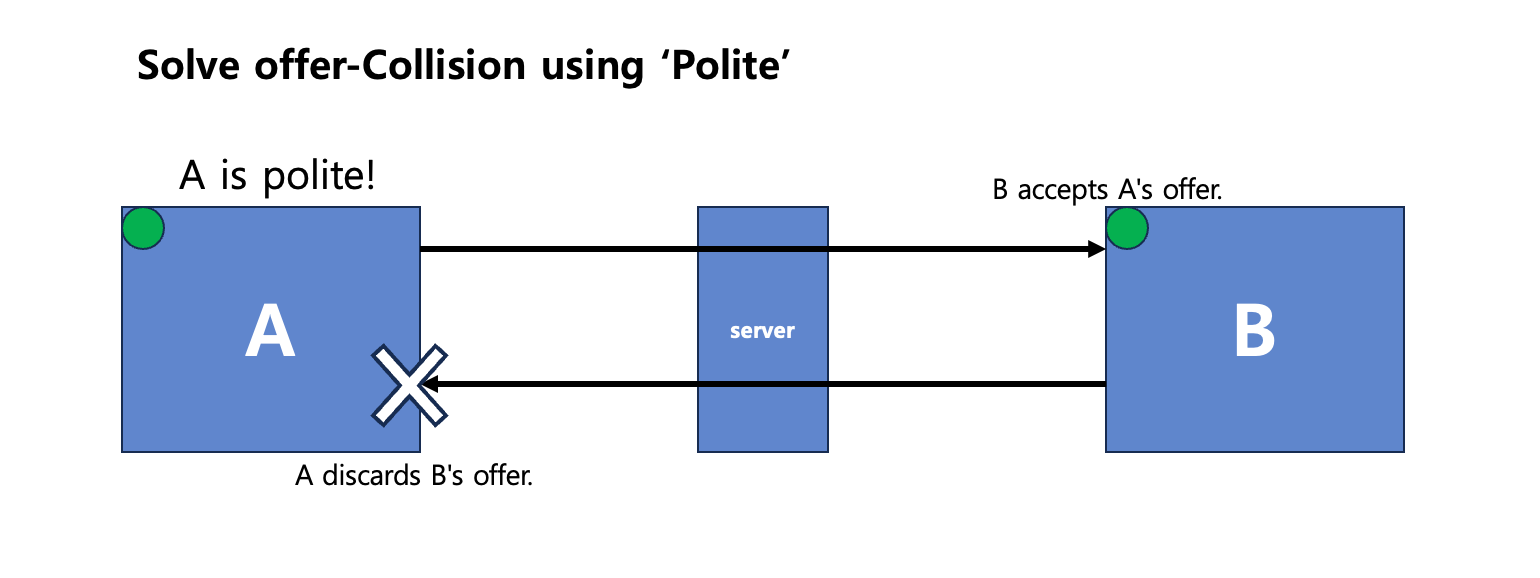
이렇게 두 개의 offer가 존재하는 offerCollision을 polite 변수를 통해 순서를 정하여 해결합니다. A는 B에게서 받은 offer를 무시하고 B는 A의 offer를 받아들입니다.
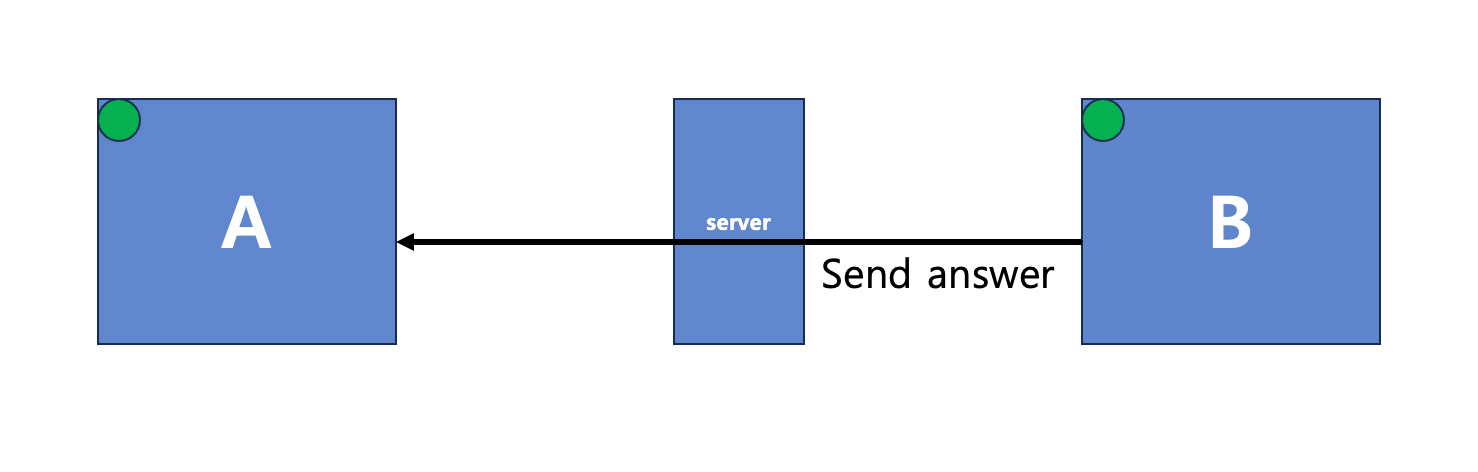
이에 따라 B는 offer를 받았으니 A에게 answer를 보냅니다. A는 B의 Answer를 받아setRemoteDescription(description) API를 통해 sdp를 설정합니다.
이것으로 A와 B가 offer 와 answer를 주고받는 과정은 끝났습니다. 마지막 과정은 icecandidate 교환입니다. 앞선 글(Introduction to webRTC)에서 다음과 같이 언급하였습니다.
webRTC 통신은 기본적으로 UDP를 기반으로 하였기 때문에 P2P(Peer To Peer) 통신입니다. 그러나 서로 다른 네트워크 사이에서 P2P 통신은 쉬운 일이 아닙니다. 각 엔드포인트 사이에는 NAT가 존재하기 때문입니다. 즉 엔드포인트가 제출한 주소는 다른 엔드포인트가 연결할 수가 없습니다. 또한 엔드포인트는 자신이 통신하려는 다른 엔드포인트 사이에 어떤 네트워크 토폴로지(Network Topology)가 있는 지 모릅니다.
(중략)
위에서의 언급처럼, 각 클라이언트(엔드포인트)는 NAT에 가로막혀 서로가 통신을 할 수 없는 상황에 놓입니다. webRTC 또한 통신을 위해서 NAT traversal이 필요합니다. webRTC는 STUN, TURN 서버를 이용한 NAT 통과 기법을 사용합니다.
const config =
    {
    iceServers: [
        {
          urls: "stun:stun.l.google.com:19302",
        }, // stun 서버 설정
      ],
    };

    // ....

 const pc = new RTCPeerConnection(config); // config에 따른 peer connection 생성
해당 코드에서 우리는 STUN 을 통한 NAT 통과 기법을 사용합니다. 이미 공개된 STUN 서버가 많고 위에서 처럼 코드상에서 단 한줄로 쉽게 사용 가능하기에 구현상 가장 간단합니다. A와 B는 config에서 설정된 STUN 서버를 통해 서로의 ICE candidate를 주고 받습니다.
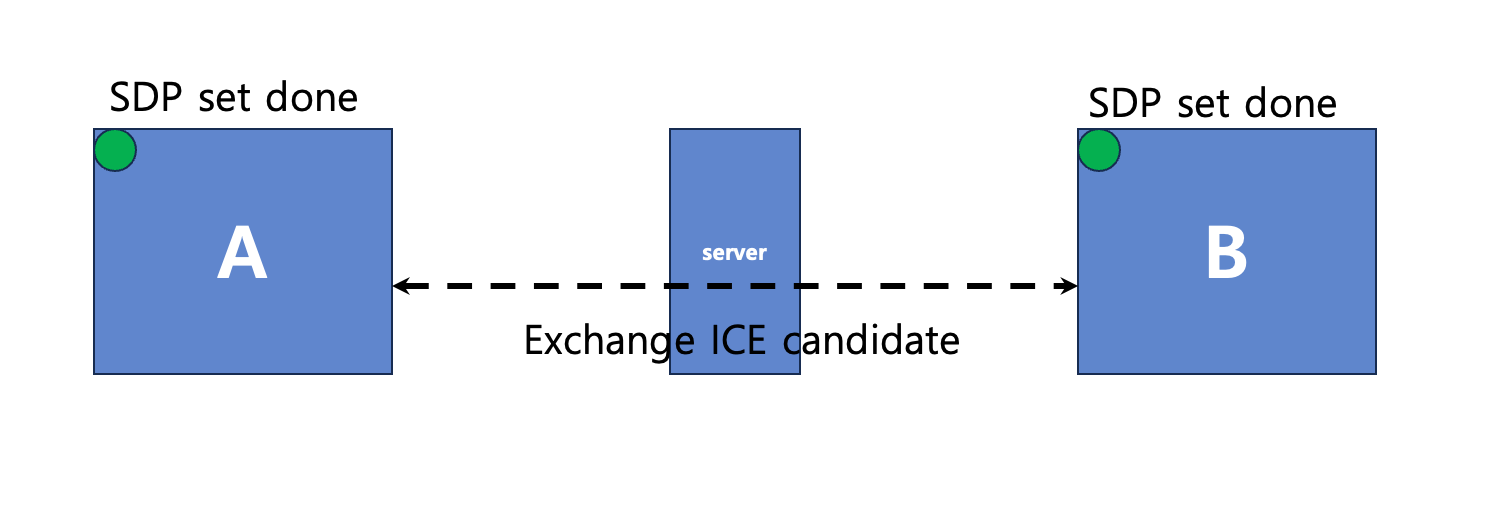
서로의 ICE candidate가 알맞게 짝지어져서(candidate pair) 통신을 위한 길이 뚫리면 이제 모든 것은 완료되었습니다.
ICE candidate 교환은 offer와 answer를 주고받은 이후에 이루어지는 것이 아닙니다. 객체가 생성되고 offer를 보내 시그널링을 시작하는 시점에 생성되어 서로 주고 받습니다. ICE candidate 교환 프로세스는 필수적인 과정이지만 offer&answer 프로세스와는 별개로(비동기적으로) 동작합니다.
참고로 SDP를 주고받고 ICE candidate pair가 생성되는 과정은 크롬 주소창에 chrome://webrtc-internals/ 를 입력하여 들어간 창에서 확인할 수 있으며, 해당 도구는 webRTC 연결이 석연치 않을 때 디버깅용으로 사용하기에 좋습니다.
코드는 깃허브 https://github.com/JoonikChoi/webRTC 에서 확인할 수 있으며 readme를 따라서 실행하세요.
궁금하신 점은 댓글 또는 omybell201@gmail.com 으로 메일을 주시면 최대한 빨리 회신해드리겠습니다.
참고
webRTC API는 인증된 웹 사이트를 증명하는 https 환경에서만 사용가능합니다. 하지만 http 이더라도 localhost인 경우에는 webRTC API를 사용할 수 있습니다. 따라서 이번 예제는 localhost 환경에서만 동작합니다.
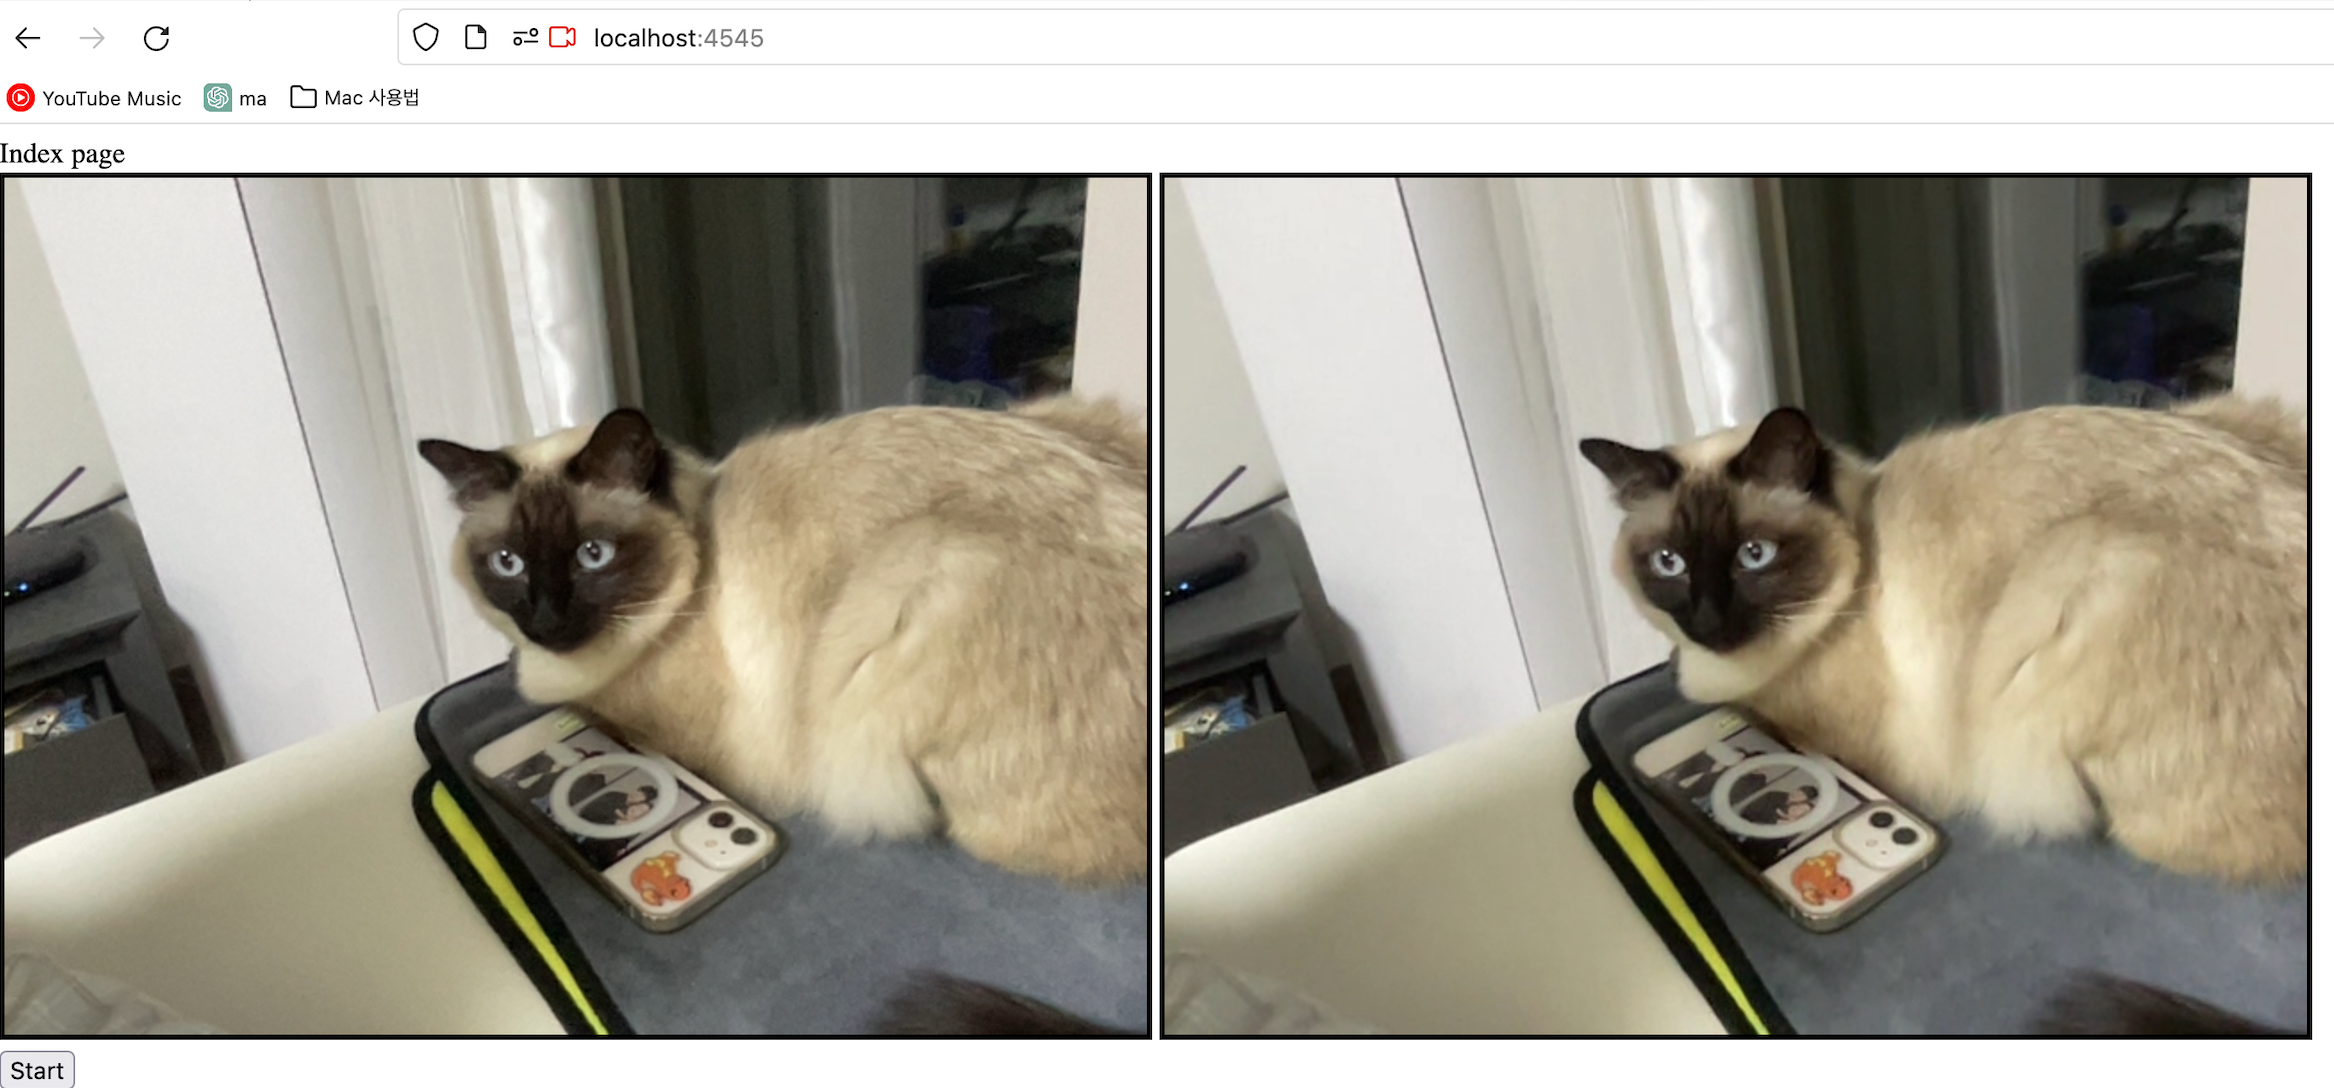
브라우저에서 페이지 두개를 만들어서 http://localhost:4545 주소로 접속한 뒤 카메라를 허용하고, 두 페이지 중 하나에서 Start 버튼을 누르면 됩니다.