
Kaniko를 이용한 Image Build & Push Pipeline 구축에서 이어서 진행한다
1. Manifest File
Cluster에 배포할 때, 우리는 Kubectl 명령어 Script와 Github Private Repo에 넣어둔 매니페스트 파일을 이용해 배포할 것이다
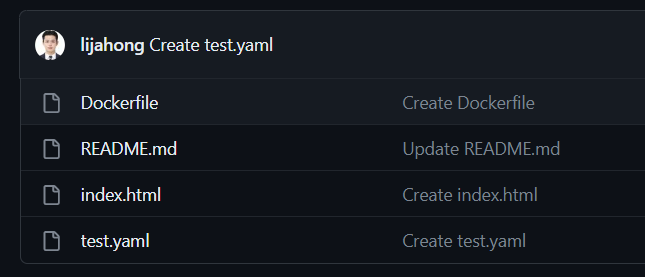
- Github Private Repo에 매니페스트 파일을 Push 하자
apiVersion: apps/v1
kind: Deployment
metadata:
  name: tektontestpod
  namespace: hongspace
spec:
  replicas: 3
  selector:
    matchLabels:
      app: hong
  template:
    metadata:
      name: hongpod
      labels:
        app: hong
    spec:
      containers:
      - name: hongcontainer
        image: lijahong/tektontest:1.0
        ports:
        - containerPort: 80

---

apiVersion: v1
kind: Service
metadata:
  name: svc-lb-hong
  namespace: hongspace
spec:
  type: LoadBalancer
  ports:
  - port: 80
    targetPort: 80
    protocol: TCP
  selector:
    app: hong
- 매니페스트 파일 내용은 위와 같다
- Build한 Image를 이용한 Deployment와 LoadBalancer Type Service를 배포할 것 이다
2. Service Account RBAC
ClusterRole
RBAC 설정 이유
Kubernetes-actions Task 실행 시 ServiceAccount를 지정하지 않으면, 자동으로 default Namespace의 default ServiceAccount를 가지고 명령을 실행한다
우리는 별도의 ServiceAccount로 명령을 실행하고 싶으므로, 해당 SA에 권한을 부여해야 한다
kind: ClusterRole
apiVersion: rbac.authorization.k8s.io/v1
metadata:
  namespace: '*'
  name: role-for-tektondeploy
rules:
- apiGroups: ["*"]
  resources: ["*"]
  verbs: ["*"]
- Cluster에 대한 모든 작업이 가능하도록 ClusterRole을 생성하자
만약 특정 Namespace에 대한 작업만 허용하고자 하면, ClusterRole이 아닌 Role을 생성하면 된다
ClusterRoleBinding
kind: ClusterRoleBinding
apiVersion: rbac.authorization.k8s.io/v1
metadata:
  name: rolebind-for-deploy
subjects:
  - kind: ServiceAccount
    name: build-bot
    namespace: hongspace
roleRef:
  kind: ClusterRole
  name: role-for-tektondeploy
  apiGroup: rbac.authorization.k8s.io
- 이전에 생성한 ServiceAccount인 build-bot과 위에서 생성한 ClusterRole을 Binding 하자
apiVersion: v1
kind: ServiceAccount
metadata:
  name: build-bot
  namespace: hongspace
secrets:
  - name: docker-credential
  - name: github-secret
- ServiceAccount에는 GitHub 인증을 위한 Secret과 DockerHub 인증을 위한 Secret을 할당해야 한다
3. ImagePullSecret
Kubectl 명령으로 Private Registry의 Image를 Pull 할 때, ImagePullSecret 정보를 보고, Container Image Registry 에 인증 요청을 한다
- ImagePullSecret 없이 Private Registry에 접근하고 싶으면, Kubernetes Node에 Credential을 추가해야 한다
ImagePullSecret은 Pod 매니페스트 파일에 직접 명시하거나, 명령 실행에 사용하는 SA에 할당하는 방법이 있다
- 우리는 Kubectl 명령은 build-bot SA로 내리지만, Pod 생성은 default SA를 사용한다
- 앞에서 생성한 DockerHub 인증 정보를 담은 Secret을 hongspace의 default SA의 imagePullSecret으로 할당해주자
apiVersion: apps/v1
kind: Deployment
metadata:
  name: tektontest
  namespace: hongspace
spec:
  replicas: 5
  selector:
    matchLabels:
      app: hong
  template:
    metadata:
      name: hongpod
      labels:
        app: hong
    spec:
      containers:
      - name: hongcontainer
        image: lijahong/tektontest:1.0
        ports:
        - containerPort: 80
      imagePullSecrets:
      - name: docker-config-secret
- 만약 매니페스트 파일에 직접 명시하고자 한다면, 위와 같이 매니페스트 파일에 imagePullSecret을 추가하면 된다
- 허나, 매번 매니페스트 파일에 명시하는 것은 불편하다. 따라서 default SA에 imagePullSecret을 할당해주자
namespace hongspace의 default ServiceAccount에 ImagePullSecret 할당하기
- 모든 Namespace에는 기본적으로 default ServiceAccount가 존재한다. 해당 Namespace에서 작업을 실행할 때, 작업 실행에 사용할 ServiceAccount를 따로 지정하지 않는다면, 해당 Namespace의 default ServiceAccount를 이용하여 작업을 실행한다
[ec2-user@ip-100-0-1-19 auth]$ k get sa -n hongspace
NAME        SECRETS   AGE
build-bot   2         25m
default     0         7d4h
- default ServiceAccount를 확인하자
kubectl patch serviceaccount -n hongspace default -p '{"imagePullSecrets": [{"name": "docker-config-secret"}]}'
- 위에서 생성한 Docker 인증 정보가 담긴 Secret을 default SA에게 할당하자
[ec2-user@ip-100-0-1-19 auth]$ k describe sa -n hongspace default
Name:                default
Namespace:           hongspace
Labels:              <none>
Annotations:         <none>
Image pull secrets:  docker-credential
Mountable secrets:   <none>
Tokens:              <none>
Events:              <none>
- 잘 할당됬는지 확인하자
4. Pipeline 구축
Task
Kubernetes-actions Task는 Kubectl이 동작할 수 있는 이미지를 통해 Kubectl 명령어를 사용할 수 있게 해준다
apiVersion: tekton.dev/v1beta1
kind: Task
metadata:
  name: kubernetes-actions
  labels:
    app.kubernetes.io/version: "0.2"
  annotations:
    tekton.dev/pipelines.minVersion: "0.17.0"
    tekton.dev/categories: Kubernetes
    tekton.dev/tags: CLI, kubectl
    tekton.dev/displayName: "kubernetes actions"
    tekton.dev/platforms: "linux/amd64"
spec:
  description: >-
    This task is the generic kubectl CLI task which can be used
    to run all kinds of k8s commands
  workspaces:
    - name: manifest-dir # if you have yaml
      optional: true
    - name: kubeconfig-dir # it is need when yo deploy at other cluster
      optional: true
  results:
    - name: output-result # result text
      description: some result can be emitted if someone wants to.
  params:
    - name: script  # cli command, you setting
      description: The Kubernetes CLI script to run
      type: string
      default: "kubectl $@" # $@ means use all parameter and all parameter is individual. parameter is args
    - name: args
      description: The Kubernetes CLI arguments to run # args for kubectl command. if you not describe script. then default script " kubectl $@ " activate and use this args like "get" "pod"
      type: array # multiple args can come
      default:
        - "help"
    - name: image # image for use kubectl to our cluster or other cluster ( if you set kubeconfig )
      default: gcr.io/cloud-builders/kubectl@sha256:8ab94be8b2b4f3d117f02d868b39540fddd225447abf4014f7ba4765cb39f753 #image is huge
      description: Kubectl wrapper image
  steps:
    - name: kubectl
      image: $(params.image)
      script: |
        #!/usr/bin/env bash

        # if workspace which yaml file saved has bound, go to that directory
        [[ "$(workspaces.manifest-dir.bound)" == "true" ]] && \
        cd $(workspaces.manifest-dir.path)

        # if kubeconfig workspace has bound and kubeconfig file exist, set env for kubeconfig path
        [[ "$(workspaces.kubeconfig-dir.bound)" == "true" ]] && \
        [[ -f $(workspaces.kubeconfig-dir.path)/kubeconfig ]] && \
        export KUBECONFIG=$(workspaces.kubeconfig-dir.path)/kubeconfig

        # do kubectl command
        $(params.script)

      args: # args for kubectl command
        - "$(params.args)"
- Task의 전체 코드는 위와 같다
코드를 살펴보자
workspaces:
    - name: manifest-dir # if you have yaml
      optional: true
    - name: kubeconfig-dir # it is need when yo deploy at other cluster
      optional: true
- workspace는 위와 같다
- yaml 파일이 저장된 workspace와 Kubeconfig 파일이 저장된 workspace를 Bound 할 수 있으며, 이는 선택적이다
- Kubeconfig는 다른 Cluster에 배포하고 싶을 때, 해당 Cluster의 Kubeconfig 파일이 담긴 workspace를 Bound 하면 된다
- 우리는 Tekton이 설치된 Cluster에 배포할 것이므로, Kubeconfig를 따로 Bound 하지 않아도 된다
params:
    - name: script  # cli command, you setting
      description: The Kubernetes CLI script to run
      type: string
      default: "kubectl $@" # $@ means use all parameter and all parameter is individual. parameter is args
    - name: args
      description: The Kubernetes CLI arguments to run # args for kubectl command. if you not describe script. then default script " kubectl $@ " activate and use this args like "get" "pod"
      type: array # multiple args can come
      default:
        - "help"
    - name: image # image for use kubectl to our cluster or other cluster ( if you set kubeconfig )
      default: gcr.io/cloud-builders/kubectl@sha256:8ab94be8b2b4f3d117f02d868b39540fddd225447abf4014f7ba4765cb39f753 #image is huge
      description: Kubectl wrapper image
- 전달 받을 파라미터는 위와 같다
- script는 kubectl 명령어이다. 기본값은 kubectl $@ 이다. 이는 매개 변수들을 개별 문자로 취급하며, 이를 이용하여 kubectl 명령어를 실행한다는 의미이다
- 예시로 script를 지정하지 않고, args로 "get", "pod"를 넘겨 주면, kubectl get pod가 자동으로 실행된다
- 반대로 $* 은 매개 변수들을 하나의 문자열로 취급하는 것이다
- args는 kubectl 명령어에 사용될 매개 변수들의 인자 값이 담긴 배열이다. 사용자가 script를 따로 정의하지 않는다면, kubectl $@을 통해 전달 받은 매개 변수들의 인자 값을 이용하여 kubectl 명령어를 실행하는데, 이때 사용된다
- image는 kubectl 명령을 내릴 수 있는 환경이 구성된 image로 용량이 크다. 따라서 처음 실행 시, 시간이 소요될 수 있다
steps:
    - name: kubectl
      image: $(params.image)
      script: |
        #!/usr/bin/env bash

        # if workspace which yaml file saved has bound, go to that directory
        [[ "$(workspaces.manifest-dir.bound)" == "true" ]] && \
        cd $(workspaces.manifest-dir.path)

        # if kubeconfig workspace has bound and kubeconfig file exist, set env for kubeconfig path
        [[ "$(workspaces.kubeconfig-dir.bound)" == "true" ]] && \
        [[ -f $(workspaces.kubeconfig-dir.path)/kubeconfig ]] && \
        export KUBECONFIG=$(workspaces.kubeconfig-dir.path)/kubeconfig

        # do kubectl command
        $(params.script)

      args: # args for kubectl command
        - "$(params.args)"
- 작업은 다음과 같다. Pipeline에게 전달 받은 args 배열에 들어있는 값들을 컨테이너에게 인자 값으로 넘겨준다
- 만약 yaml 파일이 저장된 workspace가 Bound 되어 있다면, 해당 디렉토리로 이동한다
- 만약 Kubeconfig 파일이 저장된 workspace가 Bound 되어 있고, 안에 Kubeconfig 파일이 존재한다면, 해당 Kubeconfig 파일 경로를 KUBECONFIG 환경 변수로 설정한다
- Kubectl 명령어를 실행한다
Pipeline
apiVersion: tekton.dev/v1beta1
kind: Pipeline
metadata:
  name: hong-cicd
  namespace: hongspace
spec:
  params:
  - name: repo-url
    type: string
  - name: image-reference
    type: string
  - name: kubectl-args
    type: array

  workspaces:
  - name: shared-data

  tasks:
  - name: fetch-source
    taskRef:
      name: git-clone
    workspaces:
    - name: output
      workspace: shared-data
    params:
    - name: url
      value: $(params.repo-url)

  - name: build-push
    runAfter: ["fetch-source"]
    taskRef:
      name: kaniko
    workspaces:
      - name: source
        workspace: shared-data
    params:
      - name: IMAGE
        value: $(params.image-reference)

  - name: deploy
    runAfter: ["build-push"]
    taskRef:
      name: kubernetes-actions
    workspaces:
      - name: manifest-dir
        workspace: shared-data
    params:
      - name: args
        value: $(params.kubectl-args[*])
- Pipeline의 Deploy Task를 추가하고, 넘겨줄 workspace랑 params를 정의하자
- runAfter를 통해 Image Build & Push 작업이 완료된 후에 실행되도록 설정해야 한다
- git에서 clone한 yaml 파일이 저장된 workspace인 shared-data를 manifest-dir이란 이름으로 넘겨 주면 된다
- PipelineRun에서 넘겨준 배열 kubectl-args에 들어있는 값들을 모두 Task의 배열 args에게 넘겨 준다. 이 배열에 들어있는 값들을 컨테이너에게 인자 값으로 넘겨 주어 kubectl 명령어를 실행할 것이다
PipelineRun
apiVersion: tekton.dev/v1beta1
kind: PipelineRun
metadata:
  namespace: hongspace
  generateName: hong-cicd-run- # make name automate with random index ( for re use pipelinerun yaml )
spec:
  serviceAccountName: build-bot # sa for git credientials -> pipeline will use for clone private repo
  pipelineRef: # select pipeline
    name: hong-cicd
  podTemplate: # setting taskpod
    securityContext:  # pod security
      fsGroup: 65532 # set volume owner gid = 65532
  workspaces: # volume for clone code
  - name: shared-data
    volumeClaimTemplate: # automatically create pvc -> create pv
      spec:
        accessModes:
        - ReadWriteOnce
        resources:
          requests:
            storage: 1Gi

  params: # git address
  - name: repo-url
    value: "https://github.com/lijahong/tektontest.git"
  - name: image-reference
    value: lijahong/tektontest:1.0
  - name: kubectl-args
    value:
      - "apply"
      - "-f"
      - "test.yaml"
- PipelineRun에는 Kubectl 명령어 실행에 사용될 매개 변수들의 인자 값들만 정의해주면 된다
- GitHub Private Repo에서 Clone한 매니페스트 파일을 apply 할 것이므로, 위와 같이 "apply" "-f" "test.yaml"을 배열에 넣어주면 된다
- Task에서 $@을 통해 매개 변수 값들을 개별 문자로 취급하기에 써줘야 한다
5. 결과 확인
작업 결과 확인
[ec2-user@ip-100-0-1-19 auth]$ tkn pr list -n hongspace
NAME                  STARTED      DURATION   STATUS
hong-cicd-run-fpq6m   1 hour ago   41s        Succeeded
[ec2-user@ip-100-0-1-19 auth]$ tkn pr logs -n hongspace hong-cicd-run-fpq6m
.
.
[fetch-source : clone] + '[' false '=' true ]
[fetch-source : clone] + '[' false '=' true ]
[fetch-source : clone] + '[' false '=' true ]
[fetch-source : clone] + CHECKOUT_DIR=/workspace/output/
[fetch-source : clone] + '[' true '=' true ]
[fetch-source : clone] + cleandir
[fetch-source : clone] + '[' -d /workspace/output/ ]
[fetch-source : clone] + rm -rf /workspace/output//lost+found
[fetch-source : clone] + rm -rf '/workspace/output//.[!.]*'
[fetch-source : clone] + rm -rf '/workspace/output//..?*'
[fetch-source : clone] + test -z
[fetch-source : clone] + test -z
[fetch-source : clone] + test -z
[fetch-source : clone] + /ko-app/git-init '-url=https://github.com/lijahong/tektontest.git' '-revision=' '-refspec=' '-path=/workspace/output/' '-sslVerify=true' '-submodules=true' '-depth=1' '-sparseCheckoutDirectories='
.
.

[build-push : build-and-push] INFO[0001] Retrieving image manifest nginx:1.21.1
[build-push : build-and-push] INFO[0001] Retrieving image nginx:1.21.1 from registry index.docker.io
.
.
.
/usr/share/nginx/html/index.html requires it.
[build-push : build-and-push] INFO[0007] COPY ./index.html /usr/share/nginx/html/index.html
[build-push : build-and-push] INFO[0007] Taking snapshot of files...
[build-push : build-and-push] INFO[0007] EXPOSE 80
[build-push : build-and-push] INFO[0007] cmd: EXPOSE
[build-push : build-and-push] INFO[0007] Adding exposed port: 80/tcp
[build-push : build-and-push] INFO[0007] Pushing image to lijahong/tektontest:1.0
[build-push : build-and-push] INFO[0010] Pushed image to 1 destinations

[build-push : write-url] lijahong/tektontest:1.0

[deploy : kubectl] deployment.apps/tektontestpod unchanged
- PipelineRun 실행 결과와 log를 확인하자. 잘 실행 되었다
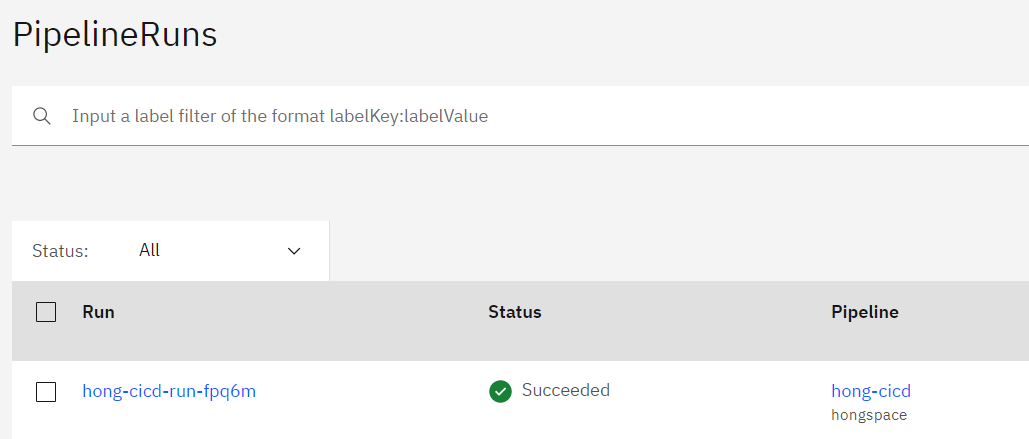
- DashBoard에서 결과를 확인해보자

- 각 Task가 잘 실행되었다
Deploy 확인
[ec2-user@ip-100-0-1-19 tektontest]$ k get deploy -n hongspace
NAME            READY   UP-TO-DATE   AVAILABLE   AGE
tektontestpod   3/3     3            3           9s
[ec2-user@ip-100-0-1-19 tektontest]$ k get pod -n hongspace | grep tektontestpo
NAME                                   READY   STATUS             RESTARTS   AGE
tektontestpod-c5ff89b8c-7bbw8          1/1     Running            0          25s
tektontestpod-c5ff89b8c-f7s54          1/1     Running            0          25s
tektontestpod-c5ff89b8c-jcf5v          1/1     Running            0          25s
- Kubernetes Cluster에 잘 배포되었는지 확인하자. 잘 배포되었다
[ec2-user@ip-100-0-1-19 tektontest]$ k describe pod -n hongspace tektontestpod-c5ff89b8c-7bbw8
Name:             tektontestpod-c5ff89b8c-7bbw8
Namespace:        hongspace
Priority:         0
Service Account:  default
Node:             ****************************
Start Time:       Thu, 27 Apr 2023 06:06:45 +0000
Labels:           app=hong
                  pod-template-hash=c5ff89b8c
Annotations:      <none>
Status:           Running
IP:               ************
IPs:
  IP:           ********************
Controlled By:  ReplicaSet/tektontestpod-c5ff89b8c
Containers:
  hongcontainer:
    Container ID:   containerd://******************************
    Image:          lijahong/tektontest:1.0
    Image ID:       docker.io/lijahong/tektontest@sha256:*************************
    Port:           80/TCP
    Host Port:      0/TCP
    State:          Running
      Started:      Thu, 27 Apr 2023 06:06:46 +0000
    Ready:          True
- Pod의 상세 정보를 확인하자. Build 한 Image를 이용해 배포되었으며, 잘 동작하는 것을 확인할 수 있다
LoadBalancer 접속
[ec2-user@ip-100-0-1-19 tektontest]$ k get svc -n hongspace
NAME          TYPE           CLUSTER-IP     EXTERNAL-IP                                                                    PORT(S)        AGE
svc-lb-hong   LoadBalancer   10.100.91.61   a*************************.ap-northeast-2.elb.amazonaws.com   80:32637/TCP   3m7s
- 우리는 LoadBalancer Type Service를 배포했으므로, 자동으로 AWS 상에 LB가 생성된다
- 주소를 확인하자

- 실제로 LB가 생성됬다
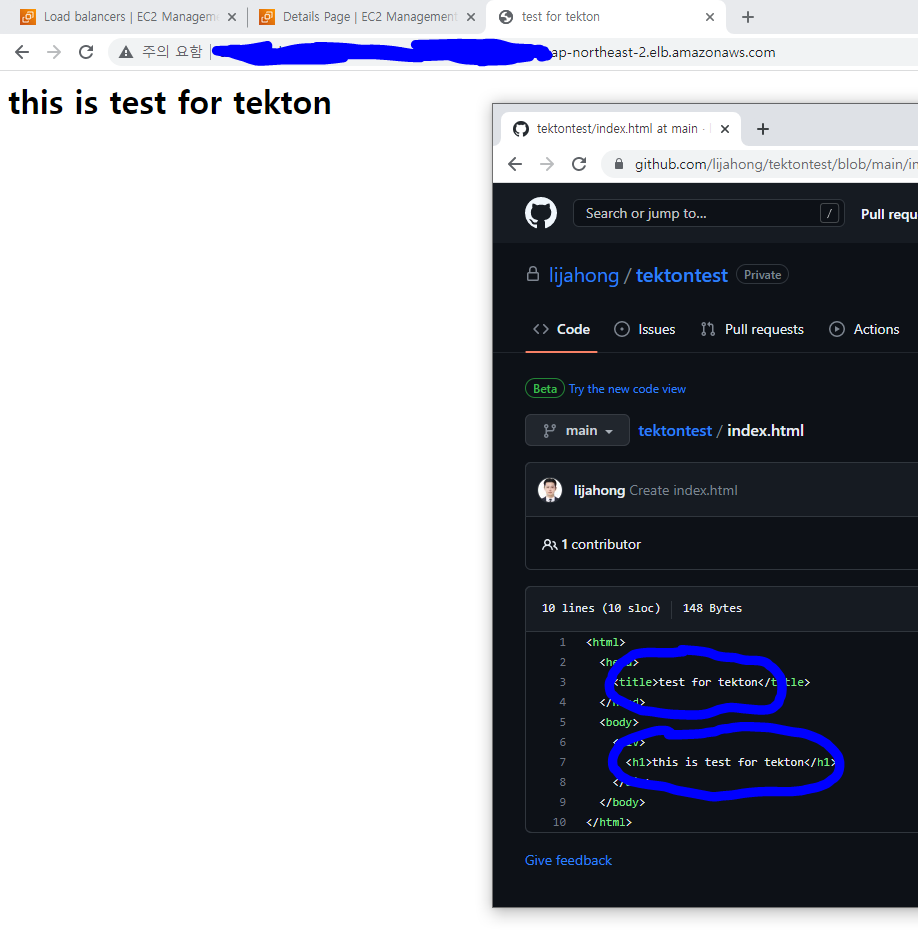
- 잘 접속된다! 설정한 내용대로 Image가 잘 Build 되었으며, 해당 Image를 이용하여 Pod가 잘 배포되었다

멋진 엔지니어가 될 때까지