
Item
Item 의 종류
Jenkins 에서 Item 은 새롭게 정의할 작업을 의미하며, 프로젝트라고 생각하면 된다. 모든 작업의 정의와 순서를 모아 둔 전체 작업을 프로젝트라고 한다. 이 프로젝트를 정의하고, 생성하는 것을 Item 이라고 한다
- 출처 : 쿠버네티스와 도커를 활용한 컨테이너 인프라 환경 구축 p. 337
Item 의 종류
- Freestyle Project
- Pipeline
- Multi-configuration project
- Folder
- Multibranch Pipeline
파일 준비 & 업로드
실습을 위해 파일을 준비하고, 업로드하자
docker pull nginx
- 각 Node 에 Image 를 Pull 하자
user@LAPTOP-CISI8I61 MINGW64 ~/Desktop/test1 (master)
$ cat Dockerfile
FROM nginx
ADD index.html /usr/share/nginx/html/index.html
user@LAPTOP-CISI8I61 MINGW64 ~/Desktop/test1 (master)
$ cat index.html
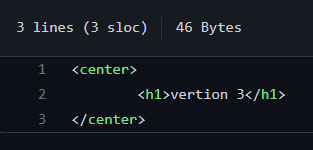
<center>
<h1>vertion 1</h1>
</center>
- index.html 과 Dockerfile 을 작성하자
git add .
git commit -m "index & dockerfile"
- add 및 commit
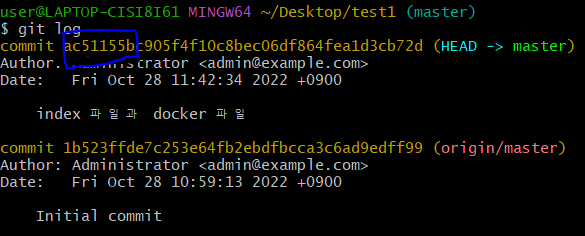
- commit 번호를 확인하자
git push origin master
- push 해주자
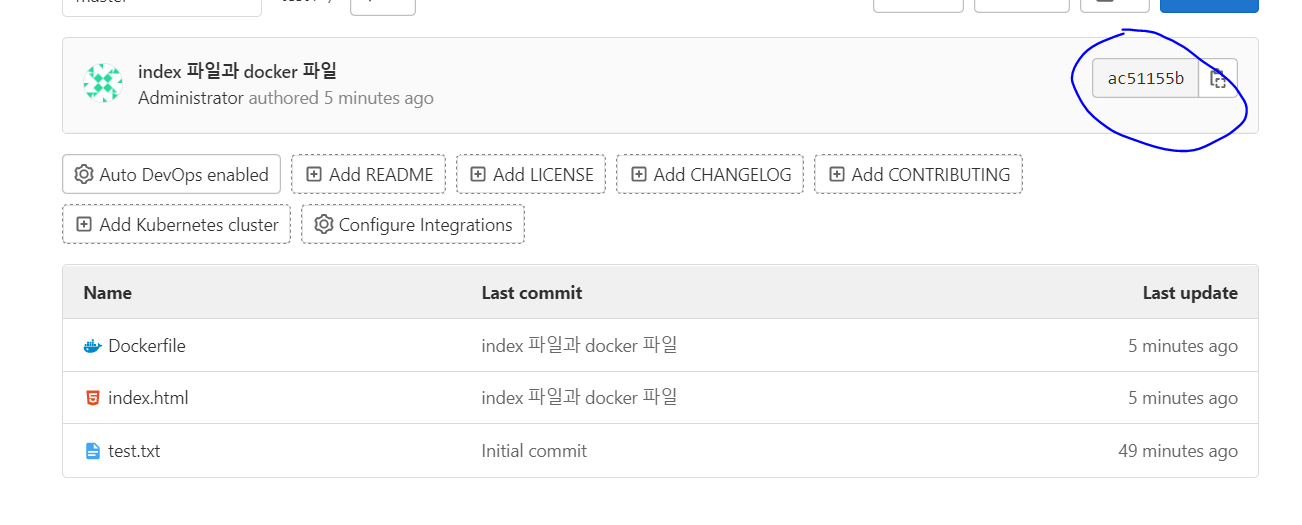
- 잘 업로드 되었다. Commit 번호 역시 변경되었다

- GitHub 에도 업로드 하자. Readme.md 는 생성하면 안된다
Jenkins & Docker 권한 부여
Jenkins 에서의 Docker 작업을 위해 Jenkins 와 Docker 소켓에 권한을 부여하자
kubectl create clusterrolebinding jenkins-cluster-admin --clusterrole=cluster-admin --serviceaccount=default:jenkins
- Kubernetes 에서 Jenkins SA 에 권한 부여
systemctl restart docker
systemctl restart nfs-server
- 변경 사항 반영을 위해 재시작
chmod 666 /var/run/docker.sock
- Pod 내에 있는 Jenkins 와 Host간 Docker 통신이 가능하도록 소켓에 퍼미션을 부여. 이는 모든 Node 에서 실행한다
Freestyle
Freestyle 사용하기
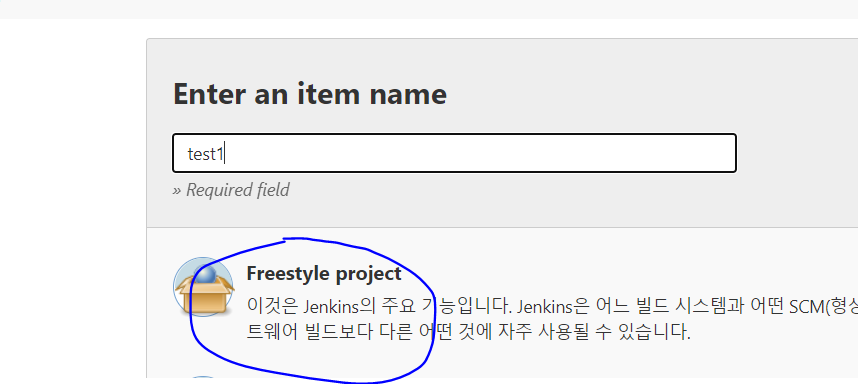
- 새 Item 을 만들자. Freestyle 을 선택하자
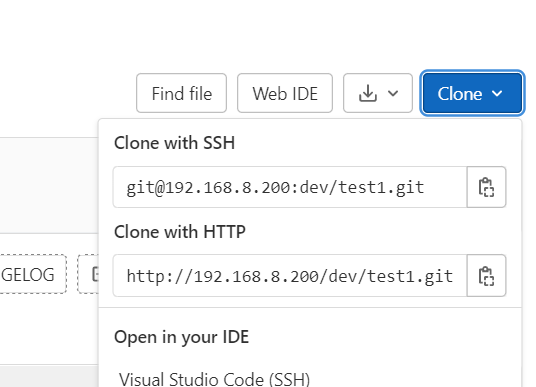
- Clone with HTTP 주소 복사
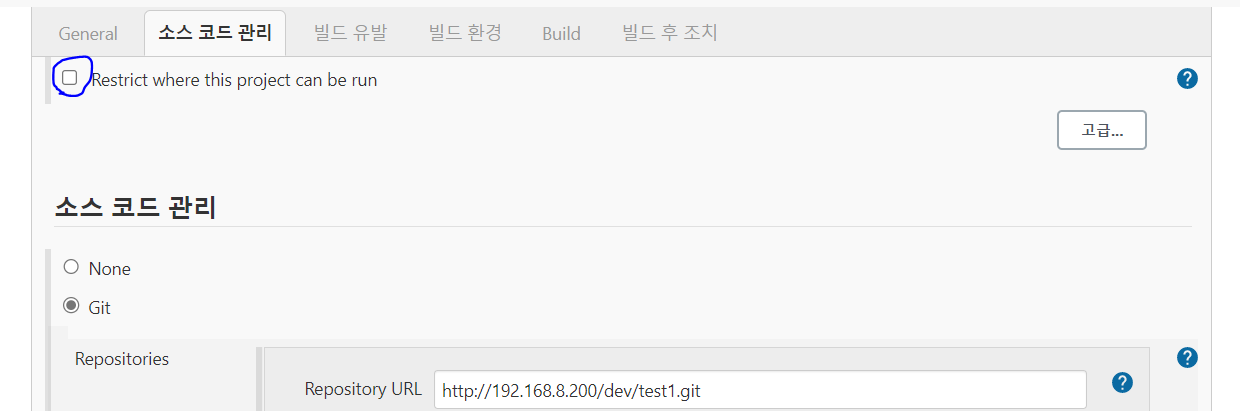
- 위와 같이 표시한 부분의 체크를 제거하고, 복사한 Git 주소를 붙여넣자. branch 는 master 로 설정한다
- 만약, Gitlab 으로 했을 때 Build 가 실패하면, Github 를 사용하자
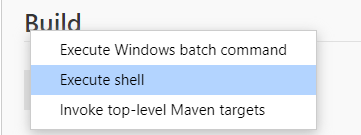
- Build 에서 shell 을 선택하자. Build 에서는 해당 Project 에서 실행할 작업을 정의한다
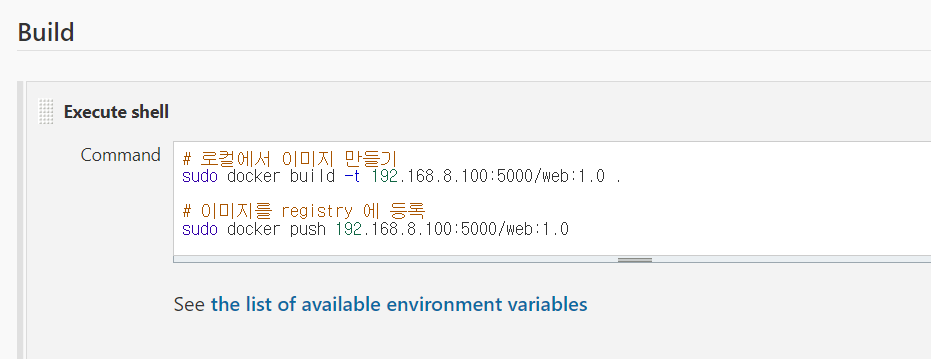
- 실행할 작업을 입력하자
# 로컬에서 이미지 만들기
docker build -t 192.168.8.100:5000/web:1.0 .

# 이미지를 registry 에 등록
docker push 192.168.8.100:5000/web:1.0

# 노드에서 private registry 에 등록된 이미지를 끌어다가 Pod 배포
kubectl create deploy web --image 192.168.8.100:5000/web:1.0

# 생성된 Pod 를 외부에 노출하기 위한 서비스 생성
kubectl expose deploy web --type=LoadBalancer --name=web-lb --port=80 --target-port=80
- 위 shell 명령어를 넣어주자. 해당 작업은 이미지를 만들고, 저장소에 등록한 다음, 해당 이미지를 통해 Pod 를 배포하고, Pod 를 외부에 노출하기 위한 서비스를 만들어주는 작업이다
- 위에서 Jenkins 에 권한을 부여했으므로 sudo 를 쓰지 않아도 된다
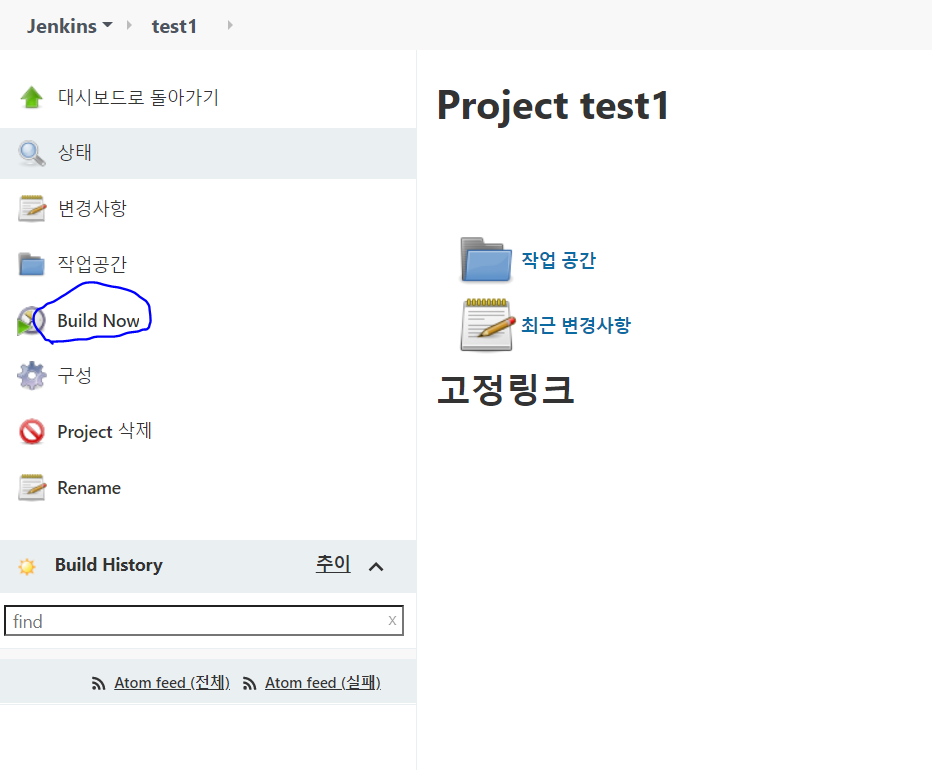
- 생성된 Project 에서 Build Now 를 누르면 Build 가 실행된다
- Build 가 실행되면 Agent 들이 생성되고, 작업을 실행하기에 시간이 소요된다

- Build 가 실행된다
결과 확인

- Build 성공시 위와 같이 나온다
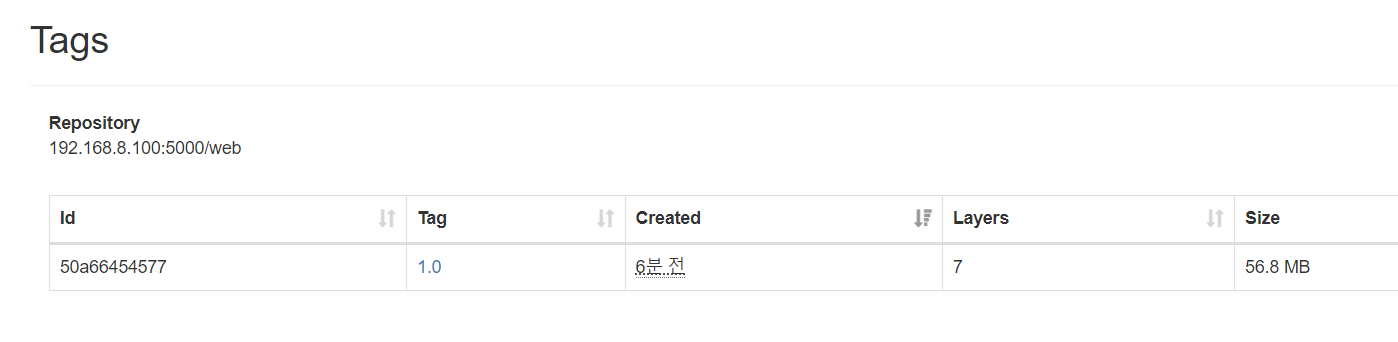
- 이미지가 Registry 에 잘 등록되었다
root@master:~# k get pod
NAME                       READY   STATUS    RESTARTS   AGE
jenkins-6f46869d7b-ncnsb   2/2     Running   8          21h
web-696df897-qhxs6         1/1     Running   0          6m19s
root@master:~# k get svc
NAME            TYPE           CLUSTER-IP       EXTERNAL-IP     PORT(S)        AGE
jenkins         LoadBalancer   10.98.38.220     192.168.8.201   80:31457/TCP   21h
jenkins-agent   ClusterIP      10.111.60.164    <none>          50000/TCP      21h
kubernetes      ClusterIP      10.96.0.1        <none>          443/TCP        28h
web-lb          LoadBalancer   10.108.146.191   192.168.8.202   80:31092/TCP   6m21s
- 이미지를 통해 Pod 가 잘 배포되었으며, 서비스도 배포되었다

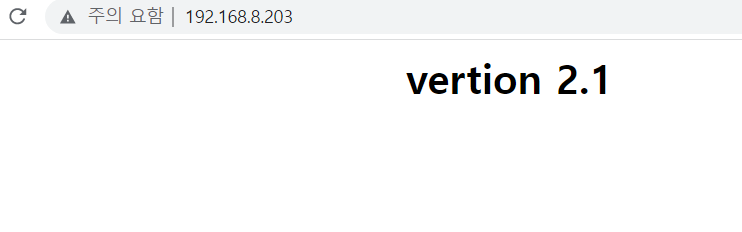
- 잘 접속된다

- 만약 실패가 나온다면, Console Output 에 들어가서 Error 를 살펴보자
Build 재실행
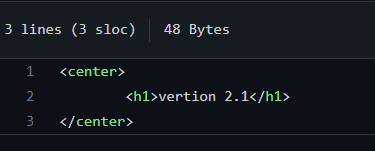
- index.html 을 수정하자
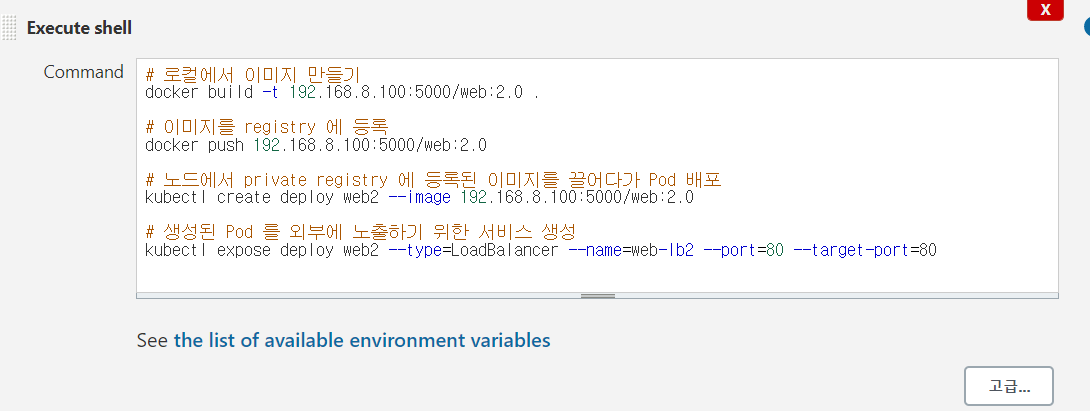
- Project 구성의 Build 부분에서 이미지 Tag 와 LB 이름을 변경하자. Deploy 이름도 바꿔줘야 한다
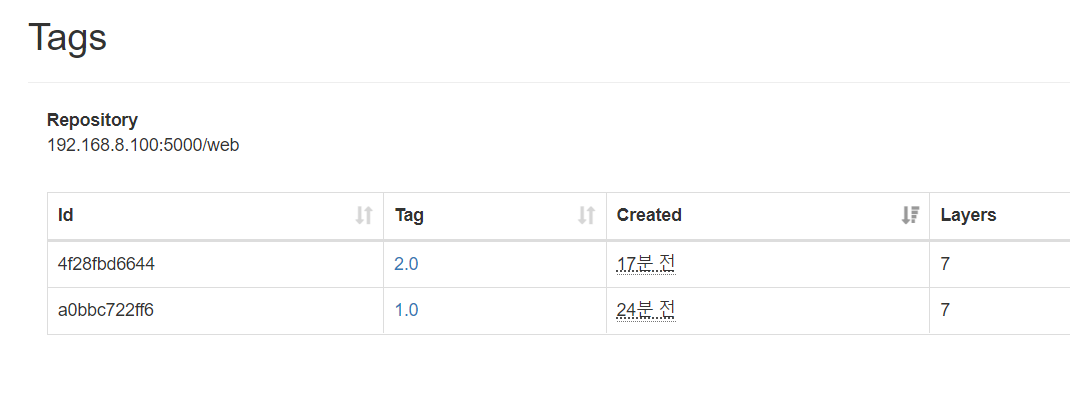
- Build 를 하면, 이미지가 새로 생성되어 저장소에 등록되었다
- 새로 Pod 와 SVC 가 배포되었다
작업을 재실행할 때마다 직접 코드를 바꿔주는 것은 불편하다. 이를 자동화해보자
Build 재실행 - 자동화
기존 프로젝트를 실행한 뒤, 만약 다시 실행한다면, 기존 Deploy, Svc 와 겹치므로 오류가 발생할 것이다. 하지만 재실행할 때마다 새로운 이미지가 만들어지고, 새로운 Deploy, Svc 가 생성되어 모든 서비스를 정상적으로 동작하게 해보자
Build Code 수정
#현재 날짜 및 시간을 변수로 저장
version=$(date +%y%m%d%H%M)

# 로컬에서 이미지 만들기
docker build -t 192.168.8.100:5000/web:${version} .

# 이미지를 registry 에 등록
docker push 192.168.8.100:5000/web:${version}

# 노드에서 private registry 에 등록된 이미지를 끌어다가 Pod 배포
kubectl create deploy web${version} --image 192.168.8.100:5000/web:2.0

# 생성된 Pod 를 외부에 노출하기 위한 서비스 생성
kubectl expose deploy web${version} --type=LoadBalancer --name=web-lb${version} --port=80 --target-port=80
- 위와 같이 현재 날짜와 시간을 변수로 담아 사용하자
- index.html 을 수정하자
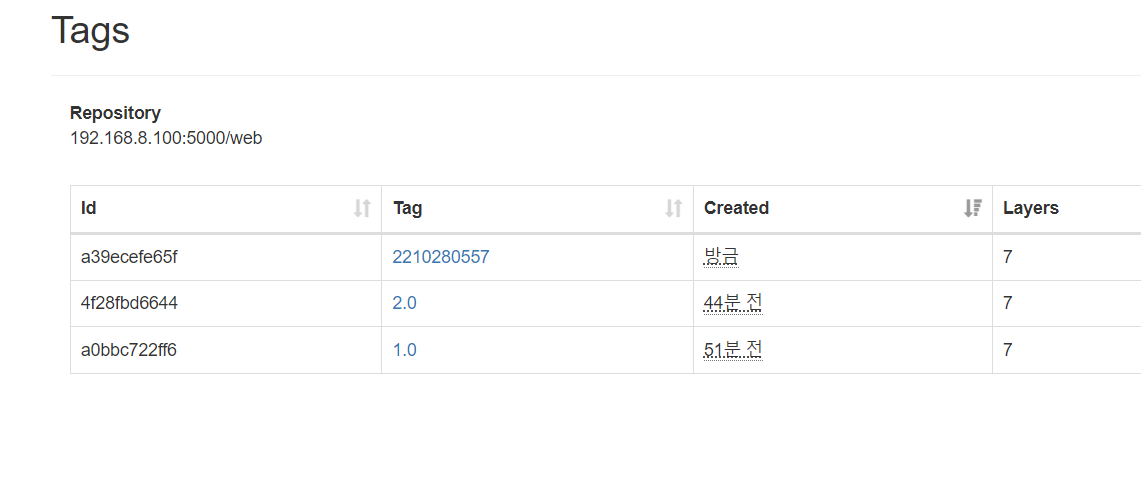
- Image 가 새로 생성되어 등록되었다
web-lb2210280557 LoadBalancer 10.104.216.51 192.168.8.204 80:31997/TCP 46s
- 지정한 이름으로 LB 가 배포되었다
Pipeline
Pipeline 이란?
Freestyle 은 웹 화면에서 메뉴를 눌러서 필요한 것을 정의하는 방식이기 때문에 간단한 단일 작업할 때는 유용하지만, CI / CD 는 여러 단계로 나누어진 작업들이 효과적으로 이루어져야 한다. 이를 Pipeline 을 통해 코드로 정의할 수 있다
- Pipeline 은 스크립트 문법과 선언적인 문법을 사용할 수 있다
Pipeline 은 작업을 코드 또는 파일로 정의해주는 Jenkins 의 기능으로, 고유의 문법으로 작성된 코드 or 파일로 이루어져 있다
- Jenkinsfile ( @Jenkins ) -> Agent 가 작업을 수행한다
- gitlab-ci.yml ( @gitlab ) -> gitlab-runner 가 작업을 수행한다
환경 준비
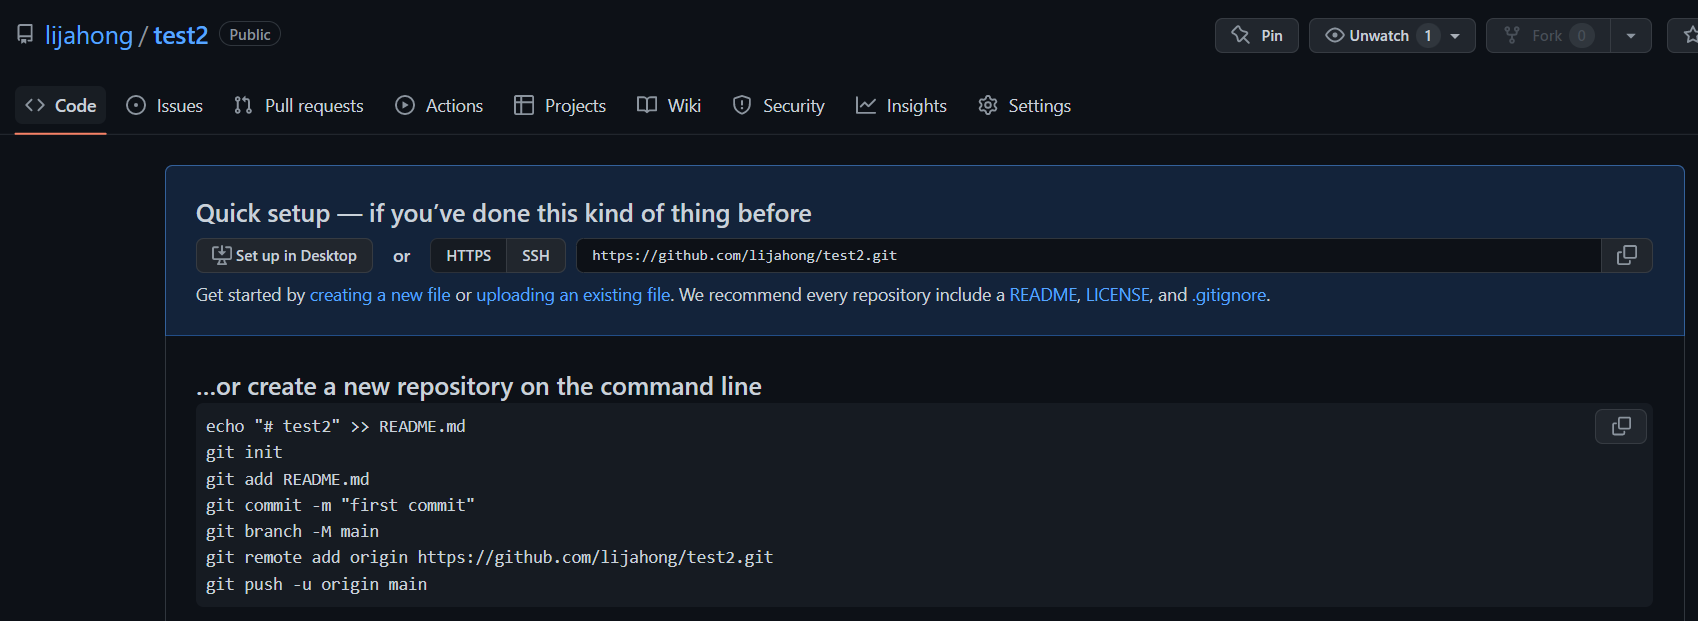
- Github 에 test2 라는 새 Repository 를 생성하자
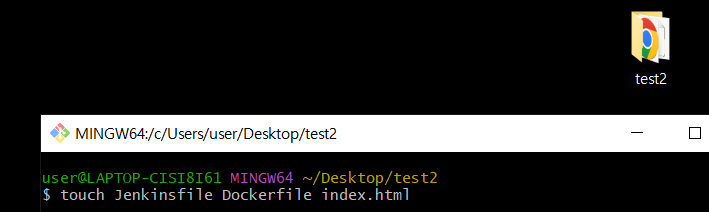
- Repository 와 이름을 동일하게 폴더를 만들고, git bash 를 통해 3 개의 파일을 생성하자
user@LAPTOP-CISI8I61 MINGW64 ~/Desktop/test2
$ echo "<h2> 첫번째 버전</h2>" > index.html

user@LAPTOP-CISI8I61 MINGW64 ~/Desktop/test2
$ vi Dockerfile

user@LAPTOP-CISI8I61 MINGW64 ~/Desktop/test2
$ cat Dockerfile
FROM nginx
ADD index.html /usr/share/nginx/html/index.html
- index.html 과 Dockerfile 을 위와 같이 구성하자
Jenkinsfile
pipeline {
  agent any
  stages {
    stage(' git clone or git pull' ) {
      steps {
        git url: 'https://github.com/beomtaek/test2.git', branch: 'master'
      }
    }

    stage(' docker image build and push to p-registry' ) {
      steps {
        sh '''
        docker build -t 192.168.8.100:5000/testweb:blue .
        docker push 192.168.8.100:5000/testweb:blue
        '''
      }
    }

    stage(' deployment, svc creation ' ) {
      steps {
        sh '''
        kubectl create deploy testweb --image=192.168.8.100:5000/testweb:blue
        kubectl expose deploy testweb --type=LoadBalancer --port=80 --target-port=80 --name=testweb-svc
        '''
      }
    }
  }
}
- 위와 같이 입력하자
- Pipeline 은 선언적인 문법이 시작하는 부분이다
- agent 는 작업을 수행할 Agent 를 지정하고, 필요한 설정을 한다
- stages 는 stage 들을 모아서 정의하고, 순서대로 진행하게 한다
- stage 는 step 들을 정의한다
- step 은 실제로 동작하는 내용을 정의한다
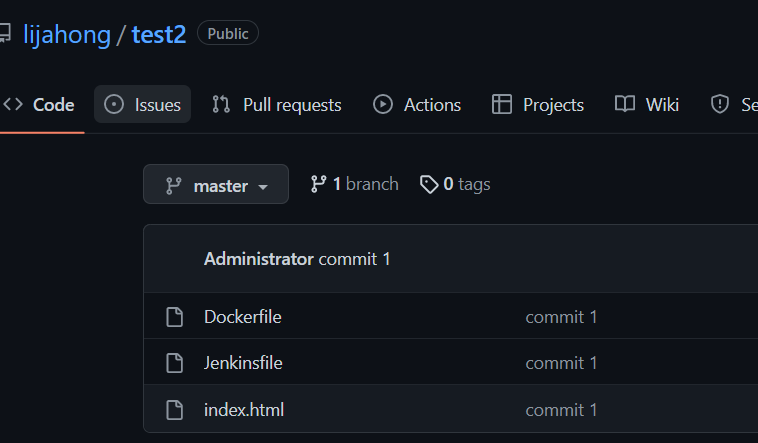
위 폴더를 Github 저장소에
git init
git remote add origin [Github Repository 주소]
git add .
git commit -m "commit 내용"
git push origin master
- 업로드된 것을 확인하자
Pipeline 사용하기
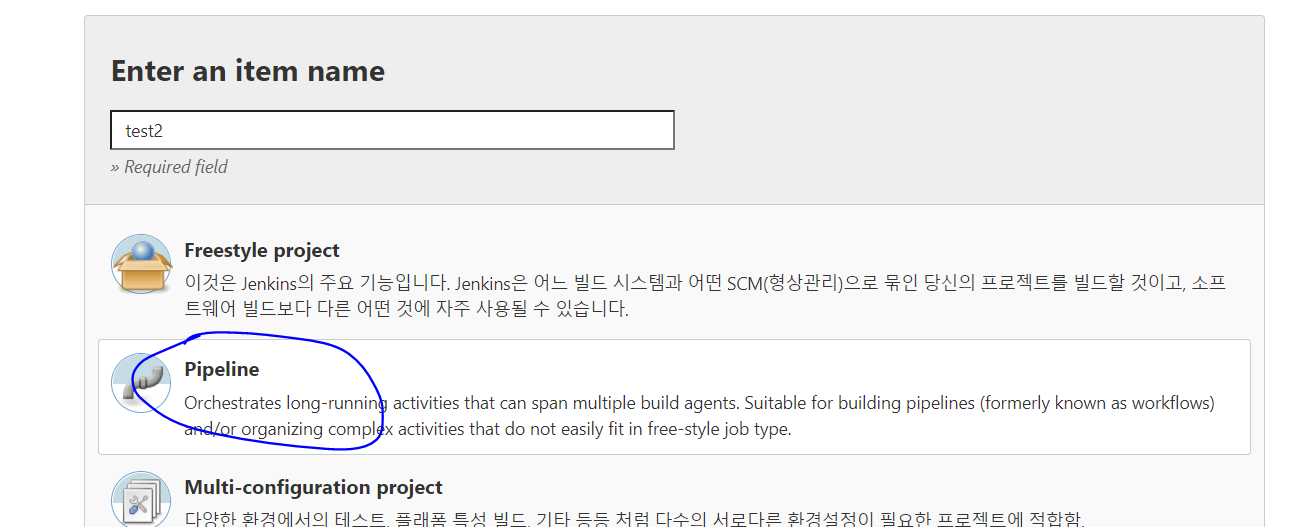
- 새 Item 에서 Pipeline 을 선택하자
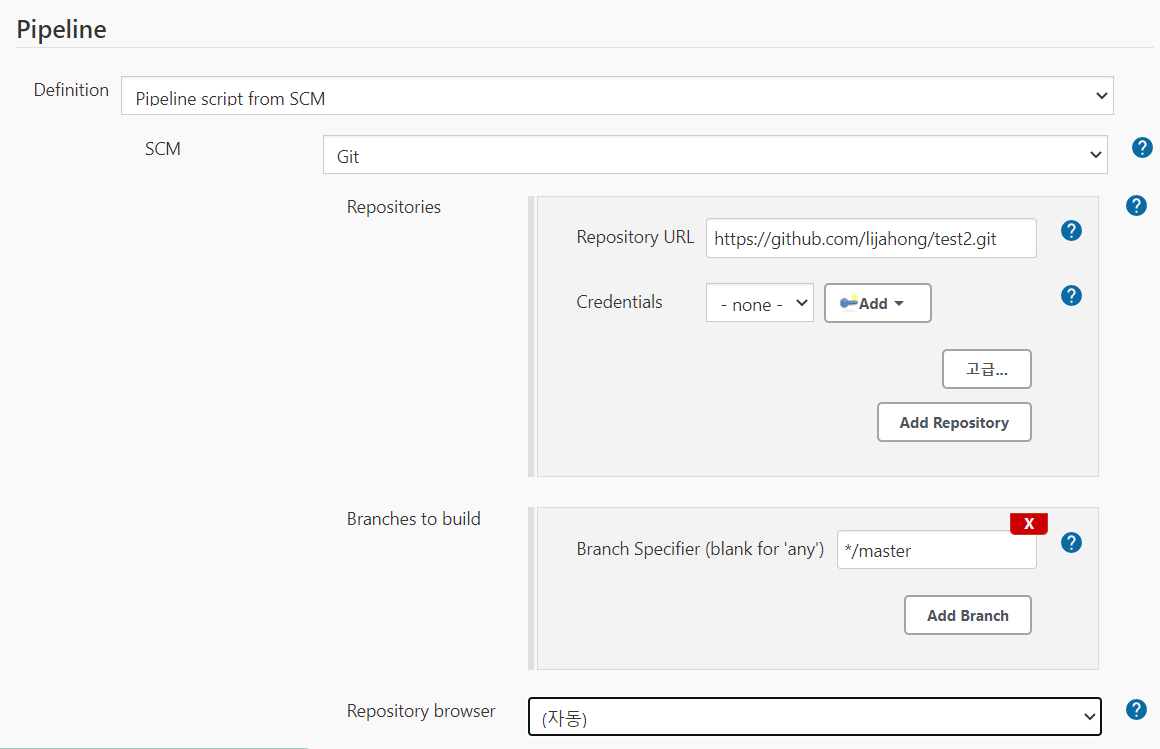
- Pipeline 탭에서는 Jenkins 의 Build 작업 절차를 정의한다
- Pipeline 부분에 Git Repository 주소와 Branch 를 입력하자
- Pipeline script 는 선언적인 문법을 통해 직접 Code 를 입력해야 한다
- Pipeline script from SCM 으로 설정하면, 외부 Source Code 저장소에서 선언적인 문법으로 작성된 파일을 가지고 와서 실행한다. 이 파일이 Jenkinsfile 이다
저장하고 Build 를 해보자
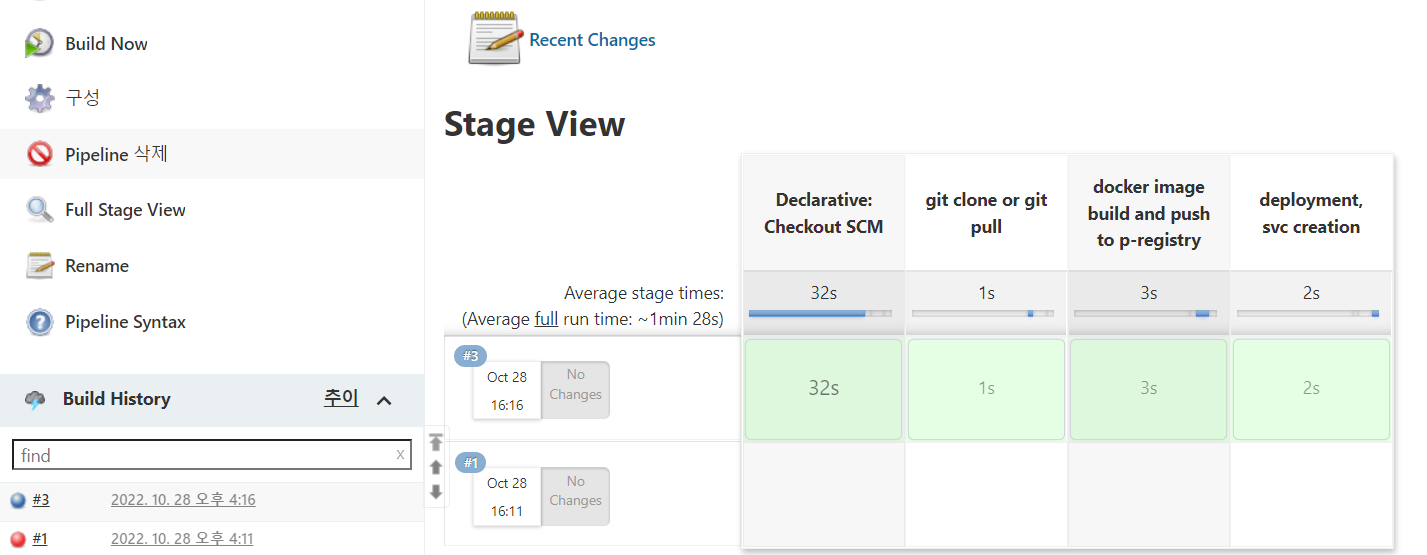
- 작업이 완료되면 위와 같이 출력된다
- 각 Stage 의 소요 시간을 확인할 수 있다
- 잘 접속된다
실습 Quiz
문제
- 개발용 local Directory 에 testweb:blue Image 를 이용하여 Deploy, Svc 를 배포할 수 있는 yaml 파일을 생성하라 -> blue.yaml
- 개발용 local Directory 에 testweb:green Image 를 이용하여 Deploy, Svc 를 배포할 수 있는 yaml 파일을 생헝하세요 -> green.yaml
- Jenkinsfile 에는 초기에 Git Clone & Pull , Image 생성 & 등록 , Image 를 불러와서 Service 가 실행될 수 있도록 Jenkinsfile 을 작성하되, kubectl apply -f blue.yaml 을 이용하도록 하라
- 추가적으로 이후에 Jenkinsfile 의 내용을 수정하여 green.yaml 을 배포하게 하라
- blue 의 Page 내용을 변경하고, 다시 서비스가 제공될 때에는 blye 페이지가 보이도록 하라. 즉, blue -> green -> blue2.0 이 보여지게 하라
blue 배포
touch blue.yaml green.yaml
- Deploy , Svc 를 배포하기 위한 yaml 파일을 생성하자
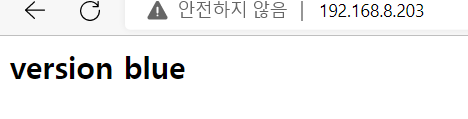
user@LAPTOP-CISI8I61 MINGW64 ~/Desktop/test2 (master)
$ cat index.html
<h2> version blue</h2>

user@LAPTOP-CISI8I61 MINGW64 ~/Desktop/test2 (master)
$ cat Dockerfile
FROM nginx
ADD index.html /usr/share/nginx/html/index.html

user@LAPTOP-CISI8I61 MINGW64 ~/Desktop/test2 (master)
$ cat Jenkinsfile
pipeline {
  agent any
  stages {
    stage( 'git clone or git pull' ){
      steps {
        git url: 'https://github.com/lijahong/test2.git' , branch: 'master'
      }
    }
    stage( 'docker image build and push to p-registry '){
      steps {
        sh '''
        docker build -t 192.168.8.100:5000/testweb:blue .
        docker push 192.168.8.100:5000/testweb:blue
        '''
      }
    }
    stage( 'deployment and svc creation '){
      steps {
        sh '''
        kubectl apply -f blue.yaml
        '''
      }
    }
  }
}
- index.html , Dockerfile , Jenkinsfile 을 위와 같이 작성하자
apiVersion: apps/v1
kind: Deployment
metadata:
  name: tweb
spec:
  replicas: 3
  selector:
    matchLabels:
      color: blue
  template:
    metadata:
      labels:
        color: blue
    spec:
      containers:
      - name: test
        image: 192.168.8.100:5000/testweb:blue

---

apiVersion: v1
kind: Service
metadata:
  name: tweb-lb
spec:
  type: LoadBalancer
  ports:
  - port: 80
    targetPort: 80
    protocol: TCP
  selector:
    color: blue
- blue.yaml 작성
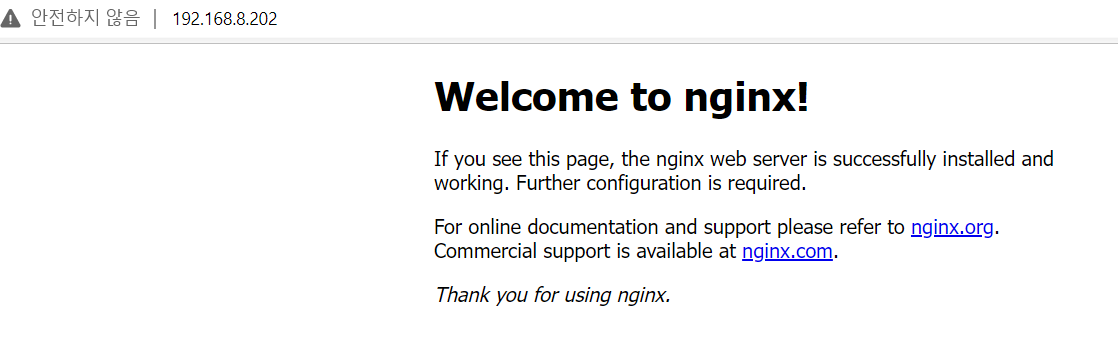
Build 후 확인해보자
- 잘 배포되었다
green 배포
apiVersion: apps/v1
kind: Deployment
metadata:
  name: tweb-green
spec:
  replicas: 3
  selector:
    matchLabels:
      color: green
  template:
    metadata:
      labels:
        color: green
    spec:
      containers:
      - name: test-green
        image: 192.168.8.100:5000/testweb:green

---

apiVersion: v1
kind: Service
metadata:
  name: tweb-lb-green
spec:
  type: LoadBalancer
  ports:
  - port: 80
    targetPort: 80
    protocol: TCP
  selector:
    color: green
- green.yaml 작성
pipeline {
  agent any
  stages {
    stage( 'git clone or git pull' ){
      steps {
        git url: 'https://github.com/lijahong/test2.git' , branch: 'master'
      }
    }
    stage( 'docker image build and push to p-registry '){
      steps {
        sh '''
	docker build -t 192.168.8.100:5000/testweb:green .
	docker push 192.168.8.100:5000/testweb:green
	'''
      }
    }
    stage( 'deployment and svc creation '){
      steps {
        sh '''
	kubectl apply -f green.yaml
	'''
      }
    }
  }
}
- Jenkinsfile 수정
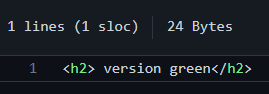
- index.html 도 수정하자
Build 해보자
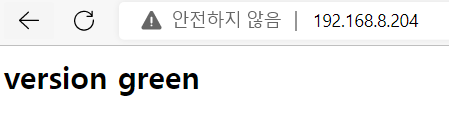
- 잘 배포되었다

멋진 엔지니어가 될 때까지