1. 요구 사항
- 모든 노드르 실행하고, master 에서 토큰을 발행하여 각 노드에서 토큰을 이용한 뒤, 클러스터에 조인
- master 는 calico 를 이용하여 네트워크 에드온을 설치한다. 이는 포드간 통신에 오버레이 네트워크를 제공할 수 있다. 또한, BGP 를 이용하는 대규모 라우팅이 제공되는 환경이라면 이 역시 이용 가능한 플러그인으로 동작한다
- 단, 이번에는 L2 로 이용
- 다음의 조건을 만족하는 웹 서비스를 제공하라
- 외부로의 접속은 MetalLB 를 이용한다. 단, LB 에 제공하는 주소 대역은 211.183.3.231 ~ 211.183.3.249 이다
- Deployment 는 3 개의 nginx 를 이용한 웹 서비스를 제공하며, Pod 는 각각 0.5 CPU, 32MB 메모리가 기본적으로 제공된다. Pod 는 기본적으로 3 개 제공한다
- 만약, 각 Pod 의 Cpu 사용량이 80 % 를 넘어서게 되면, 최대 10 개 까지 확장 가능해야 한다
- nginx 의 페이지는 Ingress 를 통해 라우팅 되어야 한다. 이는 nginx ingress controller 를 이용하여 다음과 같이 구성한다
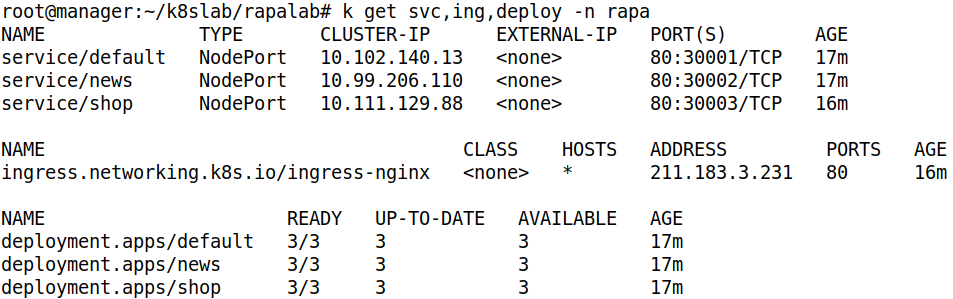
LB 를 통해 Ingress Controller 에 들어온 다음, / - default , /shop - shop , /news - news 로 연결한다. 각각 NodePort 서비스이며, 순서대로 30001, 30002, 30003 으로 한다
- NFS 를 구성하여 각 Pod 에 공간을 제공할 수 있어야 한다
/ 는 /default, /shop 은 /shop, /news 는 /news 디렉토리 사용
- Ingress Controller 는 Node Balancer 와 연계하고 있다. 이때, www.이름.com 을 /etc/hosts 에 등록하고, master 에서는 curl 을 통해 확인하고, 다른 곳에서는 브라우저로 Ip 를 통해 확인한다
- 이 모든 작업은 rapa 고객이 요청한 것이다 -> NS 를 만들자
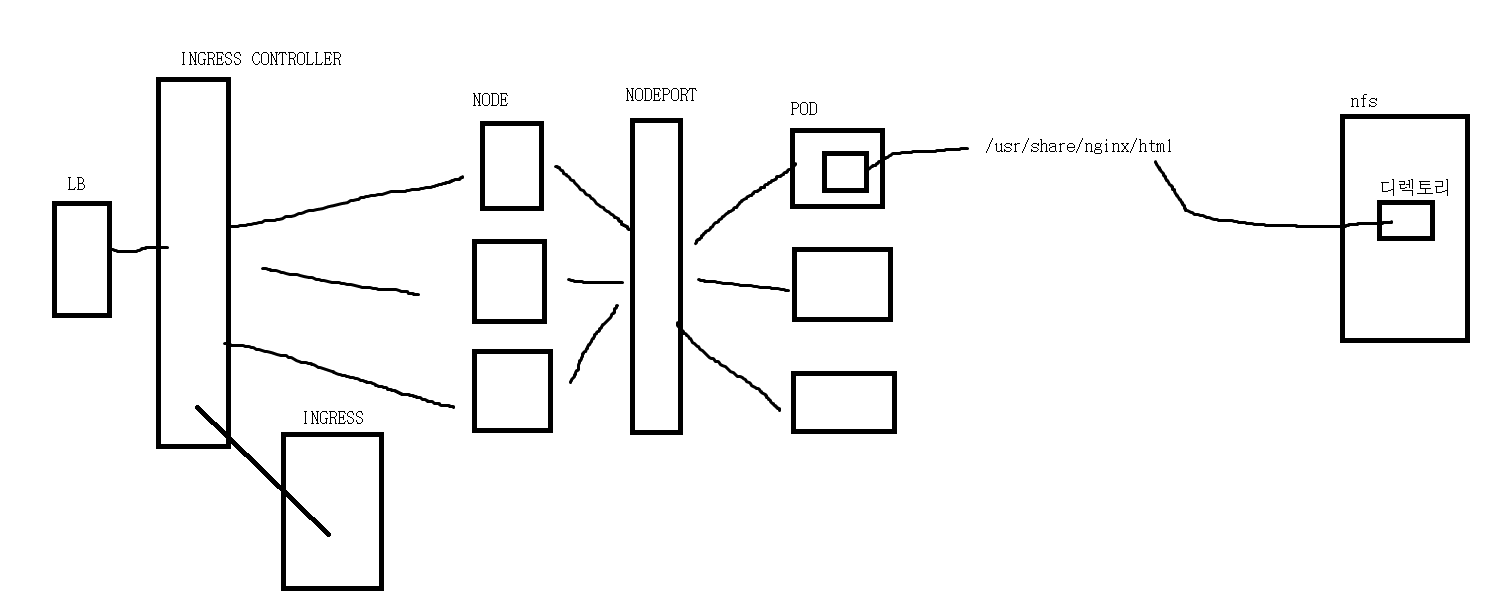
- 위와 같은 구조이다
2. 환경 구현
Cluster 환경 구현 및 admin 권한 설정
kubeadm init --apiserver-advertise-address 211.183.3.100- 클러스터 초기화 및 토근 발행
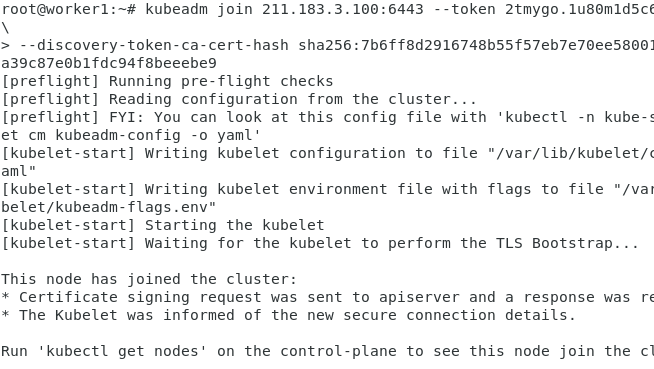
- worker Node 를 토큰을 통해 클러스터에 join 시키자
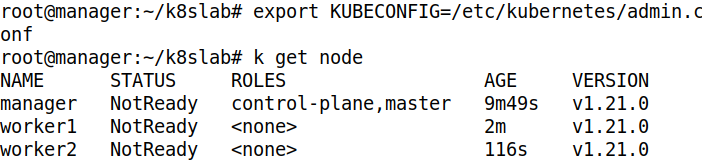
- admin 계정 정보 파일을 KUBECONFIG 에 등록하여, 현재 계정을 admin 계정으로 등록하자
- Join 한 Node 의 상태를 확인하자
Calico 설치 및 K8S 환경 확인
docker login
kubectl apply -f https://docs.projectcalico.org/manifests/calico.yaml # yaml 파일로 calico 배포- docker login 후 Calico 를 배포하자
root@manager:~/k8slab# kubectl get pod -n kube-system
NAME                                       READY   STATUS     RESTARTS   AGE
calico-kube-controllers-867d8d6bd8-wb2h5   0/1     Pending    0          9s
calico-node-jm5vq                          0/1     Init:0/3   0          9s
calico-node-nzpvr                          0/1     Init:0/3   0          9s
calico-node-zkrjk                          0/1     Init:0/3   0          9s
coredns-558bd4d5db-k5w72                   0/1     Pending    0          12m
coredns-558bd4d5db-q47vn                   0/1     Pending    0          12m
etcd-manager                               1/1     Running    0          12m
kube-apiserver-manager                     1/1     Running    0          12m
kube-controller-manager-manager            1/1     Running    0          12m
kube-proxy-kglb9                           1/1     Running    0          4m57s
kube-proxy-nc22d                           1/1     Running    0          12m
kube-proxy-x6xxs                           1/1     Running    0          5m
kube-scheduler-manager 1/1 Running 0 12m- kube-system 에 속한 Pod 를 확인하여 현재 K8S 환경을 구성하는 Pod 들이 잘 동작하는 지 확인하자
NFS 환경 구현
apt install -y nfs-server # master 에 서버 설치
apt install -y nfs-common # worker 에 Client 설치- nfs 서버와 클라이언트를 설치하자
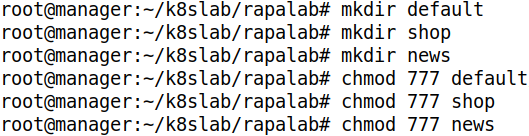
- nfs 서버에서 공유할 디렉토리 생성 및 권한 설정
root@manager:~/k8slab/rapalab# cat /etc/exports
# /etc/exports: the access control list for filesystems which may be exported
#		to NFS clients.  See exports(5).
#
# Example for NFSv2 and NFSv3:
# /srv/homes       hostname1(rw,sync,no_subtree_check) hostname2(ro,sync,no_subtree_check)
#
# Example for NFSv4:
# /srv/nfs4        gss/krb5i(rw,sync,fsid=0,crossmnt,no_subtree_check)
# /srv/nfs4/homes  gss/krb5i(rw,sync,no_subtree_check)
#
/root/k8slab/rapalab/default 211.183.3.0/24(rw,no_root_squash,sync)
/root/k8slab/rapalab/shop 211.183.3.0/24(rw,no_root_squash,sync)
/root/k8slab/rapalab/news 211.183.3.0/24(rw,no_root_squash,sync)- 생성한 디렉토리를 외부에서 접근 가능하게 설정하자

- 방화벽을 비활성화하고, nfs-server 를 재시작하여 변경된 설정을 적용하자
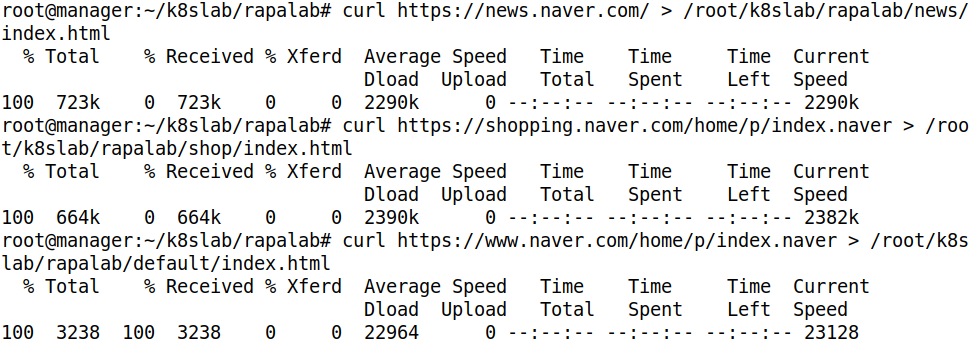
- 공유할 디렉토리에 각기 다른 페이지를 curl 로 가져와서 index.html 에 저장하자
3. 서비스 구현
Namespace 배포
apiVersion: v1
kind: Namespace
metadata:
name: rapa- yaml 파일을 작성하자

- 배포해주자
MetalLB 구현
kubectl create ns metallb-system
kubectl apply -f https://raw.githubusercontent.com/metallb/metallb/v0.12.1/manifests/metallb.yaml- namespace 생성 후 Controller 와 Speacker 배포
apiVersion: v1
kind: ConfigMap
metadata:
  namespace: metallb-system
  name: config
data:
  config: |
    address-pools:
    - name: default
      protocol: layer2
      addresses:
- 211.183.3.231-211.183.3.249- ConfigMap yaml 작성

- ConfigMap 을 배포해주자
Ingress 구현
apiVersion: networking.k8s.io/v1
kind: Ingress
metadata:
  namespace: rapa
  name: ingress-nginx
  annotations:
    nginx.ingress.kubernetes.io/rewrite-target: /
    kubernetes.io/ingress.class: "nginx"
spec:
  rules:
  - http:
      paths:
        - path: /
          pathType: Prefix
          backend:
            service:
              name: default
              port:
                number: 80
        - path: /shop
          pathType: Prefix
          backend:
            service:
              name: shop
              port:
                number: 80
        - path: /news
          pathType: Prefix
          backend:
            service:
              name: news
              port:
number: 80- yaml 파일을 작성해주자. 아직 배포는 서비스가 없기에 안된다
kubectl apply -f https://raw.githubusercontent.com/kubernetes/ingress-nginx/controller-v1.1.2/deploy/static/provider/cloud/deploy.yaml- Ingress Controller 를 배포하자. 우리는 nginx 를 사용한다
Deployment & SVC 배포
apiVersion: apps/v1
kind: Deployment
metadata:
  name: default
  namespace: rapa
spec:
  replicas: 3
  selector:
    matchLabels:
      app: default
  template:
    metadata:
      name: default
      labels:
        app: default
    spec:
      containers:
      - name: default
        image: nginx
        ports:
        - containerPort: 80
        resources:
          requests:
            cpu: 500m
            memory: 32Mi
        volumeMounts:
        - name: default-vol
          mountPath: /usr/share/nginx/html
      volumes:
      - name: default-vol
        nfs:
          path: /root/k8slab/rapalab/default
          server: 211.183.3.100
---
apiVersion: v1
kind: Service
metadata:
  namespace: rapa
  name: default
spec:
  ports:
  - name: default-port
    port: 80 #service
    targetPort: 80 #pod
    nodePort: 30001  #worker node
  selector:
    app: default
type: NodePort- default 서비스를 위한 yaml 을 작성해주자
apiVersion: apps/v1
kind: Deployment
metadata:
  name: shop
  namespace: rapa
spec:
  replicas: 3
  selector:
    matchLabels:
      app: shop
  template:
    metadata:
      name: shop
      labels:
        app: shop
    spec:
      containers:
      - name: shop
        image: nginx
        ports:
        - containerPort: 80
        resources:
          requests:
            cpu: 500m
            memory: 32Mi
        volumeMounts:
        - name: shop-vol
          mountPath: /usr/share/nginx/html
      volumes:
      - name: shop-vol
        nfs:
          path: /root/k8slab/rapalab/shop
          server: 211.183.3.100
---
apiVersion: v1
kind: Service
metadata:
  namespace: rapa
  name: shop
spec:
  ports:
  - name: shop-port
    port: 80 #service
    targetPort: 80 #pod
    nodePort: 30003  #worker node
  selector:
    app: shop
type: NodePort- shop 서비스를 위한 yaml 을 작성해주자
apiVersion: apps/v1
kind: Deployment
metadata:
  name: news
  namespace: rapa
spec:
  replicas: 3
  selector:
    matchLabels:
      app: news
  template:
    metadata:
      name: news
      labels:
        app: news
    spec:
      containers:
      - name: news
        image: nginx
        ports:
        - containerPort: 80
        resources:
          requests:
            cpu: 500m
            memory: 32Mi
        volumeMounts:
        - name: news-vol
          mountPath: /usr/share/nginx/html
      volumes:
      - name: news-vol
        nfs:
          path: /root/k8slab/rapalab/news
          server: 211.183.3.100
---
apiVersion: v1
kind: Service
metadata:
  namespace: rapa
  name: news
spec:
  ports:
  - name: news-port
    port: 80 #service
    targetPort: 80 #pod
    nodePort: 30002  #worker node
  selector:
    app: news
type: NodePort- news 서비스를 위한 yaml 을 작성해주자
- 전부 배포해주자
HPA 구현
wget https://github.com/kubernetes-sigs/metrics-server/releases/latest/download/components.yaml- metric server 파일 다운
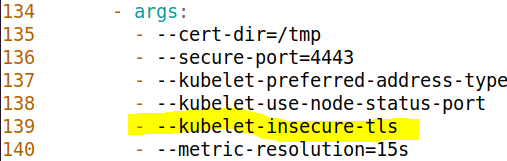
- 인증을 하지 않도록 설정 추가
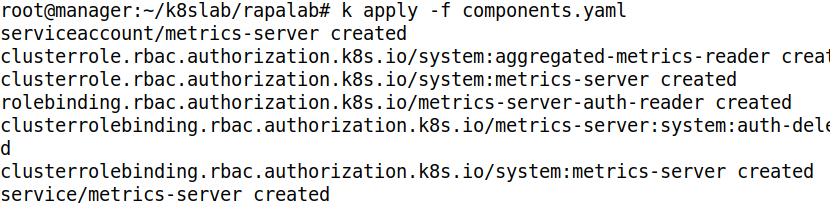
- 배포해주자
root@manager:~/k8slab/rapalab# k autoscale deploy default -n rapa --cpu-percent=80 --min=3 --max=10
horizontalpodautoscaler.autoscaling/default autoscaled
root@manager:~/k8slab/rapalab# k autoscale deploy shop -n rapa --cpu-percent=80 --min=3 --max=10
horizontalpodautoscaler.autoscaling/shop autoscaled
root@manager:~/k8slab/rapalab# k autoscale deploy news -n rapa --cpu-percent=80 --min=3 --max=10
horizontalpodautoscaler.autoscaling/news autoscaled- HPA 를 배포해주자. -n 을 통해 Namespace 를 지정해주자
hosts 등록
root@manager:~/k8slab/rapalab# cat /etc/hosts
127.0.0.1	localhost
127.0.1.1	manager

# The following lines are desirable for IPv6 capable hosts
::1     ip6-localhost ip6-loopback
fe00::0 ip6-localnet
ff00::0 ip6-mcastprefix
ff02::1 ip6-allnodes
ff02::2 ip6-allrouters

211.183.3.100	manager	manager.rapa.pri
211.183.3.101	worker1	worker1.rapa.pri
211.183.3.102	worker2	worker2.rapa.pri
211.183.3.103	worker3	worker3.rapa.pri
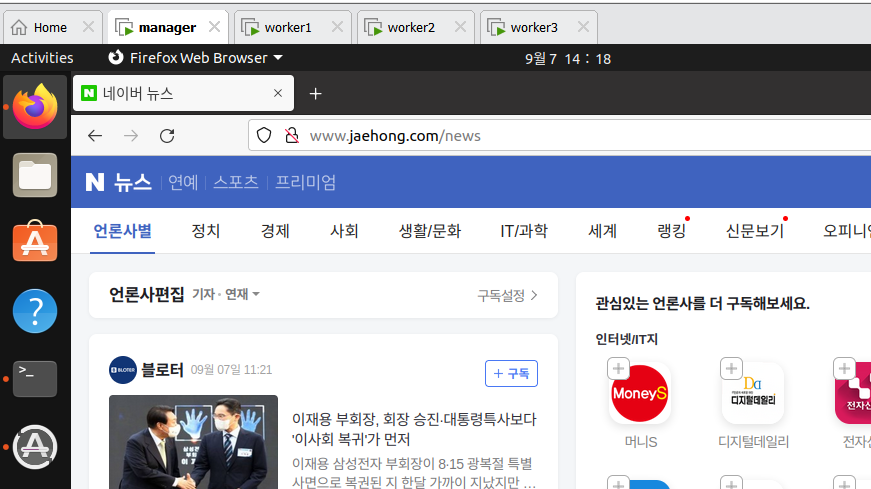
211.183.3.231 www.jaehong.com- Ingress LB 에 부여된 IP 를 hosts 에 등록하자
4. 구현 결과
curl 확인
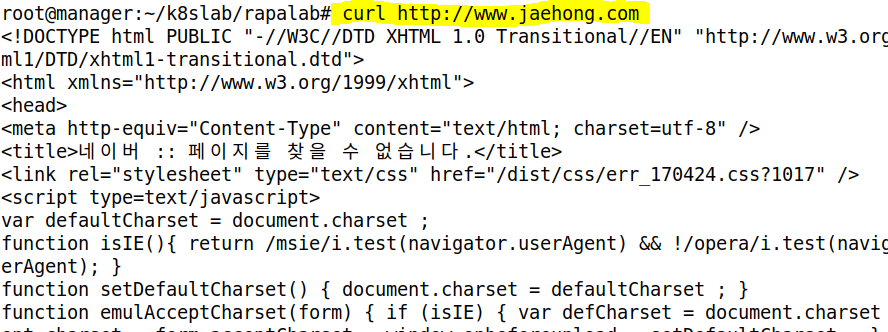
- 해당 페이지의 html 내용을 잘 가져온다
Web 접속 확인
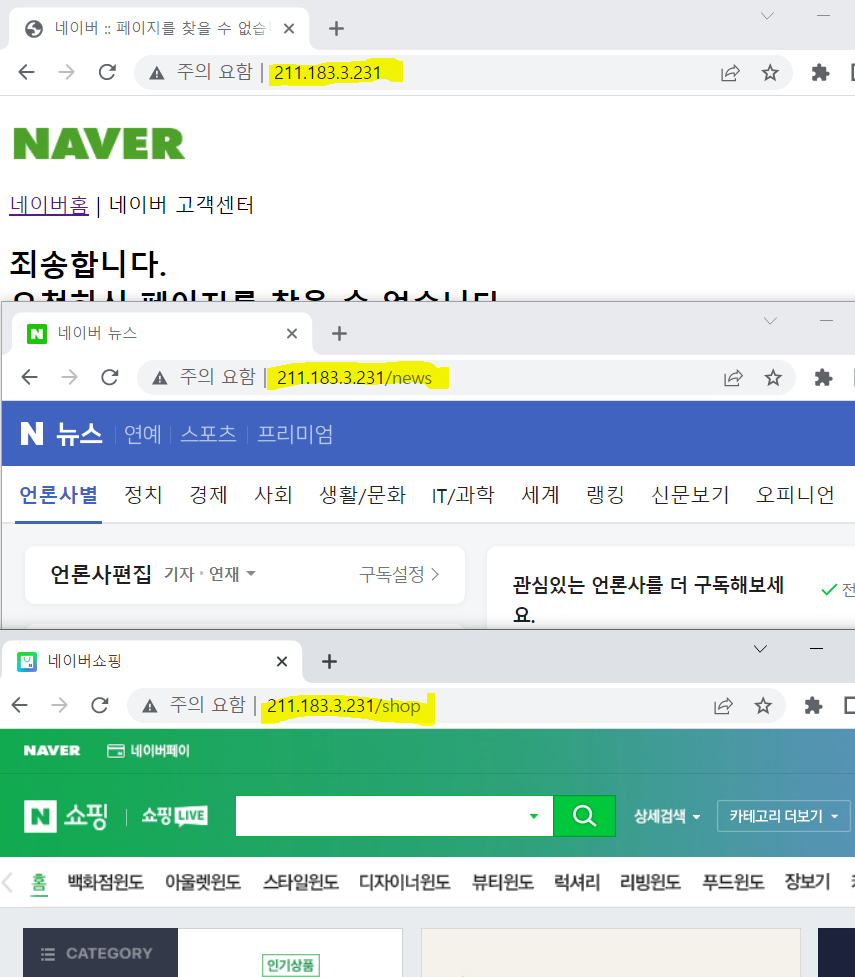
- /, /shop, /news 접속시 Ingress 를 통해 각각의 NodePort Service 에 연결되어 Pod 의 서비스가 잘 제공된다
- NFS 를 통해 지정한 index.html 이 잘 출력된다
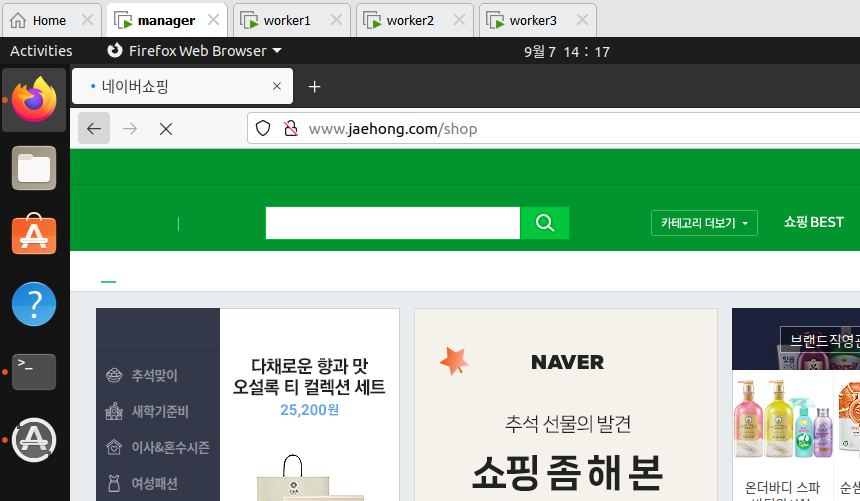
- master Node 의 브라우저에서는 hosts 에 등록한 주소로 접속이 가능하다
- 다른 페이지도 모두 잘 접속된다

Autoscale 확인
apt install -y apache2-utils
ab -c 1000 -n 200 -t 60 http://211.183.3.231/
ab -c 1000 -n 200 -t 60 http://211.183.3.231/shop/
ab -c 1000 -n 200 -t 60 http://211.183.3.231/news/- apache2-utils 패키지를 설치하고, apache bench 를 사용하여 부하를 준다

멋진 엔지니어가 될 때까지