Introduction to Objects
객체는 연관된 함수와 데이터를 담는 컨테이너
Creating Object Literals
객체는 변수에 할당될 수 있다
let spaceship = {}; // spaceship is an empty object객체에는 데이터가 순서 구분없이 담긴다
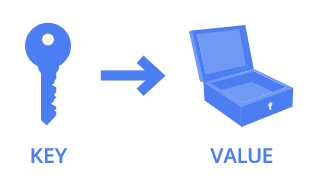
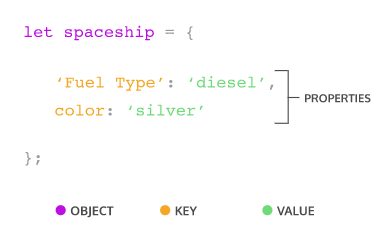
데이터는 키 - 값 을 짝으로 해서 정리된다
'키'는 '값'이 담긴 메모리의 위치를 가리키며, 변수명과 같은 역할을 한다 key = property name
키의 값으로는 모든 데이터 타입이 올 수 있고
함수와 다른 객체가 담길 수도 있다


Accessing Properties
프로퍼티를 검색하기 위해서는 dot operator (.) 를 사용한다
let spaceship = {
  homePlanet: 'Earth',
  color: 'silver'
};
spaceship.homePlanet; // Returns 'Earth',
spaceship.color; // Returns 'silver',
Bracket Notation
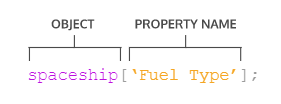
객체의 키값을 검색하기 위해서는 대괄호를 사용한다

Property Assignment
object 는 mutable
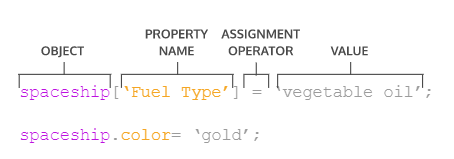
객체에 키-밸류 를 추가하기 위해서는 아래와 같이 하면 된다

const 로 선언한 변수 자체를 수정할 수는 없지만
해당 객체 내에 property 를 추가하거나 수정할 수는 있다
delete opterator 로 객체의 property 를 삭제할 수 있다
const spaceship = {
  'Fuel Type': 'Turbo Fuel',
  homePlanet: 'Earth',
  mission: 'Explore the universe'
};

delete spaceship.mission;  // Removes the mission property
Methods
객체에 저장된 데이터가 '함수' 일 때 -> 그것을 '메소드' 라고 부른다
프로퍼티: 객체가 가지고 있는 특징
메소드: 객체가 하는 행동
메소드를 객체에 추가할 수 있다
1.
const alienShip = {
  invade: function () {
    console.log('Hello! We have come to dominate your planet. Instead of Earth, it shall be called New Xaculon.')
  }
};- ES6 에서 colon 과 function keyword 생략 가능해졌다
const alienShip = {
  invade () {
    console.log('Hello! We have come to dominate your planet. Instead of Earth, it shall be called New Xaculon.')
  }
};
alienShip.invade(); // Prints 'Hello! We have come to dominate your planet. Instead of Earth, it shall be called New Xaculon.'Nested Objects
객체 안에 객체를 포함할 수 있다
const spaceship = {
     telescope: {
        yearBuilt: 2018,
        model: '91031-XLT',
        focalLength: 2032
     },
    crew: {
        captain: {
            name: 'Sandra',
            degree: 'Computer Engineering',
            encourageTeam() { console.log('We got this!') }
         }
    },
    engine: {
        model: 'Nimbus2000'
     },
     nanoelectronics: {
         computer: {
            terabytes: 100,
            monitors: 'HD'
         },
        'back-up': {
           battery: 'Lithium',
           terabytes: 50
         }
    }
};
값을 불러오기 위해서 줄줄이 소세지처럼 연산자를 연결하면 된다
헷갈리지 않게 순서를 잘 생각해서 불러오기!
spaceship.nanoelectronics['back-up'].battery; // Returns 'Lithium'Pass By Reference
객체는 레퍼런스(참조)로 전달된다
객체에 할당된 변수를 함수의 인자로 전달했을 때
컴퓨터는 객체를 가지고 있는 메모리 공간을 가리킴으로서
파라미터명을 해석한다
따라서 객체의 프로퍼티를 바꾸는 함수는
실제로는 객체를 영구적으로 바꾸게 된다
(객체가 const 변수로 할당되더라도)
*이해하기 어려워서 일단 넘어가기
Looping Through Objects
배열에서는 인덱스를 이용해서 배열 내의 엘리먼트를 돌 수 있었는데
객체는 순서가 없기 때문에 iteration 이 불가
for...in 문을 이용해서 객체 내의 각 프로퍼티에 대해 코드블럭을 실행할 수 있다
총정리 번역
- 객체는 '키 - 밸류' 로 이루어져있다
- 각각의 키 - 밸류 짝은 프로퍼티라고 한다 / 프로퍼티가 함수일 때 그것을 메소드라고 부른다
- 오브젝트 리터럴에서 키 - 밸류는 ',' 로 구분하고 전체는 '{}' 로 감싼다
- 객체 내의 프로퍼티는 '.' 이나 '[]' 로 접근, 추가, 수정할 수 있다
- 오브젝트 리터럴에 메소드를 추가할 수 있다 1. 익명함수와 키 - 밸류 문을 이용하거나 2. 새로운 es6 메소드를 이용하면 된다
- 연산자를 연결함으로써 복잡하고 nested 된 객체를 검색할 수 있다
- 객체는 mutable 하다 / 객체가 const 변수로 선언되었더라도 객체의 property 를 수정할 수 있다
- 객체는 레퍼런스로 전달된다 / 함수로 선언된 객체를 수정하면 수정사항은 영원하다
- 객체 내의 property 는 for...in 문으로 iterate 할 수 있다
The this Keyword
this 키워드를 쓰면
객체 내의 프로퍼티를 이용해서
'객체 내에' 함수를 만들 수 있다
const goat = {
  dietType: 'herbivore',
  makeSound() {
    console.log('baaa');
  },
  diet() {
    console.log(this.dietType);
  }
};

goat.diet();
Arrow Functions and this
this 를 쓸 때는 arrow function 을 쓰지 않는다
이유가 있지만 아직 이해 못했고,
궁금해졌을 때 다시 공부하기
Privacy
_ <- underscore 을 이용해서 '이 object 를 수정하지마라' 고 노티가능
객체와 객체의 프로퍼티를 함부로 수정하는 것은 이상한 결과값을 낳을 수도 있다
const bankAccount = {
  _amount: 1000
}
Getters
getter 는 객체 내부 프로퍼티를 리턴하는 메소드
프로퍼티의 값을 검색하는 것 외에도 기능이 있다
const person = {
  _firstName: 'John',
  _lastName: 'Doe',
  get fullName() {
    if (this._firstName && this._lastName){
      return `${this._firstName} ${this._lastName}`;
    } else {
      return 'Missing a first name or a last name.';
    }
  }
}

// To call the getter method:
person.fullName; // 'John Doe'- 프로퍼티를 불러올 때 데이터에 액션을 취할 수 있다
- 조건문을 이용해서 다른 값을 리턴할 수 있다
- this 를 써서 콜링객체의 프로퍼티에 접근할 수 있다
- 다른 개발자가 이해하기 쉬운 코드를 짤 수 있다 (기능성)
Setters
객체 내에 존재하는 프로퍼티의 값을 재할당할 수 있는 메소드
- 인풋을 체크할 수 있다
- 프로퍼티에 대해 액션을 취할 수 있다
- 객체가 어떻게 쓰여야 하는지 명확한 의도를 보여준다
물론 setter 가 없이도 프로퍼티를 직접적으로 재할당 할 수는 있다
const person = {
  _age: 37,
  set age(newAge){
    if (typeof newAge === 'number'){
      this._age = newAge;
    } else {
      console.log('You must assign a number to age');
    }
  }
};

person.age = 40;
console.log(person._age); // Logs: 40
person.age = '40'; // Logs: You must assign a number to age

person._age = 'forty-five'
console.log(person._age); // Prints forty-five
Factory Functions
객체의 인스턴스를 많이 만들고 싶을 때 factory functions
const monsterFactory = (name, age, energySource, catchPhrase) => {
  return {
    name: name,
    age: age,
    energySource: energySource,
    scare() {
      console.log(catchPhrase);
    }
  }
};

const ghost = monsterFactory('Ghouly', 251, 'ectoplasm', 'BOO!');
ghost.scare(); // 'BOO!'
Property Value Shorthand
destructuring = property value shorthand
: 변수에 프로퍼티를 할당하는 shortcut
const monsterFactory = (name, age) => {
  return {
    name: name,
    age: age
  }
};

const monsterFactory = (name, age) => {
  return {
    name,
    age
  }
};
Destructured Assignment
const vampire = {
  name: 'Dracula',
  residence: 'Transylvania',
  preferences: {
    day: 'stay inside',
    night: 'satisfy appetite'
  }
};

const residence = vampire.residence;
console.log(residence); // Prints 'Transylvania'

// destructured assignment
const { residence } = vampire;
console.log(residence); // Prints 'Transylvania'

// used in nested properties in an object
const { day } = vampire.preferences;
console.log(day); // Prints 'stay inside'
Built-in Object Methods
연습한 methods
- Object.keys(object name); // 객체의 키를 배열로 리턴
- Object.entries(object name); // 객체의 키와 밸류를 배열로 리턴
- Object.assign(추가할 키-밸류, 기존 객체); // 기존 객체에 몇 가지 프로퍼티를 추가한 객체를 생성