기본세팅
완전 기본이다. swing사용 시 가져다 쓰자.
public class SwingLay_09 extends JFrame {
    Container cp; // this.에 없는거 받아옴
    public SwingLay_09(String title) { // 생성자 호출
        super(title);
        cp=this.getContentPane();
        this.setBounds(200,100,300,400);
        cp.setBackground(new Color(121,124,141));
        setVisible(true);
    }

    public static void main(String[] args) {

        new SwingLay_09("레이아웃 이벤트"); // 생성자 생성
    }
}
예제1
package Day0630;
import javax.swing.*;
import java.awt.*;
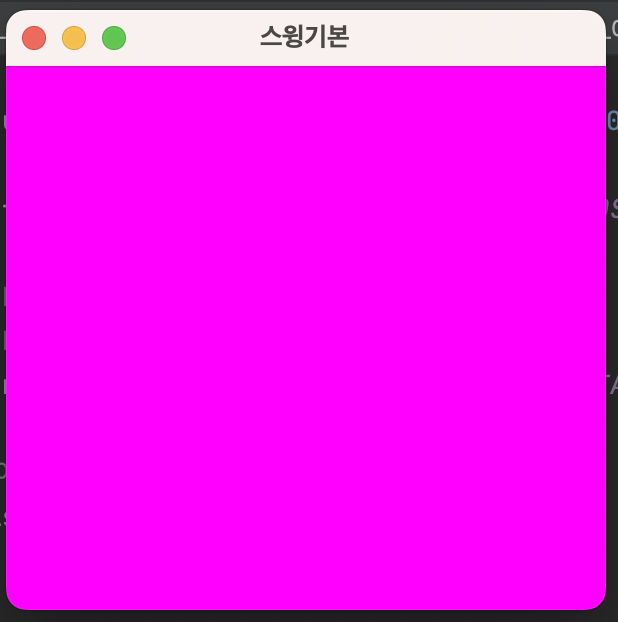
public class SwingGibon_07 extends JFrame { // extends : super를 불러온다.
// JFrame : java swing을 불러온다.
public SwingGibon_07(String Title) {
super(Title);
// 시작위치, 너비, 높이
this.setBounds(500,100,300,300); // this란 JFrame을 뜻한다.
// 종료
this.setDefaultCloseOperation(JFrame.EXIT_ON_CLOSE);
// 배경색
//this.setBackground(Color.MAGENTA); //적용 안됨
//this.setBackground(new Color(190,234,111)); // 적용 안됨
this.getContentPane().setBackground(Color.MAGENTA); // 색을 위에 컨테이너로 가져와 덮는 느낌이다. 그래서 색상은 컨테이너 먼저 호출해줘야 함.
// 프레임 보이게
this.setVisible(true);
}
public static void main(String[] args) {
new SwingGibon_07("스윙기본");
}
}
package Day0630;
import javax.swing.*;
import java.awt.*;
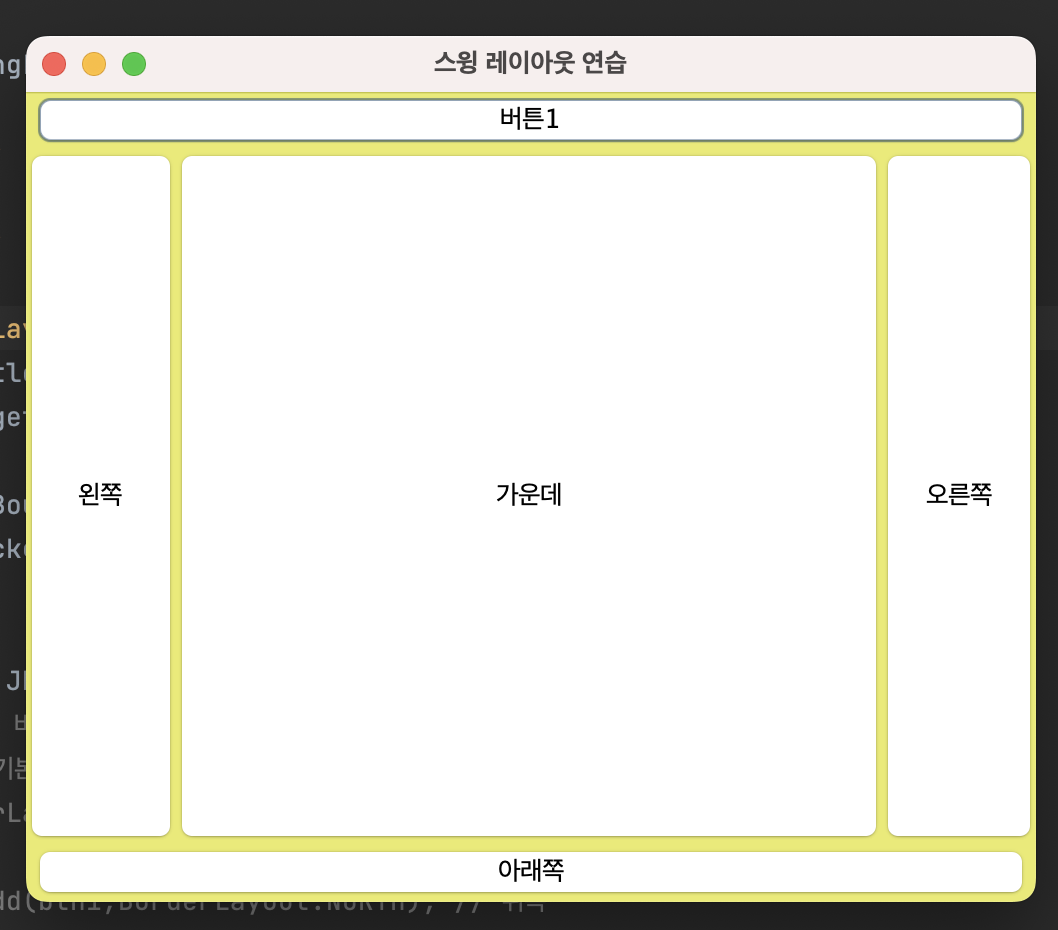
public class SwingLayout_08 extends JFrame { // java swing 불러오기
Container cp;
JButton btn1;
public SwingLayout_08(String title) throws HeadlessException {
super(title);
cp=this.getContentPane();
this.setBounds(500,230,505,433);
cp.setBackground(new Color(234,234,123));
// 버튼생성
btn1=new JButton("버튼1");
// 프레임에 버튼 추가
// 프레임 기본레이아웃이 BorderLayout
// BorderLayout 추가시 위치 지정 필수!
// this.add(btn1,BorderLayout.NORTH); // 위쪽
// this.add(btn1,BorderLayout.SOUTH); // 아래쪽
this.add("North",btn1); // 첫글자는 대문자로!
// 생성과 동시에 프레임추가 위치지정
this.add("South",new JButton("아래쪽"));
this.add("West",new JButton("왼쪽"));
this.add("East",new JButton("오른쪽"));
this.add("Center",new JButton("가운데"));
// 버튼1에 속성
btn1.setBackground(Color.CYAN);
btn1.setBackground((Color.darkGray));
this.setVisible(true);
}
public static void main(String[] args) {
new SwingLayout_08("스윙 레이아웃 연습");
}
}
package Day0630;
import javax.swing.*;
import java.awt.*;
import java.awt.event.ActionEvent;
import java.awt.event.ActionListener;
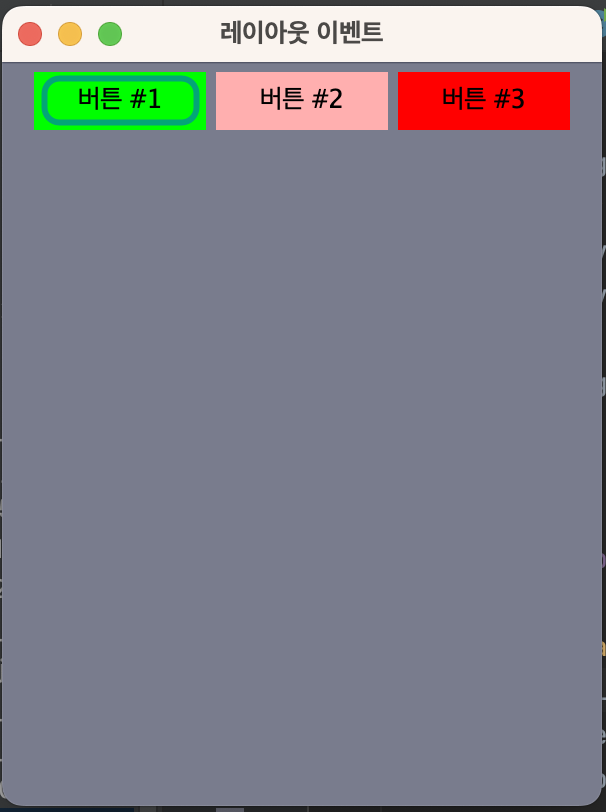
public class SwingLay_09 extends JFrame implements ActionListener {
Container cp; // this.에 없는거 받아옴
JButton btn1,btn2,btn3; // 버튼 가져오기
public SwingLay_09(String title) { // 생성자 호출
super(title);
cp=this.getContentPane();
this.setBounds(200,100,300,400);
cp.setBackground(new Color(121,124,141));
setDesign();
setVisible(true);
}
// 보더레이아웃이 기본, 다르게 할꺼면 일단 변경후 지정해야 한다.
// 내맘대로할꺼면 null,
//디자인
public void setDesign(){
// 기본 레이아웃 변경
this.setLayout(new FlowLayout());
// 버튼 생성
btn1=new JButton("버튼 #1");
btn2=new JButton("버튼 #2");
btn3=new JButton("버튼 #3");
// 프레임에 추가
this.add(btn1);
this.add(btn2);
this.add(btn3);
// 버튼 속성
btn1.setBackground(Color.green); // 버튼 색상 넣기
btn1.setOpaque(true); // 버튼 색상 넣기
btn1.setBorderPainted(false); // 버튼 색상 넣기
btn2.setBackground(Color.pink); // 버튼 색상 넣기
btn2.setOpaque(true); // 버튼 색상 넣기
btn2.setBorderPainted(false); // 버튼 색상 넣기
btn3.setBackground(Color.RED); // 버튼 색상 넣기
btn3.setOpaque(true); // 버튼 색상 넣기
btn3.setBorderPainted(false); // 버튼 색상 넣기
// 버튼에 이벤트 발생 : 이벤트 핸들러랑 이벤트 발생하는 객체랑 연결해줘야 한다.
btn1.addActionListener(this); // 상속받았으니까 this를 쓴다.
btn2.addActionListener(this); // 상속받았으니까 this를 쓴다.
btn3.addActionListener(this); // 상속받았으니까 this를 쓴다.
}
//액션
@Override
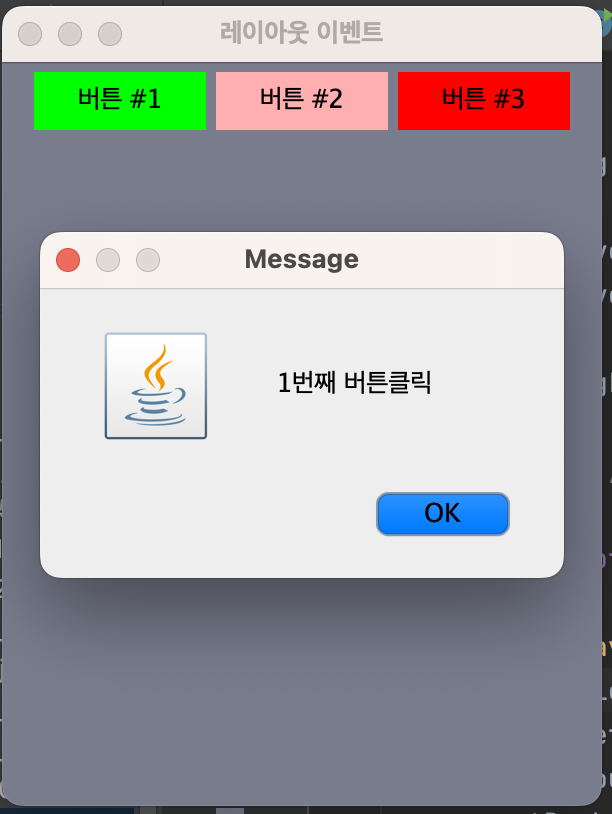
public void actionPerformed(ActionEvent e) {
Object ob=e.getSource(); // getSource()의 경우 object를 지정 해줘야 한다. //명확하게 하기 위해
// 메세지를 다이얼로그 형태로 보여주는 것
//JOptionPane.showMessageDialog(this,"버튼클릭");
if(ob==btn1) { // ob를 정의하여 버튼을 명확하게(버튼마다 지정하여) 설정할 수 있다.
JOptionPane.showMessageDialog(this, "1번째 버튼클릭");
}
else if (ob==btn2) {
JOptionPane.showMessageDialog(this,"2번째 버튼클릭");
}
else if (ob==btn3) {
JOptionPane.showMessageDialog(this,"3번째 버튼클릭");
}
}
public static void main(String[] args) {
new SwingLay_09("레이아웃 이벤트"); // 생성자 생성
}
}
package Day0630;
import javax.swing.*;
import java.awt.*;
import java.awt.event.ActionEvent;
import java.awt.event.ActionListener;
public class SwingNullLay_10 extends JFrame implements ActionListener {
Container cp; // this.에 없는거 받아옴
JButton btn1,btn2; // 버튼 소환!
public SwingNullLay_10(String title) { // 생성자 호출
super(title);
cp=this.getContentPane();
this.setBounds(200,100,300,400);
cp.setBackground(new Color(121,124,141));
setDesign();
setVisible(true);
}
//디자인
public void setDesign(){
// 기본레이아웃을 없애기
this.setLayout(null);
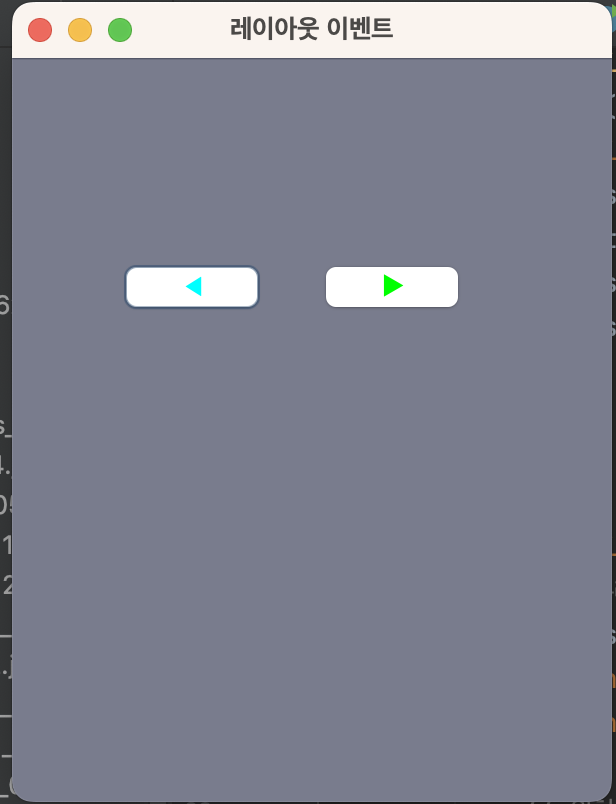
btn1=new JButton("◀︎");
btn2=new JButton("▶︎");
// 위치 직접 지정
btn1.setBounds(50,100,80,30);
btn2.setBounds(150,100,80,30);
// 프레임추가
this.add(btn1);
this.add(btn2);
//색상
btn1.setBackground(Color.RED);
btn2.setBackground(Color.YELLOW);
btn1.setForeground(Color.cyan);
btn2.setForeground(Color.green);
// 버튼에 이벤트 발생 : 이벤트 핸들러랑 이벤트 발생하는 객체랑 연결해줘야 한다.
btn1.addActionListener(this); // 상속받았으니까 this를 쓴다.
btn2.addActionListener(this); // 상속받았으니까 this를 쓴다.
}
@Override
public void actionPerformed(ActionEvent e) {
Object ob=e.getSource();
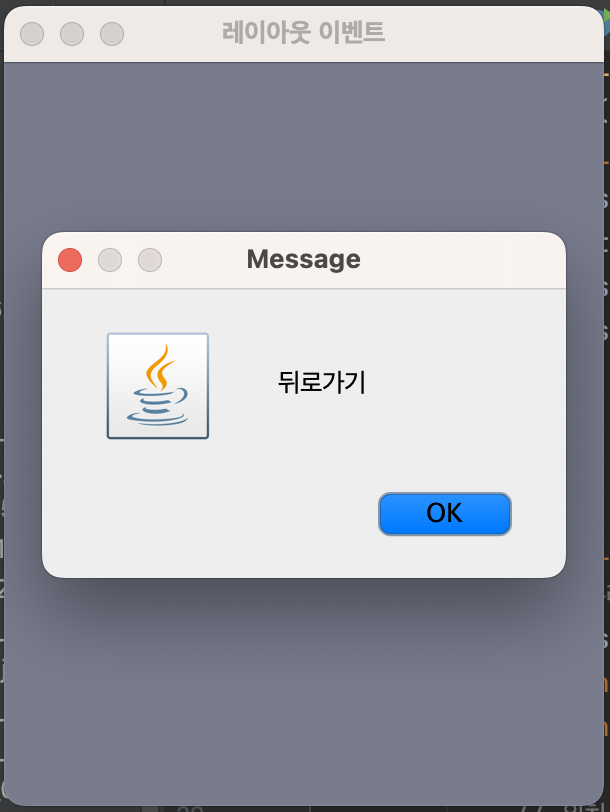
if(ob==btn1) { // ob를 정의하여 버튼을 명확하게(버튼마다 지정하여) 설정할 수 있다.
JOptionPane.showMessageDialog(this, "뒤로가기");
}
else if (ob==btn2) {
JOptionPane.showMessageDialog(this,"앞으로가기");
}
}
public static void main(String[] args) {
new SwingNullLay_10("레이아웃 이벤트"); // 생성자 생성
}
}
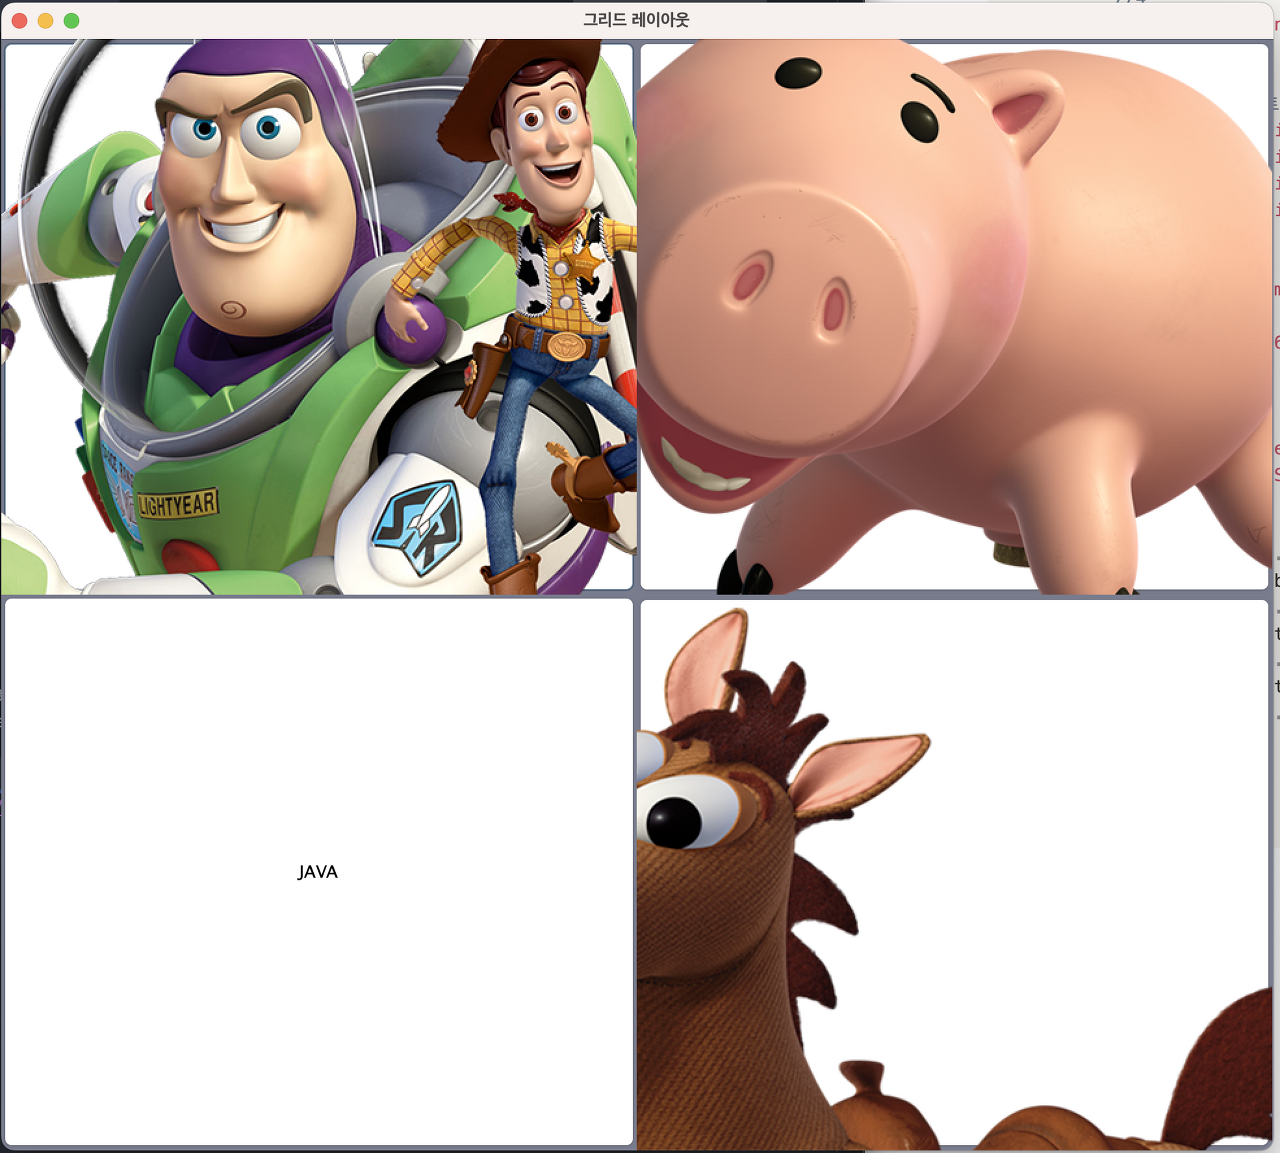
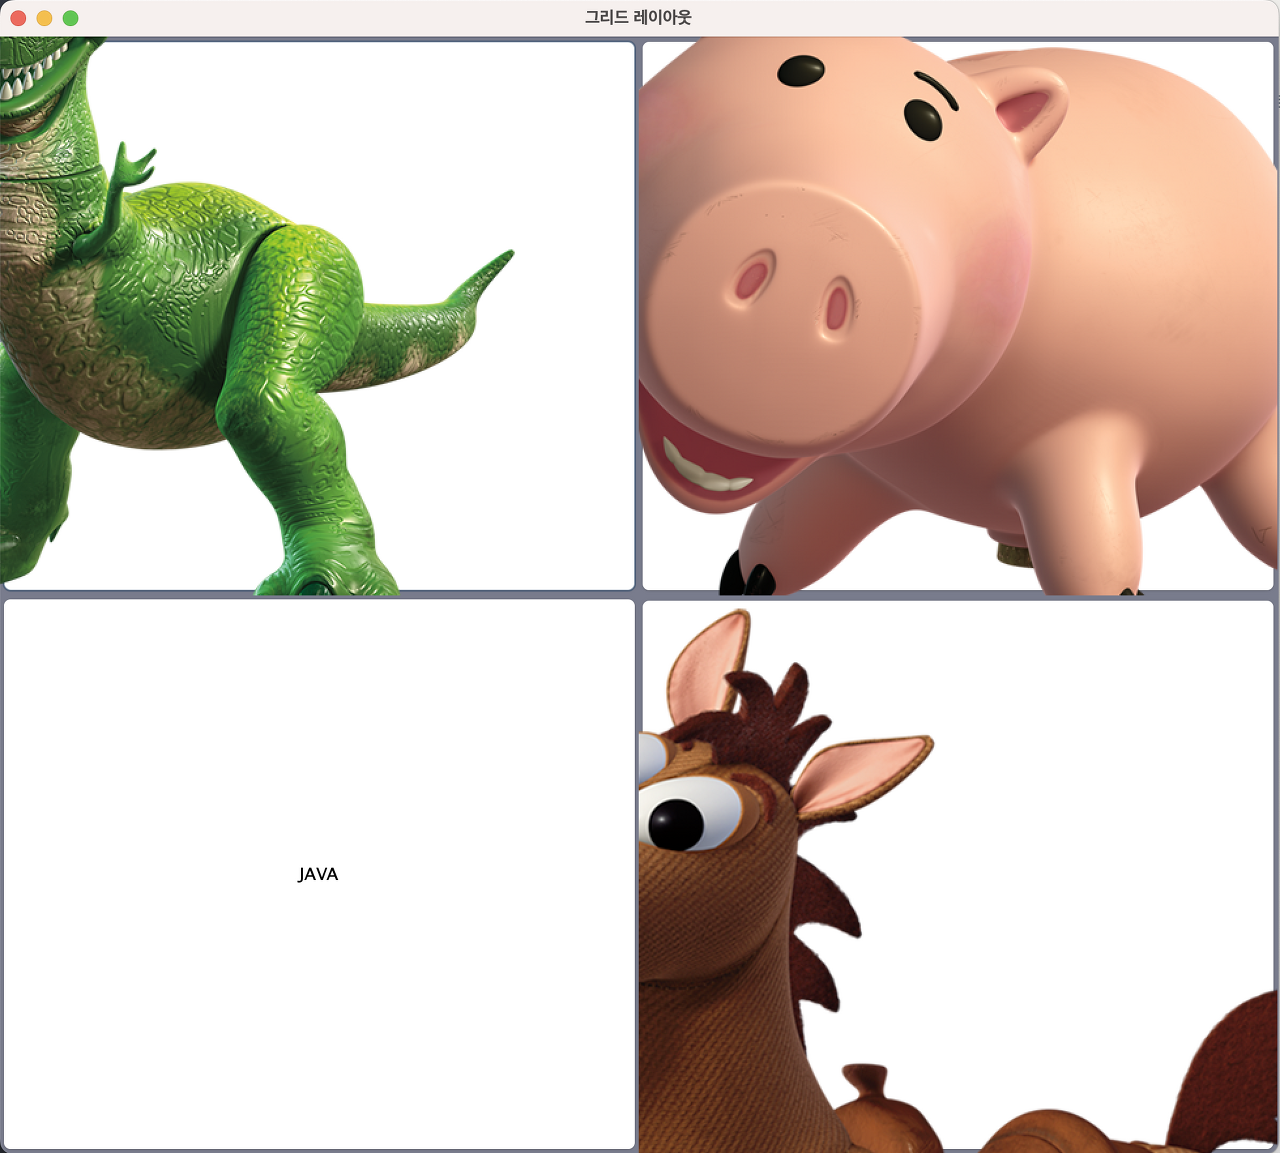
버튼에 이미지 넣기
package Day0704;
import javax.swing.*;
import java.awt.*;
import java.awt.event.ActionEvent;
import java.awt.event.ActionListener;
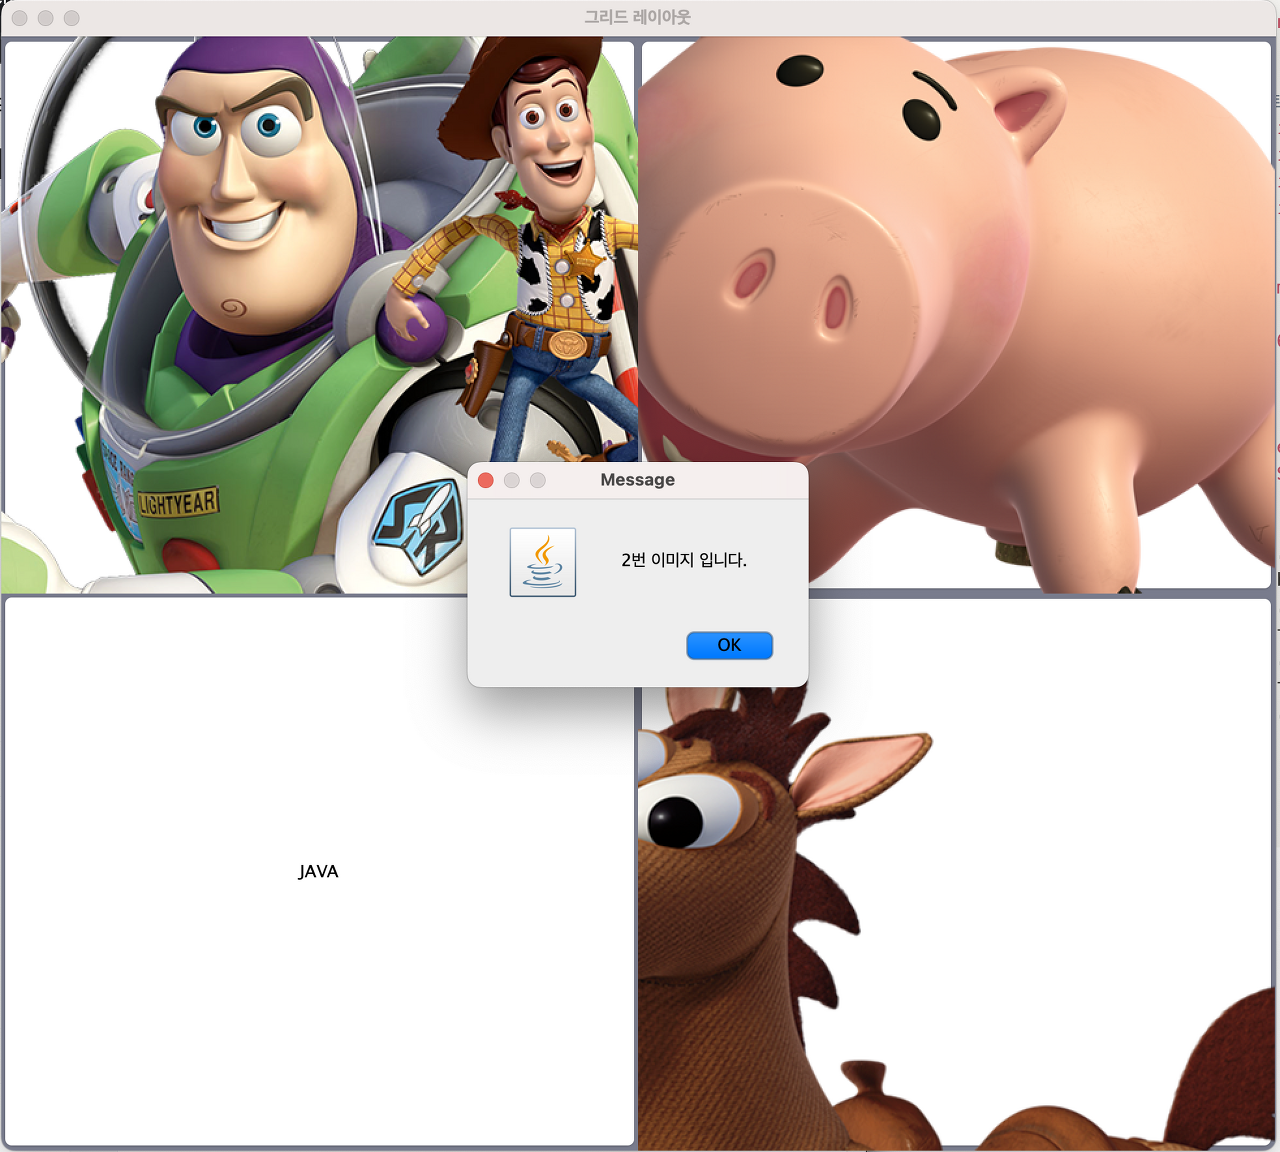
public class SwingGrid_06 extends JFrame implements ActionListener {
Container cp; // this.에 없는거 받아옴
// 이미지 아이콘 가져오기
// 버튼 선언
JButton btn1,btn2,btn3,btn4;
ImageIcon icon1=new ImageIcon("/Users/imhyeongjun/Desktop/sist0615/file/swingimage/toy01.png");
ImageIcon icon2=new ImageIcon("/Users/imhyeongjun/Desktop/sist0615/file/swingimage/toy02.png");
ImageIcon icon3=new ImageIcon("/Users/imhyeongjun/Desktop/sist0615/file/swingimage/toy03.png");
ImageIcon icon4=new ImageIcon("/Users/imhyeongjun/Desktop/sist0615/file/swingimage/toy04.png");
public SwingGrid_06(String title) { // 생성자 호출
super(title);
cp=this.getContentPane();
this.setBounds(200,100,300,400);
cp.setBackground(new Color(121,124,141));
setDesign();
setVisible(true);
}
public void setDesign(){
// 버튼4개 생성
this.setLayout(new GridLayout(2,2)); // 버튼을 2행 2열로 배치하기
btn1=new JButton("hello",icon1);
btn1.setVerticalTextPosition(JButton.BOTTOM); // 텍스트 세로로 위치
btn1.setHorizontalTextPosition(JButton.CENTER);
this.add(btn1);
btn1.setRolloverIcon(icon2); // 1번그림에 마우스 올리면 그림 변함
btn1.setPressedIcon(icon4); // 1번그림 클릭하면 그림 변함
//2
btn2=new JButton(icon4);
this.add(btn2);
//3
btn3=new JButton("JAVA");
this.add(btn3);
//4
btn4=new JButton("Hi!!!",icon3);
this.add(btn4);
// 버튼에 액션이벤트 추가
btn1.addActionListener(this);
btn2.addActionListener(this);
btn3.addActionListener(this);
btn4.addActionListener(this);
}
public static void main(String[] args) {
new SwingGrid_06("그리드 레이아웃");
}
@Override
public void actionPerformed(ActionEvent e) {
Object ob=e.getSource(); // 선택하기 위한 변수를 준 것.
if(ob==btn1){
JOptionPane.showMessageDialog(this,"1번 이미지 입니다.");
} else if (ob==btn2) {
JOptionPane.showMessageDialog(this,"2번 이미지 입니다.");
}else if (ob==btn3) {
JOptionPane.showMessageDialog(this,"3번 java 입니다.");
}else if (ob==btn4) {
JOptionPane.showMessageDialog(this,"4번 이미지 입니다.");
}
}
}
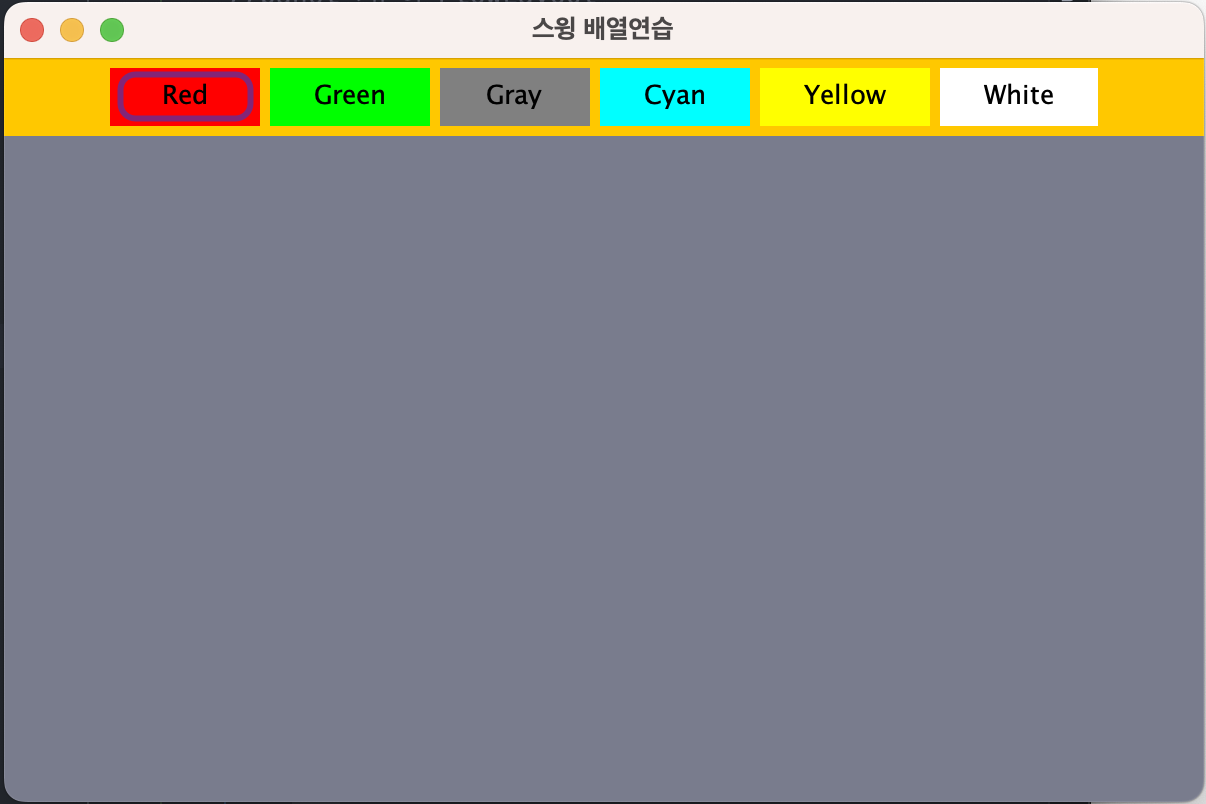
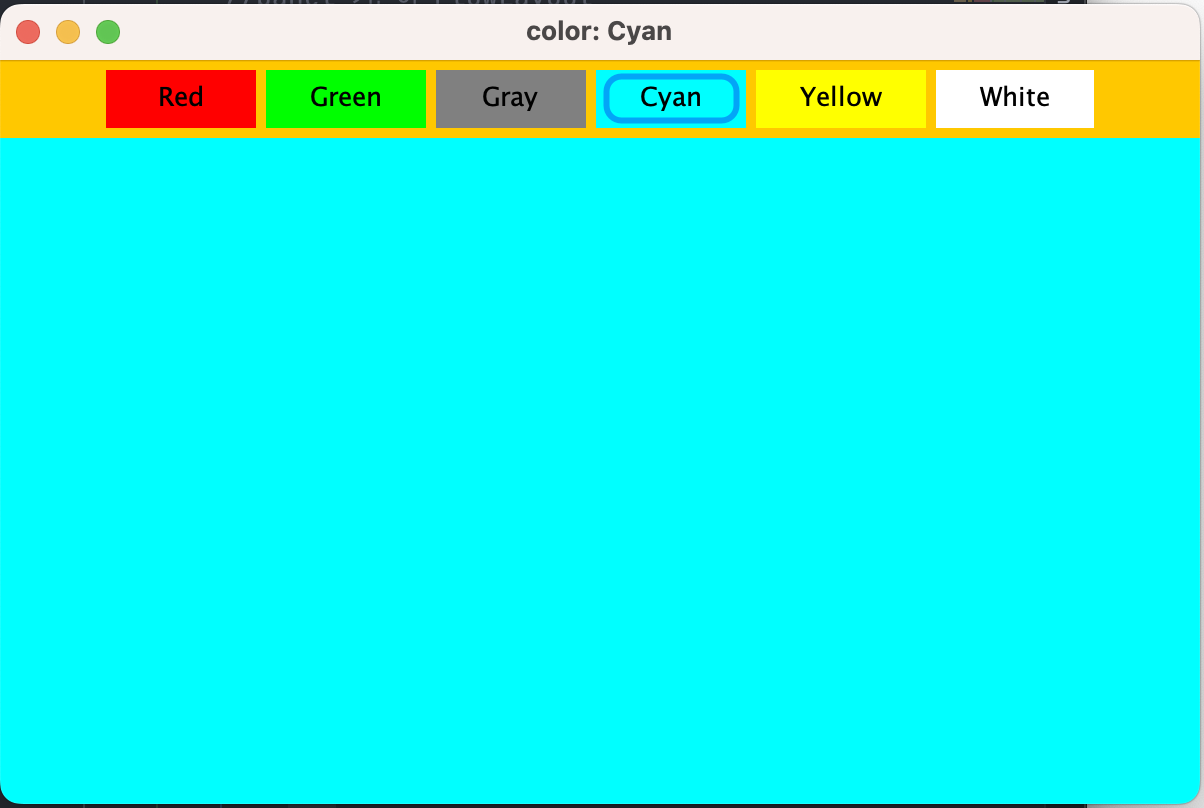
배열(Array)을 활용하여 색상 바꾸기
- 색상버튼 클릭 시 아래 배경색 변경됨.
- 색상버튼 클릭 시 제목도 변경됨.
package Day0704;

import javax.swing.*;
import java.awt.*;
import java.awt.event.ActionEvent;
import java.awt.event.ActionListener;

public class SwingArrPanel_08 extends JFrame implements ActionListener {

    Container cp; // this.에 없는거 받아옴
    JButton [] btn=new JButton[6];
    String [] btnLabel={"Red","Green","Gray","Cyan","Yellow","White"}; // label은 보통 제목으로 들어간다.
    Color [] btnColor={Color.red,Color.green,Color.gray,Color.cyan,Color.yellow,Color.white};
    public SwingArrPanel_08(String title) { // 생성자 호출
        super(title);
        cp=this.getContentPane();
        this.setBounds(500,100,600,400);
        cp.setBackground(new Color(121,124,141));
        setDesign();

        setVisible(true);
    }
    public void setDesign(){
        //panel 기본이 FlowLayout
        JPanel panel=new JPanel();
        panel.setBackground(Color.orange);
        // 프레임에 패널을 추가_상단인지 하단인지 위치 선택해서 해야한다.
        this.add(panel,BorderLayout.NORTH);

        // 버튼 생성
        for(int i=0;i<btn.length;i++){
            btn[i]=new JButton(btnLabel[i]);

            // 패널에 버튼 추가
            panel.add(btn[i]);

            // 버튼 6개 색상 추가
            btn[i].addActionListener(this);

            // 컬러 6가지 바꾸기
            btn[i].setBackground(btnColor[i]);
            btn[i].setOpaque(true);
            btn[i].setBorderPainted(false);
        }
    }

    public static void main(String[] args) {

        new SwingArrPanel_08("스윙 배열연습"); // 생성자 생성
    }

    @Override
    public void actionPerformed(ActionEvent e) {
        Object ob=e.getSource(); // 입력된 액션 받기

        for(int i=0;i<btn.length;i++){
            //배경색 변경
            if(ob==btn[i]) {
                cp.setBackground(btnColor[i]);
                // 제목바꾸기
                this.setTitle("color: " + btnLabel[i]);
            }
        }
    }
}
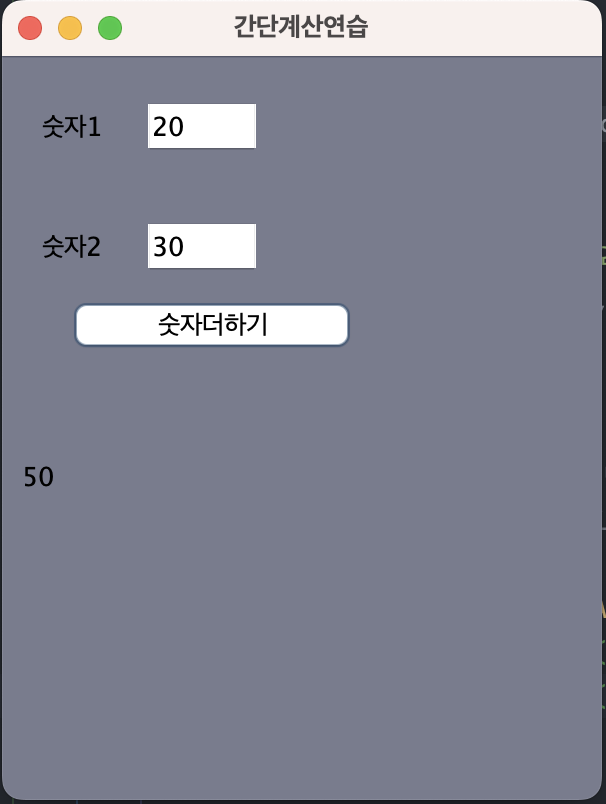
계산하는거 넣기
- 왼쪽에서 숫자 20,30 은 직접 기입한다.
- 숫자더하기를 클릭하면 결과 나오는곳 →50으로 변경된다.
package Day0704;

import javax.swing.*;
import java.awt.*;
import java.awt.event.ActionEvent;
import java.awt.event.ActionListener;

public class SwingCalc_10 extends JFrame {

    Container cp; // this.에 없는거 받아옴
    JLabel lblResult,lbl1,lbl2; // 결과 나오는 라벨(결과창, 결과 나오는곳), 숫자1제목, 숫자2제목
    JTextField tfSu1,tfSu2; // 입력하는곳
    JButton btnAdd; // 이벤트 발생 버튼
    public SwingCalc_10(String title) { // 생성자 호출
        super(title);
        cp=this.getContentPane();
        this.setBounds(1000,100,300,400);
        cp.setBackground(new Color(121,124,141));
        setDesign();
        setVisible(true);

    }

    public void setDesign(){
        this.setLayout(null);

        lbl1=new JLabel("숫자1");
        lbl2=new JLabel("숫자2");

        lbl1.setBounds(20,20,50,30);
        this.add(lbl1);
        lbl2.setBounds(20,80,50,30);
        this.add(lbl2);

        tfSu1=new JTextField();
        tfSu1.setBounds(70,20,60,30);
        this.add(tfSu1);
        tfSu2=new JTextField();
        tfSu2.setBounds(70,80,60,30);
        this.add(tfSu2);

        btnAdd=new JButton("숫자더하기");
        btnAdd.setBounds(30,120,150,30);
        this.add(btnAdd);

        lblResult=new JLabel("결과 나오는곳");
        lblResult.setBounds(10,180,250,60);
        this.add(lblResult);

        // 버튼 이벤트인데 익명내부 클래스 형식으로 만들기
        btnAdd.addActionListener(new ActionListener() { // 익명내부클래스
            @Override
            public void actionPerformed(ActionEvent e) {
                int su1=Integer.parseInt(tfSu1.getText()); // 숫자를 가지고 온다.
                int su2=Integer.parseInt(tfSu2.getText()); // 숫자를 가지고 온다.

                int sum=su1+su2;

                String s1=sum+""; // 숫자를 문자로 보내는 방법들
                String s2=String.valueOf(sum); // 숫자를 문자로 보내는 방법들
                String s3=su1+"+"+su2; // 숫자를 문자로 보내는 방법들

                // 결과라벨지에 출력(setting 해주는 것, 결과창에 보내주는것)
                lblResult.setText(s2);
            }
        });
    }

    public static void main(String[] args) {

        new SwingCalc_10("간단계산연습"); // 생성자 생성
    }
}
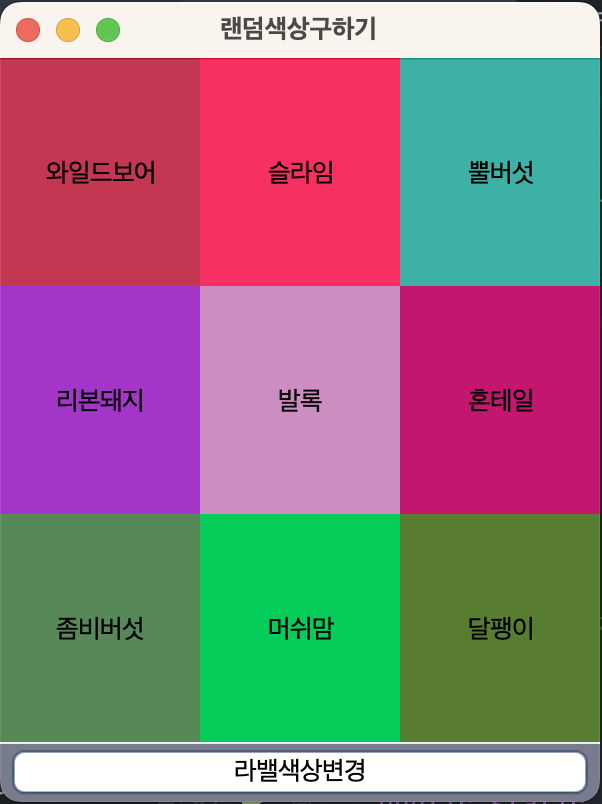
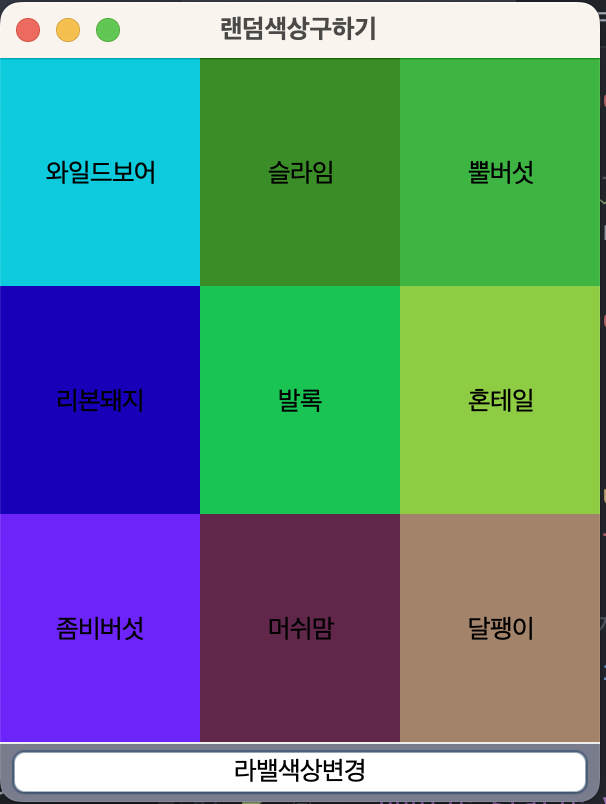
Random을 활용하여 색상 무작위 바꾸기
- 라밸색상변경을 클릭하면 각 칸의 색상이 무작위로 바뀐다.
package Day0704;

import javax.swing.*;
import java.awt.*;
import java.awt.event.ActionEvent;
import java.awt.event.ActionListener;

public class SwingRandom_11 extends JFrame implements ActionListener {
    Container cp; // this.에 없는거 받아옴
    JLabel[] lblName=new JLabel[9];  // 3행 3열 이므로
    String [] str={"와일드보어","슬라임","뿔버섯","리본돼지","발록","혼테일","좀비버섯","머쉬맘","달팽이"};
    JButton btn;

    public SwingRandom_11(String title) { // 생성자 호출
        super(title);
        cp=this.getContentPane();
        this.setBounds(200,100,300,400);
        cp.setBackground(new Color(121,124,141));
        setDesign();
        setVisible(true);
    }
    // 디자인
    public void setDesign() {
        // 패널을 프레임의 센터에 추가
        JPanel pCenter=new JPanel(new GridLayout(3,3));
        this.add(pCenter,BorderLayout.CENTER);

        // 라벨을 패널에 추가
        for(int i=0;i<lblName.length;i++){
            lblName[i]=new JLabel(str[i],JLabel.CENTER);

            int r=(int)(Math.random()*256);  // rgb 컬러 0~255
            int g=(int)(Math.random()*256);  // rgb 컬러 0~255
            int b=(int)(Math.random()*256);  // rgb 컬러 0~255

            lblName[i].setBackground(new Color(r,g,b));

            //panel에 라벨 추가
            pCenter.add(lblName[i]);

            lblName[i].setOpaque(true); // 투명도 제거.. 색상이 나온다.
        }

        // 버튼 추가
        btn=new JButton("라밸색상변경");
        this.add(btn,BorderLayout.SOUTH);

        // 이벤트 추가
        btn.addActionListener(this);

    }
    public static void main(String[] args) {

        new SwingRandom_11("랜덤색상구하기"); // 생성자 생성
    }
    // 액션
    @Override
    public void actionPerformed(ActionEvent e) {

        for(int i=0;i<lblName.length;i++){
            int r=(int)(Math.random()*256);  // rgb 컬러 0~255
            int g=(int)(Math.random()*256);  // rgb 컬러 0~255
            int b=(int)(Math.random()*256);  // rgb 컬러 0~255

            lblName[i].setBackground(new Color(r,g,b));
        }
    }
}
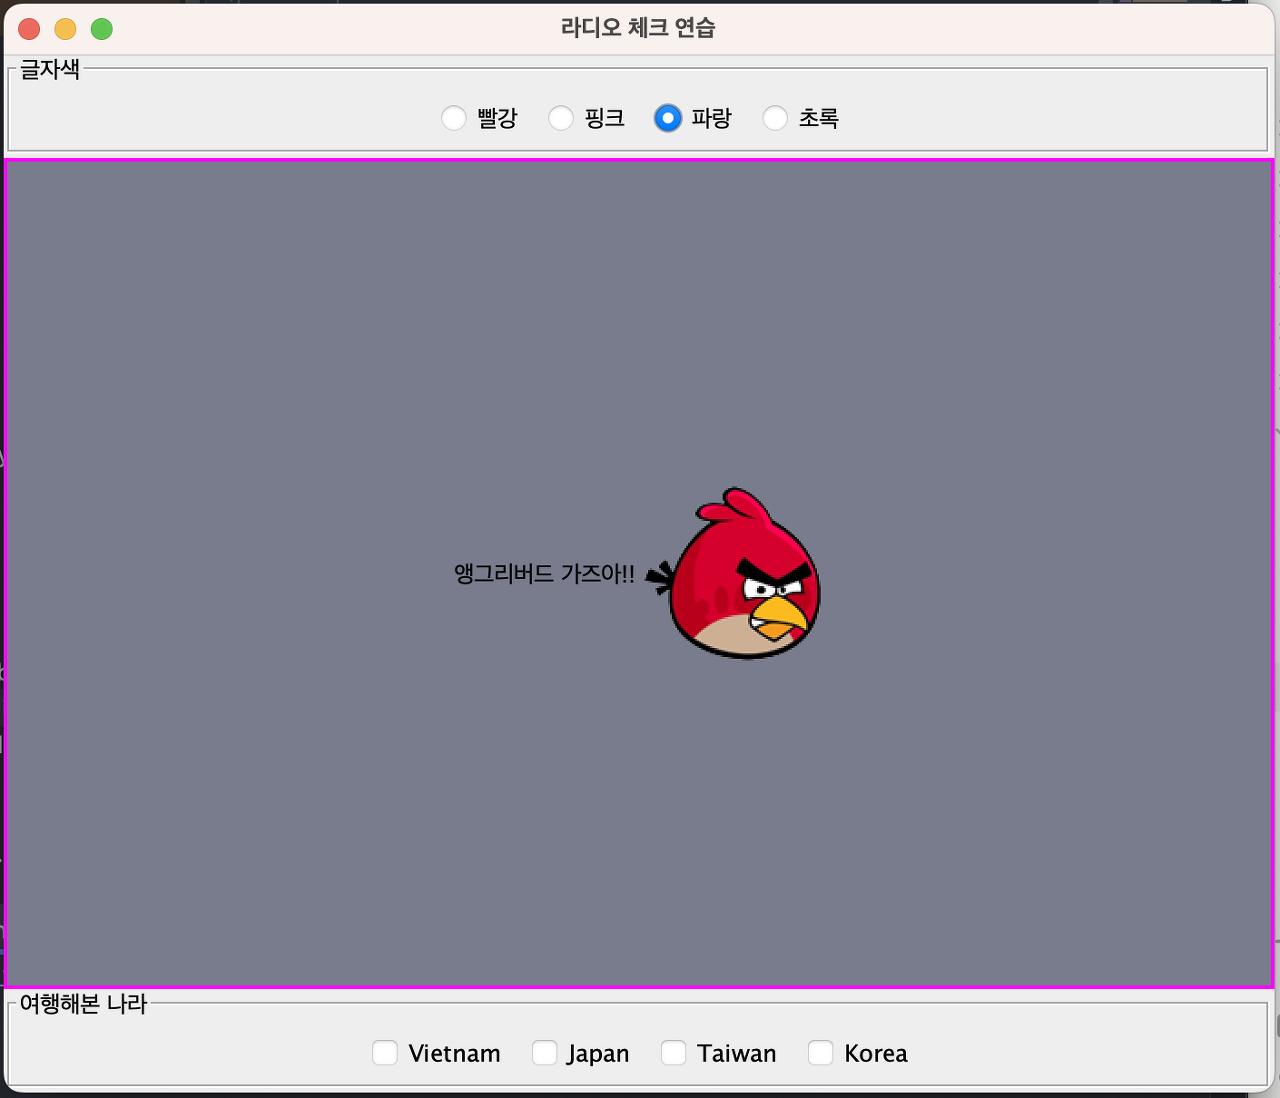
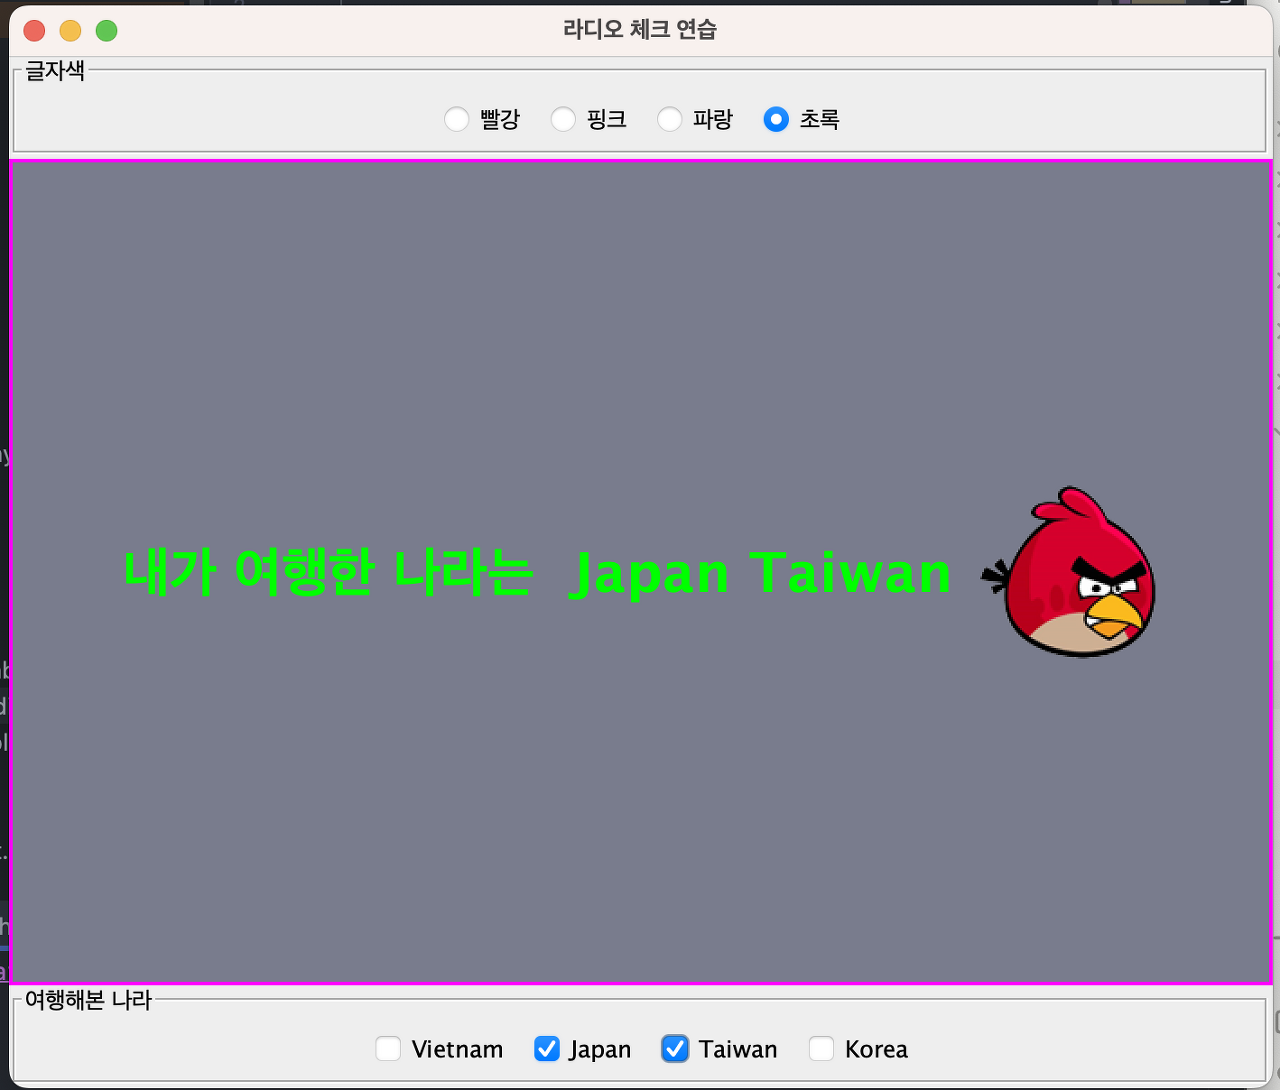
Radio Button
package Day0705;

import javax.swing.*;
import javax.swing.border.LineBorder;
import javax.swing.border.TitledBorder;
import java.awt.*;
import java.awt.event.ActionEvent;
import java.awt.event.ActionListener;

public class SwingRadioCheck_01 extends JFrame implements ActionListener{

    Container cp; // this.에 없는거 받아옴
    JRadioButton [] rb=new JRadioButton[4]; // 하나만 선택하고 싶을때
    JCheckBox[] cb=new JCheckBox[4]; // 다중 선택의 경우 CheckBox 사용 함
    JLabel lblMessage; // 라디오버튼, 체크박스 결과값 출력할 곳.
    JPanel pTop,pBottom; // 라디오버튼, 체크박스 올릴 패널.
    Color [] colors={Color.red,Color.pink,Color.blue,Color.green};
    public SwingRadioCheck_01(String title) { // 생성자 호출
        super(title);
        cp=this.getContentPane();
        this.setBounds(500,200,700,600);
        cp.setBackground(new Color(121,124,141));
        setDesign();
        setVisible(true);
    }
    public void setDesign(){
        // 상단패널에 보더로 감싼 4개의 radio버튼 만들기
        String [] str1={"빨강","핑크","파랑","초록"};
        pTop=new JPanel();
        pTop.setBorder(new TitledBorder("글자색"));
        this.add("North",pTop);

        // 라디오 버튼 하나만 선택되도록 하려면 라디오 그룹에다가 라디오버튼을 둔다.
        ButtonGroup bg=new ButtonGroup();

        for(int i=0;i<rb.length;i++){
            rb[i]=new JRadioButton(str1[i],i==2?true:false); // 라디오버튼 생성
            rb[i].addActionListener(this); // 라디오버튼에 액션 추가
            pTop.add(rb[i]); // 4개의 버튼을 탑패널에 추가한다.
            bg.add(rb[i]); // 버튼그룹에 추가!!
        }
        ImageIcon icon=new ImageIcon("/Users/imhyeongjun/Desktop/sist0615/file/swingimage/redbird.png");
        lblMessage=new JLabel("앵그리버드 가즈아!!",icon,JLabel.CENTER);
        lblMessage.setHorizontalTextPosition(JLabel.LEFT);
        lblMessage.setBorder(new LineBorder(Color.magenta,2));
        this.add("Center",lblMessage);

        // 하든패널에 보더로 감싼 4개의 checkbox 버튼 만들기
        pBottom=new JPanel();
        pBottom.setBorder(new TitledBorder("여행해본 나라"));
        this.add("South",pBottom);

        String [] str2={"Vietnam","Japan","Taiwan","Korea"};

        for(int i=0;i<cb.length;i++){
            cb[i]= new JCheckBox(str2[i]); //
            pBottom.add(cb[i]);
            cb[i].addActionListener(this); //
        }
    }
    @Override
    public void actionPerformed(ActionEvent e) {
        Object ob=e.getSource();

        // 라디오버튼 호출처리, 메세지를 컬러별로 출력해보자.
        for(int i=0;i<rb.length;i++){
            if(ob==rb[i]){
                lblMessage.setForeground(colors[i]);
                lblMessage.setFont(new Font("",Font.BOLD,30));
            }
        }

        // 체크박스 호출처리.. 선택한 체크를 라벨베세지별 출력
        String lang="내가 여행한 나라는  ";
        for (int i=0;i<cb.length;i++){
            if(cb[i].isSelected()){
                lang+=cb[i].getText()+" ";
            }
        }
        lblMessage.setText(lang);

        // ob와 cb 분리를 위해서 클래스타입 비교를 해줘야 한다.
        if(ob instanceof JCheckBox){
            lblMessage.setText(lang);
        } else if (ob instanceof JRadioButton) {
            lblMessage.setText("앵그리버드 가즈아!!");
        }
    }
    public static void main(String[] args) {

        new SwingRadioCheck_01("라디오 체크 연습"); // 생성자 생성
    }
}

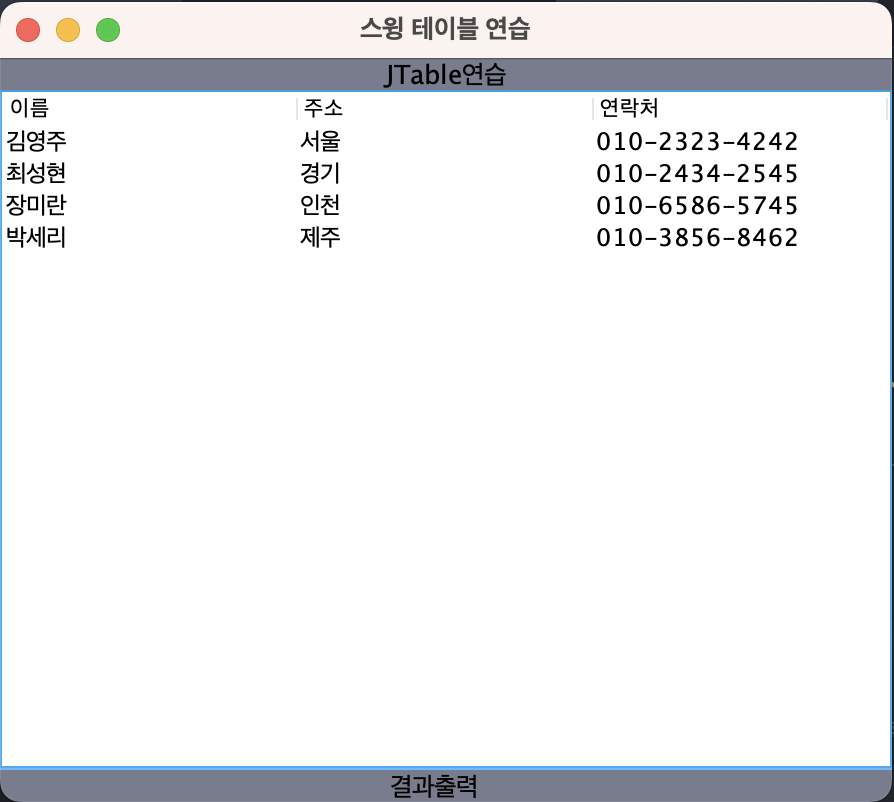
JTable
package Day0705;

import javax.swing.*;
import java.awt.*;
import java.awt.event.MouseAdapter;
import java.awt.event.MouseEvent;

public class SwingJTable_02 extends JFrame {
    Container cp; // this.에 없는거 받아옴
    JTable table; // 테이블
    JLabel lblTitle; // 제목
    JLabel lblOut; // 출력(마우스 클릭을 확인하기 위함)
    public SwingJTable_02(String title) { // 생성자 호출
        super(title);
        cp=this.getContentPane();
        this.setBounds(200,100,300,400);
        cp.setBackground(new Color(121,124,141));
        setDesign();
        setVisible(true);
    }
    public void setDesign(){
        String[][]data={{"김영주","서울","010-2323-4242"},
                {"최성현","경기","010-2434-2545"},
                {"장미란","인천","010-6586-5745"},
                {"박세리","제주","010-3856-8462"}
                };
        String[]title={"이름","주소","연락처"};

        lblTitle=new JLabel("JTable연습",JLabel.CENTER);
        lblOut=new JLabel("결과출력...",JLabel.CENTER);

        table=new JTable(data,title);
        JScrollPane pane=new JScrollPane(table);

        // 테이블에 마우스 이벤트 추가
        table.addMouseListener(new TableEvent()); // 내부클래스를 생성해줘야 한다.

        this.add("North",lblTitle);
        this.add("Center",pane);
        this.add("South",lblOut);
    }
    // 테이블 클릭시 발생하는 마우스 이벤트를 추가하기 위해 내부 클래스를 생성해야 한다.(상속받기 위해서)
    class TableEvent extends MouseAdapter {
        @Override
        public void mouseClicked(MouseEvent e) {
            super.mouseClicked(e);

            //System.out.println("테이블 클릭!!!"); 콘솔창에 문구가 뜨면 잘 되고 있는거다.

            //선택한 행번호 얻기
            int rowNum=table.getSelectedRow();
            String str="이름: "+table.getValueAt(rowNum,0)+"\\t주소: "+table.getValueAt(rowNum,1)+"\\t연락처: "+table.getValueAt(rowNum,2);
            lblOut.setText(str);
        }
    }
    public static void main(String[] args) {

        new SwingJTable_02("스윙 테이블 연습"); // 생성자 생성
    }
}
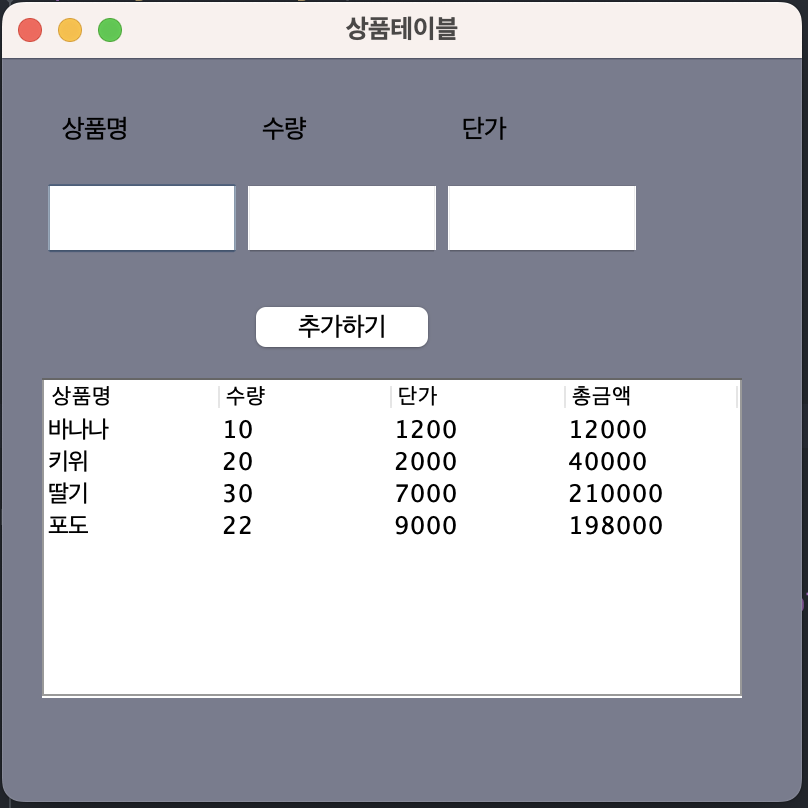
JTable 심화
package Day0705;

import javax.swing.*;
import javax.swing.table.DefaultTableModel;
import java.awt.*;
import java.awt.event.ActionEvent;
import java.awt.event.ActionListener;
import java.awt.event.MouseAdapter;
import java.awt.event.MouseEvent;
import java.io.BufferedReader;
import java.io.FileNotFoundException;
import java.io.FileReader;
import java.io.IOException;
import java.text.NumberFormat;
import java.util.Vector;

public class SwingTableShop_03 extends JFrame implements ActionListener {

    Container cp; // this.에 없는거 받아옴
    JTextField tfSang,tfSu,tfDan;
    JButton btnAdd;
    JTable table;
    DefaultTableModel model;

    // 저장하고 불러올 파일명
    String FILENAME="/Users/imhyeongjun/Desktop/sist0615/file/fruit.txt";
    public SwingTableShop_03(String title) { // 생성자 호출
        super(title);
        cp=this.getContentPane();
        this.setBounds(500,200,400,400);
        cp.setBackground(new Color(121,124,141));

        // 디자인
        setDesign();

        // 테이블데이터
        tableData();

        setVisible(true);
    }
    // 디자인
    public void setDesign(){
        this.setLayout(null);
        JLabel lbl1=new JLabel("상품명");
        JLabel lbl2=new JLabel("수량");
        JLabel lbl3=new JLabel("단가");

        lbl1.setBounds(30,20,80,30);
        this.add(lbl1);
        lbl2.setBounds(130,20,80,30);
        this.add(lbl2);
        lbl3.setBounds(230,20,80,30);
        this.add(lbl3);

        tfSang=new JTextField();
        tfSang.setBounds(20,60,100,40);
        this.add(tfSang);
        tfSu=new JTextField();
        tfSu.setBounds(120,60,100,40);
        this.add(tfSu);
        tfDan=new JTextField();
        tfDan.setBounds(220,60,100,40);
        this.add(tfDan);

        //버튼
        btnAdd=new JButton("추가하기");
        btnAdd.setBounds(120,120,100,30);
        this.add(btnAdd);

        //버튼에 이벤트
        btnAdd.addActionListener(this);

        //테이블 생성
        String [] title={"상품명","수량","단가","총금액"};
        model=new DefaultTableModel(title,0); //0은 행갯수
        table=new JTable(model);
        JScrollPane js=new JScrollPane(table);
        js.setBounds(20,160,350,160);
        this.add(js);

        //테이블 클릭시 선택한 행번호를 selectRow값에 저장하기.
        table.addMouseListener(new MouseAdapter() {
            @Override
            public void mouseClicked(MouseEvent e) {
                super.mouseClicked(e);

                int selectRow=table.getSelectedRow(); // 행번호 저장하는 것
            }
        });
    }

    // 처음생성시 테이블에 불러올 메서드 만들기
    public void tableData(){
        FileReader fr=null;
        BufferedReader br=null;

        try {
            fr=new FileReader(FILENAME);
            br=new BufferedReader(fr);

            while (true){
                String s=br.readLine();

                if(s==null){
                    break;
                }
                String[] data=s.split(",");

                //table에 배열형 데이터  추가
                model.addRow(data);
            }

        } catch (FileNotFoundException e) {
            throw new RuntimeException(e);
        } catch (IOException e) {
            throw new RuntimeException(e);
        }
    }

    public static void main(String[] args) {

        new SwingTableShop_03("상품테이블"); // 생성자 생성
    }

    @Override
    public void actionPerformed(ActionEvent e) {
        Object ob=e.getSource();
        if(ob==btnAdd){
            String sang=tfSang.getText().trim(); // 공백도 인식하는게 trim. 안전빵으로 써주는게 좋다.
            String su=tfSu.getText().trim();
            String dan=tfDan.getText().trim();

            if(sang.length()==0||su.length()==0||dan.length()==0){
                JOptionPane.showMessageDialog(this,"3개의 값을 모두 입력해주세요.");
                return;
            }
            int total=0;
            total=Integer.parseInt(su)*Integer.parseInt(dan);

            NumberFormat nf=NumberFormat.getInstance();

            Vector<String> data=new Vector<>();
            data.add(sang);
            data.add(su);
            data.add(dan);
            data.add(nf.format(total));

            // table에 추가
            model.addRow(data);

            // 입력값 지워주기
            tfSang.setText("");
            tfSu.setText("");
            tfDan.setText("");
        }
    }
}

java를 잡아...... 하... 이게 맞나...