
1.요청 파라미터 종류
서버에 전송되는 값을 요청 파라미터(Request Parameter)라고 합니다. 스프링에서 요청 파라미터는 클라이언트가 서버로 데이터를 전달하는 데 사용되는 매개변수들을 의미합니다. 다양한 종류의 요청 파라미터가 있으며, 주로 웹 개발에서 많이 사용되는 몇 가지를 아래에 설명합니다:
-
쿼리 문자열(Query String) 파라미터:
- 설명: URL에 물음표(?) 뒤에 키-값 쌍으로 전달되는 파라미터로, 주로 GET 요청에서 사용됩니다.
- 예시:
https://example.com/api/resource?name=value&age=25 - 활용: 검색 기능, 필터링, 정렬 등에 주로 사용됩니다.
-
폼 데이터(Form Data):
- 설명: HTML 폼을 통해 전송되는 데이터로, 주로 POST 요청에서 사용됩니다.
- 예시: 폼 요소에서 입력한 데이터 (e.g.,
<form method="post"><input type="text" name="username"></form>) - 활용: 사용자가 제출한 폼 데이터를 서버로 전송할 때 사용됩니다.
-
파라미터 위치:
- 설명: 요청의 일부로서 URL 경로에 포함되는 파라미터입니다.
- 예시:
https://example.com/api/resource/{parameter} - 활용: RESTful API에서 리소스 식별이나 필수 데이터 전달에 사용됩니다.
-
헤더(Header) 파라미터:
- 설명: HTTP 요청 헤더에 포함된 파라미터로, 클라이언트와 서버 간의 부가적인 정보를 전달합니다.
- 예시:
Authorization: Bearer <token> - 활용: 사용자 인증, 캐시 제어, 언어 설정 등에 사용됩니다.
-
쿠키(Cookie):
- 설명: 클라이언트에 저장되는 작은 데이터 조각으로, 서버와 상호작용을 유지하고 클라이언트 상태를 유지하는 데 사용됩니다.
- 예시:
user_id=123; session_token=ABC - 활용: 세션 관리, 사용자 추적 등에 사용됩니다.
-
리퀘스트 바디(Request Body) 파라미터:
- 설명: HTTP 요청의 본문에 담겨져 전송되는 데이터로, 주로 POST 또는 PUT 요청에서 사용됩니다.
- 예시: JSON 또는 XML 형식의 데이터
- 활용: 데이터 생성 또는 업데이트 시에 사용됩니다.
이러한 파라미터들은 서로 다른 용도로 사용되며, 각각의 상황에 맞게 선택하여 활용됩니다.
2. 요청 파라미터 사용
하나의 뷰에 버튼이 여러 개 있을 때 어느 버튼이 클릭되어 요청이 보내졌는지를 식별해야 하는 경우 사용되는 것이 '요청 매핑(RequestMapping)' 어노테이션의 params 속성입니다. 링크 등 URL의 일부로 포함된 값을 취득할 때는 요청 매핑 어노테이션의 value 속성에 값이 저장된 경로로 지정하고 요청 핸들러 메서드의 인수에 @PathVariable 어노테이션과 값을 저장할 인수를 지정합니다.
스프링은 요청 파라미터를 처리하기 위한 다양한 방법을 제공합니다. 주로 @RequestParam, @PathVariable, Form 클래스 그리고 커맨드 객체를 사용하여 요청 파라미터를 처리합니다. 아래에서 각각에 대한 설명과 예제를 제공하겠습니다.
2.1 @RequestParam 어노테이션 사용:
@RequestParam 어노테이션은 URL 쿼리 문자열이나 폼 데이터에서 파라미터를 추출할 때 사용됩니다.
@RequestParam 어노테이션을 이용해 파라미터를 하나씩 취득할 수 있습니다.
import org.springframework.stereotype.Controller;
import org.springframework.web.bind.annotation.RequestMapping;
import org.springframework.web.bind.annotation.RequestParam;
import org.springframework.web.bind.annotation.ResponseBody;

@Controller
@RequestMapping("/example")
public class ExampleController {

    @RequestMapping("/method1")
    @ResponseBody
    public String method1(@RequestParam String name, @RequestParam int age) {
        // name과 age를 사용한 로직 추가
        return "이름: " + name + ", 나이: " + age;
    }
}
위의 예제에서 /example/method1?name=John&age=25와 같은 요청이 오면 name과 age 파라미터를 추출하여 사용합니다.
2.2 @PathVariable 어노테이션 사용:
@PathVariable 어노테이션은 URL 경로에서 파라미터를 추출할 때 사용됩니다.
import org.springframework.stereotype.Controller;
import org.springframework.web.bind.annotation.PathVariable;
import org.springframework.web.bind.annotation.RequestMapping;
import org.springframework.web.bind.annotation.ResponseBody;

@Controller
@RequestMapping("/example")
public class ExampleController {

    @RequestMapping("/method2/{name}/{age}")
    @ResponseBody
    public String method2(@PathVariable String name, @PathVariable int age) {
        // name과 age를 사용한 로직 추가
        return "이름: " + name + ", 나이: " + age;
    }
}
위의 예제에서 /example/method2/John/25와 같은 요청이 오면 name과 age 파라미터를 추출하여 사용합니다.
2.3 Form 클래스 사용:
Form을 통한 요청 역시 요청 파라미터를 전달하는 방법 중 하나입니다. HTML Form을 사용하여 사용자 입력을 서버로 전송할 때, 입력된 데이터는 요청 파라미터로 전달됩니다. 주로 HTTP POST 메서드를 사용하여 Form 데이터를 전송합니다.
예를 들어, 다음은 HTML Form을 사용하여 사용자의 이름을 서버로 전송하는 간단한 예제입니다.
<!DOCTYPE html>
<html>
<head>
    <title>Form 예제</title>
</head>
<body>
    <form action="/example/submit" method="post">
        <label for="name">이름:</label>
        <input type="text" id="name" name="name">
        <input type="submit" value="전송">
    </form>
</body>
</html>
이 Form에서 name 속성은 서버로 전송되는 요청 파라미터의 이름을 나타냅니다. 이 Form이 서버로 전송되면, 서버에서는 해당 요청을 받아 처리할 컨트롤러가 필요합니다.
Spring에서는 @RequestParam 어노테이션을 사용하여 Form 데이터를 처리할 수 있습니다. 아래는 Spring 컨트롤러의 예제입니다.
import org.springframework.stereotype.Controller;
import org.springframework.web.bind.annotation.PostMapping;
import org.springframework.web.bind.annotation.RequestParam;
import org.springframework.web.bind.annotation.ResponseBody;

@Controller
public class ExampleController {

    @PostMapping("/example/submit")
    @ResponseBody
    public String handleFormSubmit(@RequestParam String name) {
        // name을 사용한 로직 추가
        return "전송된 이름: " + name;
    }
}
위의 예제에서 @RequestParam 어노테이션을 사용하여 Form 데이터 중에서 name 파라미터를 추출합니다.
Form을 사용한 요청 파라미터 전송은 주로 사용자의 입력을 서버로 전송하는 데에 많이 활용되며, Spring에서는 다양한 방식으로 이를 처리할 수 있도록 지원하고 있습니다.
2.4 커맨드 객체 사용:
커맨드 객체를 사용하면 여러 개의 파라미터를 하나의 객체로 묶어서 처리할 수 있습니다.
import org.springframework.stereotype.Controller;
import org.springframework.web.bind.annotation.RequestMapping;
import org.springframework.web.bind.annotation.RequestMethod;
import org.springframework.web.bind.annotation.ResponseBody;

@Controller
@RequestMapping("/example")
public class ExampleController {

    @RequestMapping(value = "/method3", method = RequestMethod.POST)
    @ResponseBody
    public String method3(UserInfo userInfo) {
        // userInfo를 사용한 로직 추가
        return "이름: " + userInfo.getName() + ", 나이: " + userInfo.getAge();
    }
}
위의 예제에서 UserInfo 클래스는 name과 age 필드를 갖는 일반적인 자바 빈(JavaBean)입니다.
public class UserInfo {
    private String name;
    private int age;

    // Getter, Setter 메서드 생략
}
이러한 방법들을 조합하여 필요에 따라 요청 파라미터를 처리할 수 있습니다. 스프링 프레임워크의 강력한 기능을 활용하여 개발을 진행하면서, 문서와 예제 코드를 참고하면 더욱 효과적으로 학습할 수 있습니다.
3. 요청 파라미터 예제 1
package practice.request.controller;

import org.springframework.format.annotation.DateTimeFormat;
import org.springframework.stereotype.Controller;
import org.springframework.ui.Model;
import org.springframework.web.bind.annotation.GetMapping;
import org.springframework.web.bind.annotation.PostMapping;
import org.springframework.web.bind.annotation.RequestParam;

import java.time.LocalDate;

@Controller
public class RequestParamController {

    @GetMapping("show")
    public String showView() {
        return "entry";
    }

    @PostMapping("confirm")
    public String confirmView(
            Model model, @RequestParam String name, @RequestParam Integer age,
            @DateTimeFormat(iso = DateTimeFormat.ISO.DATE) @RequestParam LocalDate birth) {
        // Model 에 저장
        model.addAttribute("name", name);
        model.addAttribute("age", age);
        model.addAttribute("birth", birth);

        return "confirm";
    }
}
entry.html
<!DOCTYPE html>
<html lang="en" xmlns:th="http://www.thymeleaf.org">
<head>
    <meta charset="UTF-8">
    <title>입력 화면</title>
</head>
<body>
<form th:action="@{/confirm}" method="post">
    <div>
        <label for="name">이름:</label>
        <input type="text" name="name" id="name">
    </div>
    <div>
        <label for="age">나이:</label>
        <input type="number" name="age" min="1" max="100" id="age">
    </div>
    <div>
        <label for="birth">생년월일:</label>
        <input type="date" name="birth" id="birth">
    </div>
    <input type="submit" value="전송">
</form>
</body>
</html>
confirm.html
<!DOCTYPE html>
<html xmlns:th="http://www.thymeleaf.org" lang="en">
<head>
    <meta charset="UTF-8">
    <title>확인 화면</title>
</head>
<body>
<ul>
    <li>이름: [[${name}]]</li>
    <li>나이: [[${age}]]</li>
    <li>생년월일: [[${birth}]]</li>
</ul>
</body>
</html>
4. 요청 파라미터 예제 2
Model 객체를 통해 뷰와 바인딩하는 방법이 아닌, Form 클래스를 생성하여 뷰와 바인딩하는 예제입니다. 다음과 같이 수정합니다.
폼의 개념을 온라인 쇼핑에 비유하자면, 여러 가지 상품을 구입해서 배송을 받을 때 각 상품을 따로 배송받고 싶을 때가 있습니다. 보통은 구입한 상품을 한군데 모아서 하나의 큰 박스에 넣어서 배송받고 싶을 것입니다. 여기서 하나의 큰 박스를 Form으로 생각하면 Form을 이해하기 쉽습니다.
//    @PostMapping("confirm")
//    public String confirmView(
//            Model model, @RequestParam String name, @RequestParam Integer age,
//            @DateTimeFormat(iso = DateTimeFormat.ISO.DATE) @RequestParam LocalDate birth) {
//        // Model 에 저장
//        model.addAttribute("name", name);
//        model.addAttribute("age", age);
//        model.addAttribute("birth", birth);
//
//        return "confirm";
//    }

    // 확인 화면을 표시: Form 클래스
    @PostMapping("confirm")
    public String confirmView(Form f) {
        return "confirm2";
    }
요청 핸들러 메서드 confirmView의 인수에서 Model이 사라진 이유
확인 화면에서 사용한 소문자 form과 Form 클래스에 대해 다음과 같이 정리할 수 있습니다:
- 뷰마다 입력데이터 및 표시 데이터를 하나의 클래스로 취급하는 경우 Form 클래스를 이용합니다.
뷰 단위로 데이터를 처리할 수 있어서 실무에서 많이 이용되는 방법입니다. Form 클래스는 POJO로 작성합니다. - 뷰 입력 항목의 이름(name 속성)과 그것을 받는 Form 클래스의 필드명을 같은 이름으로 하면 데이터가 바인딩됩니다.
- 요청 파라미터는 Form 클래스의 필드 타입으로 자동 변환되어 저장됩니다.
- Form 클래스는 요청 파라미터를 받습니다.
요청 핸들러 메서드의 인수에 Form 클래스가 있는 경우에는 자동으로 생성되어 Model에 저장됩니다. - Model에 저장된 Form 클래스는 기본적으로 '요청 스코프'로 설정되어 응답을 송신한 후 삭제됩니다.
- Model에 저장할 때 명시적으로 '이름'을 주지 않으면 저장하는 클래스명에 소문자 카멜 표기법을 적용해서 Model에 저장합니다.
예: CalcForm -> calcForm, Form -> form
form/Form.java
package practice.request.form;

import lombok.Data;
import org.springframework.format.annotation.DateTimeFormat;

import java.time.LocalDate;

@Data
public class Form {
    private String name;
    private Integer age;

    // 날짜 형식이 yyyy-MM-dd 으로 지정됨
    @DateTimeFormat(iso = DateTimeFormat.ISO.DATE)
    private LocalDate birth;
}
confirm2.html
<!DOCTYPE html>
<html xmlns:th="http://www.thymeleaf.org" lang="en">
<head>
    <meta charset="UTF-8">
    <title>확인 화면: Form 클래스 사용</title>
</head>
<body>
<ul>
    <li>이름: [[${form.name}]]</li>
    <li>나이: [[${form.age}]]</li>
    <li>생년월일: [[${form.birth}]]</li>
</ul>
</body>
</html>
4. 요청 파라미터 예제 3
package practice.request.controller;

import org.springframework.stereotype.Controller;
import org.springframework.web.bind.annotation.GetMapping;
import org.springframework.web.bind.annotation.PathVariable;
import org.springframework.web.bind.annotation.PostMapping;

@Controller
public class PathVariableController {

    @GetMapping("show1")
    public String showView() {
        return "show1";
    }

    @GetMapping("/function/{no}")
    public String selectFunction(@PathVariable Integer no) {
        // 뷰 이름 초기화
        String view = null;
        switch (no) {
            case 1:
                view = "function1";
                break;
            case 2:
                view = "function2";
                break;
            case 3:
                view = "function3";
                break;
        }
        return view;
    }

    @PostMapping(value = "send", params = "a")
    public String showAView() {
        return "a";
    }
    @PostMapping(value = "send", params = "b")
    public String showBView() {
        return "b";
    }    @PostMapping(value = "send", params = "c")
    public String showCView() {
        return "c";
    }

}
show1.html
<!DOCTYPE html>
<html lang="en" xmlns:th="http://www.thymeleaf.org">
<head>
    <meta charset="UTF-8">
    <title>경로에 포함된 값과 클릭된 버튼 식별</title>
</head>
<body>
    <!-- URL에 값 넣기 -->
    <h3><a th:href="@{/function/1}">기능-1</a></h3>
    <h3><a th:href="@{/function/2}">기능-2</a></h3>
    <h3><a th:href="@{/function/3}">기능-3</a></h3>

    <!-- 같은 form 태그 안에 포함된 여러 개의 버튼-->
    <form th:action="@{/send}" method="post">
        <input type="submit" value="버튼A" name="a">
        <input type="submit" value="버튼B" name="b">
        <input type="submit" value="버튼C" name="c">
    </form>

</body>
</html>
show1.html 화면
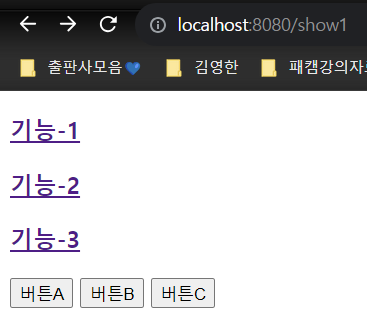 메인 화면
메인 화면
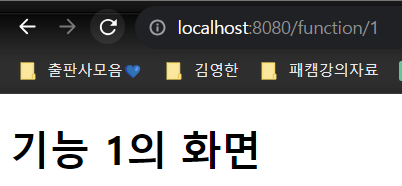 기능-1 링크 클릭 화면
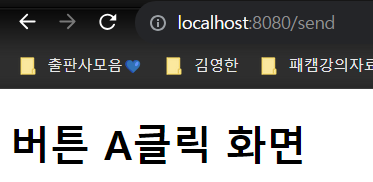 버튼A 클릭 화면