1. Version
💬
- IntelliJ : 2020.3.2.community
- spring boot : 2.6.1
2. 시작 전 확인사항
💬 gradle 추가
- springsecurity 를 이용할 것이다.
	//스프링 시큐리티 관련
	implementation 'org.springframework.boot:spring-boot-starter-security'
	implementation 'org.thymeleaf.extras:thymeleaf-extras-springsecurity5'
💬 사용할 DB 구축
💬 회원가입 내용
- 이 전 글에서 회원가입에 대해서 구현해 놓았다.
- 로그인을 하려면 계정 가입된 데이터가 있어야 한다.
3. User Table 생성
💻 Create Table sql

CREATE TABLE `TB_USER` (
  `USER_NO` int(11) NOT NULL AUTO_INCREMENT COMMENT '사용자번호',
  `USER_ID` varchar(255) NOT NULL COMMENT '아이디',
  `USER_PW` varchar(256) DEFAULT NULL COMMENT '비밀번호',
  `USER_NAME` varchar(255) NOT NULL COMMENT '사용자명',
  `USER_AUTH` varchar(255) NOT NULL COMMENT '권한',
  `APPEND_DATE` datetime DEFAULT NULL COMMENT '추가날짜',
  `UPDATE_DATE` datetime DEFAULT NULL COMMENT '수정날짜',
  PRIMARY KEY (`USER_NO`)
) ENGINE=InnoDB AUTO_INCREMENT=1 DEFAULT CHARSET=utf8;
4. application.yml 설정
💬 application.yml 경로
src/main/resources/application.yml
💬 application.yml 내용
spring:
  # 접속 DB 설정
  datasource:
    url: "jdbc:mariadb://127.0.0.1:3306/simpleBoard"
    username: "karim"
    password: "karim"
    driver-class-name: "org.mariadb.jdbc.Driver"

mybatis:
  # mapper 경로 지정
  mapper-locations: query/**/*.xml
  configuration:
    map-underscore-to-camel-case: true
5. 로그인 및 Html 페이지 생성
💬 html 페이지 경로
src/main/resources/templates/...html
💻 로그인 html 페이지 구현
- login.html
<!--로그인 페이지-->
<!-- login.html-->
<!DOCTYPE html>
<!-- Latest compiled and minified CSS -->
<link rel="stylesheet" href="https://maxcdn.bootstrapcdn.com/bootstrap/3.4.1/css/bootstrap.min.css">
<html xmlns:th="http://www.thymeleaf.org" lang="en">
<head>
    <meta charset="UTF-8">
</head>
<body>
<div class="container">
    <h1>로그인</h1>
    <form th:action="@{/login_proc}" method="post">
        <div class="form-group">
            <label th:for="username">아이디</label>
            <input type="text" name="username" class="form-control" placeholder="아이디 입력해주세요">
        </div>
        <div class="form-group">
            <label th:for="password">비밀번호</label>
            <input type="password" class="form-control" name="password" placeholder="비밀번호 입력해주세요">
        </div>
        <button type="submit" class="btn btn-primary">로그인</button>
        <button type="button" class="btn btn-primary" onClick="location.href='signUp'">회원 가입</button>
    </form>
    <br/>
</div>
</body>
</html>
💻 로그인 성공 후 html 페이지 구현
- user_access.html

<!--유저 페이지-->
<!--user_access.html-->
<!DOCTYPE html>
<html xmlns:th="http://www.thymeleaf.org" lang="en">
<head>
    <meta charset="UTF-8">
    <title>user access</title>
</head>
<body>
<h1>!!!환영합니다!!!</h1>
<div th:text="${info}"></div>
</body>
</html>
💻 로그인 실패 후 html 페이지 구현
- asset_denied.html

<!--유저 페이지-->
<!--asset_denied.html-->
<!DOCTYPE html>
<html xmlns:th="http://www.thymeleaf.org" lang="en">
<head>
    <meta charset="UTF-8">
    <title>access denied</title>
</head>
<body>
<h2>!!!아이디 또는 비밀번호가 틀렸습니다!!!</h2>
</body>
</html>
!!!이번 글에서는 회원가입 + 로그인까지 구현이 되어있다!!
5. SecurityConfig 구현
💻 SecurityConfig 구현
- 페이지 권한을 위한 SecurityConfig를 구현한다.
- .antMatchers()
: 페이지에 접근할 수 있는 권한을 설정한다. - .loginPage
: 로그인 페이지 - .loginProcessingUrl
: 구현한 로그인 페이지 - defaultSuccessUrl
: 로그인 성공 시 제공할 페이지 - failureUrl
: 로그인 실패 시 제공할 페이지 - csrf().disable()
: 사이트 간 요청 위조(Cross-Site Request Forgery) 공격 방지 기능 키기
- .antMatchers()
package com.karim.simpleBoard.configuration;

import com.karim.simpleBoard.service.UserService;
import lombok.RequiredArgsConstructor;
import org.springframework.security.config.annotation.authentication.builders.AuthenticationManagerBuilder;
import org.springframework.security.config.annotation.web.builders.HttpSecurity;
import org.springframework.security.config.annotation.web.configuration.EnableWebSecurity;
import org.springframework.security.config.annotation.web.configuration.WebSecurityConfigurerAdapter;
import org.springframework.security.crypto.bcrypt.BCryptPasswordEncoder;

@EnableWebSecurity        //spring security 를 적용한다는 Annotation
@RequiredArgsConstructor
public class SecurityConfig extends WebSecurityConfigurerAdapter {
    private final UserService userService;
    /**
     * 규칙 설정
     * @param http
     * @throws Exception
     */
    @Override
    protected void configure(HttpSecurity http) throws Exception {
        http
            .authorizeRequests()
                .antMatchers( "/login", "/singUp", "/access_denied", "/resources/**").permitAll() // 로그인 권한은 누구나, resources파일도 모든권한
                // USER, ADMIN 접근 허용
                .antMatchers("/userAccess").hasRole("USER")
                .antMatchers("/userAccess").hasRole("ADMIN")
                .and()
            .formLogin()
                .loginPage("/login")
                .loginProcessingUrl("/login_proc")
                .defaultSuccessUrl("/user_access")
                .failureUrl("/access_denied") // 인증에 실패했을 때 보여주는 화면 url, 로그인 form으로 파라미터값 error=true로 보낸다.
                .and()
            .csrf().disable();		//로그인 창
    }

    /**
     * 로그인 인증 처리 메소드
     * @param auth
     * @throws Exception
     */
    @Override
    public void configure(AuthenticationManagerBuilder auth) throws Exception {
        auth.userDetailsService(userService).passwordEncoder(new BCryptPasswordEncoder());
    }
}
6. User 객체 Vo 구현
💻 User 객체 Vo 구현
- 로그인 시 가져올 유저 정보 객체를 만든다.
spring security의 인터페이스
UserDetails를 상속 받는다.
package com.karim.simpleBoard.vo;

import lombok.Data;
import org.springframework.security.core.GrantedAuthority;
import org.springframework.security.core.authority.SimpleGrantedAuthority;
import org.springframework.security.core.userdetails.UserDetails;

import java.util.Collection;
import java.util.Collections;

@Data
public class UserVo implements UserDetails {
    private int userNo;
    private String userId;
    private String userPw;
    private String userName;
    private String userAuth;
    private String appendDate;
    private String updateDate;

    @Override
    public Collection<? extends GrantedAuthority> getAuthorities() {
        return Collections.singletonList(new SimpleGrantedAuthority(this.userAuth));
    }

    @Override
    public String getPassword() {
        return this.userPw;
    }

    // 시큐리티의 userName
    // -> 따라서 얘는 인증할 때 id를 봄
    @Override
    public String getUsername() {
        return this.userId;
    }

    // Vo의 userName !
    public String getUserName(){
        return this.userName;
    }

    @Override
    public boolean isAccountNonExpired() {
        return true;
    }

    @Override
    public boolean isAccountNonLocked() {
        return true;
    }

    @Override
    public boolean isCredentialsNonExpired() {
        return true;
    }

    @Override
    public boolean isEnabled() {
        return true;
    }
}
💬 어노테이션 설명
- @Data
@Getter, @Setter, @RequiredArgsConstructor, @ToString, @EqualsAndHashCode 어노테이션을 한꺼번에 설정해주는 어노테이션
7. Mapper 인터페이스 및 Xml 구현
💻 Mapper 인터페이스 구현
- 유저 정보를 DB에 가져오기 위한 Mapper 인터페이스 구현한다.
@Mapper
public interface UserMapper {
    // 로그인
    UserVo getUserAccount(String userId);

    // 회원가입
    void saveUser(UserVo userVo);
}
💬 sql xml 구현
<?xml version="1.0" encoding="UTF-8"?>
<!DOCTYPE mapper
        PUBLIC "-//mybatis.org//DTD Mapper 3.0//EN"
        "http://mybatis.org/dtd/mybatis-3-mapper.dtd">
<mapper namespace="com.karim.simpleBoard.mapper.UserMapper">
    <!-- 로그인 -->
    <select id="getUserAccount" resultType="com.karim.simpleBoard.vo.UserVo">
        SELECT * FROM TB_USER
        WHERE USER_ID= #{userId}
    </select>

    <!-- 회원가입 -->
    <insert id="saveUser" parameterType="com.karim.simpleBoard.vo.UserVo">
        INSERT INTO TB_USER
        (USER_ID, USER_PW, USER_NAME, USER_AUTH, APPEND_DATE, UPDATE_DATE)
        VALUES(#{userId},#{userPw},#{userName},#{userAuth},#{appendDate},#{updateDate});
    </insert>
</mapper>
💬 xml 설명
- id
@Mapper에서 정의한 이름을 동일하게 맞춰줘야 한다. - resultType
리턴타입의 자료형을 넣어준다.
8. Service 구현
💻 Service 구현
- DAO를 호출하는 Service를 구현한다.
package com.karim.simpleBoard.service;

import com.karim.simpleBoard.mapper.UserMapper;
import com.karim.simpleBoard.vo.UserVo;
import lombok.RequiredArgsConstructor;
import org.springframework.security.core.userdetails.UserDetailsService;
import org.springframework.security.core.userdetails.UsernameNotFoundException;
import org.springframework.security.crypto.bcrypt.BCryptPasswordEncoder;
import org.springframework.stereotype.Service;
import org.springframework.transaction.annotation.Transactional;

import java.text.SimpleDateFormat;
import java.util.Date;

@Service
@RequiredArgsConstructor
public class UserService implements UserDetailsService{
    SimpleDateFormat format = new SimpleDateFormat ( "yyyy-MM-dd HH:mm:sss");
    Date time = new Date();
    String localTime = format.format(time);

    private final UserMapper userMapper;

    @Transactional
    public void joinUser(UserVo userVo){
        BCryptPasswordEncoder passwordEncoder = new BCryptPasswordEncoder();
        userVo.setUserPw(passwordEncoder.encode(userVo.getPassword()));
        userVo.setUserAuth("USER");
        userVo.setAppendDate(localTime);
        userVo.setUpdateDate(localTime);
        userMapper.saveUser(userVo);
    }

    @Override
    public UserVo loadUserByUsername(String userId) throws UsernameNotFoundException {
        //여기서 받은 유저 패스워드와 비교하여 로그인 인증
        UserVo userVo = userMapper.getUserAccount(userId);
        if (userVo == null){
            throw new UsernameNotFoundException("User not authorized.");
        }
        return userVo;
    }
}
💬 어노테이션 설명
- @RequiredArgsConstructor
생성자 자동 생성 및 final 변수를 의존관계를 자동으로 설정해 준다. - @Transactional
트랜잭션 보장이 된 메소드로 설정 해준다.
9. Controller 구현
💻 Controller 구현
package com.karim.simpleBoard.controller;

import com.karim.simpleBoard.service.UserService;
import com.karim.simpleBoard.vo.UserVo;
import lombok.RequiredArgsConstructor;
import org.springframework.security.core.Authentication;
import org.springframework.stereotype.Controller;
import org.springframework.ui.Model;
import org.springframework.web.bind.annotation.GetMapping;
import org.springframework.web.bind.annotation.PostMapping;

@Controller
@RequiredArgsConstructor
public class UserController {

    private final UserService userService;

    /**
     * localhost:8080 시 login 으로 redirect
     * @return
     */
    @GetMapping
    public String root() {
        return "redirect:/login";
    }

    /**
     * 로그인 폼
     * @return
     */
    @GetMapping("/login")
    public String login(){
        return "login";
    }

    /**
     * 회원가입 폼
     * @return
     */
    @GetMapping("/signUp")
    public String signUpForm() {
        return "signUp";
    }

    /**
     * 로그인 실패 폼
     * @return
     */
    @GetMapping("/access_denied")
    public String accessDenied() {
        return "access_denied";
    }

    /**
     * 회원가입 진행
     * @param userVo
     * @return
     */
    @PostMapping("/signUp")
    public String signUp(UserVo userVo) {
        userService.joinUser(userVo);
        return "redirect:/login";
    }

    /**
     * 유저 페이지
     * @param model
     * @param authentication
     * @return
     */
    @GetMapping("/user_access")
    public String userAccess(Model model, Authentication authentication) {
        //Authentication 객체를 통해 유저 정보를 가져올 수 있다.
        UserVo userVo = (UserVo) authentication.getPrincipal();  //userDetail 객체를 가져옴
        model.addAttribute("info", userVo.getUserId() +"의 "+ userVo.getUserName()+ "님");      //유저 아이디
        return "user_access";
    }
}
💬 어노테이션 설명
- @RequiredArgsConstructor
생성자 자동 생성 및 final 변수를 의존관계를 자동으로 설정해 준다. - @GetMapping
@RequestMapping(Method=RequestMethod.GET)과 같다. - @PostMapping
@RequestMapping(Method=RequestMethod.POST)과 같다.
10. 실행
💻 WebApplication 구현
package com.karim.simpleBoard;

import org.springframework.boot.SpringApplication;
import org.springframework.boot.autoconfigure.SpringBootApplication;

@SpringBootApplication
public class WebApplication {

	public static void main(String[] args) {
		SpringApplication.run(WebApplication.class, args);
	}
}
💬 WebApplication 실행
- 기본 localhost:8080으로 띄어 진다.
11. 결과 화면
미리 회원가입을 한 후(TB_USER table에 계정이 있어야) 로그인 가능
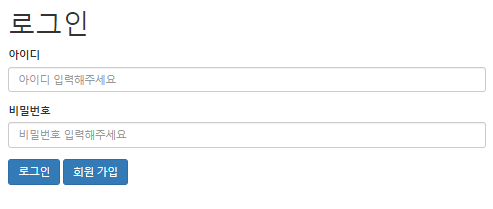
💬 로그인 화면
💬 로그인 성공 시 화면

💬 로그인 실패 시 화면

📚 참고

나도 보기 위해 정리해 놓은 벨로그