
redux 미들웨어
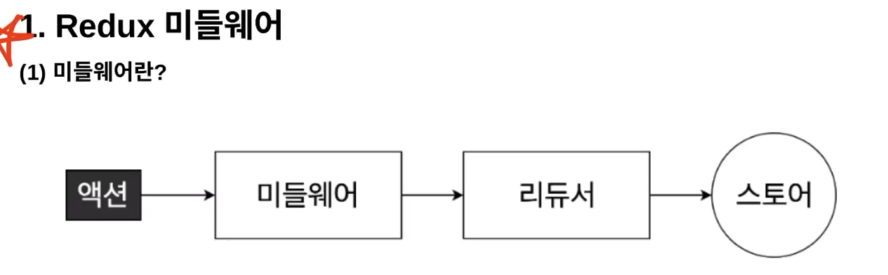
:리덕스에서 dispatch를 하면 action이 리듀서로 전달이 되고, 리듀서는 새로운 state를 반환하게 된다. 근데 미들웨어를 사용하게 되면, 이 과정 사이에 우리가 하고 싶은 작업들을 넣어서 반환할 수 있게 된다.
ex)counter
카운터 프로그램에서 더하기 버튼을 클릭했을 때 +1을 더하게 되는데,
바로 더하지 않고 "3초만 기다렸다가 더해줘!"는 수행할 수 없다.
이 때 미들웨어를 사용하면 이 작업이 가능해진다.
서버와의 통신을 위해서 사용하는 것이 대부분이다.
많이 사용되고 있는 리덕스 미들웨어는 redux-thunk이다.
thunk
:리덕스에서 많이 사용하고 있는 미들웨어
thunk를 사용하면 우리가 dispatch를 할 때 객체가 아닌 함수를 dispatch할 수 있게 해준다. 그래서 dispatch로 액션 객체가 아니라, dispatch함수를 전달하면서 우리가 하고자 하는 작업들(3초 기다리기)을 실행할 수 있게 된다.
thunk 사용
- thunk명은 앞에 __이 들어간다.
- 2개의 input이 들어간다.
- 이름이 들어간다.(의미는 없음)
- 함수가 들어간다. 함수 안에는 컴포넌트에 보내줄 payload와 thunk의 내장 기능을 가진 객체인 thunk API를 받는다. 함수 안에는 수행하고 싶은 동작을 넣는다.
import { createSlice, createAsyncThunk } from "@reduxjs/toolkit";

export const __addNumber = createAsyncThunk(
  "Add_NUMBER_WAIT",
  (payload,thunkAPI)=>{
    setTimeout(()=>{
      thunkAPI.dispatch(addNumber(payload))
    },1000)
  }
)
1.App.js에서 onClickAddHandler함수가 실행되면 dispatch로 addNumber을 실행하게 된다.(onClickAddHandelr에 리듀서 대신 들어가게 됨)
2.그러면 이 addNumber은 setTimeout함수를 실행시키게 되고, 정해놓은 시간만큼 지연이 발생하도록 한다.
3.지연 시간이 발생하면서 실행하게 될 작업은, dispatch로 addNumber리듀서를 가지고 오고, 그 안에 payload를 데려온다.
4.addNumber리듀서에서 state값에 action.payload값에 payload가 들어간다.
5.그럼 이 payload만큼 숫자를 1초 있다가 더하게 되는 로직이 완성된다.
thunk 심화
modules/todoSlice.js
import { createAsyncThunk, createSlice } from "@reduxjs/toolkit";
import axios from "axios";

const initialState = {
  todos: [],
  isLoading: false,
  error: null,
};

export const __getTodos = createAsyncThunk(
  "todos/getTodos",
  async (payload, thunkAPI) => {
    try {
      const response = await axios.get("http://localhost:4000/todos");
      return thunkAPI.fulfillWithValue(response.data);
    } catch (error) {
      return thunkAPI.rejectWithValue(error);
    }
  }
);

export const todosSlice = createSlice({
  name: "todos",
  initialState,
  reducers: {},
  extraReducers: {
    [__getTodos.pending]: (state) => {
      state.isLoading = true; // 네트워크 요청이 시작되면 로딩상태를 true로 변경합니다.
    },
    [__getTodos.fulfilled]: (state, action) => {
      state.isLoading = false; // 네트워크 요청이 끝났으니, false로 변경합니다.
      state.todos = action.payload; // Store에 있는 todos에 서버에서 가져온 todos를 넣습니다.
    },
    [__getTodos.rejected]: (state, action) => {
      state.isLoading = false; // 에러가 발생했지만, 네트워크 요청이 끝났으니, false로 변경합니다.
      state.error = action.payload; // catch 된 error 객체를 state.error에 넣습니다.
    },
  },
});

export const {} = todosSlice.actions;
export default todosSlice.reducer;
App.js
import React, { useEffect } from "react";
import { useDispatch, useSelector } from "react-redux";
import { __getTodos } from "./redux/modules/todosSlice";

const App = () => {
  const dispatch = useDispatch();
  const { isLoading, error, todos } = useSelector((state) => state.todos);

  useEffect(() => {
    dispatch(__getTodos());
  }, [dispatch]);

  if (isLoading) {
    return <div>로딩 중....</div>;
  }

  if (error) {
    return <div>{error.message}</div>;
  }

  return (
    <div>
      {todos.map((todo) => (
        <div key={todo.id}>{todo.title}</div>
      ))}
    </div>
  );
};

export default App;
1.서버통신은 100% 성공하지 않기 때문에, 우리는 이제 앞으로 state를 isLoading, isError, data상태로 나눠서 관리할 것이다.
2.따라서 초기값에 해당 항목들을 넣어준다.
3.thunk함수는 서버통신 함수이기 때문에 비동기통신을 해야한다. async와 await을 사용한다.
4.오류가 날 수 있기 때문에 try와 catch문을 활용한다.
5.try에 정상 작동할 때 구문, catch에 오류날 때 구문을 넣어준다.
6.thunk로 데이터까지는 가져 왔으니, 리덕스 스토어로 가져와야 내부에서 state로 활용할 수 있다.
7.툴킷에서 제공하는 API 두 개를 활용한다. thunkAPI.fulfillWithValue(),thunkAPI.rejectWithValue(),
성공한 기능/실패한 기능을 가지고 dispatch하는 애들이다.
8.정상적으로 처리가 성공한 애들은 reducer을 실행해야 하므로, extraReducer에 실행할 기능을 채워준다.
9.pending, fulfilled, rejected로 나눠서 각각 대기중일때, 실행됐을때, 에러났을때에 따라 나눠준다.
10.UI에서도 똑같이 나눠주면 끝!