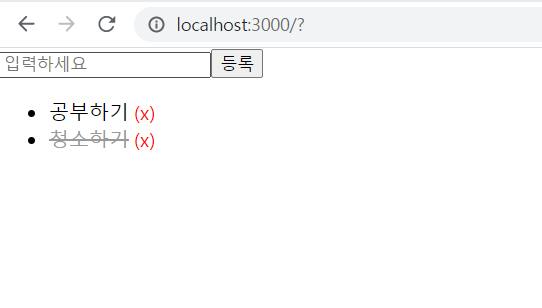
이번엔 등록, 삭제, 체크 표시가 되는 투두리스트를 만들어보자!
(with 리듀서)
components
- TodoForm : 새 todo를 등록할 수 있는 컴포넌트
(=> form, input과 useState가 들어갈 것) - TodoItem : 각각의 todos
(=> 삭제 버튼이 있어 삭제할 수 있는 개별 칸이 될 것) - TodoList : todoItem들이 여러개 모여있는 목록 컴포넌트
(=> map을 돌려 보여주는 공간이 될 것)
context
- TodosContext : 리듀서를 만드는 컴포넌트
(=> 리듀서, action 등이 들어가게 될 것)
src/components/TodoForm.tsx
import React, { useState } from "react";
import { useTodosDispatch } from "../context/TodosContext";

//새 todo를 등록할 수 있는 컴포넌트
function TodoForm() {
  const [value, setValue] = useState("");
  const dispatch = useTodosDispatch();

  const onSubmitHandler = (event: React.FormEvent) => {
    event.preventDefault();
    dispatch({
      type: "CREATE",
      text: value,
    });
    setValue("");
  };
  return (
    <form onSubmit={onSubmitHandler}>
      <input
        value={value}
        placeholder="입력하세요"
        onChange={(event) => setValue(event.target.value)}
      />
      <button>등록</button>
    </form>
  );
}

export default TodoForm;
=>
1. return문에 먼저 form 태그로 감싸고 안에 input과 button을 넣어준다.
2. 유저가 input에 입력하는 내용을 관리하기 위해서 필요한 것은 useState! useState로 state를 관리한다.
3. onSubmitHandler를 만든다. 이때 제출 후 input창은 다시 비워져야 하므로 setValue("")로 만들어준다.
//리액트
const onSubmitHandler = (event) => {
 event.preventDefault()
}

//타입스크립트
  const onSubmitHandler = (event: React.FormEvent) => {
    event.preventDefault();
  }
src/components/TodoItem.tsx
import React from "react";
import "./TodoItem.css";
import { useTodosDispatch } from "../context/TodosContext";

//todo에 대한 정보를 보여주는 컴포넌트

export type TodoItemProps = {
  todo: Todo;
};

function TodoItem({ todo }: TodoItemProps) {
  const dispatch = useTodosDispatch();

  const onToggleHandler = () => {
    dispatch({
      type: "TOGGLE",
      id: todo.id,
    });
  };

  const onRemoveHandler = () => {
    dispatch({
      type: "REMOVE",
      id: todo.id,
    });
  };

  return (
    <li className={`TodoItem ${todo.done ? "done" : ""}`}>
      <span className="text" onClick={onToggleHandler}>
        {todo.text}
      </span>
      <span className="remove" onClick={onRemoveHandler}>
        (x)
      </span>
    </li>
  );
}

export default TodoItem;- 이 컴포넌트에서는 일단 return문에서 목록을 만든다. todo.text와 x로 삭제할 수 있도록 한다.
이때 중간에 나는 type을 모아놓기로 했다.
src/types.d.ts
type Todo = {
  id: number;
  text: string;
  done: boolean;
};

type TodosState = Todo[];

type Action =
  | { type: "CREATE"; text: string }
  | { type: "TOGGLE"; id: number }
  | { type: "REMOVE"; id: number };

type TodosDispatch = Dispatch<Action>;- 이렇게 types.뒤에 d를 붙이게 되면 export, import를 따로 하지 않아도 자유자재로 불러올 수 있게 된다.
- type Todo를 선언해주고 id:number, text:string, done:boolean으로 타입을 지정해준다.
src/components/TodoList.tsx
import React from "react";
import TodoItem from "./TodoItem";
import { useTodoState } from "../context/TodosContext";

//todoItem들이 여러개 모여있는 목록 컴포넌트
function TodoList() {
  const todos = useTodoState();

  return (
    <ul>
      {todos.map((todo) => (
        <TodoItem todo={todo} key={todo.id} />
      ))}
    </ul>
  );
}

export default TodoList;- list가 모여있도록 하는 컴포넌트에는 간단히 map을 돌린다.
src/context/TodosContext.tsx
import { createContext, useContext, useReducer } from "react";

const TodosStateContext = createContext<TodosState | undefined>(undefined);

const TodosDispatchContext = createContext<TodosDispatch | undefined>(
  undefined
);

function todosReducer(state: TodosState, action: Action): TodosState {
  switch (action.type) {
    case "CREATE":
      const nextId = Math.max(...state.map((todo) => todo.id)) + 1;
      return state.concat({
        id: nextId,
        text: action.text,
        done: false,
      });
    case "TOGGLE":
      return state.map((todo) =>
        todo.id === action.id ? { ...todo, done: !todo.done } : todo
      );
    case "REMOVE":
      return state.filter((todo) => todo.id !== action.id);
    default:
      throw new Error("Unhandled action");
  }
}

export function TodosContextProvider({
  children,
}: {
  children: React.ReactNode;
}) {
  const [todos, dispatch] = useReducer(todosReducer, [
    {
      id: 1,
      text: "공부하기",
      done: true,
    },
    {
      id: 2,
      text: "청소하기",
      done: false,
    },
    {
      id: 3,
      text: "취업하기",
      done: true,
    },
  ]);

  return (
    <TodosDispatchContext.Provider value={dispatch}>
      <TodosStateContext.Provider value={todos}>
        {children}
      </TodosStateContext.Provider>
    </TodosDispatchContext.Provider>
  );
}

export function useTodoState() {
  const state = useContext(TodosStateContext);
  if (!state) throw new Error("TodosProvider not found");
  return state;
}

export function useTodosDispatch() {
  const dispatch = useContext(TodosDispatchContext);
  if (!dispatch) throw new Error("TodosProvider not found");
  return dispatch;
}- 이제 context와 리듀서를 만들어 줄 것!
- TodosStateContext는 TodosState거나 undefined거나,
TodosDispatchContext는 TodosDispatch거나, undefined거나 - todosReducer를 만들어주고, 초기 상태인 state는 TodosState(Todo[]) action은 Action( | { type: "CREATE"; text: string }
| { type: "TOGGLE"; id: number }
| { type: "REMOVE"; id: number }) - switch구문으로 나누어주고 CREATE일 때는 id를 하나씩 늘려주고,
TOGGLE일 때는 done의 상태를 반대로 바꿔주고, REMOVE일 때는 filter를 걸어서 해당하는 것을 없애준다. - useReducer구문을 사용해주고
- Provider를 붙여주어 children을 감싸준다.
- 그리고 useTodoState와 useTodosDispatch를 전역에서 사용할 수 있도록 useContext를 사용해 만들어준다.
- 이렇게 만든 후 다시 위 컴포넌트들로 올라가서 사용해주게 되면 끝!

기록은 담백하게, 성장은 빠르게! 🐘