준비물
- AWS 계정
- Terraform CLI 설치
- AWS CLI 설치
IAM 사용자 1명 + Access Key 1개 만들어 보자
루트 에서 바로 하는 것 보단 AWS 권한 분리를 위해 분리해 보려고 한다.
-
루트 계정으로 AWS 콘솔에 로그인
-
상단 검색창에 IAM 입력 후 IAM 서비스로
-
왼쪽 메뉴 Users(사용자)
-
Create user (사용자 만들기)
-
Create group
5.1. AmazonS3FullAccess 활성화
5.2. SignInLocalDevelopmentAccess 활성화 (CLI 로그인)
AmazonS3FullAccess: S3 권한 = S3 버킷생성, 버킷 삭제, 버킷 목록조회, 객체 업로드/다운로드/삭제, 버킷정책 일부 관리 -
사용자 -> 보안 자격 증명 -> 엑세스키 -> 엑세스키 만들기
-
aws 상태 확인해 보기
7.1 유저 정보aws sts get-caller-identity7.2 유저, 엑세스키, secret_key, region
aws configure list -
Terraform 상태 확인 하기 ( 버전 )
terraform version
이제 코드로 작성해보자
작업할 폴더에서 providers.tf 를 생성
# Terraform 전체 설정 블록
# 어떤 Provider를 사용할지, 버전은 몇으로 할지 정의
terraform {
  # 필수 프로파이더를 설정
  required_providers {
    # aws 변수 선언 -> asw provider를 만들겠다.
    aws = {
      # provider source 세팅
      source = "hashicorp/aws" # hashicorp에서 제공하는 aws 프로바이더 사용하겠다

      # provider 버전 세팅
      version = "~> 5.0" # 5.x 버전 사용하겠다
    }
  }
}


# aws 프로바이더 설정
provider "aws" {
  # region 설정 서울 (ap-northeast-2)
  region = "ap-northeast-2"
}
main.tf
# 실제로 만들 AWS 리소스 정의
# 리소스 타입 ex) aws_s3_bucket
# 리소스를 테라폼 내부에서 부를 이름 example
resource "aws_s3_bucket" "example" {
  bucket = "littletale-terraform-study-001" # 주의사항: AWS 전체에서 고유해야함!!
}
현재는
- providers.tf
- main.tf
이 두 구조로 진행하지만 실무에서는 좀더 나눈다고 한다.
- providers.tf: 버전과 provider
- variables.tf: 입력값 선언
- terraform.tfvars: 실제 값
- main.tf: 리소스 정의
테라폼안에서의 동작 순서 (aws 안넘어감)
초기화
terraform init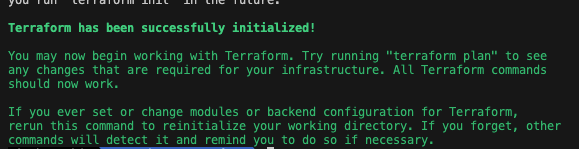
required_providers 의 값을 읽고 세팅을 한다.
린트 정리 ( 포멧 )
Terraform 코드 스타일을 표준 형태로 자동 정리
terraform fmtvalidate ( 컴파일 )
현재 작성한 Terraform 설정이 문법적으로 맞는가 보는 단계
terraform validate
더 자세히는
- 괄호/블록 문법 오류
- 잘못된 속성명
- provider 설정 구조 문제
terraform plan
이게 진짜 신기할 것 같은데
Terraform 이 현재 코드와 실제 인프라 상태를 비교
새로 만들것, 바꿀것, 지울것들을 미리 보여준다고 함
예측 동작
- 현재 AWS에 이 버킷 없음
- 코드에는 버킷 만들라고 되어 있음
- 그래서 1 to add
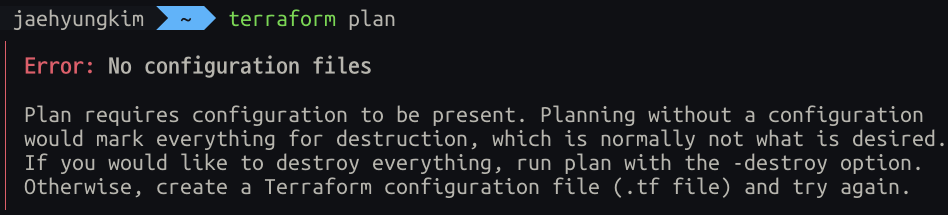
당연한 이야기겠지만 프로젝트 파일에서 진행 해야한다.
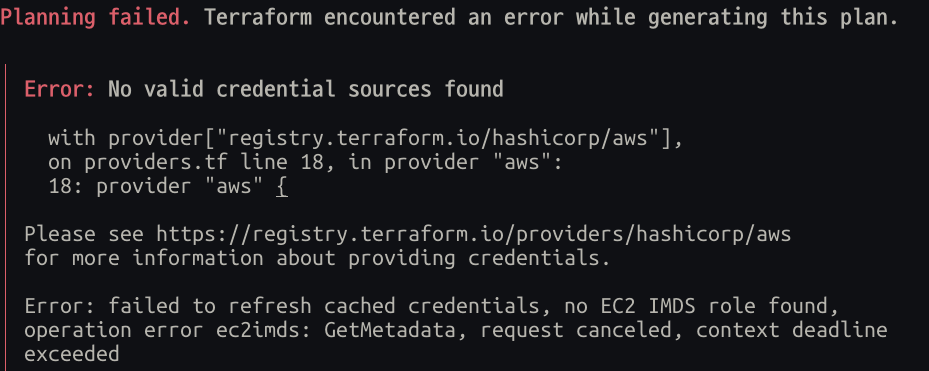
이번엔 AWS 로그인 정보를 읽지 못했다.
terraform의 AWS provider는 보통 이런 순서로 자격 증명을 찾음
- 환경변수
- AWS shared config/profile
- credentials file
- EC2 role 등
즉 aws login 값을 못 가져오는 것 같음 -> 엑세스 키가 필요
- IAM 사용자에서 Access Key 생성
- 터미널에서: aws configure
- 입력:
- AWS Access Key ID
- AWS Secret Access Key
- Default region name: ap-northeast-2
- Default output format: json
terraform plan

Terraform used the selected providers to generate the following execution plan.
Resource actions are indicated with the following symbols:
  + create

Terraform will perform the following actions:

  # aws_s3_bucket.example will be created
  + resource "aws_s3_bucket" "example" {
      + acceleration_status         = (known after apply)
      + acl                         = (known after apply)
      + arn                         = (known after apply)
      + bucket                      = "littletale-terraform-study-20260415-01"
      + bucket_domain_name          = (known after apply)
      + bucket_prefix               = (known after apply)
      + bucket_regional_domain_name = (known after apply)
      + force_destroy               = false
      + hosted_zone_id              = (known after apply)
      + id                          = (known after apply)
      + object_lock_enabled         = (known after apply)
      + policy                      = (known after apply)
      + region                      = (known after apply)
      + request_payer               = (known after apply)
      + tags_all                    = (known after apply)
      + website_domain              = (known after apply)
      + website_endpoint            = (known after apply)

      + cors_rule (known after apply)

      + grant (known after apply)

      + lifecycle_rule (known after apply)

      + logging (known after apply)

      + object_lock_configuration (known after apply)

      + replication_configuration (known after apply)

      + server_side_encryption_configuration (known after apply)

      + versioning (known after apply)

      + website (known after apply)
    }

Plan: 1 to add, 0 to change, 0 to destroy.
여기서 말하는 핵심은 간단하다
- aws_s3_bucket.example 이라는 리소스를 AWS 에 새로 하나 추가한다.
- Plan: 1 to add, 0 to change, 0 to destroy. 이부분이 핵심
will be created: 아직 안 만들었고, apply 하면 만들어진다는 뜻
이제 Apply 할 차례다
terraform apply
aws s3 ls
---
2026-04-16 09:45:47 littletale-terraform-study-20260415-01
테라폼 입장에서도 확인이 가능하다.
terraform state list
---
aws_s3_bucket.example
S3란 무엇이지?
AWS의 파일 저장 서비스
Simple Storage Service 의 줄임말!
이미지, 동영상, JSON, 로그, 백업 파일등
버킷은 무엇이지?
S3 안에서 파일을 담는
최상위 저장 공간
창고라고 생각하자.
- S3 = 창고 서비스 자체
- bucket = 창고 하나
- 버킷 안의 파일들 = 그 창고 안에 들어 있는 물건들
exam
S3
└── bucket
    ├── file1.jpg
    ├── data.json
    └── logs.txt
변수를 사용해보자
당연하겠지만 이친구도 결국 Code 이기에 변수가 있다.
variables.tf
# Terraform 입력 변수 선언
# 이 파일은 "어떤 값을 외부에서 받을지"를 정의합니다.
variable "bucket_name" {
  # 이 변수의 의미를 설명합니다.
  description = "S3 bucket name"

  # 문자열(string) 타입만 받도록 제한합니다.
  type = string
}
terraform.tfvars
# 변수에 실제 값을 넣는 파일입니다.
# variables.tf 에서 선언한 bucket_name 변수에 값을 할당합니다.
bucket_name = "littletale-terraform-study-20260415-01"
main.tf
# 실제로 만들 AWS 리소스 정의
# aws_s3_bucket = AWS S3 버킷 리소스 타입
# example = Terraform 내부에서 이 리소스를 식별하는 이름
resource "aws_s3_bucket" "example" {
  # 기존 방식: 버킷 이름을 코드에 직접 하드코딩
  # 이 방식은 간단하지만, 값 변경 시 코드 자체를 수정해야 해서 재사용성이 떨어집니다.
  # bucket = "littletale-terraform-study-20260415-01"

  # 현재 방식: 변수(variable)로 버킷 이름을 받아서 사용
  # variables.tf 에서 선언한 bucket_name 값을 참조합니다.
  bucket = var.bucket_name
}
결과를 볼 수 있게
outputs.tf는 Terraform이 작업을 끝낸 뒤, 결과로 보여줄 값을 정의하는 파일
outputs.tf
# Terraform 출력값 선언
# 이 파일은 "Terraform이 성공적으로 생성한 리소스의 정보를 외부로 보여줄지"를 정의합니다.
output "bucket_name" {
  # 이 출력값의 의미를 설명합니다.
  description = "Created S3 bucket name"

  # aws_s3_bucket.example 리소스에서 bucket 속성(attribute)의 값을 가져옵니다.
  value = aws_s3_bucket.example.bucket
}
jaehyungkim ~/Desktop/Terraform terraform apply
aws_s3_bucket.example: Refreshing state... [id=littletale-terraform-study-20260415-01]
Changes to Outputs:
+ bucket_name = "littletale-terraform-study-20260415-01"
You can apply this plan to save these new output values to the Terraform state, without changing any real infrastructure.
Do you want to perform these actions?
Terraform will perform the actions described above.
Only 'yes' will be accepted to approve.
Enter a value: yes
Apply complete! Resources: 0 added, 0 changed, 0 destroyed.
Outputs:
bucket_name = "littletale-terraform-study-20260415-01"와닿지 않는다.
- S3 버킷 생성
- 그 버킷 ARN을 IAM 정책에서 써야 함
- 그 버킷 이름을 다른 모듈에서 써야 함
- 생성된 URL을 출력해서 바로 확인해야 함
이럴 때 output이 없으면 매번 AWS 콘솔 들어가서 찾아야 한다.
- variable = 내가 Terraform에 넘기는 값
- output = Terraform이 나에게 돌려주는 값
일단 이정도로 정리하고 다시 다루어 보면 좋을 것 같음
tags
AWS 리소스에 붙이는
메타데이터
- 이 리소스 이름이 뭔지
- 누가 만들었는지
- 어떤 환경인지
- 무슨 용도인지
리소스가 많아지면 관리하기가 까다로워질 뿐더러, 관리자가 누구였는지 등 정보가 필요해 진다.
- 리소스 용도 파악
- 비용 추적
- 운영/정리 기준 통일
- 콘솔에서 검색/필터링 쉬움
main.tf
# 실제로 만들 AWS 리소스 정의
# aws_s3_bucket = AWS S3 버킷 리소스 타입
# example = Terraform 내부에서 이 리소스를 식별하는 이름
resource "aws_s3_bucket" "example" {
  # 기존 방식: 버킷 이름을 코드에 직접 하드코딩
  # 이 방식은 간단하지만, 값 변경 시 코드 자체를 수정해야 해서 재사용성이 떨어집니다.
  # bucket = "littletale-terraform-study-20260415-01"

  # 현재 방식: 변수(variable)로 버킷 이름을 받아서 사용
  # variables.tf 에서 선언한 bucket_name 값을 참조합니다.
  bucket = var.bucket_name

  # 태그는 key-value 형태로 작성
  tags = {
    Name        = "littletale-study-bucket" # 버킷의 이름
    Environment = "dev"                     # 개발 환경
    Project     = "terraform-study"         # 프로젝트 이름
    Owner       = "jaehyungkim"             # 소유자
  }
}
- 진짜 버킷 이름: littletale-terraform-study-20260415-01
- 태그의 Name 값: littletale-study-bucket
태그 Name은 관리용 라벨이라 더 자유롭게 쓸 수 있습니다.
bucket = AWS가 인식하는 진짜 고유 이름
tags.Name = 사람이 보기 쉽게 붙이는 별칭 같은 것
이름 헷갈리지 말기
resource "aws_s3_bucket" "example"
example = Terraform 코드 내부에서만 쓰는 이름, terraform이 리소스를 참조할 때 사용
----------------

bucket = var.bucket_name
AWS에 실제로 생성되는 S3 버킷의 진짜 이름, 유일무이
----------------

tags = {
  Name = "s3-for-terraform-study"
}
AWS 리소스에 붙이는 관리용 라벨
이제 적용해 보자
terraform fmt

terraform validate
Success! The configuration is valid.

terraform plan
plan 을 돌리고 나면 나온 출력은 다음과 같다
aws_s3_bucket.example: Refreshing state... [id=littletale-terraform-study-20260415-01]

Terraform used the selected providers to generate the following execution plan. Resource actions are indicated with the following symbols:
  ~ update in-place

Terraform will perform the following actions:

  # aws_s3_bucket.example will be updated in-place
  ~ resource "aws_s3_bucket" "example" {
        id                          = "littletale-terraform-study-20260415-01"
      ~ tags                        = {
          + "Environment" = "dev"
          + "Name"        = "littletale-study-bucket"
          + "Owner"       = "jaehyungkim"
          + "Project"     = "terraform-study"
        }
      ~ tags_all                    = {
          + "Environment" = "dev"
          + "Name"        = "littletale-study-bucket"
          + "Owner"       = "jaehyungkim"
          + "Project"     = "terraform-study"
        }
        # (12 unchanged attributes hidden)

        # (3 unchanged blocks hidden)
    }

Plan: 0 to add, 1 to change, 0 to destroy.
기존 S3 버킷에 작성한 태그만 추가라고 잘 뜹니다.
terraform apply
cli 로도 확인이 가능하다
aws s3api get-bucket-tagging --bucket littletale-terraform-study-20260415-01{
"TagSet": [
{
"Key": "Project",
"Value": "terraform-study"
},
{
"Key": "Environment",
"Value": "dev"
},
{
"Key": "Owner",
"Value": "jaehyungkim"
},
{
"Key": "Name",
"Value": "littletale-study-bucket"
}
]
}Destroy
(plan, apply)
- 생성
- 수정
- 확인
위 단계처럼 현재까지 진행했다.
이제 삭제를 진행해 보자
Destroy 이름 부터가 부셔버리겠다인데
말 그대로다. terraform에서 관리하던 인프라 전부를 부시겠다이기 때문이다.
일단 해보자
 terraform plan -destroy

 terraform destroy

 ----

 aws_s3_bucket.example: Destroying... [id=littletale-terraform-study-20260415-01]
aws_s3_bucket.example: Destruction complete after 1s

Destroy complete! Resources: 1 destroyed.
만든 버킷이 없어졌다.
전부를 없애는 거다 보니 상당히 위험하게 느껴진다.
특정 리소스만 부시려면?
특정 리소스만 없애기 위해 아래와 같이 작성한다.
terraform destroy -target=aws_s3_bucket.example
경고가 떳다
"인프라 전체를 종합적으로 보지 않고, 특정 리소스를 찝어서 처리하고 있다"
"권장하지 않는다"
즉, 해당 방식도 위험이 따른다. 저걸 삭제 했을때 어떤 영향이 일어날지 미지수 이기 때문이다.
그래도 한번 해보자
이것도 마찬가지로 잘 지워진 모습이다.
그렇다면 어떻게 해야 안전하게 할까?
바로, 코드로 지우거나, 주석 처리하는 것
# resource "aws_s3_bucket" "example" {
#   # 기존 방식: 버킷 이름을 코드에 직접 하드코딩
#   # 이 방식은 간단하지만, 값 변경 시 코드 자체를 수정해야 해서 재사용성이 떨어집니다.
#   # bucket = "littletale-terraform-study-20260415-01"

#   # 현재 방식: 변수(variable)로 버킷 이름을 받아서 사용
#   # variables.tf 에서 선언한 bucket_name 값을 참조합니다.
#   bucket = var.bucket_name

#   # 태그는 key-value 형태로 작성
#   tags = {
#     Name        = "littletale-study-bucket" # 버킷의 이름
#     Environment = "dev"                     # 개발 환경
#     Project     = "terraform-study"         # 프로젝트 이름
#     Owner       = "jaehyungkim"             # 소유자
#   }
# }


# output "bucket_arn" {
#   description = "ARN of the S3 bucket"
#   value       = aws_s3_bucket.example.arn
# }

# output "bucket_name" {
#   description = "Name of the S3 bucket"
#   value       = aws_s3_bucket.example.bucket
# }
plan, apply 돌리면 또 잘 지워져 나온다.
지금까지의 과정들
- provider 설정
- resource 생성
- variable 분리
- tags 추가
- plan으로 변경 확인
- apply로 반영
- destroy로 삭제
State
상태
Terraform 에서도 상태라는 개념이 존재하다.
Terraform이 관리하는 실제 인프라의 현재 상태를 기록해 둔 파일
plan에서 무엇을 만들지 예측apply에서 실제 반영destroy에서 무엇을 지울지 판단- 다음
plan에서 변경점을 비교
이 들이 가능한 이유가
state가 있기 때문
*.tf 파일= 내가 원하는 목표 상태terraform.tfstate= Terraform이 알고 있는 현재 상태
이 두개의 값을 통해 Terraform은 판단함
What If?
예를 들어 지금 네가 이런 코드를 썼다고 하자
resource "aws_s3_bucket" "example" {
  bucket = var.bucket_name
}
처음엔 state에 아무것도 없을 수 있음
그러면 Terraform은 이렇게 판단
- 코드에는 버킷이 있어야 한다고 적혀 있음
- 그런데 state에는 없음
- 그럼 새로 만들어야겠다
무슨 상태값들을?
- Terraform 버전
- 리소스 목록
- 각 리소스의 실제 ID
- 속성값
- output 값
조심할 점.
state에는 리소스 정보가 많이 들어간다.
민감한 정보도 들어있다.
- git에 올리지 않기
- 팀이 공유 가능한 원격 backend 사용
- lock 고려
- 접근 권한 고려
공유하지 말라는건가? -> X 공유해야한다.
terraform.tfstate를 각자 노트북에 따로 들고 있으면 문제가 발생
- A가 apply 해서 실제 AWS는 바뀜
- 그런데 B 로컬 state는 예전 상태
- 그러면 B가 plan/apply 할 때 잘못된 판단 가능
- 동시에 작업하면 state 충돌도 남
하나의 서버에 State를 넣어 관리하는게 정석
동시 접근은?
한 사람이 먼저 state lock을 잡으면
다른 사람의 작업은 대기하거나 실패 하게
AWS 기존에 있던걸 Terraform 이 알아서 인식할까?
놀랍게도 그건 무리다.
기존 AWS 리소스가 있어도 state에 없으면 Terraform은
“내가 관리 중인 리소스”로 인식하지 않는다.
이때 선택지는 보통 2개
-
새로 만들 수 있는 건 Terraform으로 새로 구축
기존 것을 건드리지 않고 Terraform 관리 대상은 새로 만든 것부터 시작 -
기존 리소스를 Terraform state에 편입 ( import )
- 예를들어 aws애 있던 resource들은 하나 하나 적어서 반영하기
시도해보기 - import
- 테라폼 상태 확인해보기
terraform state list
aws_s3_bucket.example-
AWS 콘솔에서 기존에 없던 S3 버킷 littletale-terraform-study-20260416-01를 만듬
-
Terraform은 이 버킷을 자동으로 알지 못한다
그래서plan만으로는 “기존 버킷을 가져오기”가 아니라 “새로 만들기”로 이해할 수 있다 -
기존 AWS 리소스를 Terraform이 관리하게 만들려면
import가 필요하다
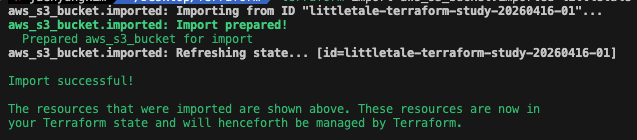
terraform import aws_s3_bucket.imported littletale-terraform-study-20260416-01aws_s3_bucket.imported: Terraform 코드 안의 리소스 주소littletale-terraform-study-20260416-01: AWS에 이미 존재하는 실제 버킷 이름
“이미 AWS에 있는 이 버킷을, Terraform의 aws_s3_bucket.imported 리소스로 등록해라”
처음엔 aws_s3_bucket.example로 import를 시도했는데,
그 주소는 이미 다른 버킷을 관리 중이어서 충돌이 났었다.
import 후 해야할 일
바로 실제 AWS와 상태가 일치 하는가 이다.
 terraform plan
aws_s3_bucket.example: Refreshing state... [id=littletale-terraform-study-20260415-01]
aws_s3_bucket.imported: Refreshing state... [id=littletale-terraform-study-20260416-01]

No changes. Your infrastructure matches the configuration.

Terraform has compared your real infrastructure against your configuration and found no differences, so no changes are needed.
현재는 간단히 하고 있어서 바꿀게 없다고 뜨지만
- 0 to add인지
- 0 to change인지
- 아니면 태그나 속성 차이 때문에 1 to change가 나오는지 등
이러한 부분들을 신경써야 한다.
Locals.tf
현재는 태그가 리소스마다 직접 박혀 있음
이런 값들을 local로 묶어서 재사용해야함 Common 느낌
현재
tags = {
  Name        = "littletale-study-bucket"
  Environment = "dev"
  Project     = "terraform-study"
  Owner       = "jaehyungkim"
}
locals.tf
locals {
  common_tags = {
    Environment = "dev"             # 개발 환경
    Project     = "terraform-study" # 프로젝트 이름
    Owner       = "jaehyungkim"     # 소유자
  }
}
main.tf
# 로컬로 따로 뺴서 연결
tags = merge(local.common_tags, {
	Name = "littletale-study-bucket"
})
단순 코드 가독성 때문일까?
그렇지 않다.
- 코드 가독성 (중복 제거)
- 재사용성
- 통제성 -> 변경 범위가 줄고, 범위 예측이 가능
variable과 local의 차이가 뭔데?
-
외부에서 주입받아야 하면 variable
-
코드 내부에서 정해도 되면 local
-
재사용성이 있는가 없는가로 생각해보자
variable "bucket_name" {
  description = "S3 bucket name"
  type = string
}

variable "bucket_name2" {
  description = "S3 bucket name"
  type = string
}
버킷 이름을 변수로 두는게 맞는지 고민해보자
- 버킷 이름은 환경마다 달라질 수 있음
- 전역 유일해야 해서 매번 바뀔 수도 있음
- 코드에 박아두면 재사용성이 떨어짐
bucket_name = "littletale-terraform-study-20260415-01"
bucket_name2 = "littletale-terraform-study-20260416-01"
즉 변수로 두는게 맞다
locals {
  common_tags = {
    Environment = "dev"             # 개발 환경
    Project     = "terraform-study" # 프로젝트 이름
    Owner       = "jaehyungkim"     # 소유자
  }
}
Environment = "dev" 이값도 변수로 빼는게 맞아 보인다.
locals {
  common_tags = {
    Environment = var.environment   # 개발 환경
    Project     = "terraform-study" # 프로젝트 이름
    Owner       = "jaehyungkim"     # 소유자
  }
}
다음과 같이 코드를 변경 하였다.
Outputs.tf
위에서 잠깐 다루었지만 이번에 좀 더 다루어 보자.
ARN
Amazon Resource Name의 약자
- AWS 리소스를 식별하는 주소
- 사람에겐 버킷 이름이
- AWS 시스템에선 ARN 같은 정확한 참조값 ex) 식별자
ex)arn:aws:s3:::littletale-terraform-study-20260415-01
- arn: → ARN 형식 시작
- aws: → AWS
- s3: → S3 서비스
- ::~ → 리소스 이름
output
terraform이 작업을 끝낸 뒤, 밖으로 보여줄 값을 정의하는 파일
만약 버킷을 만들었다면 Terraform은 버킷의 관련 값들을 알고 있음
- 버킷 이름
- 버킷 ARN
- 도메인 이름 등
→ 그중 중요한 값을 output으로 선언
→ apply or terraform output 명령으로 확인 가능
“다른 코드/모듈이 이 값을 쓰게 만드는 인터페이스”
그럼 지금 상태에서 추가한 리소스에 관한 output을 짠다면 어떻게 할까?
resource "aws_s3_bucket" "imported" {
  bucket = var.bucket_name2

  tags = merge(local.common_tags, {
    Name = "littletale-imported-bucket"
  })
}

output "imported_bucket_name" {
  description = "Name of the imported S3 bucket"
  value       = aws_s3_bucket.imported.bucket
}

output "imported_bucket_arn" {
  description = "ARN of the imported S3 bucket"
  value       = aws_s3_bucket.imported.arn
}
versioning
aws s3 버킷의 버전관리 기능
마치 npm, fvm, spm 등 과 같은 느낌으로 생각하면 된다.
- ex) 이미지들어있음 -> 수정함 -> 버전별로 관리해서 이전 이미지도 아는
중요한 포인트
버킷 안에서 관리 X -> 별도 리소스로 다루기
- aws_s3_bucket
버킷 자체 - aws_s3_bucket_versioning
버킷의 versioning 설정
버킷 차제
resource "aws_s3_bucket" "imported" {
  ...
}
버킷에 Versioning 적용
resource "aws_s3_bucket_versioning" "imported" {
  bucket = aws_s3_bucket.imported.id

  versioning_configuration {
    status = "Enabled"
  }
}
오해 금물 : 버킷을 새로 하나 더파서 하는 개념 X
-> 기존것에 설정을 추가한것임
즉 리소스는 추가 O 버킷추가? X

사진과 같이 버전 관리가 활성화 된 모습이다.
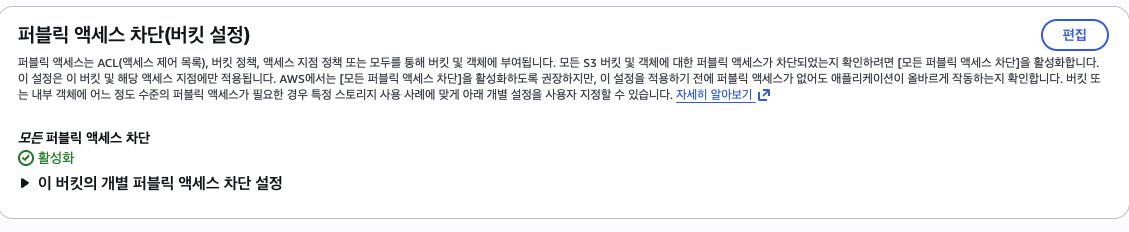
public acess block
이번엔 Versioning 이랑 비슷하지만 다른 거다.
목적은보안이다.
# S3 버킷 public access block 설정 리소스입니다.
resource "aws_s3_bucket_public_access_block" "imported" {
  bucket = aws_s3_bucket.imported.id

  # 버킷 퍼블릭 액세스 차단 설정
  block_public_acls       = true # 퍼블릭 ACL 차단
  block_public_policy     = true # 퍼블릭 정책 차단
  ignore_public_acls      = true # 퍼블릭 ACL 무시
  restrict_public_buckets = true # 퍼블릭 버킷 제한
}
S3에서 공개 여부를 제어하는 대표수단
- ACL
- Bucket Policy
ACL - Access Control List
- private
- public-read
- public-read-write
ex) 어떤 객체에 public-read -> 인터넷 누구나 읽을 수 있음
Bucket Policy
버킷에 붙는
Json
ACL보다 더 구조적, 세밀하게 권한 제어
- 특정 IAM 사용자만 접근 허용
- 특정 VPC에서만 접근 허용
- 특정 prefix 경로만 읽기 허용
- 모든 사람(*)에게 읽기 허용
간단 정리
ACL = 리소스 권한
Bucket Policy = 버킷 권한 규칙 문서
  block_public_acls       = true # 퍼블릭 ACL 차단
  -> 버킷에 퍼블릭 AWS가 ACL 설정 차단

  block_public_policy     = true # 퍼블릭 정책 차단
  /*
  	Principal *
	Action s3:GetObject
	Resource 버킷 객체 전체

    이런 퍼블릭 버킷 정책을 붙이려는 시도를 막음
  */

  ignore_public_acls      = true # 퍼블릭 ACL 무시
  -> 이미 퍼블릭 ACL이 있더라도, 그 ACL을 무시함

restrict_public_buckets = true # 퍼블릭 버킷 제한- Amazon S3에서 이 버킷에 대한 공개 버킷 정책을 제한할지 여부입니다. 기본값은 false
- 이 설정을 활성화해도 이전에 저장된 버킷 정책에는 영향을 미치지 않지만,
공개 버킷 정책 내의 공개 및 계정 간 액세스(특정 계정에 대한 비공개 위임 포함)는 차단됩니다.
문서: aws_s3_bucket_public_access_block
경로는 하나가 아니다.
위에서 4개의 값을 true 둔 것을 이해하면 알 듯이
S3가 공개되는 경로가 하나가 아니다.
- ACL 로 공개
- Bucket Policy
- 이전 설정값에 의한
Data source
테라폼이 기존에 있는
정보리소스조회만하는 방법
- resource = 만들고 관리함
- data = 읽기만 함
다시 정리하면
지금 Terraform이 어떤 AWS 계정/사용자로 인증되어 있는지 그 정보를 읽어오는 것
“Terraform이 만들지는 않지만, 알아야 하는 정보를 읽어오는 장치”
"기존 AWS 정보도 Terraform에서 참조할 수 있다"
main.tf
# 데이터 소스
# 현재 로그인된 AWS 계정 정보를 가져옵니다.
data "aws_caller_identity" "current" {}
# 현재 사용 중인 AWS 리전을 가져옵니다.
data "aws_region" "current" {}
output.tf
# 데이터 소스 출력값
output "current_account_id" {
  description = "AWS account ID currently used by Terraform"
  value       = data.aws_caller_identity.current.account_id
}

# 데이터 소스 출력값
output "current_region" {
  description = "AWS region currently used by Terraform"
  value       = data.aws_region.current.name
}
Plan 출력 값
data.aws_caller_identity.current: Reading...
data.aws_region.current: Reading...
data.aws_region.current: Read complete after 0s [id=ap-northeast-2]
data.aws_caller_identity.current: Read complete after 0s [id=xxxxxxxxxx]
locals.tf
locals {
  common_tags = {
    Environment = var.environment   # 개발 환경
    Project     = "terraform-study" # 프로젝트 이름
    Owner       = "jaehyungkim"     # 소유자
    Region      = data.aws_region.current.name
  }
}
위와 같이 적용해보고 plan
 ...
 + "Region"      = "ap-northeast-2"
 ...
 + "Region"      = "ap-northeast-2"
...
Plan: 0 to add, 2 to change, 0 to destroy.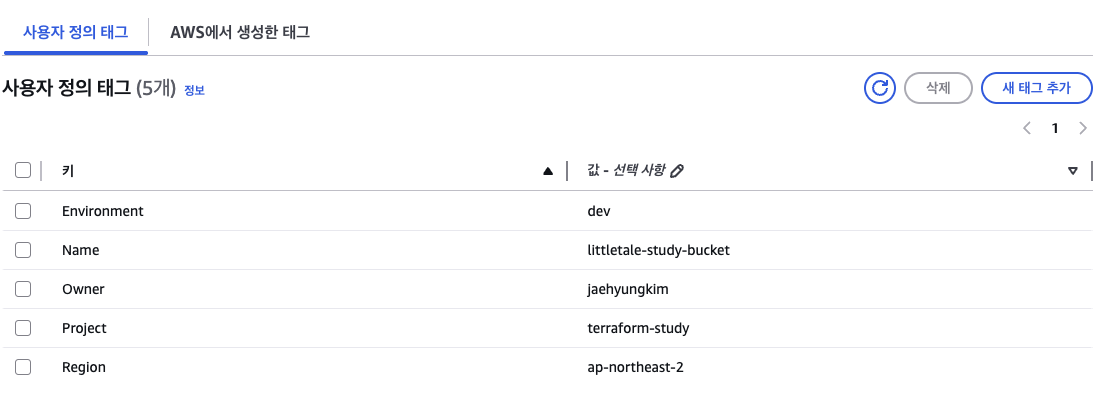
잘 반영 된 것을 확인 할 수가 있습니다.
잠깐 정리하기
- provider
- resource
- variable
- local
- output
- data
- import
- plan/apply/destroy
Module
프로그래밍을 해본사람들은 지겹게 들은 단어 모듈
즉, 재사용 단위로 묶는것을 뜻함
상황
예를들어 아래와 같이 상황을 두어보자
- 버킷 여러 개
- VPC 여러 개
- 환경 여러 개
- 프로젝트 여러 개
이때 매번 코드를 새로 쓰면
중복, 실수 가능성 이 커짐
-> 공통 패턴을 모듈로 묶자
S3 구성법을 모듈화 하자
main.tf
# 이 모듈 안에서 공통으로 쓰는 태그 맵을 만듭니다.
# 루트 모듈에서 받은 environment, owner, project_name, region 값을 한 번 묶어서
# 여러 리소스에서 반복 사용하기 쉽게 정리합니다.
locals {
  common_tags = {
    # 배포 환경 구분용 태그입니다.
    Environment = var.environment

    # 리소스 소유자 식별용 태그입니다.
    Owner       = var.owner

    # 프로젝트 식별용 태그입니다.
    Project     = var.project_name

    # 현재 AWS 리전 태그입니다.
    Region      = var.region
  }
}

# 이 모듈의 핵심 리소스인 S3 버킷 본체입니다.
resource "aws_s3_bucket" "this" {
  # 루트 모듈에서 전달받은 실제 버킷 이름을 그대로 사용합니다.
  bucket = var.bucket_name

  # 공통 태그(local.common_tags)에 버킷별 Name 태그를 추가해서 최종 tags 맵을 만듭니다.
  # 이렇게 하면 Environment/Owner/Project/Region은 공통 유지,
  # Name만 버킷마다 다르게 줄 수 있습니다.
  tags = merge(local.common_tags, {
    Name = var.name_tag
  })
}

# versioning 설정은 선택적으로 생성합니다.
# enable_versioning이 true면 count = 1이 되어 리소스가 생성되고,
# false면 count = 0이 되어 이 설정 리소스가 아예 생기지 않습니다.
resource "aws_s3_bucket_versioning" "this" {
  # 필요할 때만 리소스를 생성하기 위한 count 조건입니다.
  count = var.enable_versioning ? 1 : 0

  # versioning 설정이 적용될 대상 버킷 ID입니다.
  bucket = aws_s3_bucket.this.id

  versioning_configuration {
    # 객체를 덮어써도 이전 버전을 남기도록 버전 관리를 활성화합니다.
    status = "Enabled"
  }
}
outputs.tf
# 이 파일은 모듈 내부에서 만든 버킷의 주요 값을 모듈 밖으로 내보냅니다.
# 루트 모듈은 이 output들을 받아 다시 자신의 output으로 노출할 수 있습니다.

# 이 모듈이 만든 버킷의 ARN입니다.
output "bucket_arn" {
  description = "ARN of the S3 bucket"
  value       = aws_s3_bucket.this.arn
}

# 이 모듈이 만든 버킷의 실제 이름입니다.
output "bucket_name" {
  description = "Name of the S3 bucket"
  value       = aws_s3_bucket.this.bucket
}
valiable.tf
# 이 파일은 s3_bucket 모듈이 루트 모듈로부터 받아야 하는 입력값들을 정의합니다.

# 실제 S3 버킷 이름입니다.
variable "bucket_name" {
  description = "Name of the S3 bucket"
  type        = string
}

# versioning 설정을 생성할지 여부입니다.
variable "enable_versioning" {
  description = "Whether to enable S3 bucket versioning"
  type        = bool
  default     = false
}

# 공통 태그에 들어갈 배포 환경값입니다.
variable "environment" {
  description = "Deployment environment"
  type        = string
}

# 공통 태그와 별도로 버킷별 Name 태그에 들어갈 값입니다.
variable "name_tag" {
  description = "Value for the Name tag"
  type        = string
}

# 공통 태그에 들어갈 Owner 값입니다.
variable "owner" {
  description = "Owner tag value"
  type        = string
}

# 공통 태그에 들어갈 Project 값입니다.
variable "project_name" {
  description = "Project tag value"
  type        = string
}

# 공통 태그에 들어갈 AWS 리전 값입니다.
variable "region" {
  description = "AWS region tag value"
  type        = string
}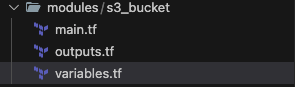
위 사진과 같이 모듈화를 해놓았다
main.tf 변경점 1. module
# example 버킷용 S3 모듈 호출입니다.
# 루트 모듈은 "어떤 값을 넘길지"만 결정하고,
# 실제 버킷 리소스, 태그 조합, versioning 구현은 modules/s3_bucket 안에 둡니다.
module "example" {
  # 이 모듈 코드가 있는 로컬 경로입니다.
  source = "./modules/s3_bucket"

  # 실제 S3 버킷 이름입니다.
  bucket_name = var.bucket_name

  # example 버킷은 versioning을 켜지 않도록 false를 전달합니다.
  enable_versioning = false

  # 공통 태그에 들어갈 환경값입니다.
  environment = var.environment

  # 버킷별 Name 태그 값입니다.
  name_tag = "littletale-study-bucket"

  # 공통 태그에 들어갈 Owner 값입니다.
  owner = var.owner

  # 공통 태그에 들어갈 Project 값입니다.
  project_name = var.project_name

  # data source로 읽어온 현재 AWS 리전을 태그 값으로 넘깁니다.
  region = data.aws_region.current.name
}

# imported 버킷용 S3 모듈 호출입니다.
# 이 모듈은 example 모듈과 같은 구현을 재사용하지만,
# versioning을 켜고 Name 태그만 다르게 넘겨서 동작 차이를 만듭니다.
module "imported" {
  # 같은 모듈을 재사용합니다.
  source = "./modules/s3_bucket"

  # imported 버킷의 실제 S3 이름입니다.
  bucket_name = var.bucket_name2

  # imported 버킷은 versioning을 활성화하도록 true를 전달합니다.
  enable_versioning = true

  # 공통 태그에 들어갈 환경값은 example과 동일하게 사용합니다.
  environment = var.environment

  # imported 버킷 전용 Name 태그 값입니다.
  name_tag = "littletale-imported-bucket"

  # 공통 태그에 들어갈 Owner 값입니다.
  owner = var.owner

  # 공통 태그에 들어갈 Project 값입니다.
  project_name = var.project_name

  # data source로 읽어온 현재 AWS 리전을 태그 값으로 넘깁니다.
  region = data.aws_region.current.name
}
위에서 재사용 가능한 방식으로 변경 했었기 때문에
그들을 사용하기 위해resource->module로 변경하였다.
main.tf 변경점 2. moved
테라폼이 갖고 있는 즉 state 에서 이미 예전 리소스를 물고 있기 때문에
새로 만든 모듈 것을 쓰도록 옮기기 위해서
main.tf
# 예전에 루트 모듈에서 직접 관리하던 example 버킷을,
# 이제는 module.example 안의 aws_s3_bucket.this로 옮겼다고 Terraform state에 알려줍니다.
# 이 선언이 없으면 Terraform은 "기존 리소스를 삭제하고 module 안 리소스를 새로 만든다"고 오해할 수 있습니다.
moved {
  from = aws_s3_bucket.example
  to   = module.example.aws_s3_bucket.this
}

# 예전에 루트 모듈에서 직접 관리하던 imported 버킷을,
# 이제는 module.imported 안의 aws_s3_bucket.this로 옮겼다고 Terraform state에 알려줍니다.
moved {
  from = aws_s3_bucket.imported
  to   = module.imported.aws_s3_bucket.this
}

# imported 버킷의 versioning 설정도 루트 리소스에서 module 내부 리소스로 주소를 이전합니다.
# count가 켜져 있으므로 module 쪽 주소는 this[0] 형태가 됩니다.
moved {
  from = aws_s3_bucket_versioning.imported
  to   = module.imported.aws_s3_bucket_versioning.this[0]
}
outputs.tf
# 루트 모듈에서 확인하고 싶은 값들을 밖으로 노출하는 파일입니다.
# 각 output은 module 내부 리소스를 직접 보는 대신, module이 내보낸 값을 다시 노출합니다.

# example 모듈이 만든 버킷의 ARN입니다.
output "bucket_arn" {
  description = "ARN of the S3 bucket"
  value       = module.example.bucket_arn
}

# example 모듈이 만든 버킷의 실제 이름입니다.
output "bucket_name" {
  description = "Name of the S3 bucket"
  value       = module.example.bucket_name
}

# imported 모듈이 관리하는 버킷의 ARN입니다.
output "imported_bucket_arn" {
  description = "ARN of the imported S3 bucket"
  value       = module.imported.bucket_arn
}

# imported 모듈이 관리하는 버킷의 실제 이름입니다.
output "imported_bucket_name" {
  description = "Name of the imported S3 bucket"
  value       = module.imported.bucket_name
}

# 현재 Terraform이 인증된 AWS 계정 ID입니다.
# data source에서 읽은 값을 output으로 확인할 수 있게 노출합니다.
output "current_account_id" {
  description = "AWS account ID currently used by Terraform"
  value       = data.aws_caller_identity.current.account_id
}

# 현재 provider가 사용 중인 AWS 리전입니다.
# data source에서 읽은 값을 output으로 확인할 수 있게 노출합니다.
output "current_region" {
  description = "AWS region currently used by Terraform"
  value       = data.aws_region.current.name
}
outputs 에서도 이젠 모듈에 있는 값을 쓸 수 있도록 변경
variables.tf
# 루트 모듈에서 관리하는 첫 번째 버킷의 실제 이름입니다.
# 전역 유일해야 하므로 보통 terraform.tfvars에서 환경별로 다르게 넣습니다.
variable "bucket_name" {
  # 이 값이 어떤 의미인지 Terraform 문서/에러 메시지에 함께 보여줍니다.
  description = "S3 bucket name for the example bucket"

  # S3 버킷 이름은 문자열이므로 string 타입을 사용합니다.
  type = string
}

# 루트 모듈에서 관리하는 두 번째 버킷(imported)의 실제 이름입니다.
variable "bucket_name2" {
  # 이 값이 어떤 의미인지 Terraform 문서/에러 메시지에 함께 보여줍니다.
  description = "S3 bucket name for the imported bucket"

  # S3 버킷 이름은 문자열이므로 string 타입을 사용합니다.
  type = string
}

# 공통 태그에 넣을 배포 환경값입니다.
# 예: dev, staging, prod
variable "environment" {
  description = "Deployment environment"
  type        = string
}

# 공통 태그에 넣을 Owner 값입니다.
# 이 프로젝트에서는 버킷 둘 다 같은 소유자 태그를 사용합니다.
variable "owner" {
  description = "Owner tag value"
  type        = string
}

# 공통 태그에 넣을 Project 값입니다.
# 이 프로젝트에서는 버킷 둘 다 같은 프로젝트 태그를 사용합니다.
variable "project_name" {
  description = "Project tag value"
  type        = string
}
위 같이 모듈화를 진행 하였다. 상당히 난이도가 복잡한 이야기 들이다.
Backend
프론트엔드, 백엔드 할때 그 백엔드.....가 아니다.
Terraform state를 어디에 저장할지 정하는 저장 방식
Provider Vs Backend
- provider = Terraform이 어느 서비스와 통신할지 선택
- backend = 어디에 저장할지 (state 를 어디에?)
BackEnd의 중요성
본인이 가진 state와 동료의 state가 불일치
- state를 S3에 저장
- lock은 DynamoDB로 분리 관리
# state를 팀원과 공유 목적 (Backend)
terraform {
  backend "s3" {
    bucket = "terraform-state-bucket"
    key    = "study/terraform.tfstate"
    region = data.aws_region.current.name
  }
}
이렇게 작성해보았었다.
다만 지적 사항이 존재한다.
data.aws_region.current.name를 쓰면 안 됩니다.
이유는 좀 재미있다.
- backend는 Terraform이 data source를 읽기 전에 먼저 초기화
- bucket = "terraform-state-bucket"는 실제로 존재하는 S3 버킷이어야
- 생성하는게 아니기 때문에 존재 하여야만 한다.
 backend "s3" {
    bucket = "terraform-state-bucket"
    key    = "study/terraform.tfstate"
    region = "ap-northeast-2"
  }
다음과 같이 하드하게 작성하도록 수정하였다.
2번째 문제를 해결하고자 resouce를 선언하면 어떻게될까 고민을 해보았다.
결론은 안된다.
- Terraform 시작
- 먼저 backend 초기화 필요
- state를 어디서 읽고 쓸지 결정
- 그다음에야 리소스들을 해석하고 plan/apply 가능
그럼 이 문제를 해결하려면 단순히 aws에 직접 생성하면 될까?
- 빠르게 해결은 됨 다만 유지보수 애매
-> backend 전용 Terraform을 구성하면 될듯
Backend 프로젝트 따로 만들고 연결
# Terraform state를 로컬 파일 대신 S3에 저장하는 backend 설정입니다.
  # bucket은 state 파일이 저장될 S3 버킷 이름입니다.
  # key는 그 버킷 안에서 state 파일이 놓일 경로입니다.
  # region은 backend 버킷이 존재하는 AWS 리전입니다.
  #
  # 주의:
  # backend 블록은 Terraform 초기화 단계에서 먼저 읽히므로
  # data.aws_region.current.name 같은 data source 참조를 사용할 수 없습니다.
  # 따라서 region은 문자열로 직접 적어야 합니다.
  backend "s3" {
    bucket         = "littletale-terraform-state-20260419"
    key            = "study/terraform.tfstate"
    region         = "ap-northeast-2"
    dynamodb_table = "terraform-state-lock"
  }

  bucket: state 파일 저장 버킷
  key: 그 버킷 안의 state 경로
  region: backend 버킷 리전
  dynamodb_table: state lock 테이블
메인 프로젝트 루트에서 마이그레이션을 진행해야 함.
terraform init -migrate-state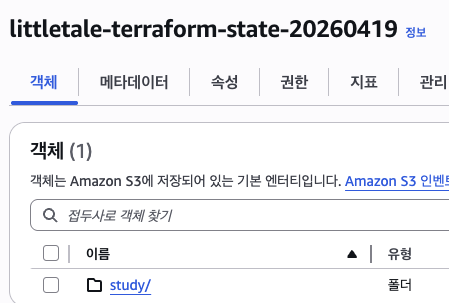
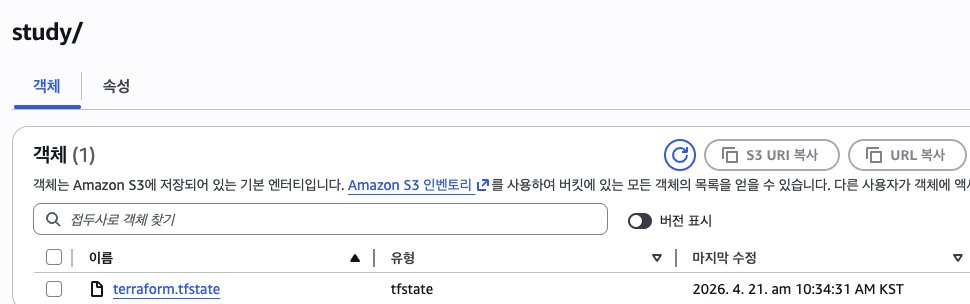
위 사진 처럼 정상적으로 State에 올라간 것이 보인다
명령어 로도 가능하다
> aws s3 ls s3://littletale-terraform-state-20260419/study/
2026-04-21 10:34:31       8793 terraform.tfstate
DynamoDB란?
AWS의 NoSQL 완전관리형 데이터 베이스
- 서버 직접 설치/운영 안 함 (AWS가 관리)
- 키-값 형태나 문서 형태처럼 빠르게 읽쓰 가능
DynamoDB Lock?
- 지금 State 작업중인지 기록
- lock 흭득
- 작업 끝내면 lock 해제
--- 먼저 시도 ---
1. Terraform Apply
2. DynamoDB 테이블에 내가 지금 lock 기록 시도
3. 성공시 작업 진행
4. 끝나면 lock 삭제
--- 후에 시도 ---
1. Terraform Apply
2. 이미 lock 있어서 실패
3. 대기 혹은 실패
환경 분리 (Dev, Prod)
이유는 뭐... 실제 운영중인 곳에 영향이 없어야 겠죠?
폴더 방식과, 워크스페이스 방식이 있다. 흥미로운 사실은 폴더 방식을 주로 사용하다는것 (실수방지)
ex)
envs/
  dev/
  prod/
modules/
  s3_bucket/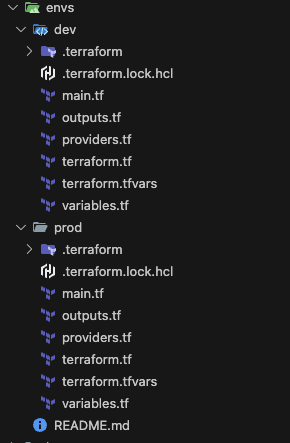
사진과 같이 변경 구조를 바꾸었다.
흐름
Root
- envs/dev
- envs/prod
cd /Users/jaehyungkim/Desktop/Terraform/envs/dev
terraform plan
File Load
- envs/dev/terraform.tf (line 1)
- envs/dev/providers.tf (line 1)
- envs/dev/main.tf (line 1)
- envs/dev/locals.tf (line 1)
- envs/dev/outputs.tf (line 1)
Backend Load
Provider Load
local load ( locals.tf )
- 버킷 이름
- 환경 이름
- owner
- project_name
- Name 태그
- versioning on/off
# dev 환경 값을 한 객체로 묶어 관리합니다.
# 이렇게 하면 env 루트가 "환경 설정 파일"처럼 보이고,
# 비슷한 변수 선언 파일을 환경마다 반복해서 둘 필요가 줄어듭니다.
locals {
  config = {
    bucket_name                = "littletale-terraform-study-20260415-01"
    imported_bucket_name       = "littletale-terraform-study-20260416-01"
    environment                = "dev"
    owner                      = "jaehyungkim"
    project_name               = "terraform-study"
    example_name_tag           = "littletale-study-bucket"
    imported_name_tag          = "littletale-imported-bucket"
    example_enable_versioning  = false
    imported_enable_versioning = true
  }
}
main.tf 가 상위 환경 모듈 호출
module "environment" {
  source = "../../modules/s3_environment"
  config = local.config
}- modules/s3_environment를 호출하고
- dev용 설정 객체를 넘깁니다
- 현재 AWS 계정/리전 조회
data "aws_caller_identity" "current" {}
data "aws_region" "current" {}- 버킷 2개 조립
module "example" { ... }
module "imported" { ... }- output 준비
# dev example 버킷의 ARN입니다.
output "bucket_arn" {
  description = "ARN of the dev example bucket"
  value       = module.environment.bucket_arn
}

# dev example 버킷의 실제 이름입니다.
output "bucket_name" {
  description = "Name of the dev example bucket"
  value       = module.environment.bucket_name
}

# dev imported 버킷의 ARN입니다.
output "imported_bucket_arn" {
  description = "ARN of the dev imported bucket"
  value       = module.environment.imported_bucket_arn
}
...
요약 흐름
- envs/dev/terraform.tf
backend/state 결정 - envs/dev/providers.tf
AWS 연결 결정 - envs/dev/locals.tf
dev 환경값 준비 - envs/dev/main.tf
modules/s3_environment 호출 - modules/s3_environment
환경 단위 조립 - modules/s3_bucket
실제 S3 버킷 리소스 구현 - output이 다시 위로 올라와 최종 노출
마치며
오우 너무 길었어요
잘라서 가겠습니다.