RabbitMQ quickstart in Node.js
express.js로 구축된 RESTAPI 서버에 푸쉬서버를 구축해보려고 한다.
푸쉬서버의 역할은 간단하다.
A라는 사용자가 B라는 사용자에게 메시지를 보내면,
B라는 사용자가 한시간 후에 접속했을때,
A가 보낸 메시지를 받을 수 있는 우체통을 만들어주는 거다.
나는 이것을 RabbitMQ 라는 메시지 브로커를 이용하려고 한다.
RabbitMQ는 AMQP 프로토콜을 따르는 오픈소스 메시지 브로커 소프트웨어 이다.
AMQP 모델은 이렇게 생겼다.
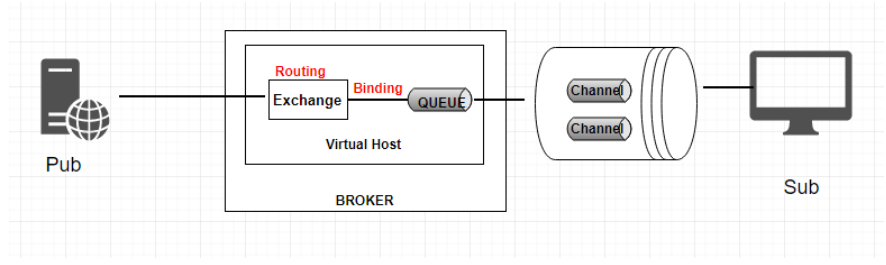
메시지를 발행하는 발행자와,
메시지를 소비하는 소비자들이 존재하며,
브로커(rabbitmq)는 메시지를 저장한다.
발행자가 특정 Queue에 메시지를 발행하면
브로커는 그 Queue에 message를 보관하고
소비자가 큐를 들여다 볼때 message를 건네준다.
셋 사이에 물리적인 연결을 Connection
하나의 발행자와 브로커, 하나의 소비자 이 셋사이에 논리적인 연결을 Channel 이라한다.
하나의 Connection 에 다수의 Channel이 존재할 수 있다.
간단하게 메시지를 큐에 저장하고,
큐에 저장된 메시지를 읽을 수 있는
API를 두개 구현해보자
어디에서나 사용할 수 있게 모듈형식으로 구현하려했고
npm amqplib 라이브러리를 사용하였다.
콜백없이 async, await으로만 구현하였고,
타입스크립트나 바벨은 이후 확장시 고려할 예정이다.
middleware/rabbitmq.js
const amqp = require('amqplib');

class RabbitmqWrapper {
    constructor(url, queueName, options) {
        this._url = url;
        this._queueName = queueName;
        this._options = options || {};

        // public
        this.channel = undefined;
        this.queue = undefined;
    }

    async setup() {
        const connect = await amqp.connect(this._url);
        const channel = await connect.createChannel();
        this.channel = channel;
    }

    async assertQueue() {
        const queue = await this.channel.assertQueue(this._queueName, {durable: false});
        this.queue = queue;
    }

    async sendToQueue(msg) {
        const sending = await this.channel.sendToQueue(this._queueName, this.encode(msg), {
            persistent: true,
        });
        return sending;
    }

    async recvFromQueue() {
        const message = await this.channel.get(this._queueName, {});
        if (message) {
            this.channel.ack(message);
            return message.content.toString();
        }
        else {
            return null;
        }
    }

    encode(doc) {
        return Buffer.from(JSON.stringify(doc));
    }

    async send_helloWorld() {
        await this.setup();
        await this.assertQueue();
        await this.sendToQueue('helloWorld');
    }

    async recv_helloWorld() {
        await this.setup();
        return await this.recvFromQueue();
    }
}

module.exports = RabbitmqWrapper;
내 입맛대로 Adapt 해서 사용하는 거기 때문에
Wrapper라는 이름을 붙였다.
이후 RESTAPI 요청을 송수신 할 때 실행이 되도록 해주었다.
controller/index.js
router.get('/msg/in/:user_id', ctrl.push_my_message);
router.get('/msg/out/:user_id', ctrl.pop_my_message);
controller/user.ctrl.js
const RabbitmqWrapper = require('../../middleware/rabbitmq');

exports.push_my_message = async (req, res, next) => {
    const userid = req.params.user_id;
    try {
        const url = 'amqp://user:bitnami@192.168.90.200:5672';
        const queueName = 'MQ_test' + userid;
        const rq = new RabbitmqWrapper(url, queueName);

        await rq.send_helloWorld();

        res.sendStatus(204);
    } catch (e) {
        console.error(e);
        next(e);
    }
};

exports.pop_my_message = async (req, res, next) => {
    const userid = req.params.user_id;
    try {
        const url = 'amqp://user:bitnami@192.168.90.200:5672';
        const queueName = 'MQ_test' + userid;
        const rq = new RabbitmqWrapper(url, queueName);

        const msg = await rq.recv_helloWorld();
        res.status(200).send(msg);
    } catch (e) {
        console.error(e);
        next(e);
    }
};
간단하게 설명을 해보면
어떤 유저가
GET /user/msg/in/a 라는 요청을 보내면
브로커는 MQ_test + a 라는 이름의 큐를 만들어 helloWorld 라는 메시지를 저장하고
A는 이를
GET /user/msg/out/a 라는 요청을 보내면
브로커가 MQ_test + a 라는 이름의 큐에서 메시지를 하나 꺼내어 응답한다.
이후 서버에 rabbitmq를 실행할 컨테이너 하나를 만들어주었다.
docker run -d --name rabbitmq -p 5672:5672 -p 15672:15672 bitnami/rabbitmq
5672 포트는 amqp 을 이용할 포트로 열어주었고,
15672 는 Rabbitmq 에서 제공하는 관리페이지를 사용하기 위해 열어주었다.
이후 테스트를 위해
http://127.0.0.1:4000/user/msg/in/1로
아래와 같은 요청을 보낸 후
http://192.168.90.200:15672 를 확인해보자
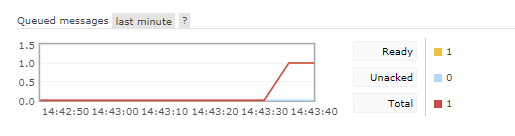
큐에 메시지가 하나 들어온 모습을 확인 할 수 있다.
이번엔 http://127.0.0.1:4000/user/msg/out/1 로
요청을 보내보자
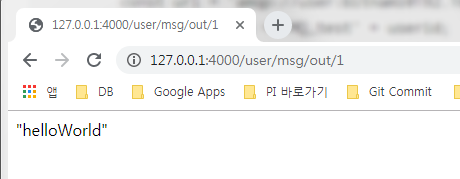
큐에 들어있던 메시지를 브라우저에서 확인할 수 있고
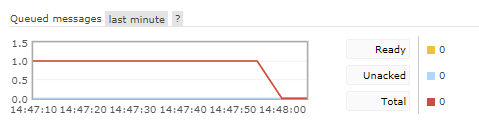
큐에 있던 메시지 또한 사라졌음을 확인할 수 있다.